


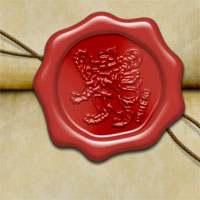
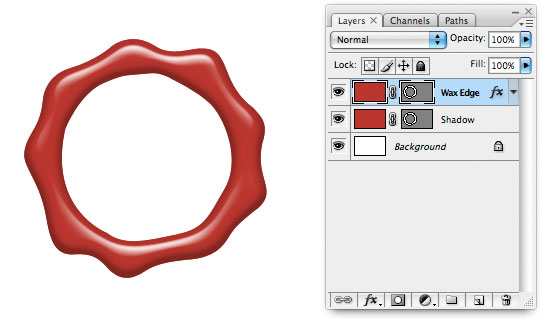
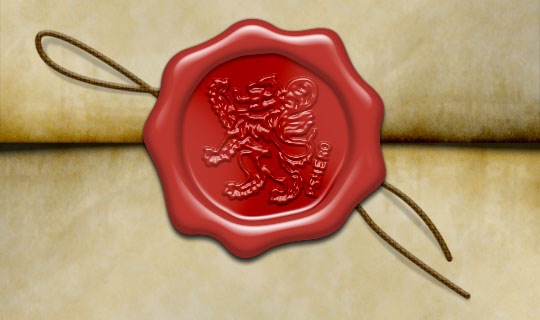
Old World Wax Seal
In this Photoshop tutorial I'll show you how to create an old world style wax seal using just a few layers, layer styles and the pen tool.Step 1
(*note: This tutorial assumes you have at least a cursory knowledge of the Pen tool.)
We’ll begin where all good Photoshop exercises do by opening a new document. Mine is 540x320px at 72ppi but as always you can adjust this to your hearts desire. Just remember that if you’re creating an image at a higher ppi or even larger on the canvas, you’ll need to adjust your layer styles to look right along the way.
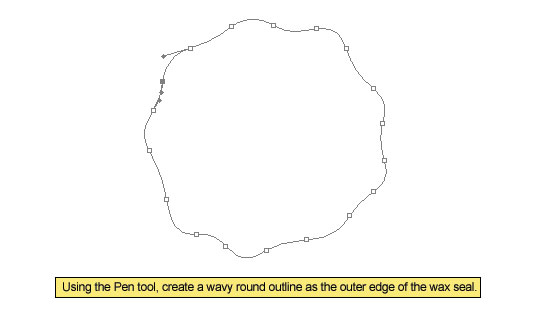
Lets jump right in and create the outer ring of wax. Grab the Pen tool by pressing the P key, click a starting point and then click and bend the segments to create the exterior perimeter of the wax seal. Typically these seals have a smooth wavy outline like the completed path below.
Step 2
Before we go any further lets click over to the Paths palette and name this new path Wax Outline.
Now lets draw the inner boundary for this area of our wax. With the Pen tool still selected make sure that the Exclude Overlapping Path Areas option is selected and then create a new lightly wavy inner circle as shown in the example below. Notice that both paths are contained in the Wax Outline path layer and the path layer thumbnail indeed shows the new path has subtracted the center area from our object.

Step 3
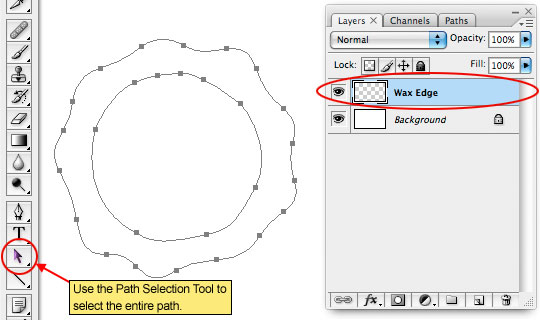
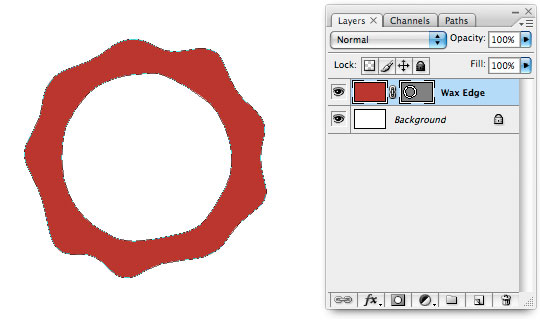
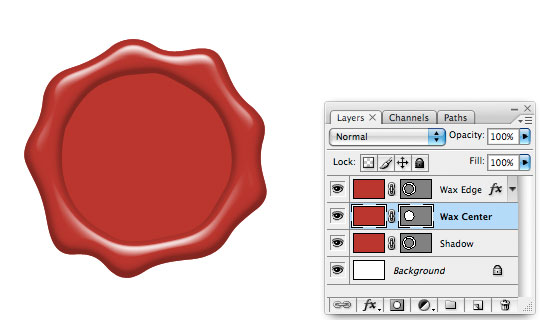
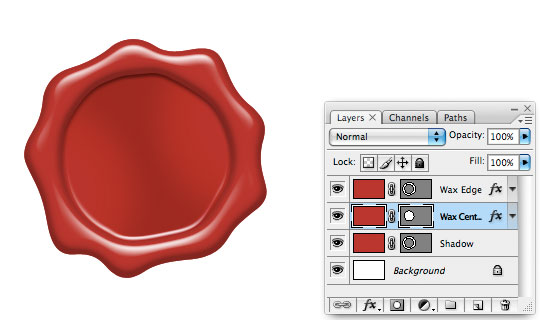
With the outer area of the wax drawn as paths lets switch over to the Layers palette and create a new layer called Wax Edge. Press the A key to invoke the Path Selection Tool and click and drag a selection around the entire path on the stage to select the entire thing. Every point on your path should now show up as a solid black square.
Step 4
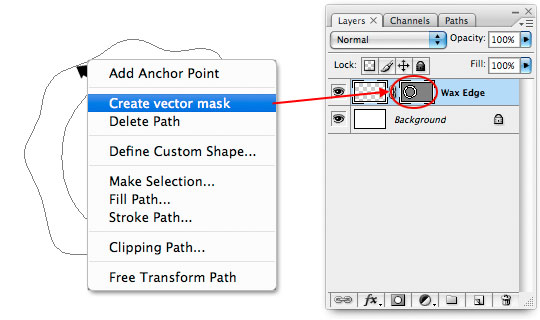
Now that the entire path is selected Control-Click (PC: Right-Click) on the path and choose Create Vector Mask from the menu. This will create a mask on the Wax Edge layer based on the paths we have selected.
Step 5
In the Tools palette change the foreground color to #bb362e and press Option-Delete (PC: Alt-Backspace) to fill the layer with that color. Notice that only the area exposed by the layer mask is showing through.
Step 6
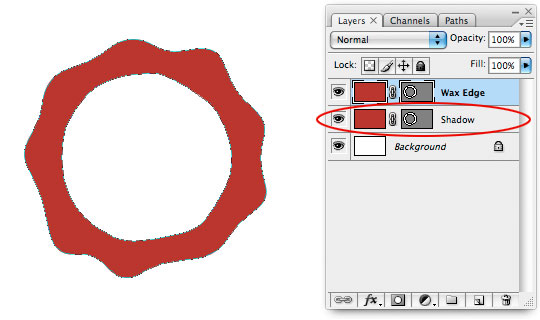
For reasons I’ll explain later we’re going to need a duplicate copy of this layer, so lets create that duplicate now by pressing Command-J (PC: Ctrl-J). Call the lower layer Shadow.
Step 7
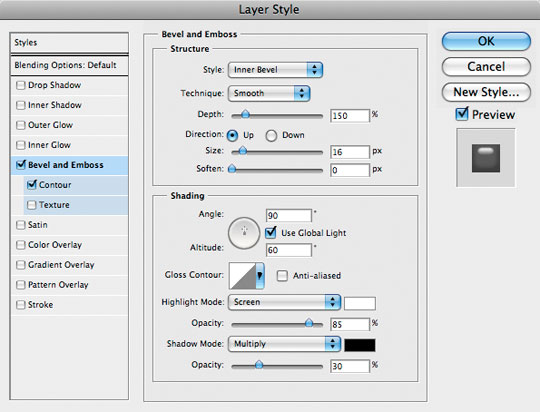
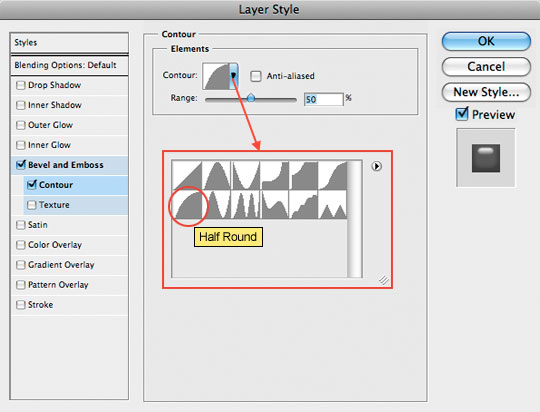
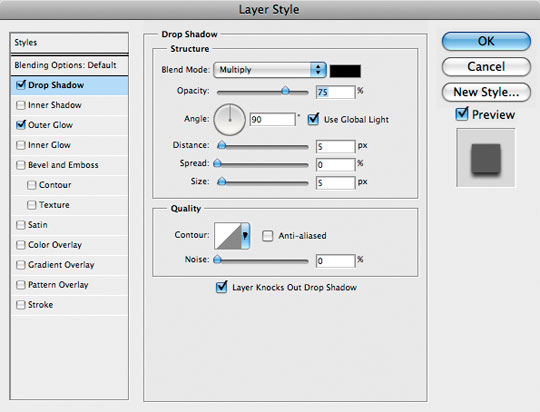
Make sure the Wax Edge layer is selected in the Layers palette and lets add a few Layer Styles to bring our wax edge to life. Command-Click (PC: Right-Click) on the Wax Edge layer and choose Blending Options from the menu to bring up the Layer Styles dialog box and add the following Drop Shadow and Contour. Be sure to check every single setting as many of them have been changed. Depending on the size and resolution of your object you may need to adjust the sizes of the styles accordingly to get a look you’re happy with.
Step 8
Your Wax Edge should now be looking something like this.
Step 9
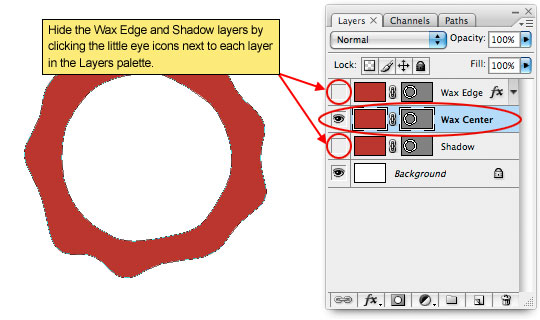
Next we’re going to create the center of the wax seal by using pieces we’ve already created. Pay close attention here so you don’t get lost.
Click on the Shadow layer and duplicate it by pressing Command-J (PC: Ctrl-J). Name this new layer Wax Center. So that we can work with this new layer clearly lets hide the Shadow and Wax Edge layers by clicking on the little eye icon next to each in the Layers palette.
Step 10
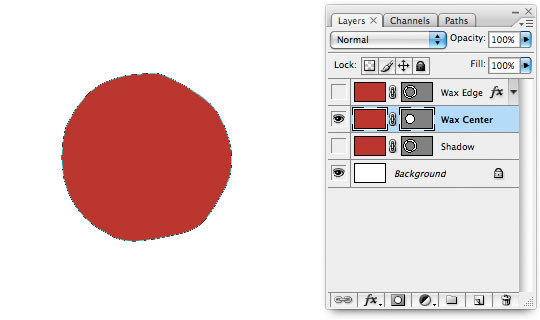
Press the A key to switch to the Path Selection tool if it’s not still selected. Click on the outer path to select it and then press Delete (PC: Backspace) to remove it. This will instantly switch the color to the inside of the inner circle.
Step 11
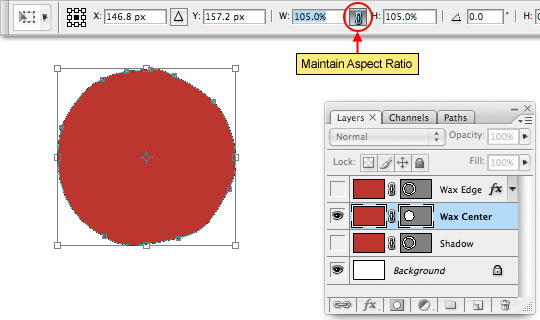
This inner circle we’ve now created is the exact size of the center of our wax, it is common however in this sort of situation for a small outline of white to appear between the inner and outer pieces so we’re going to expand this inner area a bit.
Click on the path to select it and then press Command-T (PC: Ctrl-T) to invoke the Free Transform tool. Instead of clicking and dragging the corner points we’re going to use the Free Transform options bar to do all the work. Click the Maintain Aspect Ratio icon between the Width and Height size percentage fields to insure a perfect transformation, then enter 105% into the Width field and notice that the Height field changes to 105% instantly. Press the Return (PC: Enter) key twice to commit the transformation of the path.
Step 12
Go ahead and unhide the Wax Edge and Shadow layers now and if you don’t want to see the paths on stage you can press Command-H (PC: Ctrl-H) to hide them.
Step 13
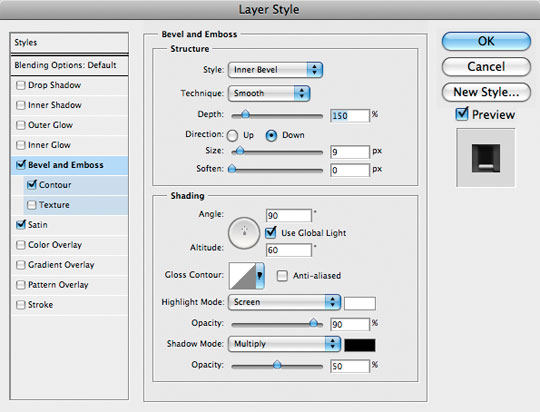
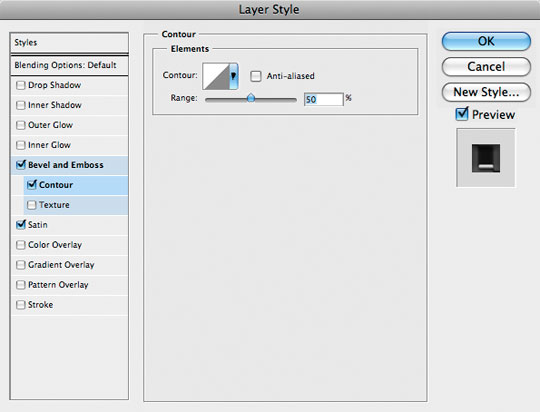
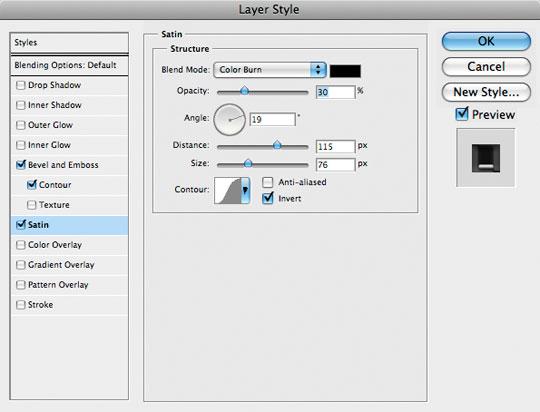
Making sure the Wax Center layer is selected add the following Bevel and Emboss, Contour and Satin layer styles. These styles will allow the center of our wax stamp to blend with the edge softly and will create a nice rounded transition between the two. Remember to check each individual setting to insure you don’t miss anything.
Step 14
If you got the layer styles right this is what your wax seal should be looking like thus far.
Step 15
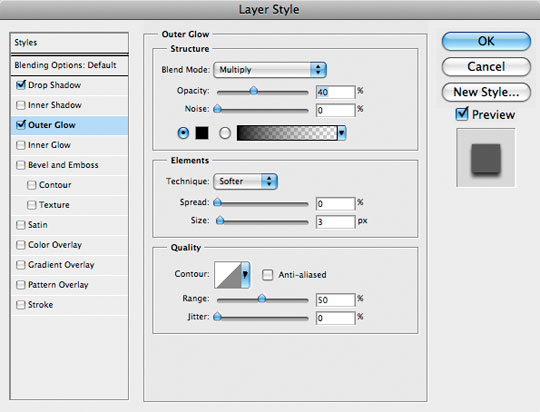
While we’re in the mode of adding layer styles, lets add a Drop Shadow and Outer Glow to the Shadow layer as well. Notice that I’ve changed the color and blend mode of the Outer Glow style to black and multiply. By doing this I can add an even outer shadow of just a few pixels around the whole object to make it look like it’s sitting on the surface a little nicer.
Remember when I said I’d explain why we’d made this duplicate of the Wax Edge layer? Well here you go… If we had added this Layer Style to the Wax Edge layer, the shadow would have also been cast across the Wax Center layer on the inside and would have ruined the effect, but by having a duplicate copy hiding at the bottom of the layer stack we can apply the shadow and it only shows up where it’s supposed to at the outer edge of our seal. Pretty tricky eh?
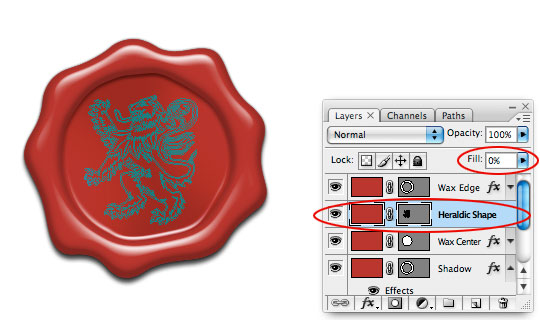
Step 16
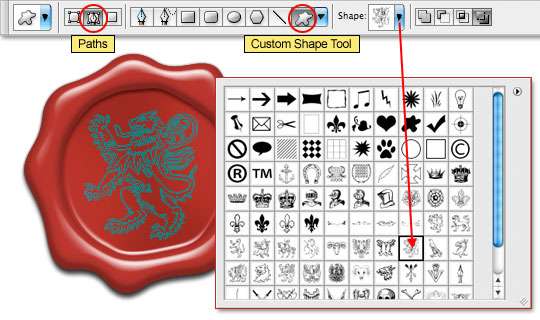
Now that our wax seal is built we can add a detail to the center of it that will finalize the effect. I’m going to use one of the shapes from my Heraldic Custom Shapes set, but you can use any custom shape you’d like, even text.
Create a new layer above the Wax Center layer (I’ll call mine Heraldic Shape since that’s what I’m putting on it). Press the U key to switch to the Custom Shape tool, make sure the Custom Shape blob is selected in the Options bar at the top of Photoshop and that the Paths option is also selected. Choose a custom shape from the Custom Shape picker and then click and drag your shape path onto the stage.
Step 17
Just like we did earlier, lets convert this path to a Vector Mask by first switching to the Path Selection tool by pressing the A key and then Command-Clicking (PC: Right-Clicking) on the path and choosing Create Vector Mask from the menu. Now fill the layer with color by pressing Option-Delete (PC: Alt-Backspace) – any color will be fine because we’re going to drop the layer’s Fill opacity to 0% as well.
If you didn’t get that hint, now would be a good time to drop the Fill opacity of this new layer to 0% in the Layers palette.
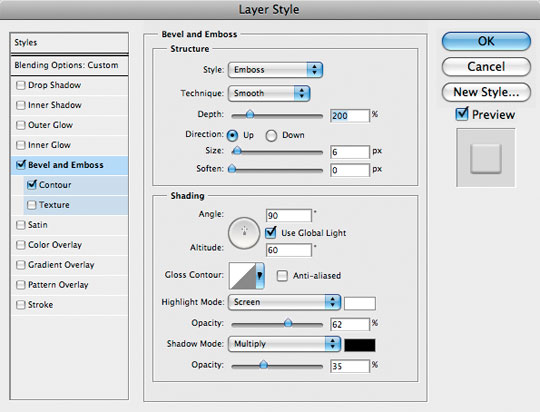
Step 18
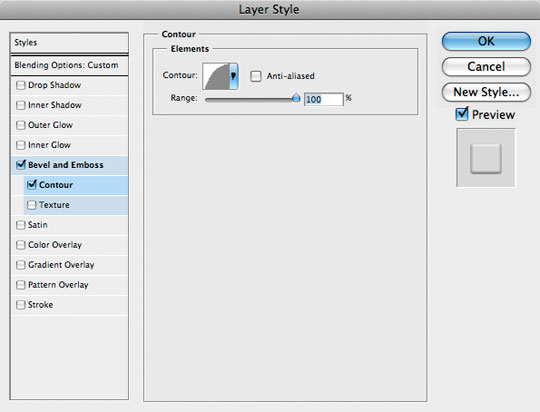
Press Command-H (PC: Ctrl-H) to hide the paths and then add a Bevel and Emboss and Contour to this layer as well. Since we’ve set the Fill opacity of the layer to 0% but the Opacity is still set to 100% the bevel and emboss will show as highlight and shadow areas but will allow the underlying layer tones to show through.
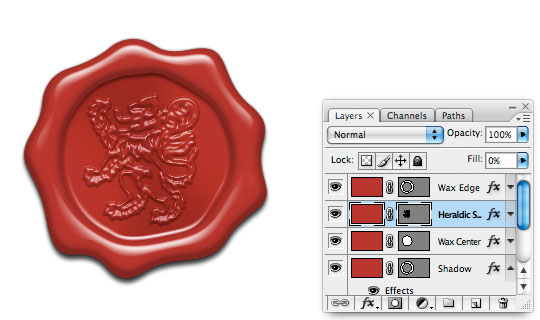
Step 19
The finished wax seal should now look like this.
Step 20
In my final image I added a piece of string below the seal and some folded old paper for the wax seal to live on. You can learn to make both of these pieces in other tutorials I’ve written. I also added a clipping mask from the Heraldic Shape layer to the Wax Center layer which allowed even more of the color from the underlying layer to appear on the Heraldic Shape. You can see all of this in the file download at the end of the lesson.
Learn to make the string in my Custom Hang Tag tutorial (Steps 14-19).
Learn to bend the string’s shadows in my Adding Depth With Shadows tutorial.
Learn to make the old paper in my Creating Old Paper With Custom Brushes tutorial.
Lesson Files + Additional Resources
Download the free .PSD file and other lesson files Right Here.
Tell Your Friends
More in Graphic Design


69 Responses to Old World Wax Seal
ondergang
November 30th, 2009 at 1:50 pm
Thanks !! This is really awesome and well explained !!!
tony g.
December 21st, 2009 at 5:45 am
Thankyou so much for the tutorial… I was able to make an awesome logo for my website!!!!
Jonet
January 26th, 2010 at 9:01 am
Wonderful site/tutorials ~ you are my HERO to be sure.
Question, how difficult would it be to use my family crest for this process?
Thanks for educating us!
Jonet
HERO
February 2nd, 2010 at 6:40 pm
JONET, If you’ve got your family crest as a vector it’d be super easy, otherwise it’s as complicated as tracing it with the pen tool and making the vector yourself.
Tyran Choy
March 11th, 2010 at 2:46 am
Thanks for your sharing, it’s easy and simple.
Jill
March 12th, 2010 at 11:28 pm
That was really fun! :)
Mike Kenny
March 13th, 2010 at 1:01 pm
Is it possible to do this same logo in illustrator instead of photoshop?
HERO
March 15th, 2010 at 7:44 am
MIKE, Yes, it’s possible to do this in Illustrator, though the techniques would be completely different and many of the 3 dimensional qualities achieved here with layer styles would need to be created by hand.
Debi Sementelli
April 1st, 2010 at 8:19 pm
I have a seal design I made in Illustrator that I am having an actual wax seal stamper made out of. I would like to use the artwork to create a wax seal graphic, like this. But after 3 hours trying to figure out how to make it work, I am stumped. I’m pretty much a newbie at all this. Any ideas?
Debi
omnibreed
April 5th, 2010 at 2:59 am
i love the graphix design community. out of all my tutorial exp. this one was the best. a true test of one skill but done right “remarkable” thx
Amber
April 17th, 2010 at 7:50 pm
I used this in black. It looks so sinister and awesome but the embossed part really needed to be white@around 10-20% fill. Only because the detail on the graphic itself gets absorbed by the blackness otherwise. Great tutorial! Thanks heaps!
Hypnogogial
May 10th, 2010 at 1:43 pm
Hero,
This tutorial was great! Not only does it look wonderful when you are done, but it covers simple paths and bevels (which were new to me when I started), and it forced me come up with a logo. It was several lessons in one.
I am very grateful for the neat reason to consider something I wasn’t even thinking about…this tutorial made me figure out what belongs in the middle of the seal.
http://raincool.blogspot.com/2010/05/waxy-path.html
This is my favorite tutorial so far and I have linked to it (of course). Check it out. But much thanks for spurring me on.
Hobittual
August 3rd, 2010 at 5:07 pm
You are very thorough with your explanations. Not tiresome in the process, you use plain talk
and communicate your intentions very well. So much better than other tutorials I have encountered. I will follow your blog and promote it whenever I can. Well done.
prashant
August 28th, 2010 at 4:39 am
Wonderful website.
Great Thanks for free material.
God Bless You.
icarus ve
December 5th, 2010 at 9:45 am
Your job is interesting and the final design is excellent!
Elizabeth
December 27th, 2010 at 2:18 pm
Awesome tutorial! Well-written with excellent screen caps so I could follow along without a problem! Thank you!
Dave
January 3rd, 2011 at 1:52 pm
Excellent tutorial! Very easy to follow, thanks. Looks great on my Harry Potter Uni Project!
Kim
March 8th, 2011 at 8:46 am
Tutorial was amazing! really easy to follow with great results! thank you
paul
March 14th, 2011 at 4:11 am
Thanks, great, well done, BRAVO!