
 Photos – Part 2")

iPod Shuffle From Scratch
In this tutorial you will learn how to re-create an Apple iPod Shuffle by using the original image from apple's website as a reference and using the gradient tool, layer masks and basic selection and guide techniques.Step 1
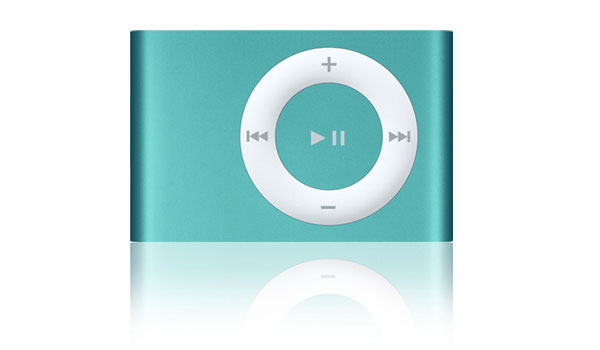
Right click on the image below and select Copy Image, then open up a new photoshop file 600×350 pixels at 72dpi and paste the coppied image into your document by pressing Command+V (CTRL+V on PC)
Step 2
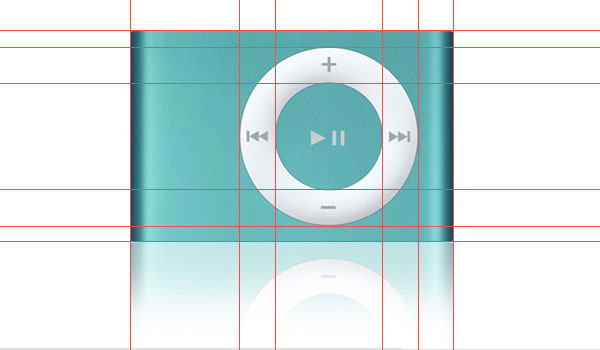
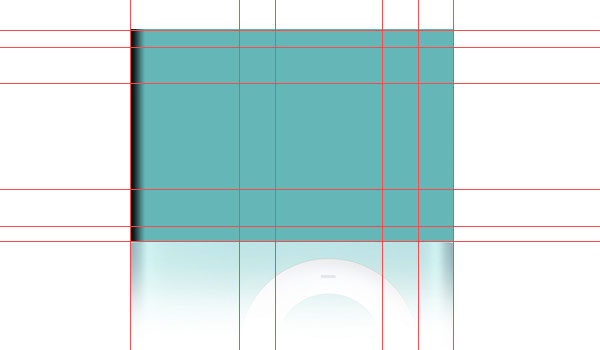
Next we are going to drag some guides onto the stage to setup our layout and make the process a little easier. If the rulers around your file aren’t showing click Command+R (CTRL+R) to bring up the rulers. It doesn’t matter if the rulers are in pixels or inches for this tutorial but you can right-click on the rulers and change the units that are displayed, this will also set the units that are used in other tools across photoshop which is rather convenient.
Buy clicking and holding your mouse button on either the horizontal or vertical ruler you can drag guides onto the stage. So go ahead and drag out guides as shown below. As you can see, I’ve used guides to set parimeters around each of the key elements of the Shuffle. (*note: if you don’t like the color of the guides, you can change them at any time by going to Photoshop>Preferences>Guides, Grids & Slices in the main menu)
Step 3
Create a new layer by clicking on the "New Layer" icon at the bottom of the layers palette. (*note: if the layers palette isn’t visible open it by clicking on Window>Layers in the main menu to bring it up)
Double click on the name of the new layer and call it Shuffle Background, and while we’re naming layers, double click on the layer with the original Shuffle on it and call it Original Image. Naming layers becomes extremely important as we add more and more layers into our document and I will refer back to them by name as we go along.
Now click on the Shuffle Background layer to select it and from the Tools bar choose the Rectangular Marquee tool from the top left corner. (*note: if the Tools aren’t visible click Window>Tools from the main menu)
Bring your mouse to the top left corner of the shuffle where your guides meet and click and drag a rectangle around the whole Shuffle until the tool locks to the guides at the other corner. (*note: if your marquee doesn’t seem to snap to the guides go to View>Snap To from the main menu and make sure that Guides is checked.) there should now be a dancing outline of little dots around the shuffle.

Step 4
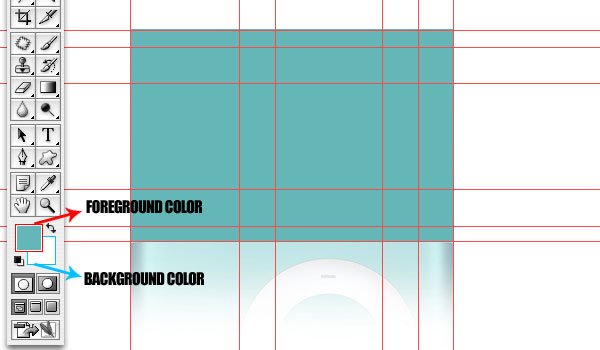
With our selection made it’s time to choose a color to fill the selection with. In the Tools palette click on the Foreground color at the bottom to bring up the Color Picker. We have two ways to choose the color here, either from the pretty rainbow of colors in the color picker, or by moving our mouse over a color in the document that we want (at which point the eye-dropper tool will appear) and clicking on the color we wish to select. Lets go for the second option and place your mouse over a center point on the Shuffle where the color is the most even, ie. the actual color of the unit where it’s not affected by shadows or highlights then click ok on the Color Picker and you will see the foreground color change to the color you just selected.
Now fill the selection with the foreground color by pressing Option+Delete (Alt+backspace on PC) and then de-select the area by pressing Command+D (CTRL+D on PC).
Step 5
Next we will add some dimension to the shuffle by adding shadows to each side of the big blue block we just created. To do this we need to set the foreground to black which can be done by clicking on the foreground color again and dragging the little circle into the black area OR by simply pressing the letter D on your keyboard. Black is the default foreground and white the default background color and by pressing the D key you reset them both.
First we want to re-select our blue box, which can be done easily by holding the Command (CTRL on PC) while clicking on the thumbnail preview of that layer in the Layers Palette. Choose the gradient tool from the Tools bar (or by hitting the G key on your keyboard), then look up at the top of photoshop and you will see the options come up for the gradient tool. We want the option that fades from black to transparent and we want the gradient to be linear so make sure those selections look like the bar below.

Step 6
Now that we’ve got our area selected and the gradient tool setup, create a new layer above the Shuffle Background layer by clicking on the New Layer icon at the bottom of the layers palette or by pressing Command+Option+Shift+N (CTRL+Alt+Shift+N on PC). Name this layer Gradient 1.
The gradient tool works on a click and drag theory. You click and hold your mouse over an area, then by dragging across the area you set the length of the gradient. So bring your mouse (which should look like a plus sign because the gradient tool is selected) to the left edge of your dancing dotted selection then click and drag towards the center of the selection, at the point you feel the gradient should stop, release your mouse and the gradient will appear. By holding the Shift key while you drag, you can constrain the angle to exactly straight which is what you want here. If you don’t like how your gradient looks a simple Command+Z (CTRL+Z on PC) will undo your last action and you can try again.
Once your gradient looks like the one below, go ahead and deselect your selection by pressing Command+D (CTRL+D on PC).
Step 7
Now we need to replicate the effect for the right side and we could simply repeat the steps we just followed OR we could learn something new. I say we learn something new, and I’m the author so that’s what we’ll do.
With the Gradient 1 Layer we just created selected in the layers palette you can right click on the layer and select Duplicate Layer … OR you can just press Command+J (CTRL+J on PC) to do the same thing. See, quick keys are fun!
The problem is that this new layer (which by default will be called Gradient 1 copy in the layers palette) is just sitting over our old layer and not where we want it over on the other side… plus, it’s facing the wrong way. First lets flip it horizontally by choosing Edit>Transform>Flip Horizontal from the main menu.
Now we need to move the gradient to the other side, so choose the Move Tool by clicking on it in the Tools bar (top right) OR by simply pressing the V key. Now you can click and drag that gradient all over the place, but hold down the shift key and drag it to your guide on the opposite side of the Shuffle where it should snap right onto the guide. (*note: again, holding the shift key allows us to drag completely straight across the stage.
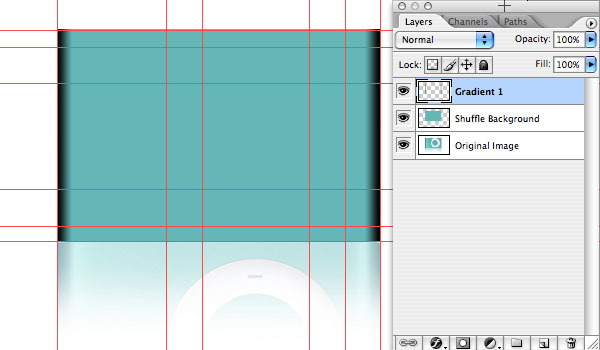
With the Gradient 1 copy layer selected, hold down the Shift key and click on the Gradient 1 layer below it. This will highlight both layers allowing us to do all sorts of fun stuff like move them together etc, but what we really want to do is make these two layers 1. This can be accomplished by selecting Layer>Merge Layers from the main menu OR by pressing Command+E (CTRL+E). You will now notice that the two layers are one and they’re called Gradient 1 copy in the layers palette. Rename the layer Gradient 1 (because it’s good practice). I’ve overlayed my layers palette on the image so you can see what things should be looking like at this point.
Step 8
At the top of the layers palette you’ll see a little drop-down menu with the word Normal in it. Each layer can be used in several ways and this is one of the places we can modify the layer. Go ahead and click on the drop-down menu and choose Soft Light. You will notice that instantly the way the black gradients react with the blue layer below has changed. Cool right?
I didn’t feel like a single layer of Soft Light really gave the effect I wanted so I duplicated the layer. Command+J (CTRL+J on PC) just like we did before with our Gradient layers. You’ve now got a layer called Gradient copy right about the Gradient layer in the layers palette. Click on this new top layer and lower the opacity to 80% (*note the opacity option is right next to the blend mode option at the top of the layers palette). Now our gradients look nice and natural.
You will notice that next to each layer in the layers palette there is a little eye icon. By clicking on the eye you can turn the layers on and off. Take a minute and play with this by turning all the layers off except the bottom one with our original iPod on it. Notice that at the inside edge of each shadow on the original there is a subtle hightlight. That’s what we’re going to create next, but while we’re playing around with keyboard-shortcuts, go ahead and try Command+H (CTRL+H on PC), this turns your guides on and off. You can leave them off for right now since they’re sort of distracting.

Step 9
Create a new layer at the top of your document and call it Highlight. If you can’t remember how, go back and review step 6.
Go back to the Tools palette and grab the gradient tool again. This time we will use white to make our highlight so press the X key to switch the foreground and background colors (white should now be in the foreground). With the gradient tool selected, go back to the very top of photoshop to the gradient options (I showed the toolbar in step 5). You should see that the gradient preview is now white to transparent. We are going to use a different kind of gradient this time, it’s called a reflected gradient and it’s the second to the last little preview icon (*note: holding your mouse over any tool will give you the tool name). Click on the reflected gradient icon to select it.
Lets test out this tool by dragging out a gradient on the stage from right to left over our iPod, don’t worry about accuracy, just play with it a little, then just press Command+Z (CTRL+Z on PC) to undo it and try again. Remember though, the undo command only works for one step, so only play around with one at a time.
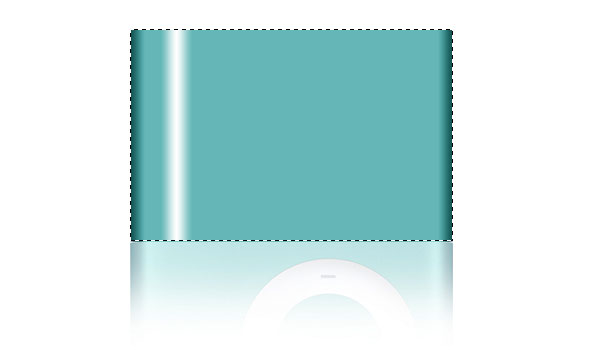
Once you’re comfortable with the tool, hold down the Command (CTRL on pc) key and click on the icon to the left of the Shuffle Background layer to make a selection then drag yourself a white gradient on our new Highlight layer like the one below. Notice that I didn’t put the gradient exactly where I wanted it just yet. The reason for this is that I didn’t want to risk cropping my gradient by being too close to the edge because the reflected gradient is created from the center out not from one edge to another.
Step 10
Go ahead and deselect the area by pressing Command+D (CTRL+D on PC). Did you remember the keyboard shortcut? You’ll use that one a ton.
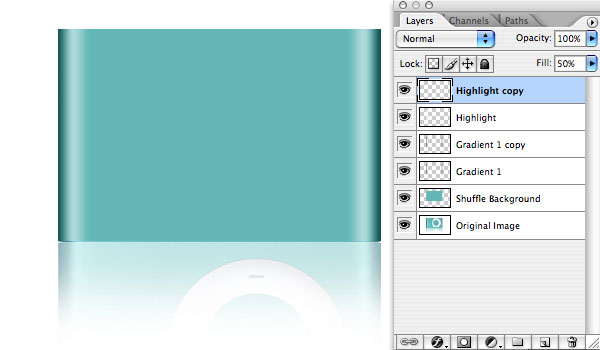
Pick the Move tool again from the Tools bar or by pressing the V key… that’s another one you’ll use a ton! Lower the opacity of this layer to 50% and then drag to a spot where it looks right (remember to hold the Shift key so it drags in a straight line). Once you’ve gotten it where you want it duplicate the layer by pressing Command+J (CTRL+J on PC) and drag this one to the other side like below. Notice that when you duplicate a layer with a lowered opacity setting, the new layer also reatains the same settings.
Step 11
It’s time to create the click-wheel on the face of the iPod. If you’ve forgotten what it looks like, go ahead and click on the little eye icons next to all your layers until you can see the original example on the bottom layer.
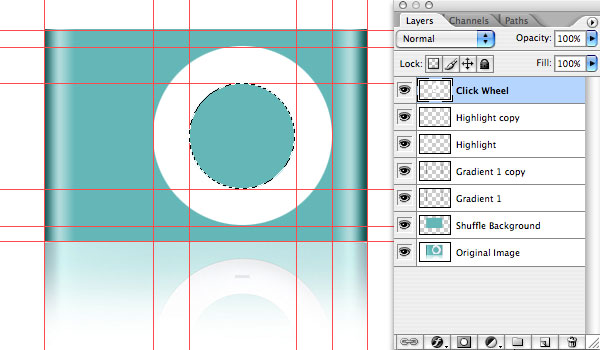
Ok, turn your layers back on again and click on the top Highlight copy layer and add a new layer called Click Wheel above it. Turn your guides back on by pressing Command+H (CTRL+H on PC).
In the Tools bar select the Rectangular Marquee tool… but it’s going to be hard to draw circles with a square, so hold down your mouse on the Marquee tool and a little fly-out menu will appear, pick the Elliptical Marquee tool. We know where the click-wheel lives on the stage because we have guides there to show us, so go ahead and drag out the outer circle with the Elliptical Marquee tool and fill the area with white. (*note: I’m going to say this one more time… hold down the Shift key when you drag to get perfect circles!)
Command+D (CTRL+D on PC) will deselect the circle, then draw the inner circle and press Delete to subtract the inner circle from the outer one, then deselect.
Step 12
Go ahead and hide the guides now because we’re done with them. Command+H (CTRL+H on PC)
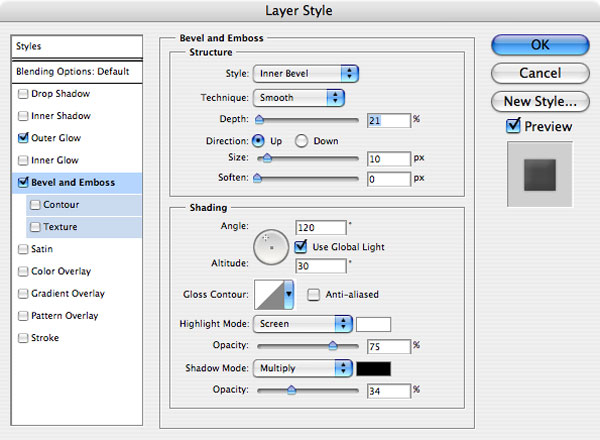
As I mentioned before, each layer has many possibilites and we’re about to explore some more. If you double click on the Click Wheel layer, just to the right of the layer name, you can bring up the Layer Style options (You can also right click on the layer and select Blending Options from the drop-down menu. There are a million combinations of styles that we can apply to our layer here and each can be combined with another to really do some neat stuff. The clickwheel however doesn’t have much going on, but we do need to give it some dimension and a little shading. I’m not going to go into great detail about Layer Styles at this time, but feel free to mess around with everything in here. As long as the Preview checkbox is checked you will instantly see the effects on your layer.
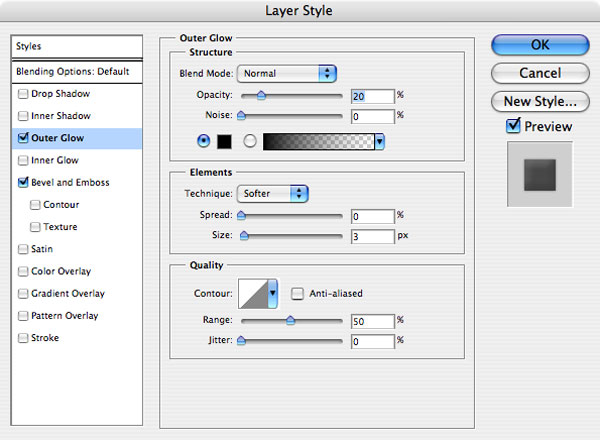
Click on the Outer Glow option on the left side of the dialog and change the options to the ones below, then Click on Bevel and Emboss and do the same. Click OK when you’re done.
Step 13
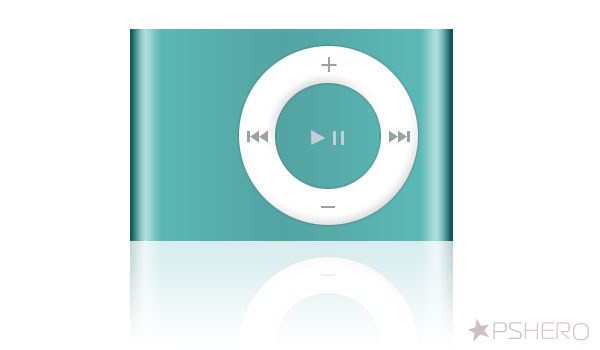
All that’s left is to draw out the little button icons on the buttons (look at the original). I think with a little thought you can figure out how to accomplish this, and it’s always good to spend some time playing around with the tools. I will however give you a few hints.
1) Create a new layer at the top of the layers stack and call it Buttons then turn off all the layers between this new layer and the Original example on the bottom layer. This way you can draw directly over the top of the original and get the buttons just right.
2) Experiment with the Rectangular Marquee tool and also the Polygonal Lasso tool and you should be able to create all the buttons easily, then just turn back on the layers again.
The beauty of projects like this is having a perfect example to work from. Everyday things can become advanced skill-building projects and many of the neatest things in Photoshop happen by experimentation.
Lesson Files + Additional Resources
Download the free .PSD file and other lesson files Right Here.
Tell Your Friends
More in Graphic Design


15 Responses to iPod Shuffle From Scratch
Mel Hugo Macaluso
December 2nd, 2007 at 4:23 pm
Great tutorial man :) thx for creating such amazing tuts for us :D
HERO
December 4th, 2007 at 10:21 pm
Mel,
You’re welcome man! Thanks for coming to visit!
Josh
May 19th, 2008 at 8:33 pm
:O amazing. now all we need is an new iPod Nano or iPhone tutorial.. im pretty sure you can do it almost the same way?
HJ
June 15th, 2008 at 2:58 pm
WOOW Really cool this tutorial
Thanks man Also your website is AWESOME
TuanAnh
July 23rd, 2008 at 9:15 am
really cool tut !
I bookmarked your site :) .
David
October 8th, 2008 at 2:23 pm
Great tutorial. I love these step by step tutorials with CLEAR explanations and good screenshots.
The hints did help in completing the tutorial!
Use the polygonal lasso tool to trace and erase made creating the interface supereasy!
David
October 8th, 2008 at 2:37 pm
Check out my purple version:
http://www.flickr.com/photos/30175756@N05/2925380398/
vamsi
March 29th, 2009 at 2:18 am
your tutorials are really rocking…
leezothekid
April 18th, 2009 at 6:40 am
one of the best tuts i followed thanks mate
Jen_D
July 21st, 2009 at 6:24 pm
That was too beautiful – I love your glossy lightening effects, they’re so pretty!!!
Noah
October 12th, 2009 at 11:06 pm
Great Tutorial. Only one suggestion- It would definitely help the newbies (like me) if you could tell the shortcuts longway of doing things. For example, you give Command+H (CTRL+H on PC) for hiding guides- can you tell us the non-shortcut way as well? It would help us noobs to understand exactly what we are doing. Other than that- great job!
evilkitty75
November 21st, 2009 at 8:23 pm
WOW I MADE IT WOOOOO!!
n thankyou for tellin us to make the buttons ourselves!! i did it …. i learnt so so much here thankyou again Hero u truly are a PSHERO!!
evilkitty75
November 21st, 2009 at 8:24 pm
ps i didnt use the poly tool @ all!
i used…. well i dont wanna say kuz it was good to figure it out XD
Harish
February 9th, 2010 at 3:30 am
Good Tutorial. :)
Photoshop trainer
February 12th, 2010 at 8:52 am
Nice tool on how to use the drawings tools in Photoshop