
Dark Grunge Photo Effect
In this Photoshop tutorial you will learn a neat grungy photo effect using a variety of Photoshop filters and image adjustments.Step 1
Lets start by taking a look at the photo I’ve chosen for today’s tutorial. This is a great shot by the photographer Tinebra from Italy. I was looking for something sort of dark, sexy and mildly gothic to begin with for this particular effect because the genre seems to suit the effect well. Not to say that you couldn’t apply this effect to a photo of your two year old niece frolicking in a garden of tulips.

Step 2
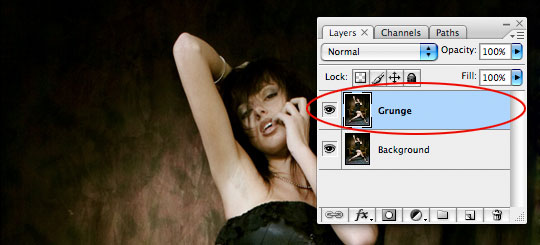
Lets begin by duplicating our Background layer by pressing Command-J (PC: Ctrl-J), not only to preserve the original image incase we need to come back to it, but because we’re about to apply 4 quite destructive filters to the image and we’ll need to have a copy of the original underneath for masking purposes later. I’m going to call this layer Grunge.
Step 3
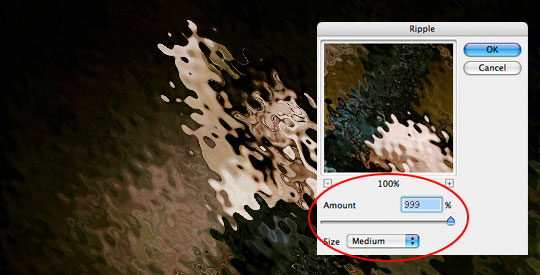
The first thing I want to do is really stir up the lines in the photo and to do this we’ll be using the Ripple filter. Choose Filter>Distort>Ripple from the main menu and set the Amount to 999% and leave the size at Medium.
For the sake of scrolling and download speed I’ll only be showing you a portion of the image as we go through these steps.
Step 4
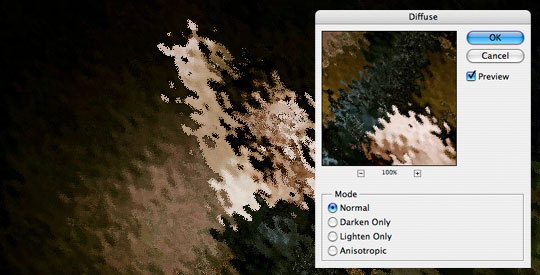
Second we’ll use the Diffuse filter to rough up the edges of our ripples by choosing Filter>Stylize>Diffuse from the main menu. Leave the mode set to the default which is Normal and click OK.
Step 5
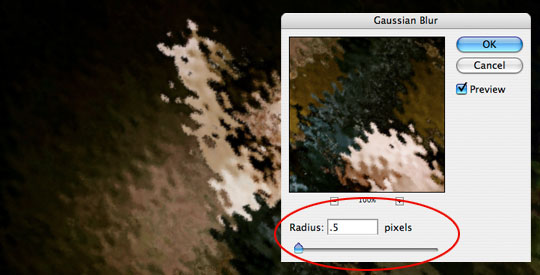
Third lets soften the effect of the Diffuse filter with a slight blur by choosing Filter>Blur>Gaussian Blur from the main menu and using a radius of 0.5 pixels.
Step 6
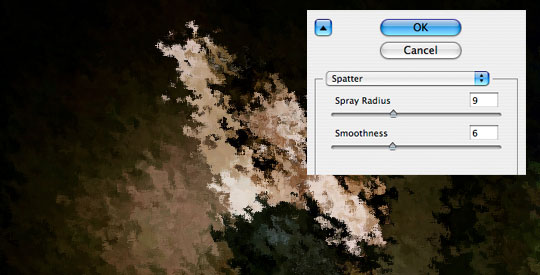
And the last thing we’re going to do here is randomize the mess just a little more using the Splatter filter by choosing Filter>Brush Strokes>Splatter from the main menu and then using the settings 9 and 4.
Step 7
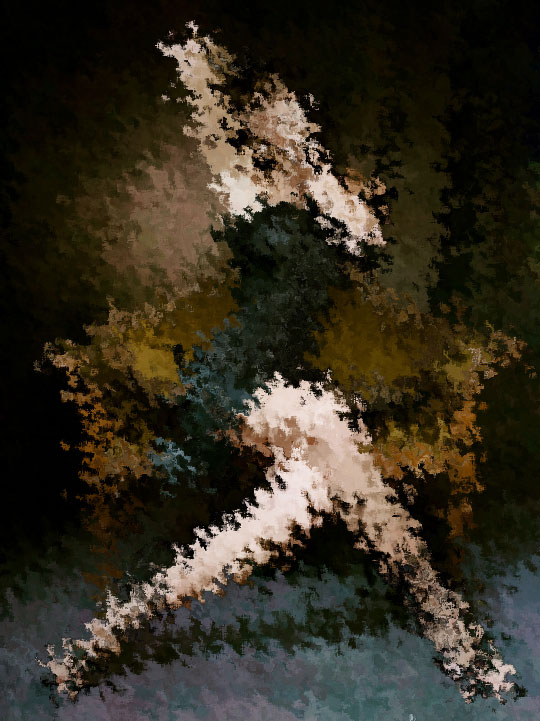
For the sake of reference, here’s what my image looks like so far.
Step 8
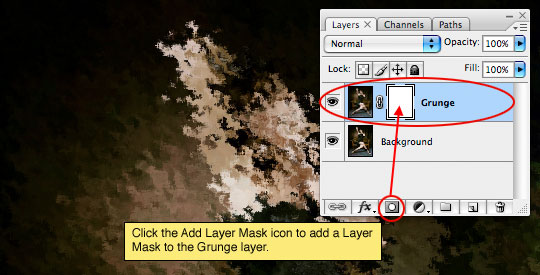
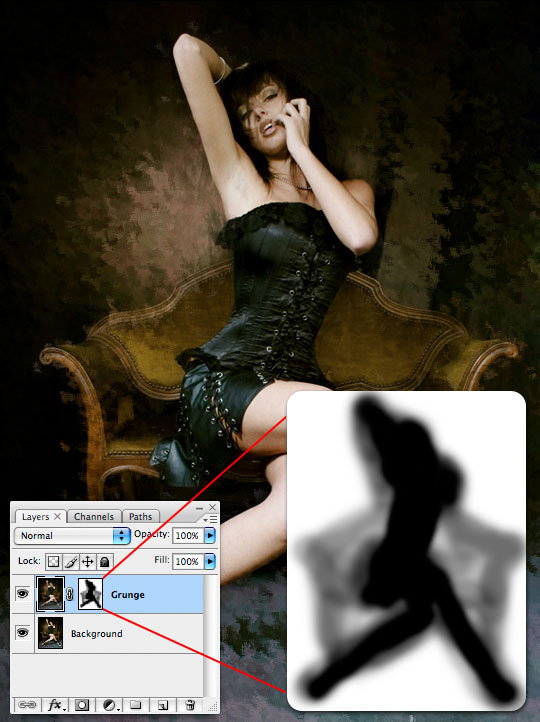
Obviously we don’t want the entire image to look like this, so lets click the Add Layer Mask icon at the bottom of the Layers palette (its the one that looks like a circle inside a rectangle).
Step 9
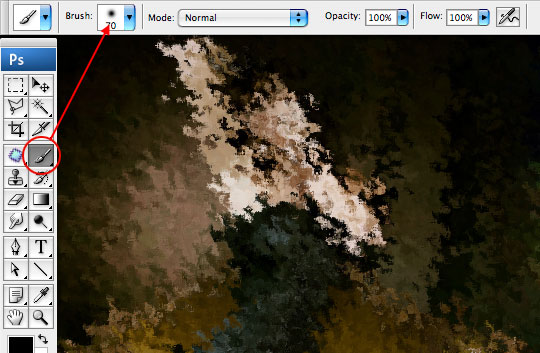
Press the B key to call the Brush tool, select a round soft edged brush from the Brush Picker and make sure that the Opacity of the brush is set to 100%. Press the D key to reset your foreground color to black and then making sure the layer mask is selected in the layers palette (it will have little brackets around it), paint onto the layer mask with black where you want the underlying Background layer to show through. In my photo I’m only going to paint over the woman, exposing her clearly and perhaps leaving a little grunge around her edges.
(*note: by using the bracket keys [ and ], you can increase or decrease the size of your brush)
Step 10
After using the brush at 100% opacity for the main features, I dropped the opacity of the brush to around 30% and painted around her rough edges as well as a little on the bench she’s sitting on, just to soften things up and let a little more detail through. If you Option-Click (PC: Alt-Click) on the Layer Mask in the Layers palette, you can see exactly what your mask looks like. I’ve inlayed my mask on the image so you can see it.
Step 11
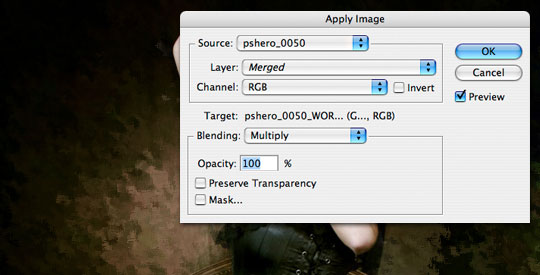
Create a new layer by clicking the Create New Layer icon at the bottom of the Layers palette and call it Gradient Map. From the main menu choose Image>Apply Image and click OK without changing any of the default settings. What the Apply Image function has just done is placed a merged composite of all our layers into a new layer.
Step 12
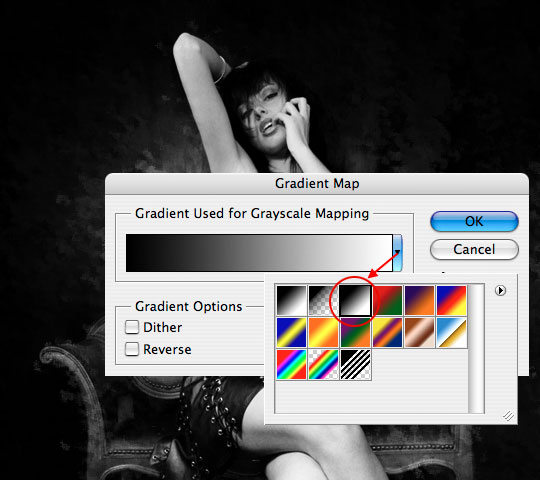
We’ll now add the Gradient Map filter to this layer by choosing Image>Adjustments>Gradient Map. When the dialog appears, choose the Black to White gradient from the Gradient Picker and click OK.
Step 13
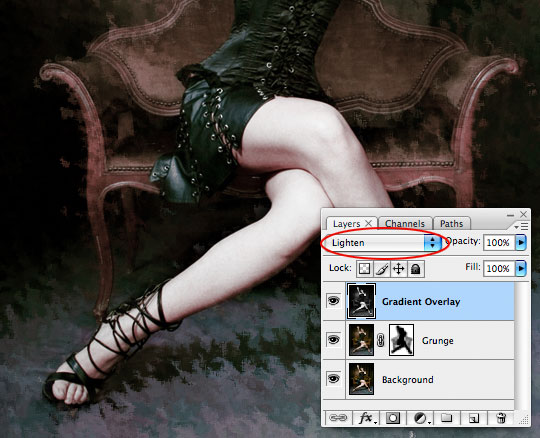
Now lets change the way this layer relates to the layers below by changing the layer’s Blend Mode to either Lighten or Darken. Each will give a different effect so try them both to decide which works best for you. I chose Lighten.
Step 14
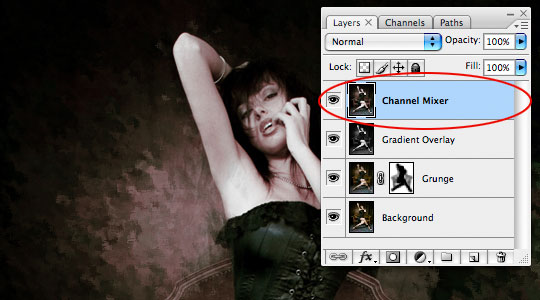
Create a new layer called Channel Mixer and just like we did in Step 11 choose Image>Apply Image and click OK, creating a new merged snapshot of our project on a new layer.
Step 15
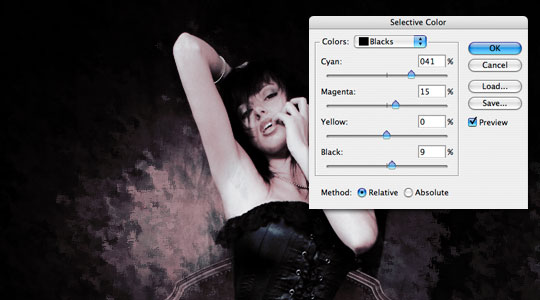
It’s time to apply our last set of adjustments. We will be using the Selective Color adjustment so choose Image>Adjustments>Selective Color from the main menu. From the Colors drop-down menu at the top of the Selective Color dialog box choose the following colors and change the settings accordingly and click OK when you’re done.
Color (Whites) +14, -10, 0, 0 Relative
Color (Neutrals) -5, +3, -4, -20 Relative
Color (Blacks) +41, +15, 0, +9 Relative
Step 16
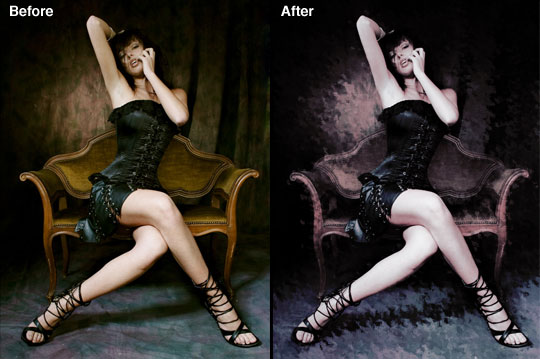
And that’s it, you’re all done! Here’s the before and after comparison.
Step 17
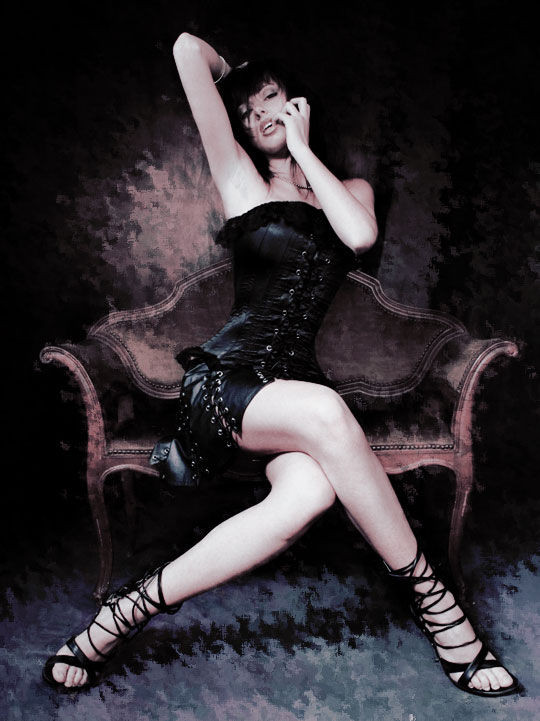
And my final image is shown below. This result also looks incredible combined with a cool edge effect like last weeks Photo Transfer Edge Effect tutorial.
(*note: Because of the Copyright limitations of this image and the fact that our filters were applied directly to the image itself, no download is available for this tutorial.)
Lesson Files + Additional Resources
There are no file downloads or additional resources for this Photoshop tutorial




48 Responses to Dark Grunge Photo Effect
Paulo Sales
May 8th, 2008 at 12:50 pm
totally awesome…!
Mikkel
May 8th, 2008 at 1:30 pm
Love the idea with the background and a layer mask!
Virgil
May 9th, 2008 at 12:00 am
Hi,
Thank you so much for all your tutorials they really gave me a new outlook on the possibilities of Photoshop when it is used right.
Thanks alot and keep up the good work.
Virgil
eternallygutted
May 9th, 2008 at 1:56 am
thanx for the tut, i think that give me ideas to make different grunge designs.;)
thanx again
dilirum
May 9th, 2008 at 11:11 pm
Very creative and impressive. I dig it! Thanks Hero!
Zephyr
May 14th, 2008 at 10:09 am
Ahhhh =(
Where is the psd file ?
But i did it here, very nice tuto.
Thx Herooooo :D
HERO
May 14th, 2008 at 1:17 pm
Zephyr!
As I said in Step 17, because of the copyright nature of the photo I can’t share the PSD for this tutorial. Sorry about that.
Rodrigo
May 16th, 2008 at 2:00 pm
Cool, i realy like it, i?Ǭ¥m gonna try this one
Poogly
May 17th, 2008 at 6:20 pm
I think the before photo looks better, but cool tut nonetheless.
HERO
May 19th, 2008 at 9:46 am
POOGLY,
Not every effect is for everyone, but hopefully you learned a little something along the way.
Missy
May 23rd, 2008 at 3:58 pm
I love the effect! I’ve never looked so amazing!
yulia
June 7th, 2008 at 5:39 am
TNX =] graet tut and very easy.
Graphic Designer
June 13th, 2008 at 8:26 am
This is great!
Poolopow
June 23rd, 2008 at 7:45 am
Thanks for your tutorial, your explanations were easy to follow for a beginner like me !
pwano
June 27th, 2008 at 10:18 am
it’s really awsome! :)
sabaqahmad
July 3rd, 2008 at 2:04 am
very good tutorial
Kate
September 19th, 2008 at 8:39 am
i tried this effect … i have to tell you , you are God sent. Love your step by step tutorials. Just perfect for a novice like me.
Fotografia
October 11th, 2008 at 12:13 am
Nice tutorial I posted a link in my blog. thanks for sharing
Douglas Teo
October 21st, 2008 at 7:08 am
good stuff thanks helped alot!
Amelia
October 29th, 2008 at 6:50 am
ty for that great tutorial ! I linked it to my flickr account :-)
Tom
October 29th, 2008 at 3:05 pm
Thank you so much!!!:D
tobylevel9
October 29th, 2008 at 9:03 pm
Great job man, thank you so much, this was extremely helpful. I appreciate the time you took to lay this out for me.
Romeo
November 24th, 2008 at 4:03 pm
Just got say that this tutorial has really help.
Arel
December 10th, 2008 at 11:54 pm
its a exelent efect to put in practice.. its a amazing idea,
thanks for to share it,
arel, from argentina
BJ Adkins
December 23rd, 2008 at 8:40 pm
this is so way cool – thanks so much for sharing!
zakaria
January 20th, 2009 at 5:19 am
awesome
Fernando Bergamaschi
February 4th, 2009 at 6:13 pm
The others have said all about the photo effect. I want to say about the woman.
What a girl! Marvelous legs!
Congratulation for both.
photo retouching
April 23rd, 2009 at 8:16 am
Really nice result and also really easy to follow tutorial steps!
Joddie
May 18th, 2009 at 11:54 pm
wow.. nice tutorial.. really nice ‘n clean result – and easy proccess too..
Juvert Calero
June 13th, 2009 at 10:37 pm
thanks for the tut.
it is awesome and well detail for beginners like myself
i will be looking forward for more tutorials.
thank you
A Friend
July 1st, 2009 at 5:23 pm
nice effect!
…I must admit that part of the reason why I visited this tutorial was because of how hot he woman in the photo is. :P
Any
July 3rd, 2009 at 6:51 am
really easy to follow, thanks a lot ^ ^
Shell
August 6th, 2009 at 8:51 am
Thanks for a really well explained tutorial.
I added a link to my result. =)
Denver Photographer
August 7th, 2009 at 9:29 am
I’m a big fan of this look, but I think I probably would have masked out more of the grunge effect, or set that layer to overlay. This would have allowed the details to come through while still getting the grungy texture.
xozan
September 21st, 2009 at 10:41 am
After looks classical grunge!
nice
Anba
October 26th, 2009 at 10:33 pm
Really nice result and also easy to follow steps
Photo Retoucher
November 6th, 2009 at 5:15 pm
absolutely awesome!
Thanks for you great tutorial.
Tutorial Lounge
November 14th, 2009 at 10:29 am
such a nice tutorials for photo manipulation, really cool you sharing with us. thanks
anassov
November 27th, 2009 at 6:01 pm
Nice effect ;) More Than That it’s really easy to follow, thanks a lot bro
BJ Adkins
December 12th, 2009 at 4:55 am
I love the effect, however when I try it in CS4 I get something totally different when I use my ripple filter. I get a custom frame – doesn’t allow me to change anything. Could you tell me where I’m furbarred at?
BJ
HERO
December 13th, 2009 at 9:33 am
BJ ADKINS, Just checked the filter in CS4, and it works exactly the same, make sure you’re using the Ripple filter not the Ocean Ripple filter (not that there’s much difference, but there is some).
nurul hakam
January 7th, 2010 at 9:24 pm
I like it your Effect…thank you very much…
MzMelanie
January 22nd, 2010 at 2:59 pm
I love it! I have to try this out soonish!
vandella
February 17th, 2010 at 9:59 am
I loved It…
zhilla
August 25th, 2010 at 11:12 pm
thanks
MyaSSara
November 6th, 2010 at 8:46 am
Thnk you for the tutorial ! Me & my friends like it SO MUCH ! :D i give you 5 stars for dis :)
Haseeb
April 10th, 2011 at 11:07 am
Thanks a lot for such a wonderful tutorial!! I really appreciate it, it helped me a lot
john
May 27th, 2011 at 1:06 pm
Just Great man, thanks for all the time you put in, a master of your craft..