


High Dynamic Range (HDR) Photos – Part 2
In part 2 of this HDR series I'll cover my process for tone mapping in Photomatix Pro and then we'll move on to Adobe Camera Raw for some final adjustments.Part 2 – Introduction
Welcome to Part 2 of the High Dynamic Range (HDR) Photoshop Tutorial. Read Part 1 here. As a reminder, please remember that this is simply MY process, HDR processing is an art form subject to the artists opinion. There is no right or wrong way to produce an image, only to be able to communicate your artistic vision of a scene in a way that makes you happy.
When we left off we’d combined our 5 shots in Photoshop using the Merge To HDR function and had saved our 32bit TIFF file into the folder that we’d put our original photos inside. We’re using Adobe Bridge as our “home base” so to speak, using it to modify and organize our files.
In this lesson I’ll go through my process of Tone Mapping the image with Photomatix Pro, rendering the image down to 16bit and then making final adjustments using the flexibility of Adobe Camera Raw. Now let’s get started!
In the screenshot below you can see that I’ve selected the 32bit TIFF and am ready to continue with the lesson.
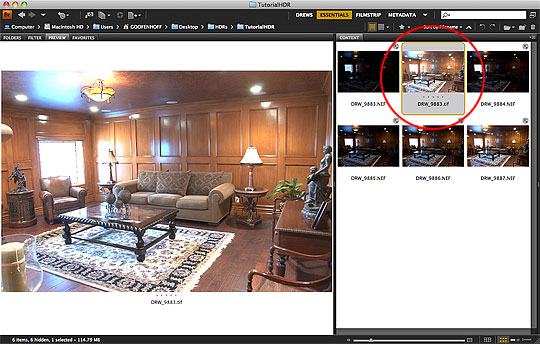
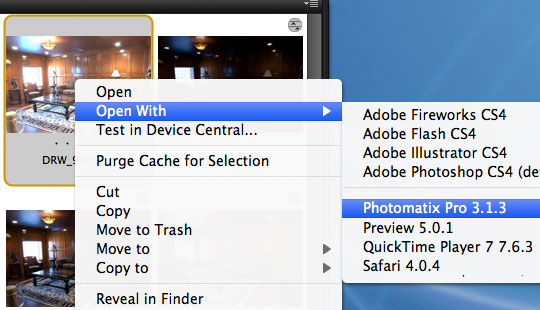
Step 8 – Opening The Image In Photomatix Pro
From Bridge we can select the image and choose the program we’d like to use to open it. Command-Click (PC: Right-Click) on the .tiff file in Bridge and choose Open With > Photomatix Pro. This will open our 32bit TIFF file in the Photmatix Pro interface where we’ll do our Tone Mapping. If you don’t have Photomatix Pro, you can download the trial version of the program RIGHT HERE.
Step 9 – Photomatix Pro Initial Interface
When Photomatix Pro finally opens your file (and it might take a minute, so be patient), you’ll see a rendering of your image that again looks like complete rubbish, but don’t worry, this is just Photomatix’s way of rendering the 32bit file so you can see it. By default the HDR Viewer panel should be visible, if you don’t see it, choose View > HDR Viewer from the Main Menu. You’ll notice that the HDR Viewer has a little thumbnail viewer at the top and as you mouse over your image you’ll see a better rendering of the detail in this viewer window (don’t mind how noisy the preview is, it’s just a quick rendering). At this point all we really need to do is hit the Tone Mapping button at the bottom of the HDR Viewer to open the Tone Mapper and get rolling
(*note: Also under the View Menu is the HDR Histogram function which will generate a full-spectrum histogram of your HDR image. This will show you if you’ve clipped any information on the black or white end, if you’ve got clipping then you didn’t shoot a big enough F-Stop range. The more you shoot HDR, the more you’ll get a feeling for how many F-Stops is enough.)
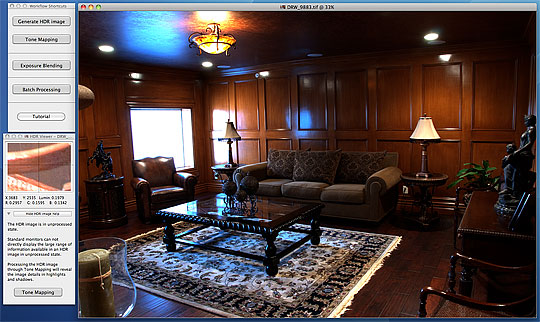
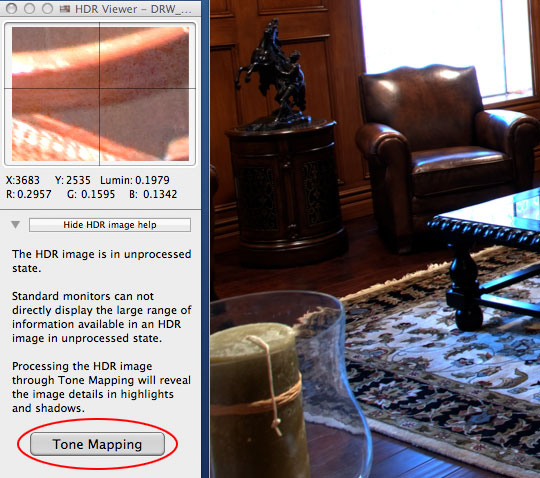 The HDR Viewer – Just Push The Button!
Step 10 – The Detail Enhancer Interface
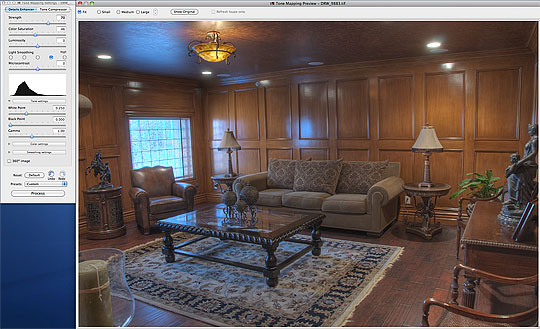
Once you hit the Tone Mapping button you’ll be whisked off to the Detail Enhancer / Tone Compressor dialogs and you’ll (for the first time) get a good look at just how much information you’ve got to work with in your 32bit HDR file.
I still remember the first time I did this… I nearly fell off my chair when I saw just how much detail was actually living inside this 32bit file..
Notice that even at this unrefined stage of the process just how much detail is visible, especially in the glass tiles in the window that previously looked completely blown out.
Step 11 – The HDR Processing Options
If you take a closer look at the Tone Mapping Settings dialog you’ll notice that we have 2 different options available for tone mapping: Details Enhancer and Tone Compressor. Having played around extensively with both I prefer the Details Enhancer because I feel like it does the best job bringing out the details in the entire tonal range. I’d encourage you to spend time with both options and make up your own mind based on your needs.
For this lesson, lets go ahead and collapse the Color Settings and Smoothing Settings areas and focus on the main area and Tone settings
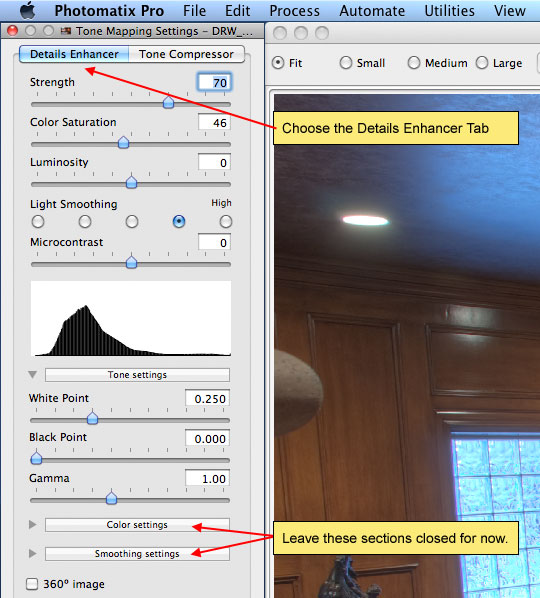
Step 12 – My Basic Tone Mapping Process
This portion of the process is obviously highly subjective depending on the image you’re processing and how vivid you want the HDR effect to be. Many HDR Photographers choose to push the settings to the limit creating a vivid and breathtaking effect, but for my architectural work, especially interior shots, I prefer to shoot for a little more “true to the scene” realism with maybe a little more punch in the details. Once you’ve got the basics of the process down, you should definitely play around until you find your HDR style.
Lets start at the top of the dialog and work our way down in sequence making changes as we go and then we’ll take a look at the image again. If you’re playing along at home know that it takes a second or two for the program to render each change, so don’t rush it and get frustrated that the program isn’t responding as fast as you’d like… It’s got lots of data it has to work though.
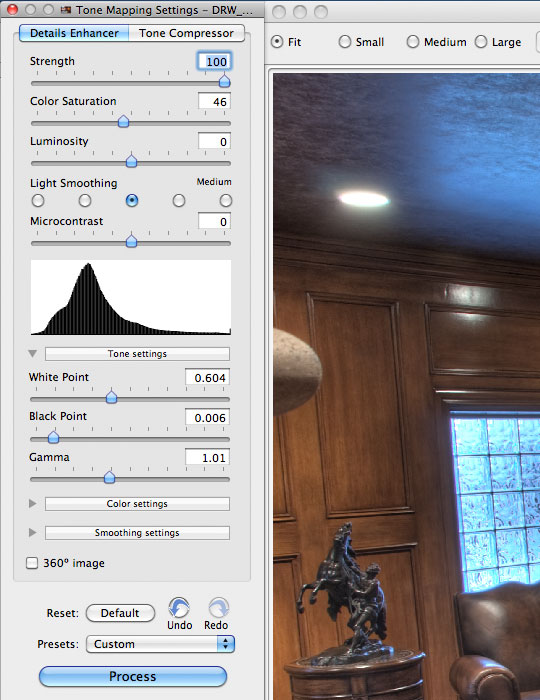
- Strength: My experience has been that cranking this baby up to 100% produces the crispest most vivid results. If you feel like it’s too much, back it off a little. I’d probably say 70% is the lowest I ever go here.
- Color Saturation: We’re going to do all the color work in Camera Raw, so just leave this setting in the middle at 50%.
- Luminosity: This is another adjustment I prefer to make in Camera Raw, so I leave it set at 0.
- Light Smoothing: Here’s where you get to determine just what level of crunch and effect the HDR process will have. For realism I usually stick to the two on the right, the further left (towards Light Smoothing) the stronger the effect. For this example I’m going to go with the option right in the center.
- Microcontrast: As the name suggests, this increases or decreases the contrast in the detail areas. I usually just leave this at 0 because you’ll have more control in Camera Raw.
- White Point: The idea with this slider is to increase the slider until the right side of the histogram touches the edge of the histogram window basically telling the program where you’d like the white tone’s to start
- Black Point: Same as white point but on the black (left) side of the histogram. Get it close, but be careful not to clip any tones by going too far.
- Gamma: I usually leave this setting alone, but if you feel like your image is a bit on the dark/light side feel free to experiment. Again, you’ll have this latitude in Camera Raw too.
(*note: Notice that if you put your mouse over any of the sliders, you’ll get a tool-tip reminder of what it’s for.)
Keep in mind that we’re really only concerned with the details here, all the fine tuning, color correction and levels adjustments are going to happen in Camera Raw.
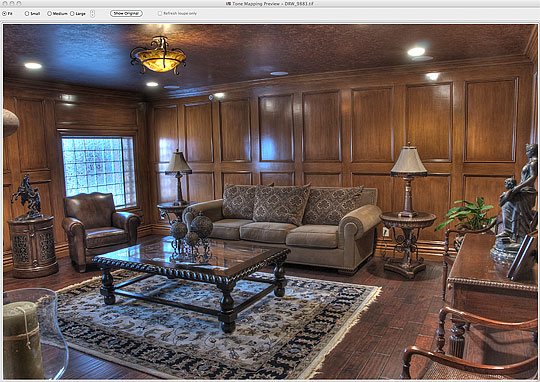
Here’s a look at our image thus far.
Step 13 – Processing And Saving The Image
When you’ve got the Details Enhancer settings finished, go ahead and hit the Process button. This will process the 32bit image with the Tone Mapping specifications from the Details Enhancer dialog and output a 16bit file. When Photomatix is done processing you’ll be able save the file. Choose File > Save As from the Main Menu, navigate to the folder where you’ve got the rest of your files and click Save. I like the Photomatix file naming sequence adding “_tonemapped” to the name, so I just keep that and save it.
You can now close the file in Photomatix Pro and return to Bridge, where you’ll find your newly tone mapped image waiting for you.

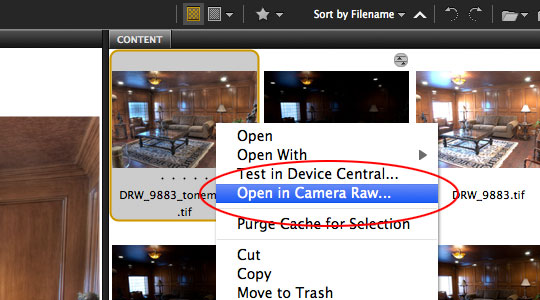
Step 14 – Opening The Image in Adobe Camera Raw
Lets go ahead now and open our new tone mapped image in Adobe Camera Raw. In Bridge Control-Click (PC: Right-Click) on the image and choose Open In Camera Raw from the menu.
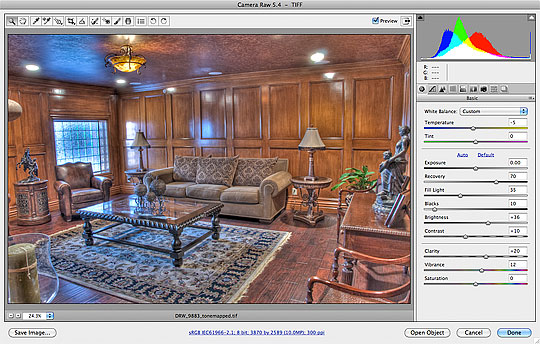
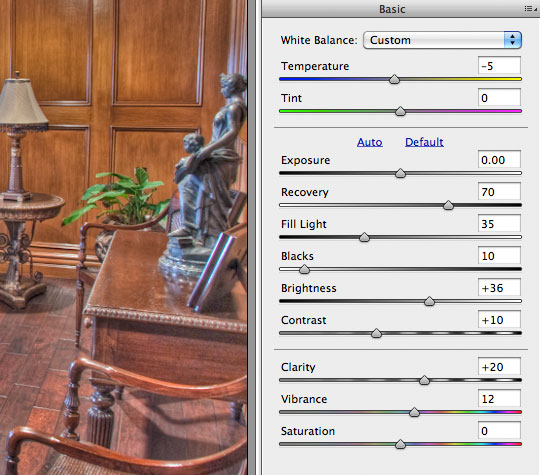
Step 15 – Camera Raw Adjustments
If you’re a proficient photographer shooting RAW files you should already be intimately familiar with the Camera Raw dialog. If you use Adobe Lightroom instead of Bridge then you should be right at home as these adjustments work exactly the same as they do in Lightroom. The Camera Raw dialog is a full series of tutorials all by itself, so I won’t be going into much detail here, just know that now that you’ve got a 16bit TIFF file into Camera Raw, it’s going to act exactly the same as your RAW files would and you can adjust to your hearts content.
The one thing I should point out here is that with HDR images you don’t need to mess with the Exposure setting because we’ve already determined the tonal range of the image in Photomatix, so if you need to adjust brightness, use the Brightness Slider.
For this image, I’m going to make a few basic adjustments which I’ll show in the image below. You’ll notice that I’ve used the Recovery slider to bring back a great deal of the subtle nuances of texture in the glass window blocks. I’ve used the blacks slider to deepen the shadows and the Brightness slider to bring the overall brightness of the image up quite a bit. I also find that using a mid-range value in the Clarity adjustment adds a nice differentiation in mid-tone detail.
If you’d like an in-depth tour through the Camera Raw dialog, I highly recommend you buy and read from cover to cover Rob Shepards’s “Camera Raw For Digital Photographers“. In my eyes it’s the definitive work on the subject
Step 16 – Finalize The Image
Once you’ve finished tweaking the image in Camera Raw and don’t wish to do any further work in Photoshop (like retouching or sharpening) then go ahead and click the Done button to save your Camera Raw changes and you’re done.
If you do wish to continue working on the image in Photoshop, I recommend opening the file as a Smart Object so you can return to Camera Raw and tweak again later directly from your Photoshop file. You can choose how you open the file by holding your mouse over the Open button and using the Option (PC: Alt) or Shift keys to change the open method (Open as Object, Open as Copy, Open Image).
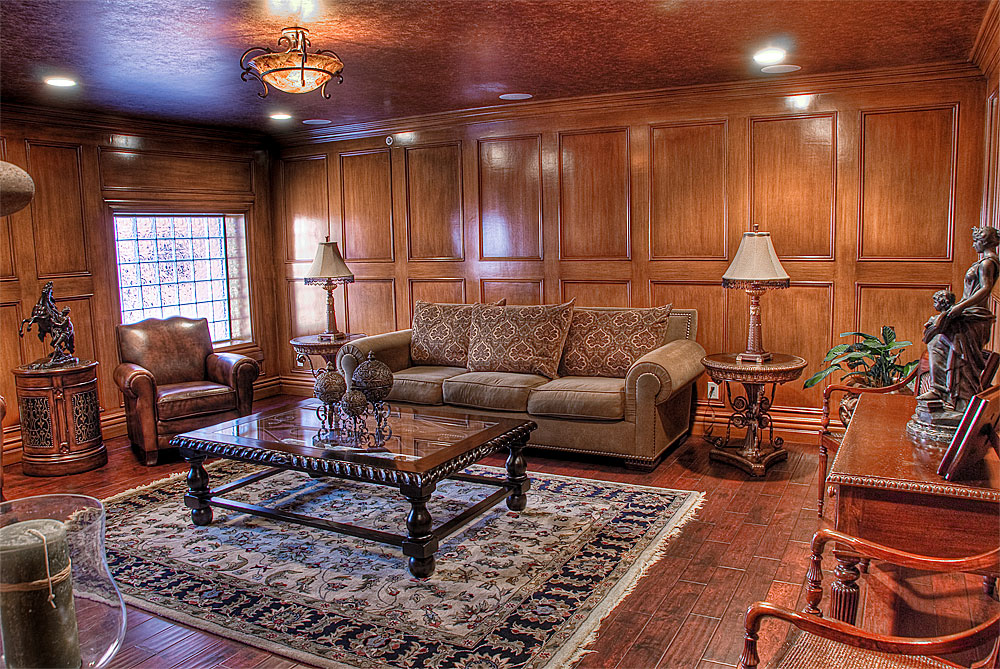
I worked through the file in Camera Raw and was happy with the result so I never opened it in Photoshop (except to output the image as a .jpg for you to see of course). Here’s my final image (click it for a larger view).
Conclusion
Thanks for following along, I hope you’ve taken something useful away from this lesson. As I’ve said before, this is simply my process and I encourage you to play with all those neat sliders, experiment and discover your own style. Expanding into HDR has opened my eyes (again) to the amazing possibilities of Digital Photography and has given me renewed enthusiasm to explore the world around me with my camera. I hope it does the same for you.
Lesson Files + Additional Resources
Download the 5 Camera RAW files used in this lesson (BIG 60MB download) Right Here.
Please be considerate of my bandwidth and only download the files if you wish to follow the tutorial at home.
Visit HDRSoft.com for a trial of Photomatix Pro.
Pick up Rob Shepard’s book Camera Raw For Digital Photographers.
Tell Your Friends
More in Photo Effects


17 Responses to High Dynamic Range (HDR) Photos – Part 2
Nelson
February 12th, 2010 at 4:22 am
Nice tutorial man, thanks
nova5
February 14th, 2010 at 12:49 am
Nice part of good tutorial, thx!
Leiv Reed
February 18th, 2010 at 2:23 am
Great work!!!
Alex
February 19th, 2010 at 3:56 pm
What camera are you using? thx for tutorial!
HERO
February 20th, 2010 at 8:57 am
ALEX, These images were shot with a Nikon D200.
Ben
March 3rd, 2010 at 4:00 pm
Hey Hero,
Thanks for this tutorial! For everyone who has a compact Canon camera with no bracketing function but wants to take photos for HDR projects without changing exposure everytime manualy – check http://chdk.wikia.com!!!
I didn’t know what my cam is capable of..
Greetz, Ben
HERO
March 3rd, 2010 at 5:52 pm
BEN, Thanks for the contribution! I’m sure there are some Canon PowerShot folks out there that will find that incredibly useful!
JonaThan
March 13th, 2010 at 11:02 am
Very helpful. Thanks for the article!
Aivea
March 25th, 2010 at 2:15 am
Great informative tutorials. Nice effort!!!
tomtaylorr
April 1st, 2010 at 11:41 pm
“The practice of writing has always verged on folly, and in a world that craves images it has become more questionable and frustrating than ever. I’d give it up tomorrow ccna if I could shed my unfashionable belief in its importance.” Wonderfully written column, Tom. And dead on.
Jae Xavier
April 8th, 2010 at 1:19 pm
Awesome tutorial. Now if I can just get a DSLR… any suggestions?
HERO
April 8th, 2010 at 6:16 pm
JAE, my only suggestions would be to do your research, and don’t pay for features you’re never going to use… oh yeah, and don’t ever make your decision based upon megapixels. There are a lot of fantastic cameras out there but in my experience a brilliant photograph is 5% Camera and 95% Photographer.
Jae Xavier
April 9th, 2010 at 12:42 pm
Thanks very much for the advice Hero.
I have been using a low end digital point-and-shoot Canon. I had bought it for taking pictures of textures to apply on my 3D models (and taking pictures when clubbing). It has served me well but I’m growing out of it now as photography has led me to take photos everywhere I go. Thanks again!
Denver Engagement Photographer
May 18th, 2010 at 12:41 pm
wow the end result is amazing. I really appreciate the tutorial here. Thanks man.
Design Panoply
October 25th, 2010 at 5:28 pm
Very nice. I never thought of bringing an HDR shot back into Camera RAW after Photomatix, but I see a ton of potential there!
Thanks for the tip.
LEDs Lights
March 9th, 2011 at 11:36 pm
Great illustrated tutorial. thank you for posting it
soe
October 7th, 2011 at 10:49 pm
Thank you so much.
Yr tutorials are very clear bcoz of label & yr efficient skills.