


High Dynamic Range (HDR) Photos – Part 1
In this Photoshop Tutorial I'll take you through my process for creating stunning High Dynamic Range (HDR) Images with tonal ranges just not possible to achieve with a single photograph.An Introduction to HDR (High Dynamic Range) Photography
For those of you not familiar with HDR Photography, it is quite simply the process of combining multiple bracketed exposures into a single photograph, underexposing for highlight detail and then overexposing for shadows we can capture every last bit of detail from both… Details that just aren’t possible to capture in a single shot. You can explore the galleries of HDR photography HERE and HERE
(*note: This is not a photography tutorial. If you don’t know how to use your camera, take the time to learn. I can’t answer your camera questions. Thanks!)
Recently I’ve been doing a lot of architectural HDR photography and have had friends ask for a introductory lesson on my HDR method. Let me begin by saying that I am by no means an authority on HDR Photography. I am however an accomplished photographer with a solid HDR skill-set. This lesson will be more of an introduction and springboard into the world of HDR than an in-depth examination of the craft. Like in most other areas of art and photography, there is no “right” or “wrong” way, as long as you are happy with your results.
Keep in mind that although you can accomplish this effect using .jpg or .tif files from your digital camera, shooting your camera’s version of RAW (like NEF for Nikon or CRW for Canon) will yield the best results as Photoshop is optimized specifically towards these types of RAW files when compiling High Dynamic Range images.
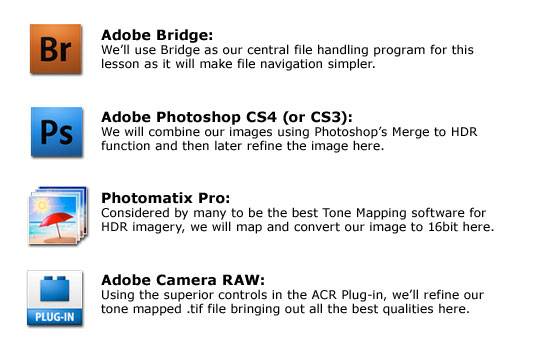
This lesson will follow my HDR workflow from start to finish and will be using the following programs (or extensions of Photoshop)
- Adobe Photoshop CS4 (though CS3 will be fine too)
- Adobe Bridge (not a must, but helpful and comes with Photoshop)
- Photomatix Pro (download the trial version RIGHT HERE
- Adobe Camera Raw (also comes with Photoshop)
Considerations When Photographing For HDR
If we’re going to create an HDR image, we’ll need to start with a set of photos. How these photos are taken will make all the difference in how the final image turns out. Making errors in the photography end of the process will render the rest of this lesson useless, so pay close attention.
When shooting multiple files for HDR take the following under strong advisement (I’ll touch on a few of these in more detail later):
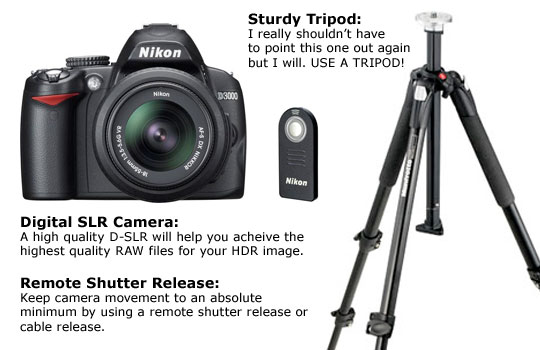
- USE A TRIPOD! I can’t stress this one enough. If your camera wiggles even a little bit, the quality of the whole image will be effected.
- USE A TRIPOD! Seriously… I mean it.
- Along with using a sturdy tripod, I also use a cable release so that there is no chance my shutter finger is wiggling the camera.
- DO NOT SHOOT IN AUTO MODE. I use Aperture Priority Mode, but Shutter Priority or Full Manual will also work. I prefer AP because I can more accurately set my depth of field.
- Focus the camera then switch to Manual Focus so the camera doesn’t try to re-focus between shots.
- Bracket 3 to 9 photographs at 1 stop increments. For most conditions I shoot 5 (-2, -1, 0, +1, +2) in that order.
Taking The Pictures
Ok, so lets assume you’ve setup your tripod, attached the camera, arranged your composition and are ready get started. Here are the steps you need to take before hitting the shutter:
- As I said earlier, I prefer Aperture Mode because I feel it allows me to most easily set my depth of field. Every photographer has their preference here, so I won’t push mine upon you, but make sure whether you’re shooting Aperture, Shutter or Manual that you’ve got the settings correctly for a standard single exposure shot of the scene. (If you’re shooting in Full Manual mode, be sure you’ve metered for the entire scene so that your bracketing will be correct.)
- If you’re using Auto Focus, this is the time to press your shutter part way down to get the lens focused. Once you’re in focus, go ahead and switch to Manual Focus so the camera won’t try to focus again during the multi-shot bracketing sequence. You folks using Manual Focus, just do your thing.
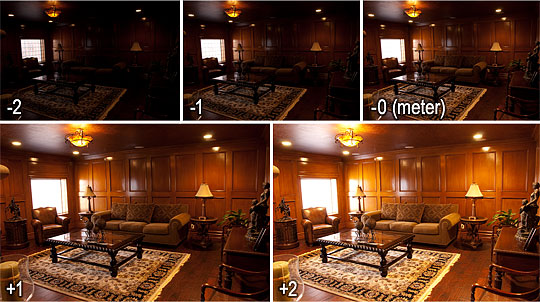
- Make sure you’ve specified your bracket size in your camera’s menu to bracket at either 1 or 2 full stops depending on which it will allow. Photoshop can handle a 2 stop difference in photos for HDR, so if your camera allows for it, go the full 2 stops. Now switch bracketing ON and choose how many images you wish to shoot. I typically shoot a 5 stop range for most scenes unless I’m dealing with extreme highlights and shadows. For the scene I’ll be using for this tutorial I shot 5 photos at 1 stop increments.
- Now go ahead and shoot your photos. I use my camera’s motor-drive function so I just have to hold down the shutter release and it will take all 5 shots without stopping, but shooting them individually is perfectly fine too.
Great, now that you’ve got your photos, head over to the computer and offload them into a folder (or wherever).
I’ll be using these 5 images, which I’ve shot with the wrong White Balance for illustration purposes. These 5 images are available for download at the end of the lesson if you’d like to use them.
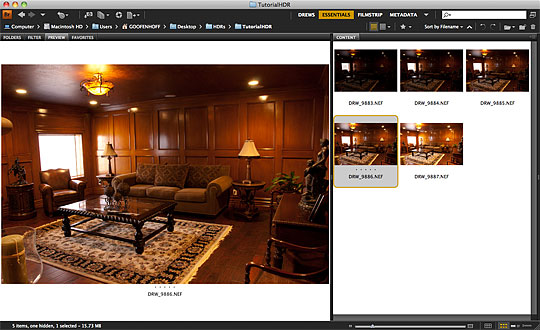
Step 1 – Opening The Files In Bridge
Now that you’ve got the images safely from the camera to your computer, lets go ahead and open Adobe Bridge and navigate to the folder where we’ve saved the photos. Everyone’s got their own arrangement of panels in Bridge, and this doesn’t really matter for the tutorial but I’m using the Essentials layout for this lesson. The important thing is that you can see all the photos in your photo folder.
(*note: If you’d like to follow along with me at home and wish to use my files, I’ve put all 5 of my RAW files into the download at the end of the lesson.)
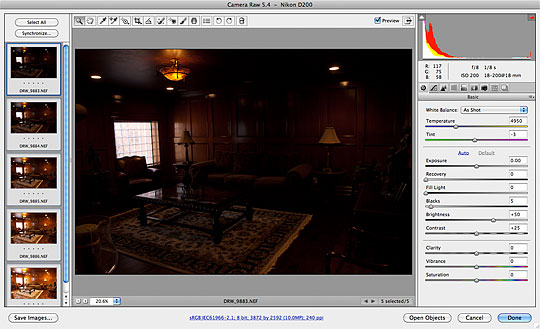
Step 2 – Identify Problems And Open In Camera Raw For Adjustment
As I mentioned previously, I’ve made the intentional mistake of setting the wrong White Balance in my camera and as you can see, all my photos have a strong yellow cast as they were shot under indoor Tungsten light. Not a big deal since we shot in RAW, but this is an issue we definitely want to fix before we go any further to ensure we’re bringing the most well adjusted files to the HDR process. So lets grab all these files at once and edit them as a group in Camera Raw so that the White Balance will be uniform throughout the set.
Select all 5 files in Bridge by clicking on the first one to select it and then holding down the Shift key and clicking on the last image in the sequence. Choose File > Open In Camera Raw from the Main Menu (shortcut Command-R (PC: Ctrl-R)). This will open all 5 files together in the Camera Raw dialog where we’ll be able to make our changes.
When Camera Raw opens, select all the images by either clicking on the first and holding down Shift while you click the last like we did in Bridge, or by simply pressing Command-A (PC: Ctrl-A). Or, I guess you could just click that Select All button at the top of the thumbnails column. ;)
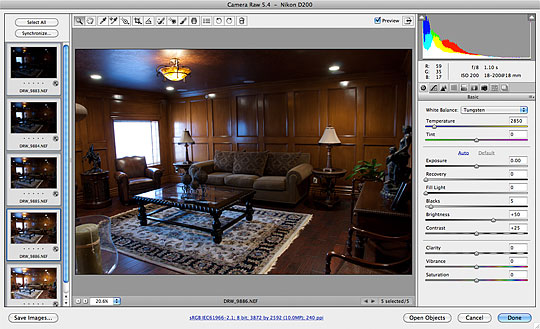
Step 3 – Make The Camera Raw Adjustments
With all your images selected in Camera Raw it’s likely that you’re seeing the preview for your first underexposed image, which probably isn’t going to be the best one to look at when we’re making changes since it’s so dark, so to switch to another thumbnail without changing our “Select All”, hold down the ALT key and click on the thumbnail you’d rather use as the preview.
Now we’re all set to make our adjustments. I’m just going to change the White Balance to Tungsten since that’s all this image really needs, but if you wanted, you could change many of the other ACR settings relating to color except the things in the Exposure/Recovery/Fill Light/Blacks/Brightness/Contrast area of course, because we need those to remain intact for our HDR process. When you’re done, just click the DONE button to return to Bridge.
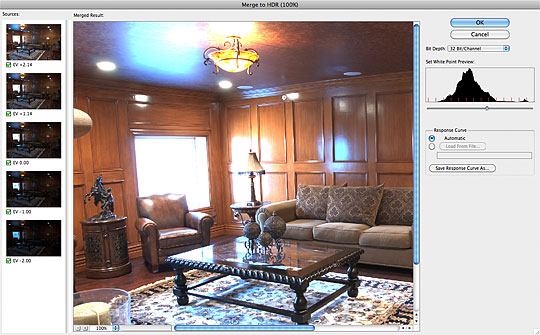
Step4 – Initiate Merge To HDR
When you click the DONE button in Camera Raw, you will be returned to Bridge and you’ll notice that all the thumbnails automatically update with the changes you just made, and that they are all still selected. We’re now ready to merge these files together and officially begin the HDR process.
From the Main Menu choose Tools > Photoshop > Merge To HDR. This will initiate the HDR Plug-In inside Photoshop and will open Photoshop if it’s not already running. Photoshop will load all the images into a single file, run through it’s process (this may take a minute or two depending on file size and how fast your computer is) and it will then open the Merge To HDR window. Yes, your photo will look like total crap and you’ll wonder if you’ve done something wrong. Settle down, everything is fine. What you’re looking at is a 32bit image that can’t be viewed properly with your monitor.
Leave everything as it is and just click OK so that Photoshop can complete the merging process
(*note: On a side note, the White Point Preview in the Merge to HDR dialog is just that, a preview to show you the tonal range of your 32bit file and how much information you’ve got between black and white. Moving this slider will not effect your HDR image.)
Step 5 – Saving The 32Bit File
When you click OK in the Merge To HDR window, Photoshop will finalize the merge and will open the 32bit file it’s created. Don’t worry if this image doesn’t look good either, again, it’s 32bit and your monitor can’t handle it.
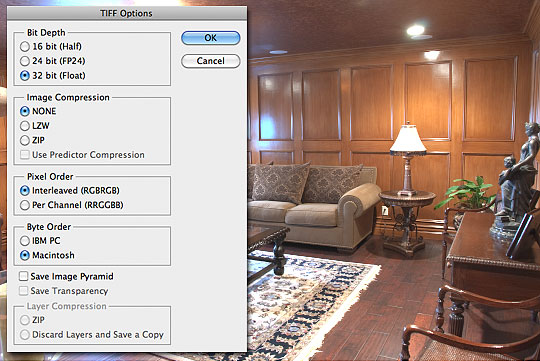
Lets save this image as a .TIF file to the same folder where we saved the original RAW files from the camera. Choose File > Save from the Main Menu and navigate to the folder where you saved your original photos. I always name my HDR files after the first photo in the sequence, so I’d name this one DRW_9883.tif since DRW_9883.nef was the name of the first photo in my set. Saving in this manner will make it easier to find your files when you’ve got a lot of photos in your folders. Make sure you choose TIFF from the Format menu and that the Embed Color Profile box is checked and then click Save.
When you click Save, the TIFF Options dialog will appear. Choose 32 Bit, None, Interleaved, and Mac or PC depending on your Operating System, leave everything else unchecked and click OK.
Step 6 – Back To Bridge
Go ahead and close the file now that the .TIFF has been saved and switch back to Bridge. You’ll now notice (if you named your file right) that it appears inline with the photos from the set. We’re now ready begin the Tone Mapping process using Photomatix Pro. If you haven’t downloaded the program trial yet and are following along at home, this would be the time to do so.

Continued In Part II
In Part II of this tutorial we’ll explore the power of Tone Mapping in Photomatix Pro and bring this HDR image to life! Continue to Part 2 – Click Here
Lesson Files + Additional Resources
Download the 5 Camera RAW files used in this lesson (BIG 60MB download) Right Here.
Please be considerate of my bandwidth and only download the files if you wish to follow the tutorial at home
Read the second part of the HDR Photos tutorial Here
Tell Your Friends
More in Photo Effects


8 Responses to High Dynamic Range (HDR) Photos – Part 1
Russ Goldin
February 8th, 2010 at 11:01 pm
As usual, stellar stuff! Will have to give this a try later. Cool new design, as well.
Webstandard-Blog
February 9th, 2010 at 2:25 am
Awesome! If you wanna know more about HDR-Stuff don’t miss Best of High-Dynamic-Range – Fotos, Weblogs, Tutorials, Software, Books!
Surin 3
February 9th, 2010 at 7:38 am
thanx hero
Travis Thomas
February 9th, 2010 at 7:47 pm
As always, very well explained
nova5
February 11th, 2010 at 1:31 am
Great lesson, tnx. Waiting for second part of HDR photos =)
Jae Xavier
April 8th, 2010 at 1:15 pm
Very helpful for 3D artists. We use HDR images for “lighting maps” when we are trying to make a 3D scene as real as possible.
Denver Engagement Photographer
May 18th, 2010 at 12:40 pm
Very nice, I’m starting to see how my favorite indoor architecture shots are done. I think this is the technique that most indoor photographers must be using.
SEO Nottingham
August 3rd, 2011 at 6:03 am
Great tutorial – thanks for sharing the extensive info!