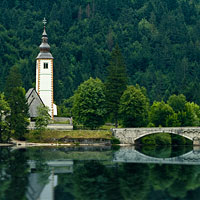
Basic Photo Reflections
In this Photoshop tutorial I'll show you how to create realistic reflections on water already present in your favorite photographs.Step 1
Let me begin by saying just a few things about this effect. First and foremost, this is one of those techniques that’s better kept to yourself when showing off your amazing photos to your friends and fellow photographers. For some reason, even in this day and age, the digital work a photographer does is looked down on as cheating by others… so mum’s the word.
Secondly, if you plan to show or print photos using this technique, make sure you go the distance to make the photo completely convincing. Any small inconsistencies will immediately give you away as an imposter, and lets face it, none of us want that.
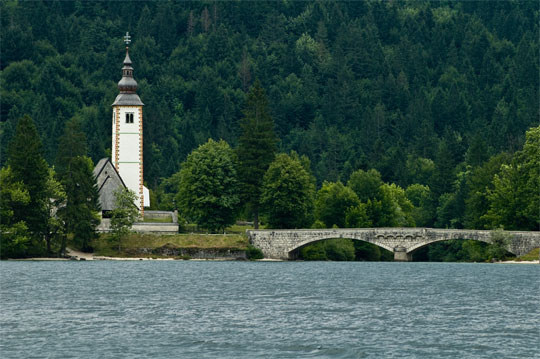
So pick a photo with a nice straight (or at least relatively straight) waterline. If you’ve got a shoreline that has big jogs and variations this technique becomes much more tricky and often impossible. I chose this photograph I took in Slovenia a few years back. I’ve always liked the composition, but hated the rough water so much I never printed it.
Step 2
The first thing I always do when working with a photograph is to duplicate the Background layer by pressing Command-J (PC: Ctrl-J). Keep in mind that although you’re viewing a small web sized version of the photograph, I’m actually working on a full sized 300ppi image.
With the Background layer duplicated and the duplicate selected, lets break out the Rectangular Marquee tool (or the selection tool of your choice) and select all the water. The press Command-Shift-I (PC: Ctrl-Sift-I) to invert the selection (effectively selecting everything that’s not water)

Step 3
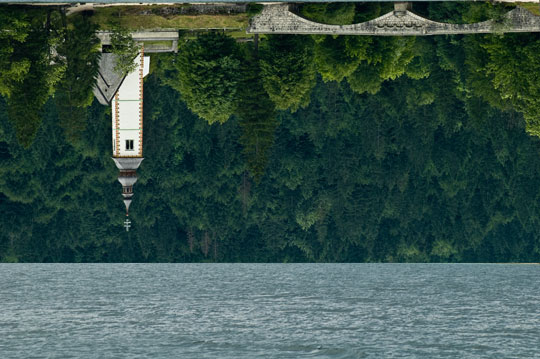
Press Command-J (PC: Ctrl-J) to duplicate only the selected area onto a new layer. Then lets go ahead and flip our new layer which we’ll name "Reflection 1" upside down by choosing Edit>Transform>Flip Vertical from the main menu.
Now of course this won’t look right at all.
Step 4
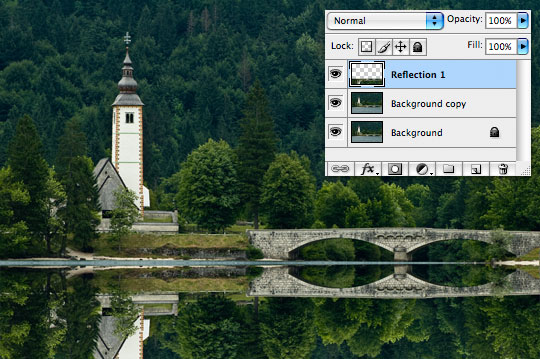
Grab the move tool by pressing V on your keyboard and while holding down the Shift key drag the inverted image down until it’s positioned in where the reflection should go.
Step 5
As you can see by the little wedge of blue that’s exposed between the actual image and my new reflection, either my photo wasn’t taken exactly level or the shoreline drifts a little bit. I’m going to go with the shoreline issue because of course I never shoot crooked.
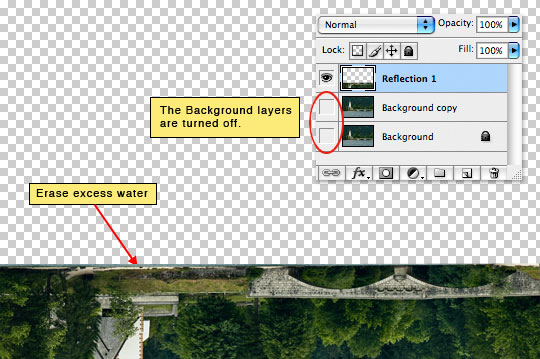
If we turn off the two background layers ("Background" and "Background copy") by clicking the little eye icons next to them in the Layers palette so we can see only the reflection layer, I can then select and delete that little wedge of water that remains in my "Reflection 1" layer. I used the Polygonal Lasso tool, but you could just as easily use the Eraser tool with a hard edged brush and a little patience.
Step 6
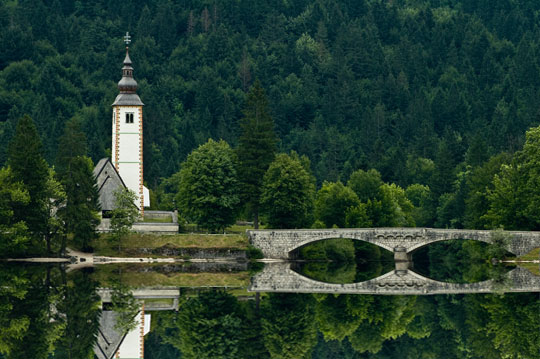
Turn the background layers back on now and you’ll notice that we still have that wedge of blue showing through on the layers below. So lets grab the Transform Tool from the main menu, but lets make sure and select Warp (Edit>Transform>Warp).
Then simply drag the points on the corners and the bend handles of the warp tool until the reflection meets the shoreline everywhere. In my case, because I was able to cut out the water in a straight line, I could simply use the Free Transform tool and drag the left corner up by holding the Option (PC: Alt) key and get a pretty good match.
Step 7
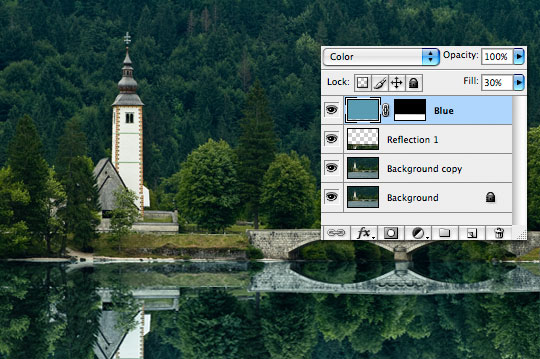
Things are beginning to look like they should, but be careful. Water is never the same color as the world it reflects because of it’s depth and the ability of water to reflect the sky as well, so lets add a slight blue tint to the water now.
Create a new layer at the top of the document and call it "Blue". Fill the layer with a nice light blue like #5a9cb2.
Now, because we only want this blue tint to effect the reflection we could create a simple Clipping Mask to the "Reflection 1" layer, but in this case we’re going to use a Layer Mask instead. Hold down the Command (PC: Ctrl) key and click on the thumbnail of the "Reflection 1" layer to load it as a selection, then click the Add Layer Mask icon at the bottom of the layers palette.
Change the Layer Blend mode to Color and the Fill opacity to around 30% to create a nice blue undertone in the water.
Step 8
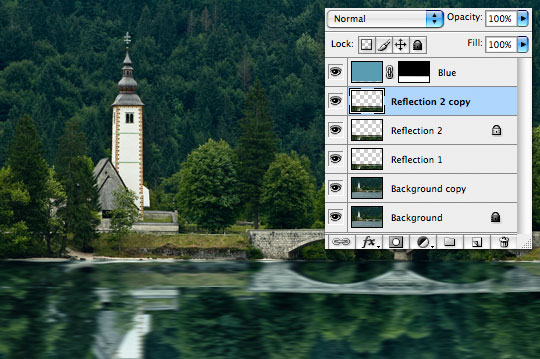
Lets add a little more realism to our water now by clicking back on the "Reflection 1" layer and pressing Command-J (PC: Ctrl-J) to duplicate the layer. Call this one "Reflection 2" and click the Lock Transparent Pixels button at the top of the Layers palette. We lock the pixels because we’re about to add a blur to this layer and we don’t want the blur to spill over onto the other layers.
Choose Filter>Blur>Motion Blur from the main menu, set the angle to 0 degrees and the Distance to 20 pixels (if you’re working on a lower resolution image you may want to reduce the Distance until things just look blurred a little). Press OK. Now repeat the blur by simply pressing Command-F (PC: Ctrl-F).
(*note: pressing Command-F (PC: Ctrl-F) is a great short cut to reapply the last filter used.)
Step 9
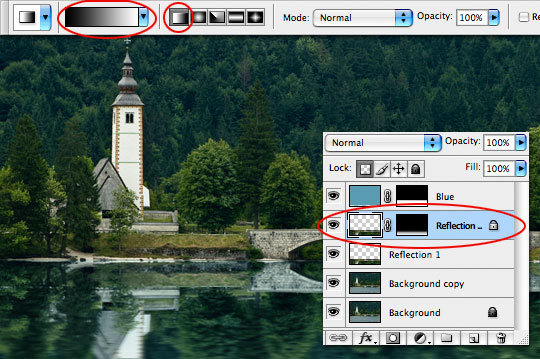
Obviously this blur won’t be consistent from the shore to the bottom of the photograph, so add a Layer Mask and grab the Linear Gradient tool set to Foreground to Background, hit the D key to set the reset the foreground and background to black and white, then simply drag a gradient from the shoreline to the bottom of the document. This will make the reflection still look crisp against the shore but as the water comes towards us, the reflection will get a little more blurry.
Step 10
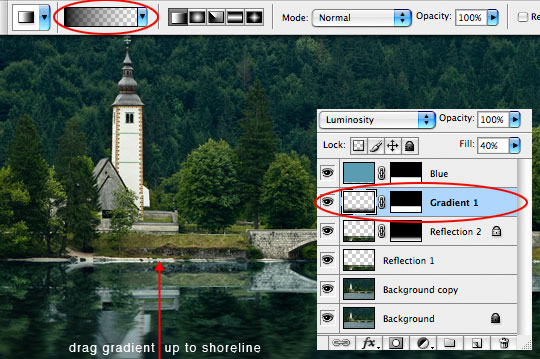
Create a new layer above the "Reflection 2" layer and call it "Gradient 1". Next lets duplicate the layer mask we have on the "Blue" layer onto the new "Gradient 1" layer by holding down the Option (PC: Alt) key and simply click and drag the Layer Mask from the "Blue" layer to the "Gradient 1" layer.
Press G to invoke the Gradient tool once again, choose Foreground to Transparent from the gradient options and drag a gradient from the bottom of the document up to the shoreline. Change the Layer Blend Mode to Luminosity and the Fill transparency to 40%.
Step 11
You can experiment with gradients coming from the shoreline down and perhaps a highlight reflected gradient in the middle of the water, but at this point the reflection is convincing to the eye and the photograph looks much better than the original.
When I’m working to develop a technique like this one, I always have several real life references (ie. actual photos with reflections) to pull ideas from to create the most realistic and true to life representation possible.
You know that I usually don’t include a .PSD download in my PHOTO EFFECTS category, but because of the many layers, layer masks and blend modes used in this tutorial I’m including a low resolution version of this file for download at the bottom of the lesson. Enjoy!
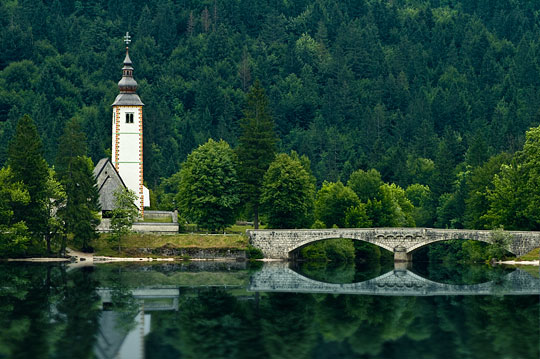
At this point you can either be satisfied with the level of realism and a nice glassy lake, or you could take it a step further and create a displacement map to mimic the tiny waves and water reflections (which we’ll save for another tutorial), and end up with this result.

Lesson Files + Additional Resources
Download the free .PSD file and other lesson files Right Here.




28 Responses to Basic Photo Reflections
Brian
March 13th, 2008 at 3:54 pm
I work with Benjamin over at db clay, I hope I’ve been sending a little traffic your way! I’ve been loving your tutorials, they are very descriptive and easy to follow. Take care and keep them coming!!!
Cheers,
Brian
Ben
March 13th, 2008 at 7:15 pm
Any chance you might get an RSS feed that can be sent to emails? You have a great site.
Omega19
March 14th, 2008 at 12:46 pm
Your website is gorgeous. Great tutorial but I spent more time looking at the layout of this site. Beautiful is an understatement.
Travis Thomas
March 14th, 2008 at 5:23 pm
I don’t mean to be overly critical but does anyone think that the bridge in the final image looks a little too perfect?
Jonathan Solichin
March 14th, 2008 at 8:33 pm
That’s pretty slick and so is your site! The displacement map is a nice touch.
dubaibilly
March 14th, 2008 at 9:06 pm
I’m very impressed with this tutorial – thank you. I now need to have a look around the rest of your site, which other posters seem to like.
I’ve been playing with Photoshop for about 3 years or so now and I enjoy what I do with it but I am sure I can learn a lot from your tutorials.
Cheers
DB
HERO
March 15th, 2008 at 5:16 am
Travis,
These tutorials are created as a resource to folks who are trying to learn Photoshop. I try to use old tools in new ways and I truly strive to create tutorials that the reader can learn something from.
Water is an incredibly difficult medium to replicate, especially in an 11 step tutorial web tutorial. But for a new Photoshop user to learn how to use multiple layers with varying layer masks and blend modes and see how they can all come together… that’s quite valuable.
Take the techniques and make them your own… then make them better!
flipx1000
March 15th, 2008 at 4:39 pm
Very good (A1) tutorial – thank you.
koxl
March 15th, 2008 at 5:25 pm
Hey, congrats, great site and tuts. You took this picture by yourself? Its in moutains of Slovenia, really nice lake and a start of a Sava river is what we see.
HERO
March 15th, 2008 at 7:55 pm
KOXL, Yes I took this photograph. Mrs. HERO is from Slovenia and we visit there every year. It’s great to see some SLO action on the site!
shmilcc
March 16th, 2008 at 3:36 am
i am the first time coming here,i am a chinese.
this is an amazing site.
thank you.
Renee
March 16th, 2008 at 7:14 am
Nice tutorial. Two things I might have done a little differently:
1. Crop out obviously horizontal surfaces. Typically you wouldn’t see the beach in the water reflection unless you took the picture right near water level – and then you’d have quite a different perspective. Cropping out the beach first, and then lining things up would help with some of the artificialness still in the horizon.
2. Not sure if you did this (I’ll see in the next article), but are the waves in the last photo making use of perspective instead of just gradient blending? Perspective would add a greater sense of depth than just a gradient would allow for.
Otherwise, very nice looking.
koxl
March 16th, 2008 at 9:51 am
Great, me and mrs.KOXL are just watching an old school slovenian movie classic Kekec2, shot at the mountains above Bohinj.
Dallas
March 16th, 2008 at 5:47 pm
“because of course I never shoot crooked.” – lol… nice ^_^
HERO
March 16th, 2008 at 8:38 pm
I’m glad somebody thought that was funny Dallas!
malnourish
March 17th, 2008 at 12:10 pm
I was linked here from Life Hacker, and I adore your site. Well designed, very human. Great tutorial, thanks for including the .psd file as well. Will be visiting (and commenting here) more often.
HERO
March 17th, 2008 at 3:06 pm
Thanks for stopping by MalNourish! I look forward to your future comments.
Casey Wise
March 18th, 2008 at 5:57 am
Nice tutorial and nice WordPress installation. You’ve inspired me.
Lorie
March 23rd, 2008 at 10:14 am
Thanks for the great tutorial. I am new to Photoshop and need all of the help I can get.
Designer
March 31st, 2008 at 8:19 am
Hello again,
I have been downloading the .psd files from your tutorials, however, when I open them there is only one layer.. Are this suppose to be the files as a startup and build as I go along using your tutorials? Sorry if this is an obvious question but since I just came across your site today, and am going to use it to learn as much as I can, I had to ask it right away!!
Thanks Designer..
HERO
March 31st, 2008 at 8:40 am
Designer,
Each tutorial .PSD file contains all the layers from the entire lesson. I’m curious which version of PS you are using. I’ve checked the download files for the tutorials you commented on and they all have every layer intact.
Bengt Johansson
May 5th, 2008 at 4:02 am
Hi, I’m a great fan of your work. I just wonder if you can put together something where you explain how you did the water reflections ?
Rayden
May 10th, 2008 at 2:17 am
Hi,
Amazing tut and i admire ur site’s design.
I gotta chk out other tuts and il stay put wid my comments in wateva posts i read.
Thx again.
Ray.
Dubravko
October 23rd, 2008 at 4:08 pm
Hello-uu,
realy cool tut. and good idea!
keep going … and thx
Vatsal
December 25th, 2008 at 5:06 am
Hello Hero,
Hats off to all yr tutorials.
I want to know tht which is the most basic tutorial? who has just started to lear photoshop.??
Bostjan
September 29th, 2009 at 3:03 am
Must say, i was pretty amazed, when i saw picture you used for this tutorial. Right away i knew where was it taken. Because i am from Slovenia. And that picture was taken at lake Bohinj. it’s just the greatest place :)
And of course, i like, what you have done with photo.
Paulo Renato Souza Cunha
January 20th, 2010 at 11:44 am
Simple things = amazing things. Or you may try “simpler, better”. Thank you forever for posting art. Cheers from Brazil.
Tom
July 14th, 2010 at 3:56 pm
Another superb lesson, Hero.
With your talent, I’ve just created a reflected river scene and nobody will ever know that it’s a manipulated photo.
Well Done. Keep ’em comin’
Tom