

Film Inspired Photo Borders
In this Photo Effects tutorial I'll show you how to extract a photo border from it's background and make it infinitely more versatile for your photography projects.Introduction
In this tutorial I’m going to show you how to convert a flat black on white photo border into a much more usable one in just a few simple steps. The image we’ll be working from comes to us courtesy of Andrea Rascaglia who put together a nice collection of these a few years ago and has graciously given permission for me to reassemble them for your Photoshop pleasure here at PSHERO.com. (Keep an eye on the site, or even better, Follow me on Twitter to get notified when the collection goes live over the next few days.
Before we get started, lets take a look at the original file and how it was intended to be used.
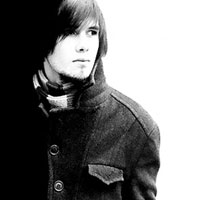
Andrea’s original intention for this border was to allow you to simply put your photo on a layer above the border and then change it’s Layer Blend Mode to Overlay. Because the area surrounding the border was white, and the photo area inside the border was cut-out, this method worked perfectly as shown below but ONLY if you wanted to have the photo and border on a white background.
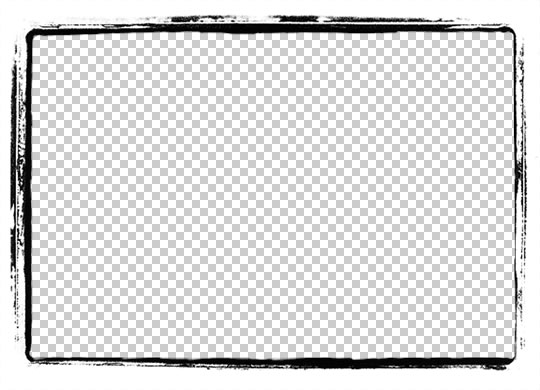 Notice that the area inside the border is actually empty/transparent.
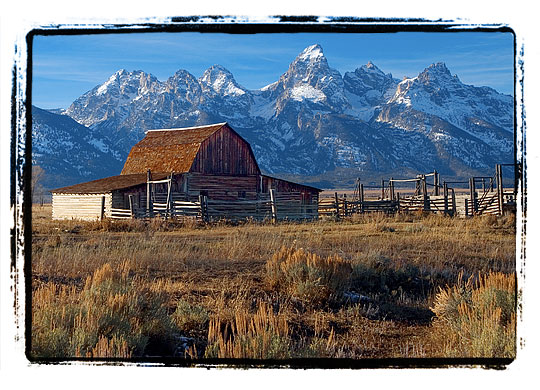 By pasting a photo on a new layer above the border and changing it’s Blend Mode to Overlay, the photo instantly masks itself to the appropriate space.
And the answer is YES, if you want to use the border on a white background, that’s all you have to do. However, if you’d like to extract the border and make it more versatile, read on.
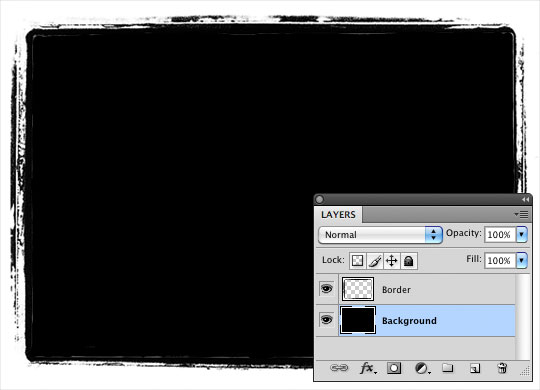
Step 1 – Setting Up The Photoshop File
Lets get started by opening a .png version of the photo border with the transparency intact. If you’re going to play along at home, download the image HERE.
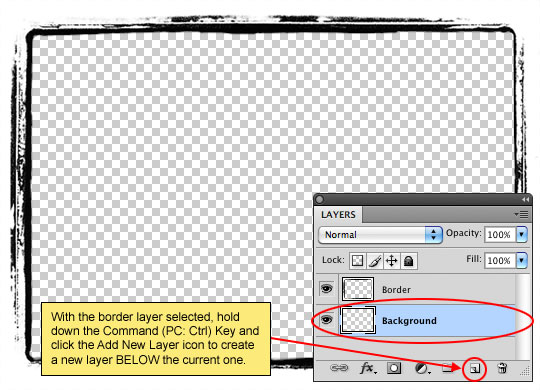
When you open the .png file in Photoshop, you’ll see the checkerboard background that indicates that there is no pixel information in the middle of the image, and that’s actually going to be an advantage for us since we won’t have to cut the middle out of the photo frame ourselves. Notice that the only layer in the file so far is the one with the border on it. Lets change that by adding a new layer below the border. In the Layers Palette make sure the border layer is selected and then while holding down the Command (PC: Ctrl) Key, click on the Add New Layer icon at the bottom of the Layers palette. This will add a new layer below the selected layer. Lets go ahead and name this layer Background while we’re at it.
Step 2 – Fill The Background Layer with Black
Our first order of business will be to create a layer that can act as a mask for the photo. This mask needs to encompass the exact area available inside the border plus a little extra area for good measure, so lets start by blocking in that area. Because there’s a big hole in our border layer, all we’ve got to do is fill the Background Layer with black. Press the D key on your keyboard to reset the foreground color in the Tools Palette to Black and then fill the layer by pressing Option-Delete (PC: Alt-Backspace).
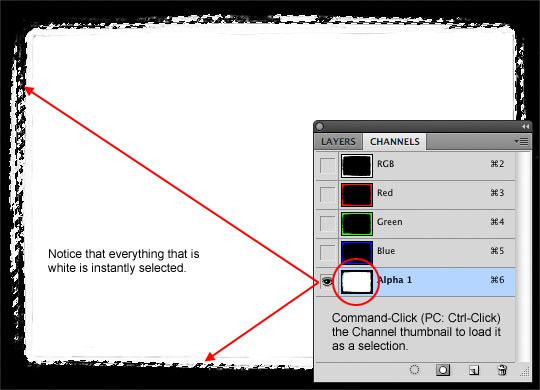
Step 3 – Create A New Alpha Channel
As the title of this step implies, we’re now going to use what we’ve done to isolate the black areas on their own layer so we can use it as our mask.
Select the entire canvas by choosing Select > All from the Main Menu or by simply pressing Command-A (PC: Ctrl-A). Then lets copy the information from both layers to the Clipboard by choosing Edit > Copy Merged from the Main Menu or by using the keyboard shortcut Command-Shift-C (PC: Ctrl-Shift-C).
Open the Channels Palette if it’s not already visible by choosing Window > Channels from the Main Menu. At the bottom of the Channels Palette click the New Channel icon (looks just like the New Layer icon) which will add a new Alpha channel at the bottom of the Channels Palette called Alpha 1. Simply paste what we just copied into this new channel by pressing Command-V (PC: Ctrl-V).
Using Channels we can isolate and select any white area, and since our border area is black, we need to invert out channel. Simply press Command-I (PC: Ctrl-I). And now we can select the border area by simply Command-Clicking (PC: Ctrl-Clicking) on the Channel’s thumbnail in the Channels Palette.
(*note: Notice that when you paste the copied layers into the new channel layer that it now looks just like our original image. Don’t be fooled though, you’re looking at an Alpha Channel.)
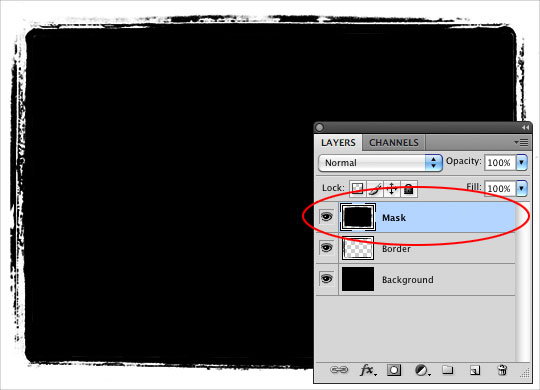
Step 4 – Creating The Mask Layer
Ok, now that you’ve got your selection made, click no the RGB Channel to switch back to our standard working mode and then go back to the Layers Palette and add a new layer at the top of your document by clicking on the Border layer and clicking the Add New Layer icon at the bottom of the Layers Palette and name it Mask. Once the new layer is selected, go ahead and fill your selection with black by again pressing the keyboard shortcut Option-Delete (PC: Alt-Backspace).
Yes, I know you’re thinking “Um, Hero… this looks exactly the same as what we’ve been looking at… what the heck are we doing?” But hang on for a few more steps and this will all make sense.
We’re now done with this selection, so go ahead and press Command-D (PC: Ctrl-D) to deselect.
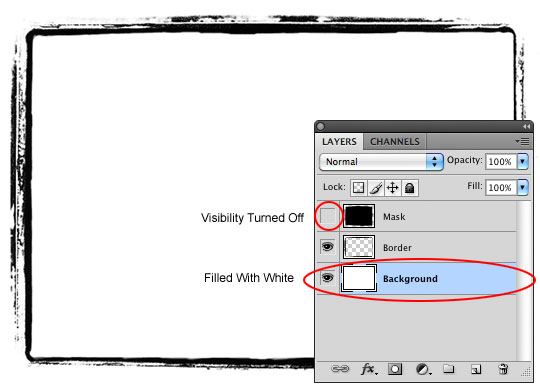
Step 5 – Preparing To Create The Photo Border
Now that we’ve got the photo mask built, it’s time to create the photo edges (like in the original example) that will lay over the photo and give that black edge effect.
First, lets turn off the visibility of our new Mask Layer by clicking on the little eye icon to the left of the layer’s thumbnail in the Layers Palette. Next, click on the Background Layer to make it the active layer and fill it with white by pressing Command-Delete (PC: Ctrl-Backspace). That last keyboard shortcut assumes that you haven’t made any changes to the black/white foreground/background colors since we reset them back in Step 2, if you have, then you’ll have to press the D key again to get that background color back to white.
Notice that the middle of the photo frame is now white instead of black
Step 6 – Creating The Photo Border Layer
Ok, I hope you were paying attention because we’re going to repeat Steps 3-4 to isolate the photo border and put it on it’s own layer. I’ll break down the process again in this step.
- Select the entire canvas by pressing Command-A (PC: Ctrl-A)
- Copy all layers by choosing Edit > Copy Merged from the Main Menu
- Switch to the Channels Palette
- Create a new Alpha Channel and Paste the copy you just made by pressing Command-V (PC: Ctrl-V)
- Invert the Channel by pressing Command-I (PC: Ctrl-I)
- Load the Channel as a selection by Command-Clicking (PC: Ctrl-Click) the Channel Thumbnail
- Switch back to the RGB Channel view by clicking on the RGB Channel
- Switch over to the Layers Palette
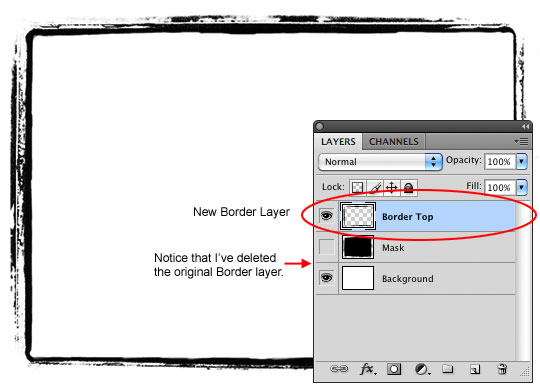
- Create a new layer at the top of the layer stack called Border Top
- Fill the selection with black by pressing Option-Delete (PC: Ctrl-Backspace) and Deselect.
You can now throw away the original Border Layer by dragging it to the trash. Your document and Layers Palette should now look like mine below.
Step 7 – Open And Copy Your Photo
You should all have a handle on the whole Copy/Paste thing by now, but for the noobs I’ll go ahead and walk you through this part too, thus sparing my inbox all the noob-mail. Not that I mind the email, but I might as well save us all some time right?
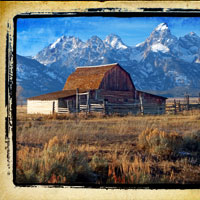
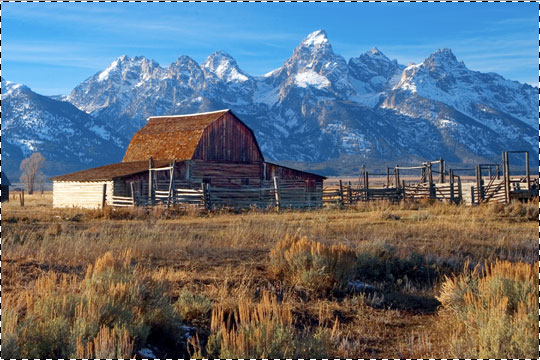
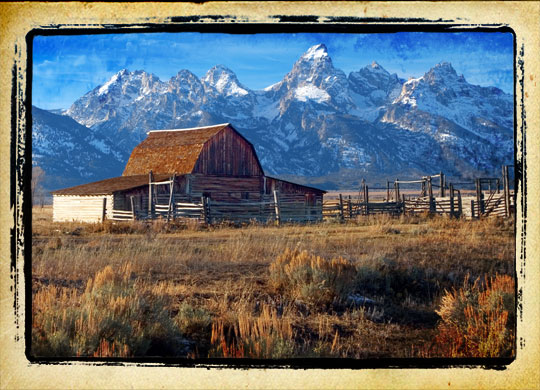
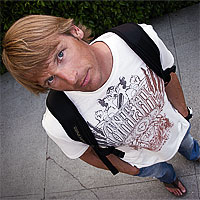
Open the photo you’d like to add the photo edges to. In this case I’m going to use this photo of an old barn that I took in Wyoming a few years back. Again, we’re going to select the entire canvas by pressing Command-A (PC: Ctrl-A) and then copy the photo to the clipboard by pressing Command-C (PC: Ctrl-C).
(*note: Notice that we didn’t have to copy merged layers here because the photo is just a single layer. If you use the keyboard shortcut for Copy Merged instead of just Copy and there’s only 1 layer, nothing will get copied to the clipboard and you’ll be confused and I’ll get more noob-mail.)
Step 8 – Insert Your Photo Into The Document
With your photo now copied to the clipboard, close your photo document and switch back to your working file. Turn the Mask Layer back on by clicking on the empty box to the left of the thumbnail in the Layers Palette and click on that layer to make it active. Now Paste the photo we just copied to the clipboard into the file by pressing Command-V (PC: Ctrl-V). It also wouldn’t hurt to rename the layer Photo… because that’s just a good habit.
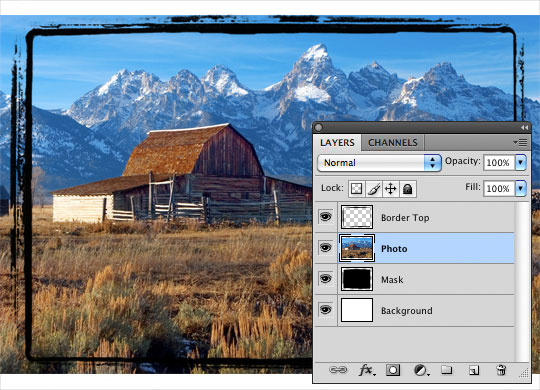
Step 9 – Bring It All Together
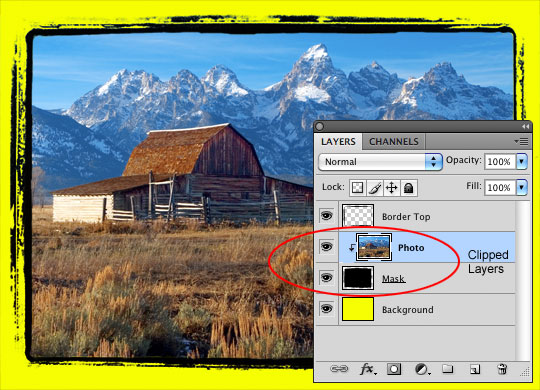
The only thing left to do is to clip our photo to the Mask Layer. You can create a clipping mask in a few ways: You can Command-Click (PC: Right-Click) on the Photo Layer and choose Create Clipping Mask from the menu.. OR you can hold down the Option (PC: Alt) Key and move your mouse to the line between the layers you wish to clip together in the Layers Palette until the pointer turns into what looks like two overlapping circles and then clicking… OR you can simply use the keyboard shortcut Command-Option-G (PC: Ctrl-Alt-G) which is my personal favorite. However you choose to do it, clip the Photo Layer to the Mask Layer and you’ve got your photo border complete and independent of that pesky white background that you started with. (Change the background color if you don’t believe me!… Though hopefully you’ll choose something a little more tasteful than bright yellow.)
Conclusion
Now that you’ve been through the process I hope that you’ve learned just a little bit about the power of the Alpha Channel and how knowing how to use them can make your life a little easier. And don’t forget to check out for the Photo Borders category… And yes, I’ve done all the work for you on those files so all you’ve got to do is paste your photo and go!
You might compliment this effect with another layer added above the Photo Layer with some grunge effects (also clipped to the Mask Layer) for an even neater effect. Noobs, you might want to check out the Grunge Photo Edges Tutorial and the Photo Transfer Edge Effect Tutorial for more on the subject.
Lesson Files + Additional Resources
Download the .PDF and .PNG files used in this lesson Right Here.
Check out the Grunge Photo Edges Tutorial
Check out the Photo Transfer Edge Effect Tutorial
Check out the Photo Borders Cagegory for free downloadable Photo Borders and Photo Edges.
Tell Your Friends
More in Photo Effects


12 Responses to Film Inspired Photo Borders
Max
February 18th, 2010 at 5:01 pm
I love how you’ve incorporated the alpha channel work into the lesson. I never thought to use them like that. Great tut.
HERO
February 18th, 2010 at 5:03 pm
Thanks MAX, practical usage is really the best way to learn those little tricks.
Aaron
February 18th, 2010 at 9:22 pm
Hero-rockstar tut man. Thank you. I’m loving the new site design by the way. I love how clean it is.
Kap0w
February 19th, 2010 at 10:22 am
Love your tutorial Hero – great practical advice on something I actually do want to do. I follow your stuff avidly. Keep it up!
Taha
February 19th, 2010 at 12:57 pm
This is really beautiful
Erik
February 21st, 2010 at 12:32 pm
Thank you for this, most appreciated.
Lady Hera
March 7th, 2010 at 3:59 am
nice tut. i think you should write a book about all your tuts. you are a brilliant writer!! :D
Ben
April 6th, 2010 at 4:58 pm
Bro (I’m from New Zealand lol)
This is pretty fkin awesome tutorials. If you read it, you actually can do it step by step.
Keep em coming bro, it’s helping us lol
Denver Engagement Photographer
May 18th, 2010 at 12:39 pm
Very cool post I am for sure going to use this border on a recent engagement shoot I did. I need something to punch up the pictures a little bit. Thanks for this.
Page Gardens
May 21st, 2010 at 4:25 pm
Great rustic look!
Law firm marketing plan
August 12th, 2010 at 4:38 am
thanks this looks really good. I’m a big fan of these tuts. you can really change the feel of an image with things like this
Sarah
October 7th, 2010 at 8:33 am
Thank you! Great tutorial – very useful and easy to follow.