


Grunge Photo Edges
In this Photoshop tutorial I'm going to show you a quick and effective way to create a cool photo edge effect using a single Photoshop grunge brush and a series of clipping masks.Introduction
You should already know how to load Brushes into Photoshop and how to rotate those brushes in the Brushes palette. If that sounds like Chinese to you, check out my previous tutorials on the subject: Installing And Managing Brushes & Other Presets and Rotating Brushes.
Step 1
For illustration purposes, I’m going to begin with a new document that is 540x540px at 72ppi. Obviously if you’re preparing images for print you’ll want a starting file that is at least as large as the print you wish to produce and at least 150ppi.
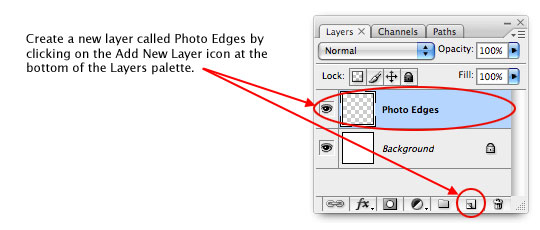
The first order of business will be to create a new layer in the Layers palette by clicking the Create New Layer icon at the bottom of the Layer’s palette. If your layers palette isn’t visible, simply choose Window>Layers from the main menu. Double click on the name of the layer (which by default will be called Layer 1) and rename it Photo Edges.
Step 2
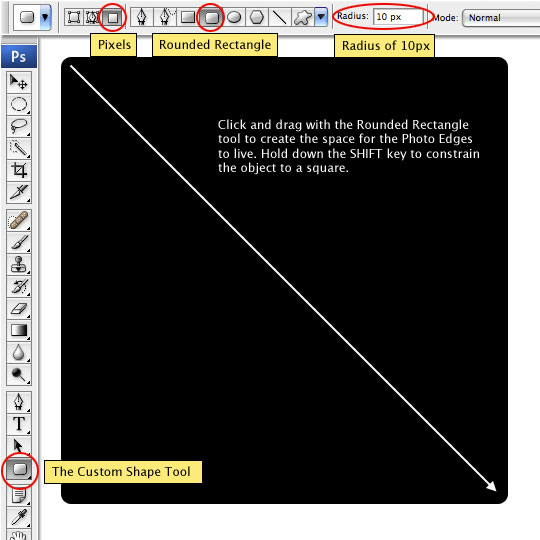
Press the U key to activate the Custom Shapes tool and from the options bar at the top of Photoshop, make sure the Pixels and Rounded Rectangle icons are selected and set the corner radius to 10px.
Press the D key to reset your foreground color to black, then click and drag a nice large rounded rectangle onto the stage. Remember to hold down the Shift key to constrain the proportions if you want your photo frame to be square.
Step 3
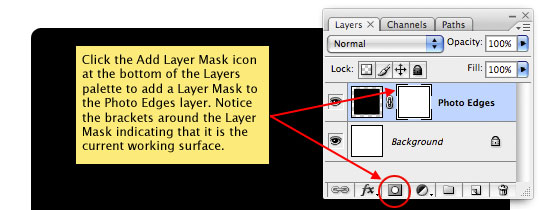
Since non-destructive is really the best way to work, rather than using the eraser to delete areas from our rounded rectangle, we’re going to apply a Layer Mask to it. We can then paint onto the Layer Mask without ever disrupting our original shape. Click the Add Layer Mask icon at the bottom of the Layers palette and notice that a new Layer Mask is added to your Photo Edges layer and that the Layer Mask has little brackets around it telling us that it is the active working surface.
Step 4
As I said in the intro, we’re going to achieve this effect with the use of a single brush. If you’re playing along at home, now would be a good time to download the zip file at the end of the lesson and install the brush I’ve included for you (named PhotoEdgeBrush.abr).
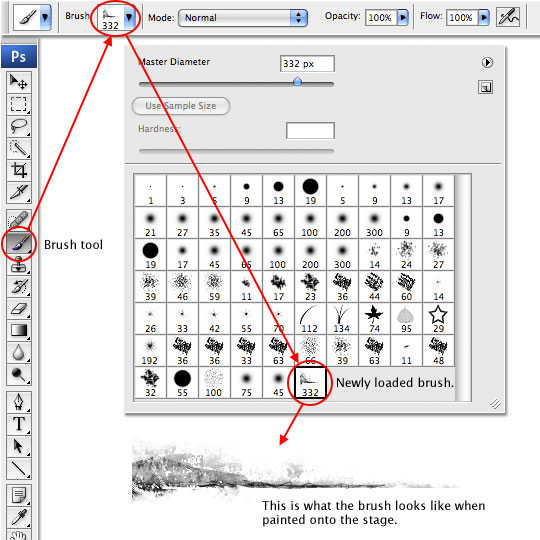
Once you’ve loaded the brush, press the B key to switch to the Brush tool and select the brush from the Brush Picker in the options bar at the top of Photoshop. I’ve chosen this brush because of it’s particular construction as shown below.
Step 5
Now would be a good time to open the Brushes palette if it’s not already open by choosing Window>Brushes from the Main menu. Make sure you’ve got the Brush Tip Shape option selected from the left sidebar so you’ll be ready to rotate the brush as we proceed.
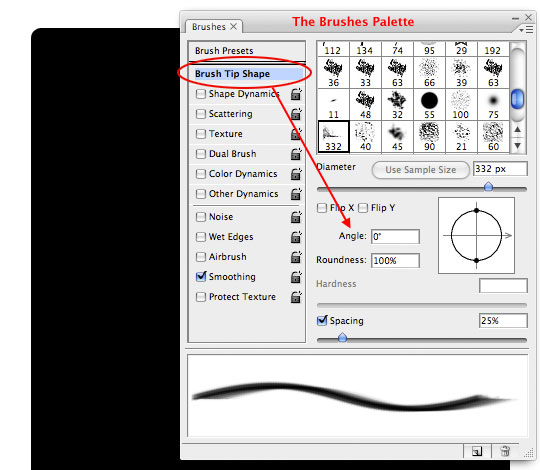
Step 6
Make sure that the Layer Mask in the Photo Edges layer is still selected (remember the brackets?) and that your foreground color is still set to black. The original orientation of the brush is horizontal with the heavy end on the left side, so lets begin on the lower left hand corner by placing the brush over the corner and clicking once.
You’ll notice that by painting with black on the layer mask, we can effectively make areas of our rounded rectangle disappear even though we haven’t actually erased anything. If you ever screw up, you can just switch your brush color to white and paint back in the are you’ve removed. I’ve cropped my example below to just the lower half of the square to save space, but you can see that we already have a dramatic effect happening with just a single click of the brush.

Step 7
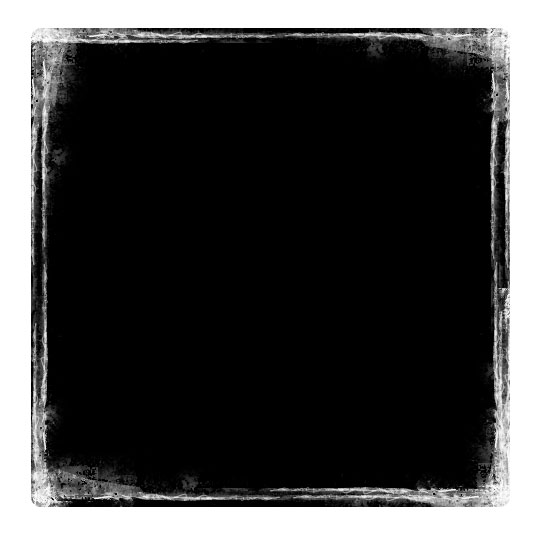
Repeat this process while using the Angle field in the Brushes palette to rotate the brush 90°, -90° and 180°. Work your way around the edge until you’re result resembles mine below. Notice that sometimes I’ll use the brush more than once in a single direction, and occasionally it goes off the edge lengthwise to rough up the still harsh edges. I also try to make the lines almost touch in the middle for a little more "framish" feel.
Step 8
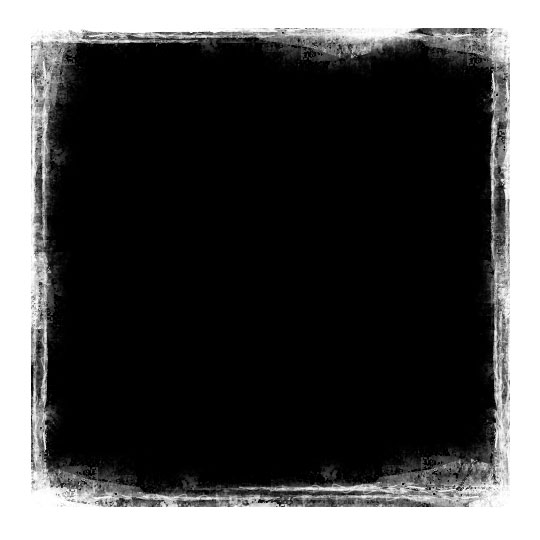
Now that we’ve got the basic area inside the frame the way we like, it’s time to work down the harsh outer edges. I’m going to use the same brush, in the same way, only this time I’m going to make sure I’m only painting right at the edge of the rounded rectangle. Don’t be afraid to do some real damage to the edges.
Step 9
Now lets go ahead and open the photograph we want to use inside the photo frame. With the photo open, press Command-A (PC: Ctrl-A) to Select All, then copy the whole thing by pressing Command-C (PC: Ctrl-C), then go ahead and close your photo.
Switch back to your working photo frame document and paste your photo into the file by pressing Command-V (PC: Ctrl-V). I’m going to use this rather disturbing photo I found in the iStockPhoto.com weekly freebies bin. Notice that your photo is pasted into a new layer just above the one we were just working on.
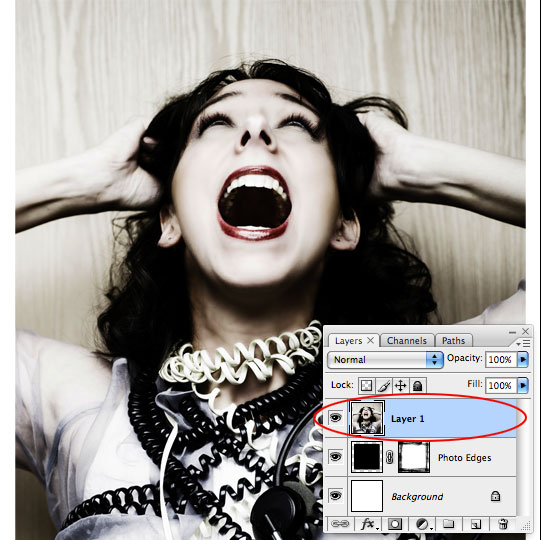
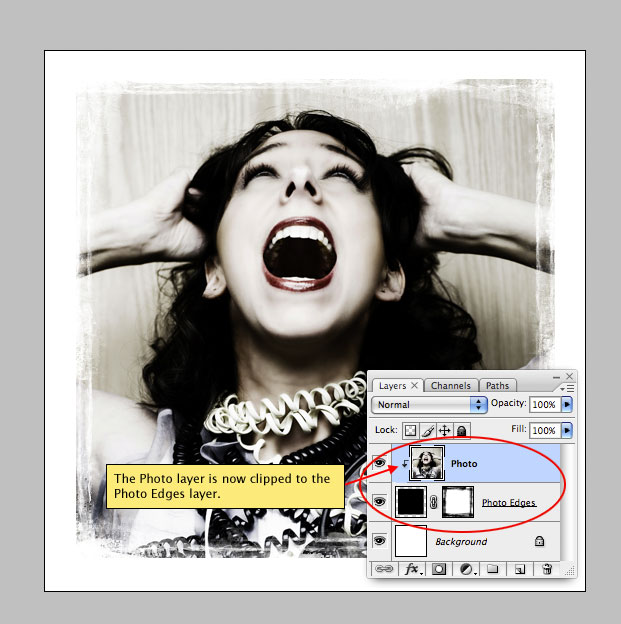
Step 10
Lets mask this new photo layer (which I’ve appropriately renamed Photo) by Control-Clicking (PC: Right-Clicking) on the layer and choosing Create Clipping Mask from the menu. You’ll notice that when one layer is clipped to another, it is indented and a small arrow is placed at the left of the layer.
(*note: An even quicker way of creating a Clipping Mask is to hold down the Option (PC: Alt) key and place your mouse between the two layers. When the curser switches to what looks like a pair of overlapping circles, click your mouse to add the Clipping Mask.)
Step 11
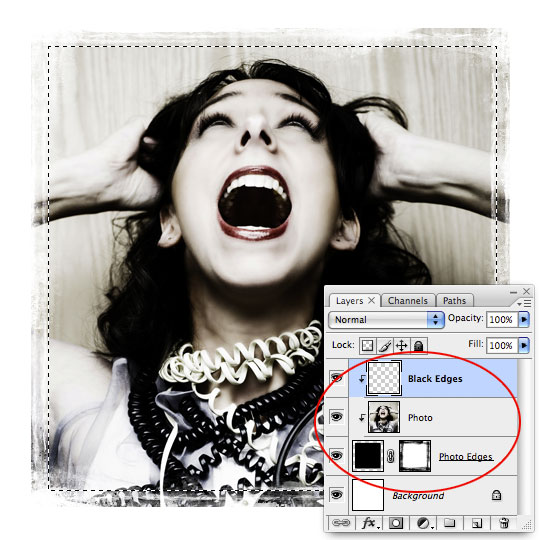
This is a nice effect by itself (and actually looks pretty awesome on a black background), but lets take it just a step or two further. Create a new layer above the Photo layer called Black Edges and add a clipping mask to it just like we did in the last step (you should now have two layers clipped to the Photo Edges layer).
Press the M key to switch to the Rectangular Marquee tool and draw a selection inside the photo frame. This selection will define where the black edges end. Notice that my selection includes small amounts of the distressing we’ve done at the edges, but I’ve still left a decent sized frame around the edge.
Step 12
Next we’ll soften the edge of the selection a bit by choosing Select>Modify>Feather from the main menu (in some older versions of PS the Feature option was just in the Select menu). Set a feather of 3px and click OK.
If we filled our selection right now, we’d black out our photo, so we need to invert the selection. You can do this easily by pressing Command-Shift-I (PC: Ctrl-Shift-I). Now that everything outside of our original selection is selected, simply fill the selection with the foreground color, which should still be black, by pressing Option-Delete (PC: Alt-Backspace). When you’re done press Command-D (PC: Ctrl-D) to deselect.

Step 13
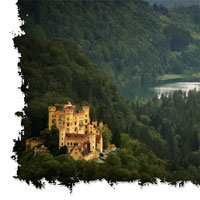
If you wanted, you could add additional clipped layers and using your black brush add some more distressing to the photo edges, maybe add a vignette… but for this lesson, we’ve reached our finished product, a nice grungy photo frame created using a single brush.

Lesson Files + Additional Resources
Download the free .PSD file and other lesson files Right Here.
Check out the Photo Borders Cagegory for free downloadable Photo Borders and Photo Edges.
Tell Your Friends
More in Photo Effects


41 Responses to Grunge Photo Edges
Jenny Stewart
January 7th, 2009 at 11:30 pm
This is great! I have always wanted to make my own borders, so I will give this a shot! Thanks so much :)
SSV
January 8th, 2009 at 3:29 am
Nice effect. Definately gonna try i out :-)
moih60
January 8th, 2009 at 7:13 am
thanx …iam being looking for that for long time .finally i found it ;D
SA Web Design
January 8th, 2009 at 10:15 am
Very cool look and so easy to do once you know how. Thanks for sharing your talent.
ilias
January 8th, 2009 at 6:02 pm
Nice ‘n easy tut. Thanks!
It would be great if you could do a videotut or two. I find them much easier to understand/follow.
Keep up the good work!
Mchilly
January 11th, 2009 at 10:14 pm
This is cool, I love this effect!
Karla
January 15th, 2009 at 5:41 pm
awesome!
CORNELIUS
January 16th, 2009 at 4:11 am
Well done,thank you.
sandra
January 24th, 2009 at 5:32 pm
this is soo goood!!! where did u get that brush set??????
dara
January 26th, 2009 at 3:01 pm
great very great, you’re the boss !!!
Tracey
February 4th, 2009 at 11:03 pm
Terrific….helpful, easy to follow. Thanks!
Sarai
February 24th, 2009 at 11:31 pm
This is awesome! I’ve found it very helpful to make borders for some textures I’ve been making. Thank you! :D
professional photo retouching
March 22nd, 2009 at 5:58 am
really nice borders in this picture
Johnson Koh
April 3rd, 2009 at 4:57 am
This is very detailed and useful. Thanks Hero!
sally
April 21st, 2009 at 8:44 am
yayyyyeeee
Ann Renee Lighter
May 6th, 2009 at 11:37 am
Thanks for another great tutorial!
I’m sending you a small payment in appreciation. I know this took lots of time to put together and we are all benefitting from your generosity.
Deborah
May 12th, 2009 at 4:28 pm
Masks are still a bit mysterious to me, but going through tutorials like this on your website is bringing it more and more into focus! Thanks for your kindness in sharing all this info with us!
luycas
June 6th, 2009 at 6:16 am
googd effect,i will try it out,thanks^^
NATHALY
June 18th, 2009 at 11:08 am
OOOOOOOOHHHHHHHH YEAAAAAAAHHHH!!!!!!
jignesh paatel
June 26th, 2009 at 7:21 am
mind blowing! Thanks!
chris
July 5th, 2009 at 8:30 pm
Hi there!!!!, can you post some photo retouching,big size pictures from small size without compromising on the picture quality.
Gabriel
July 9th, 2009 at 7:38 am
Good photo
HERO
July 10th, 2009 at 9:35 am
CHRIS, Anytime you enlarge a small picture you’re going to loose quality because by increasing the size you are forcing Photoshop to essentially make-up pixels to fill in the gaps. There are programs out there like Genuine Fractals by OnOne Software that do a better job than Photoshop, but it will never be as good as having a large image to begin with.
Kathryn
July 12th, 2009 at 2:57 pm
Hi. Thank you for the brush, and for the instructions. First effort worked quite satisfactorily. That’s the proof of a good tutorial, in my mind.
Sorry I can’t leave anything in the tip jar at this time. Paypal account is empty until I am working again. Caught in the general flow of current economy, like many.
Kathryn
Denver Photographer
August 20th, 2009 at 11:23 am
I love the idea of using a brush to create this edge. I usually use textures that i’ve created over the years, but I really like the look of this. Gonna have to try it. Thanks again.
Fuad Ahasan Chowdhury
August 23rd, 2009 at 3:43 am
I love the way you use this effects. I’ve using a few plugins and filter.. but I like it most.
Pradeep
October 12th, 2009 at 9:42 pm
Thanks a ton for this! very very helpful.
canvas art
November 3rd, 2009 at 4:07 pm
cool borders, love them!!!will def try out
Andr?© Weigel
November 4th, 2009 at 5:04 am
Wow… very nice tutorial and so easy !
Thank you !
ellen
December 3rd, 2009 at 10:49 am
hurray it worked, thanks for your easy to understand tuut I’ve been struggling with masks for ages.
Michelle
December 3rd, 2009 at 5:15 pm
Very helpful. Just what I was looking for. Just starting to dive into more creative endeavors in PS beyond just making my pics look sharp, color balanced and well composed.
Tony
January 14th, 2010 at 5:56 pm
Mmm…didnt work for me ! I ended up with a grungy pattern that still had a smooth curved border around the edge.
Obviously user error !
Neil
January 17th, 2010 at 6:09 pm
Fantastic. Thanks. I am a retired teacher and I can spot a great teacher and you are such a one, that’s for sure.
One thing I found was that by adding a layer style to the background layer you can get some great effects.
Gay guy
February 18th, 2010 at 10:00 am
Just what I have been looking for and easy to follow. Thanks
emlak ilan
March 6th, 2010 at 4:15 am
This is very detailed and useful. Thanks Hero!
minhtriet
July 17th, 2010 at 12:49 pm
i have nothing more to say but thank you so much. i’ve learned much from you, thanks!
Property in Turkey
August 6th, 2010 at 3:59 am
I’ve found it very helpful to make borders for some textures I’ve been making.
Rokaiya Yeasmin Munni
October 18th, 2010 at 4:54 am
Great job! thanks for sharing.
Kelly
November 15th, 2010 at 10:44 pm
I LOVE this tutorial! This was one of the biggest time/money savers for my bands press kit. I am just a beginner, but this was soooo easy to follow. My band loves it, I love it and I hope the fans and media love it!
You are a lifesaver!
-Kelly/7envy
bryan
February 25th, 2011 at 9:54 am
sure beats having to go out and buy edges or frames
ezzuhadka
September 25th, 2011 at 11:50 pm
coolest tutorial…thanks