


Vector Coffee Cup
In this tutorial you will learn how to create a vector coffee cup in Photoshop by using Vector Masks. You will need a working knowledge of the pen and gradient tools for this tutorial.Step 1
When creating a vector element in Photoshop I always like to have a piece of reference material to get me started. It makes the process easier and gives me a guage as to how well I’ve pulled off the effect. In this tutorial we will be creating a vector coffee cup like the one below from the good folks at iStockPhoto. Go ahead and copy and past this coffee cup into your new document if you want to follow along at home.

Step 2
Enlarge the photo so it’s easy to see. We will be tracing all the sections of this cup with the pen tool in a minute so it’s important to have the file large enough that it’s easily traceable. Each section will get it’s own layer and it’s own vector mask.

Step 3
Start by using the pen tool to draw a selection around the inside and outside of the rim of the mug.
With the selection made we can now convert this path to a Vector Mask by right clicking on one of the paths and choosing the option Create Vector Mask from the drop-down menu. Doing this will add a vector mask next to the thumbnail in the layers palette similar to adding a basic layer mask. The difference is that a vector mask is based on the mathematical path data rather than on the pixels of the layer.
We can see that the rim of the cup has a gradient so lets go ahead and use the eye-dropper tool to set the foreground color to the darker color on the right of the rim and the background to the lighter shade on the left. With the layer selected, use the gradient tool to drag a linear gradient from right to left filling the layer. You will notice that because we have a vector mask associated with this layer, only the rim of the glass gets the gradient, but on the layer thumbnail it is obvious that the whole layer has a gradient. You can right click on the vector mask icon in the layers palette to disable or inable the mask as well.

Step 4
The selection is filled with the new gradient now and we’re ready to head to the next step. Notice I haven’t worked around the steam coming off the cup, so the portion that is on the reference layer has been covered up by the new rim of the cup. This is fine, we can always place a layer above the rim layer to put the steam swirls back in, but I’m opting to leave them out of this tutorial.

Step 5
Lets tackle the main body of the cup next. Place a new layer below the Cup Rim layer called Cup Body and trace the parimeter with the pen tool. You don’t need to worry about how you trace the top of this area because it will be hidden by Cup Rim layer.

Step 6
Again, right click on the path to create a vector mask (*note: you must have the pen tool selected to get this option in the menu).
Sample the light and dark areas of the cup body just like we did in step number 4 and then using a radial gradient this time, start at the center of the highlight and drag away to create the desired look. By turning off the background layer (and adding a background layer of the same yellow) you can see what we’ve done so far.

Step 7
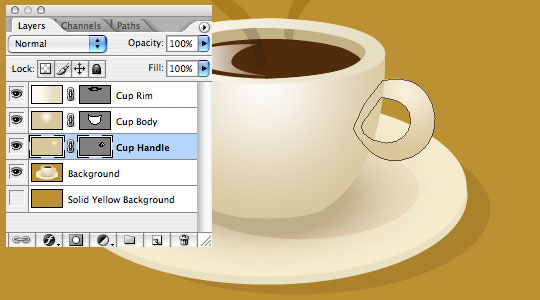
Next the Cup Handle layer is created, traced and a radial gradient added. I’ve included my layers palette in the illustration below. Notice that I’m not tracing the overlapping areas tightly, it’s better to have overlapping than gapping.
Step 8
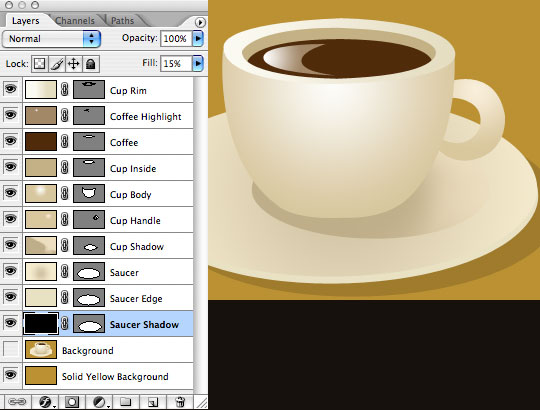
Repeat this process for each of the other elements in the cup and saucer, concluding with the saucer’s shadow. I opted not to do the steam. Here’s my final version with my layers palette.
One thing to consider in this particular example is the shadow cast by the saucer onto the background layer. Instead of filling it with a solid dark orange like the background, I filled it with black and then dropped the opacity to 15%, that way no matter what background you place this piece on, it will be a shadow.
Step 9
My final tip would be to place all the layers that make up the cup into a group by selecting all of them and pressing Command+G (CTRL+G on PC). With the layers all in a group it’s a snap to transform and move them as a complete unit. At this point the coffee cup is a complete vector graphic and can be sized large or small with no pixelization AND can be re-sized at any time without consequence either.
Hey, I have an idea! Lets add another step!

Step 10
I’m thinking maybe it would be a cool idea to create some light rays behind the cup and maybe resize it with some text to make a cool little banner.
Open a new file 600×600 with a transparent background, place a guide directly in the center and proceed to place 20×600 white bars from exact center 20 pixels apart in each direction from the center. (I put in a yellow background so you can see the white lines, but your backround should be transparent.

Step 11
Now click Filter>Disort>Polar Coordinates and select Rectangular to Polar and click OK (who knew it would be that easy?)

Step 12
Drag that layer over into your coffee cup document, put it above the background layer, maybe add a radial gradient map from the center so the rays fade away, add some fun text and here you go. Great job!
Now that you know how to create vectors in Photoshop there are a million things you can do better than before!

Lesson Files + Additional Resources
Download the free .PSD file and other lesson files Right Here.
Tell Your Friends
More in Graphic Design


5 Responses to Vector Coffee Cup
Rori
November 19th, 2007 at 1:21 pm
Brilliant! Your site rocks!
Rafeek
July 7th, 2008 at 10:24 am
i like it :).. step 10&11 very good idea ;)
josh
October 20th, 2008 at 9:12 am
fantastic…….work….next time more and easy tuts for illustator……….please???
Steven
November 4th, 2008 at 4:12 am
Thanks, exactely what I was looking for. I’m NOT a graphical artist. I needed this for an exhibition I’m working on, about fair trade coffee.
Do you have any idea where I can find a vector chocolate bar? Can’t find it anywhere.
Greeting form Belgium!
Steven
lw
December 4th, 2009 at 8:45 pm
you are so cool! many thnks!!!