


Wrapping Text Around An Object
In this Photoshop tutorial I'll show you how to wrap text around an object like you can in Illustrator or InDesign using simple paths and a little creativity... well that plus a working knowledge of the pen tool.Step 1
Here I have a nice little image from the iStockPhoto dollar bin. I’d like to wrap test to the right of the hand pretty closely but Photoshop doesn’t come equipped with a text wrap feature like you’d find in Adobe Illustrator or Adobe InDesign. Although we can’t literally "wrap" the text around the object, we can create a series of overlapping paths that will act as a container for our text and thus allow us to pseudo-wrap the text to get the desired wrapping effect.

Step 2
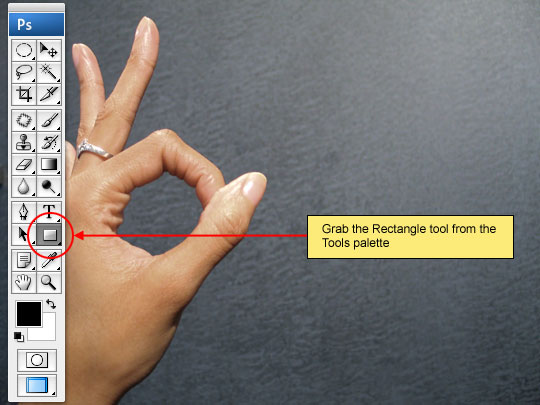
The first order of business is to select the general area where our text will live, so lets grab the Rectangle tool from the Tools Palette, this is not the Rectangular Marquee tool, but rather the Rectangle tool found in the Custom Shapes area of the Tools palette.
Step 3
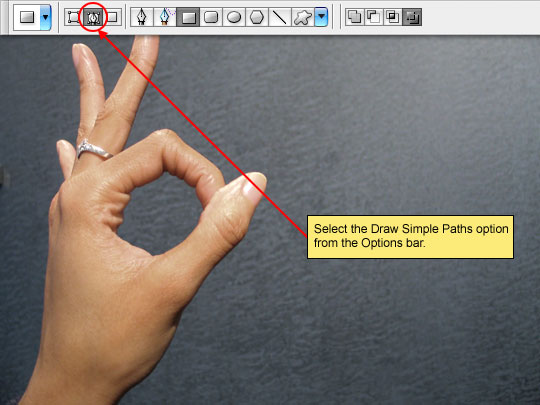
Now we need to set the Path options, in the Options bar. Photoshop gives us 3 path options to choose from. From left to right the options are to draw vector shapes, draw simple paths and draw pixel-based objects. We will be using option number two (draw simple paths), so select that option from the Options bar.
Step 4
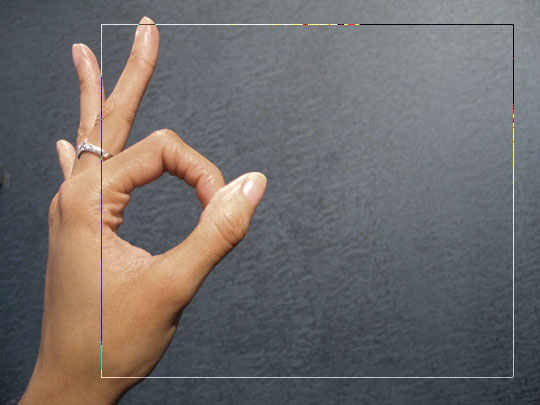
With the Rectangle tool’s options set, go ahead and click and drag out the main bounding box for the text. We will be subtracting areas from this selection in the next few steps, so the important thing is to make sure that this box is the right size for all the text to fit inside.
Step 5
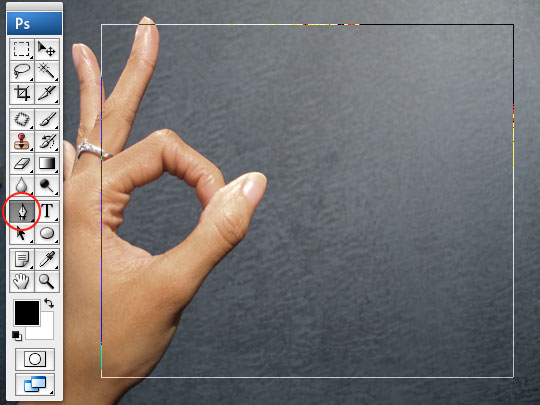
Notice that my rectangle encompass part of the hand and if we were to place text within the rectangle it obviously wouldn’t wrap around it. If the object we were going to wrap text around had been a ball or an apple the next step would be much easier, but I wanted to show you a complex object because in the real world we don’t often get to work with perfect circles and squares.
To solve this problem I’m going to go to the Tools palette again, this time to grab the Pen Tool.
Step 6
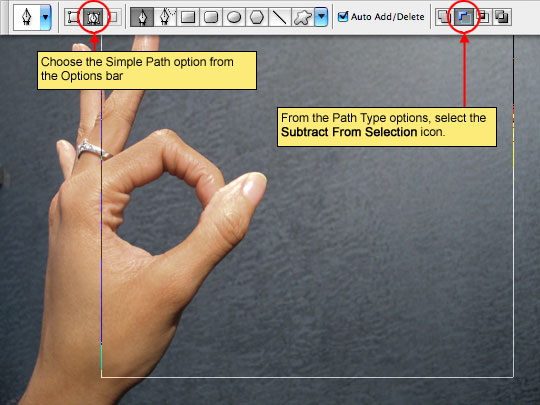
With the Pen tool selected, go up to the Options bar and make sure that the Simple Paths option is still selected. While you’re looking at the Options bar, look to the right where the 4 path overlap style icons live and choose the one called Subtract From Path Area. (*note: if you leave your mouse over each icon, the tool tip will pop up to tell you what each one does.)
Step 7
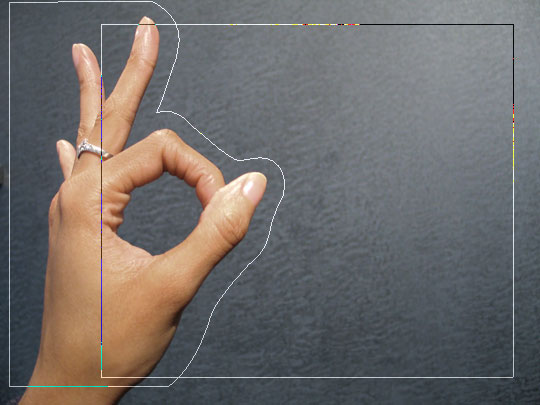
Using the pen tool, trace a nice area around the object, be sure to leave a little breathing room between the path and the object unless you want your text to sit tightly against it. If you’re not comfortable using the Pen tool, and most folks aren’t, I’d seriously recommend spending some quality time with the tool getting good with it. You’d be surprised how often this little baby comes in handy.
Step 8
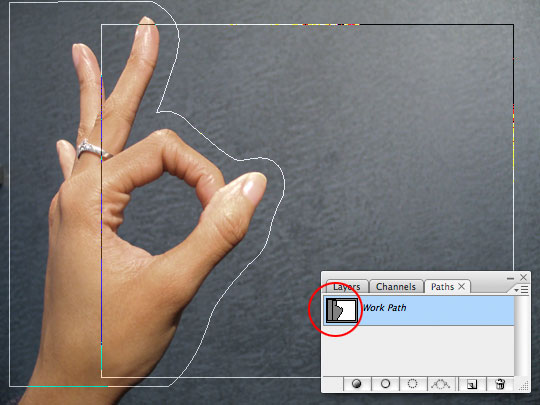
At this point it looks as if I have two separate paths living on the stage, the original rectangle and the newly drawn outline of the hand, but a quick glance into the Paths palette shows us that the new path has indeed been subtracted from the original path (look at the thumbnail next to the path’s name).
Step 9
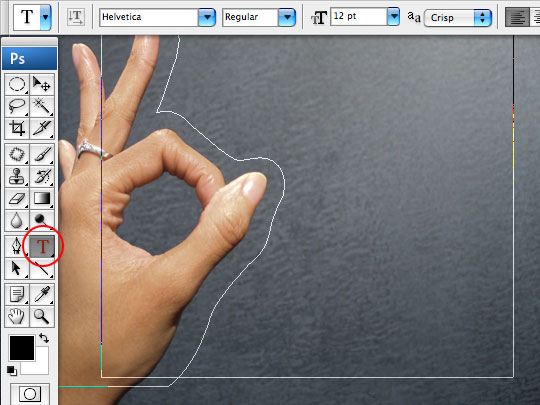
Select the Text tool from the Tools palette by pressing the T key, then choose the font, size and color from the options bar as shown.
Step 10
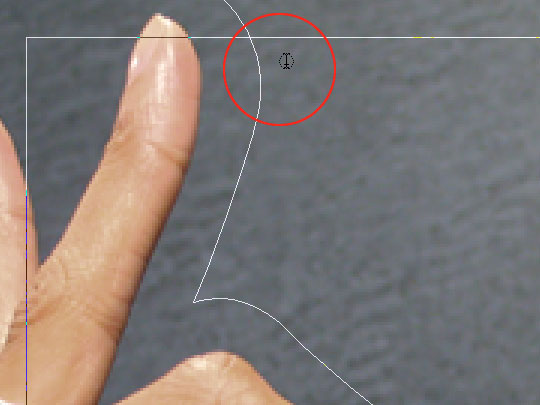
To use the path I’ve created as a container for my text, all I need to do is move my cursor anywhere inside the active path area. When I do that, my Type Tool cursor changes from having a dotted square outline around it to a dotted elliptical outline, indicating that the path will become my text container if I click here and start typing.
Step 11
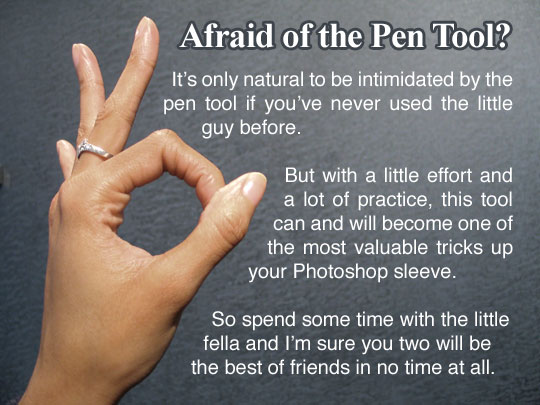
You can see that as soon as text is placed inside the path area, the path automatically defines the space for all the text.

Step 12
Ok, you’re right, this has to be one of the ugliest finished products I’ve posted… but the technique is a valuable one that I’m sure you’ll find uses for often.
Lesson Files + Additional Resources
Download the free .PSD file and other lesson files Right Here.
Tell Your Friends
More in Graphic Design


22 Responses to Wrapping Text Around An Object
Chad
February 16th, 2008 at 10:16 am
I had no idea you could do this! Thanks for another great tutorial!
Denver Web Design
March 14th, 2008 at 4:56 pm
Very very good tutorial. I didn’t know you could do this! It’ll save a lot of time
ben
March 16th, 2008 at 2:27 pm
great tip, i was just wondering how to do this the other day
Reuben
April 2nd, 2008 at 12:34 pm
this is one of the best tip ever.. simple!
BTW, i’m trying to do my university’s year book with Photoshop CS3 – is it recommended? or is indesign or illustrator better?
Reuben
Garry
June 26th, 2008 at 1:56 pm
Thank you so much for this, it’s been buging me for ages.
John
June 26th, 2008 at 8:36 pm
Not For Photoshop 7
HERO
June 26th, 2008 at 9:43 pm
JOHN,
With all due respect, Photoshop 7 was released in early 2002 and in the six (6) years since then Adobe has graced us with PS8, PS9, CS, CS2 and now CS3. You’re using a version that’s 6 generations old… Perhaps it’s time for an upgrade?
Htoo Tay Zar
June 30th, 2008 at 4:56 am
Ohh! Man Great Post, Thanks for this tip!!
Bearius
July 15th, 2008 at 9:32 am
I can always count on your site to find the answers to my design questions. Thanks for all the great work Hero!!!!
HERO
July 15th, 2008 at 9:39 am
BEARIUS,
I’m glad you found what you were looking for! I’m always stoked to hear that what I’m doing here helps!
Boomtastic
July 21st, 2008 at 9:31 pm
Wow one word describes the jer right now.
STOKED!
erik
September 2nd, 2008 at 3:41 pm
Awesome! I just started using photoshop for a course I am taking at college- I have done almost every tutorial you have on your site and I already feel way ahead of the class thanks to your tutorials. Thanks!
Keep it up!
YUSRIE
October 18th, 2008 at 11:12 am
thanks. i have looking so long how to make like this…awesome !!
pearlie
December 2nd, 2008 at 6:57 pm
I just stumbled upon this site, and this is only the second tut I’ve read, but I have already bookmarked the site. Thanks so much -I also had no idea you could ‘wrap’ in photoshop! Very cool. I’m an oldfashioned Quark fan, and still fairly new to ps, so this is a great trick to know.
Bellatrix
December 21st, 2008 at 12:16 pm
Great post!!! Never thought of something like this, before when I had to wrap text around an image I would work the image first in Photoshop and then add the text in inDesign…blah!
Great! Many thanks!
Bellatrix
Becky
January 3rd, 2009 at 8:54 am
Great tutorial. I will be sharing your website with others. I knew how to do this in InDesign, and in PS how to put text inside a shape. But this is just what I needed today, THANKS!
Chard
March 5th, 2009 at 8:40 pm
Nice! is there a way to do this a website without using photoshop? maybie css?
HERO
March 8th, 2009 at 10:16 am
CHARD, There is a way to do this with a CSS and image float combo routine in CSS, but it’s a little hokey and isn’t always appropriate. The theory is to slice your image into small horizontal pieces, each only wide enough to encompass your graphic, then float them left or right in your paragraph so that the text is forced to conform to the varying edge profiles.
Like I said, possible, but a cheezy workaround at best right now and you still won’t get the same smooth effect that the Photoshop method will.
DENNIS
July 19th, 2009 at 3:31 am
I always used to do these things with indesign, but this like really suprising to me. I know about the type tool but i had no idea you could also use it in a vertical way.. guess it never came up in me to try it out.
Thanks for the great tutorials Hero!
Samira
August 29th, 2009 at 12:19 pm
Great tutorial! I now know how to use the pen tool!
James Montealegre - Freelance Web Developer
April 9th, 2010 at 9:49 pm
Useful tip. A great solution for wrapping the text in PS. I use to it via the CSS, now I can draft a design with text within Photoshop.
Great tutorial.
James
Denise Weston
July 28th, 2011 at 8:35 pm
Brilliant tutorial! Thanks!