


Pencil It In
It seems like the big thing to do these days is play handmade objects and ideas from the physical world into graphic and web designs, so in this tutorial you\'ll learn how to add pencil drawn elements into your designs.Introduction
But what if you’re person who can’t draw a stick figure to save your life? Do you always loose at Pictionary? No problem! I’ll show you how to cheat your way through to awesome results even if you’re crap with a pencil!
(*note: If you’re going to play along at home, you’ll need a printer and scanner.)
Step 1
So how about I stop pointing out your stick figure shortcomings, and lets get started.
First things first… you’ll need to decide what sort of hand drawn element you want to add to your design. Whether it’s a simple bit of handwritten text or a complex drawing, knowing what you want is the first step. I’ve decided to draw an old banner style element, but like you I’ve spent too much time with a mouse and too little time with a pencil lately, so here’s what we’re going to do:
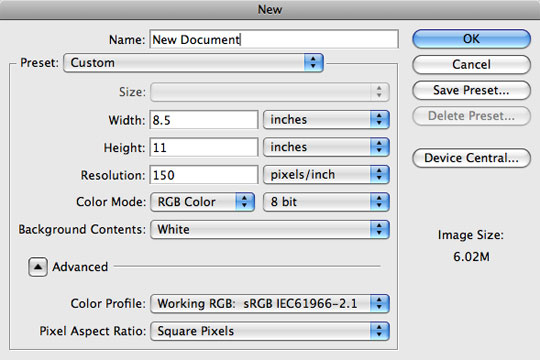
Open up a new Photoshop document by pressing Command-N (PC: Ctrl-N). When the New Document dialog appears choose US Paper from the Preset drop-down menu, change the ppi setting to 150 and click OK.
Step 2
With this new document we’re going to create a graphical version of what we want to be drawn into our design. We’re doing this because we’re going to take a step back to high school art class and do some tracing in the next step.
I’m going to use one of the custom shapes from my popular Heraldic Shapes custom shape set, but you can use anything you’d like. Feel free to add text, shapes, even photos if you’re feeling ambitious. My only pointer here would be that this is easiest if your design is in black and white. Make your design nice and big so it’ll be easy to trace (you can always shrink it to fit your design).
I also rotated my canvas so that I could work horizontally by choosing Image>Rotate Canvas>90° CW from the main menu. If you do this, don’t forget to rotate it back before moving on to the next step.

Step 3
When you’ve got your design all done, choose File>Print from the main menu to print out a hard copy.
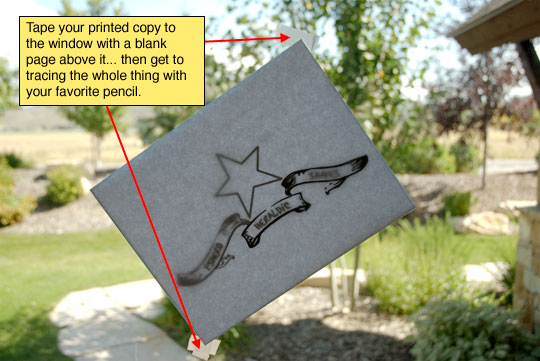
With the printed out design in your hot little hands, grab a blank piece of paper and some tape and go find yourself a window that has light coming through it (unless of course you’re one of the cool kids that has a light table at home). Tape the paper with your printed design onto the window at a level that will be easy for you to draw then tape the blank paper over the top and SHAZAM! you’ve got a light table of your very own!
Sharpen up that #2 pencil and get to tracing! When you’re done, pull your mess down from the window, remove the tape from the edges and move on to Step 4.
Step 4
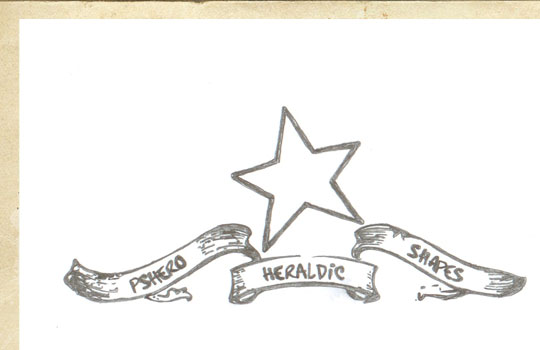
Ok, now take that beautifully traced page over to the scanner (I told you you’d need one, remember?). Scan the page using the scanner’s "Photo" setting, this will ensure that you capture all the levels of gray that your pencil put down and will give the depth to the final result to be convincing. Save the scan as a .jpg or .tiff at at least 150ppi.

Step 5
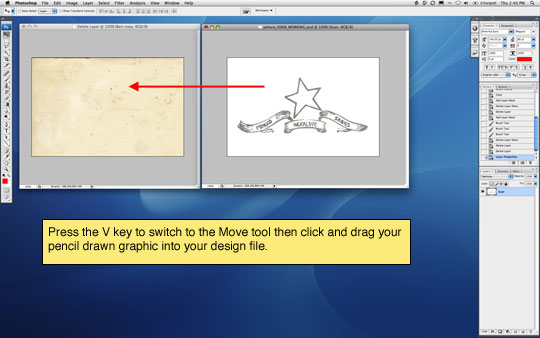
Now back to Photoshop where you’ll need to open the design you want to place your pencil drawing into as well as the pencil drawing we just scanned. Since I want to be able to show you a full scale version, I’ve created a small file with an aged paper background. If you’re interested in how to create one of your own, check out my Creating Old Paper With Custom Brushes tutorial.
Arrange your two photoshop windows so that you can see them both, press the V key to switch to the Move tool, then click and drag your scanned pencil drawing into your design document.
Step 6
It’s quite possible that your drawing is way too big when you get it into your design document so press Command-T (PC: Ctrl-T) to activate the Free Transform tool. Holding down the Shift key to constrain the dimensions of your pencil drawing, click and drag from the corners until you’ve got it sized correctly then commit the transformation by hitting the Return (PC: Enter) key on your keyboard.
Step 7
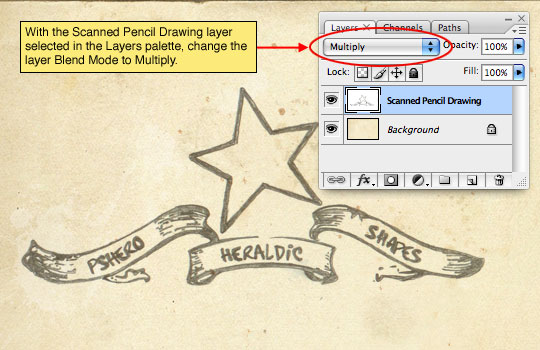
Obviously all that white background needs to be dealt with now, and this is the easy part. Make sure that the layer with your pencil drawing is active in the Layers palette and change the Blend Mode of the layer to Multiply. Depending on your background you may want to lower the layer opacity a little as well.
(*note: The Color Burn and Linear Burn blend modes can also produce good results depending on your background.)
Step 8
And there you have it! You’ve just added a pencil sketch into your design AND you’ve made people think you actually know how to draw!

Lesson Files + Additional Resources
Download the free .PSD file and other lesson files Right Here.
Tell Your Friends
More in Graphic Design


20 Responses to Pencil It In
Paulo Sales
September 18th, 2008 at 5:43 pm
great trick, whit a magical touch…and really usefull tut for those who are affraid of sketching
final result here is very cool..thks a lot for allways make this tutorials a surprise and most of the time really a great source of knowledge.
Best regards from Lisbon!
.
Jac Hill
September 18th, 2008 at 6:29 pm
Very nice. I’ve been wondering how certain sites achieved that effect, thanks a lot.
Just out of curiosity, what did you use to trace your print-out? From the looks of the last image it doesn’t seem to be a normal pencil. To brush-like. Maybe I’m wrong.
HERO
September 18th, 2008 at 10:52 pm
Thanks PAULO, it’s always great to see your name come up in the comments!
HERO
September 18th, 2008 at 10:52 pm
JAC, nope, just a sort of dull #2 pencil. A little of the brush look may have been caused by the extreme resizing since I built the sketch at 8.5×11 inches and my final image is only 540px wide.
Prabhjeet Singh
September 21st, 2008 at 10:26 am
I love your site. I am from INDIA, I have seen your site before when it was in its starting days. But just now found your site again and I am impressed that it has great tutos to learn, I mostly visit at PSDTUTS.com but i have seen one big difference is the detail of your teaching. Great job HERO. Keep it up. And sorry for my bad english.
HERO
September 21st, 2008 at 12:42 pm
PRABHJEET, I’m glad you’ve found your way back to the site, and I appreciate your comments. Collis and the gang over at PSDTUTS do an amazing job and it’s an honor to be mentioned in the same sentence. I try hard to write my tutorials as deliberately and with as much regard for the novice Photoshop user as possible. It’s always nice when someone notices. Thanks.
Owain
September 24th, 2008 at 9:33 am
Hero I just want echo the words from PRABHJEET, I Class myself a noivce when it comes to using photoshop, But I find your tutorials are not only interesting but they are very detailed. I to visit Psd tuts and many other really cool Tut sites and I place yours high in my list..
Keep up the good work…
We are all benefiting from your generosity…
Ow
web-d
October 2nd, 2008 at 11:53 pm
wow!
just found this site!
im going to bookmark it!
I will be back for sure!
and about the tutorial – I have so much to learn… I neddedto do do something similar and now i know how…
J.T. Shaver
October 10th, 2008 at 11:57 am
Definitely a sweet idea. I hope I get a project that could use this technique sometime soon. Nice.
Shaver Design – Print, Identity, and Web Design
sere
November 9th, 2008 at 11:10 am
wow!!! :) I really LOVE your tutorials…
I agree with PRABHJEET, I mean,, your tutorials are explained step to step… You don’t miss anything!!! :) thanks!!!!
I really want to learn.. I spend hours and hours on it…. I’m just 15… luckyly.. I’ve got time!!!!!
ciao ciao
Kayla
December 8th, 2008 at 12:05 pm
Very nice, I’ll have to try it sometime.
I just need to find the motivation to draw something nice
Critic
January 10th, 2009 at 11:47 am
WOW, nice. Love your tutorials.
Erik Ford
January 29th, 2009 at 1:43 pm
Really nice tutorial. Would you mind if I took it to the next step and explain how you can take the hand drawn sketch and import it into Illustrator to create a vector version of it?
Keep up the good work.
HERO
January 29th, 2009 at 1:47 pm
ERIK, Please, be my guest!
Liz
February 15th, 2009 at 8:23 pm
Wow Hero, you are awesome! I just happened upon your website. Excellent stuff allround. You have been added to my favourite list. Easy to follow explanation. Perfect 10. Like Arnold says “I will be back”.
Thanks
Otzivi
January 12th, 2010 at 4:48 pm
An excellent and comprehensive tutorial – just super
Otzivi
January 12th, 2010 at 4:52 pm
Best tutorial – great job
Kinorobot
March 25th, 2010 at 5:10 am
Hm, thanks, I heard about this, but never seen. Try it now do so.
Grant
April 29th, 2010 at 10:53 am
Hi great tutorial helped me alot. Where can i get a angel wing brushe, but i want 1 not a whole batch. Keep up the great tutorials.
zela
February 22nd, 2011 at 10:59 pm
omg i love this like i totally do, do you think you could keep posting this amazing stuff because it i mean omg guys! LOL