

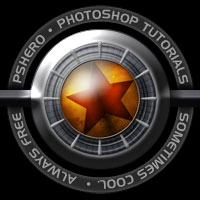
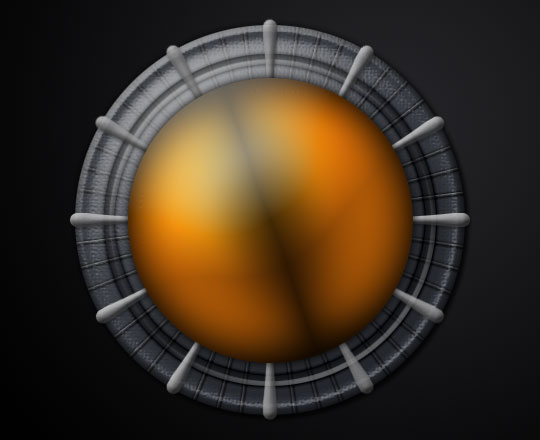
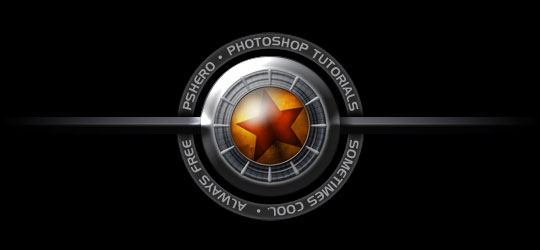
Glowing Orb With Dial
In this Photoshop tutorial we'll be experimenting with layers and styles to create a cool glowing orb and dial effect.Step 1
I’m starting with a document size of 540×400 at 72ppi and I’ve laid down a radial gradient in the background from #242427 to #005400.
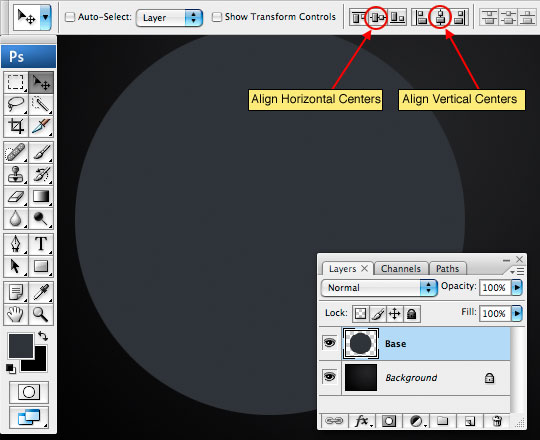
On a new layer which I’ll name Base I’ve created a perfectly round Elliptical Selection 390x390px and filled it with #2F323A and deselected. At this point I’m going to press Command-A (PC: Ctrl-A) to select the entire canvas, then V to switch to the Move tool. Using the Align Horizontal Centers and Align Vertical Centers buttons in the Move tool options bar at the top of Photoshop I’m going to center the circle on the stage. This step is very important because everything in the layers above will also use this centering technique to insure symmetry. So when I tell you to "Center" an object later in the lesson, you’ll know what I mean. Got it? Good.
(*note: If you haven’t selected the canvas, the centering buttons will be disabled.)
(*note: if you open up the Info palette by choosing Window>Info from the main menu, you’ll be able to see the exact size of any shape or selection as you create it. I promise this be useful in this lesson!)
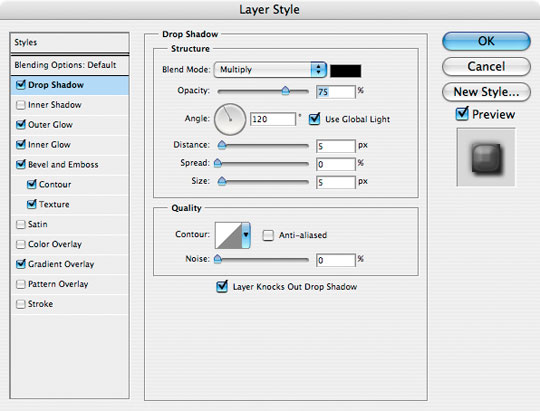
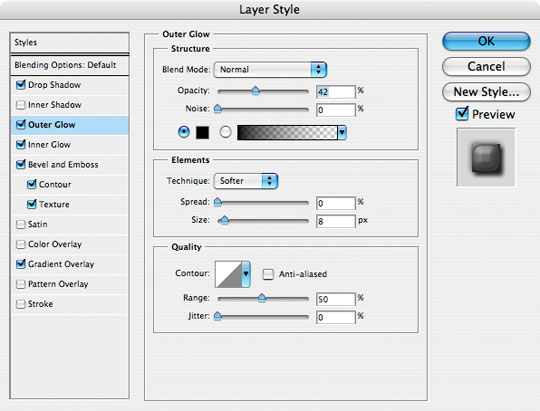
Step 2
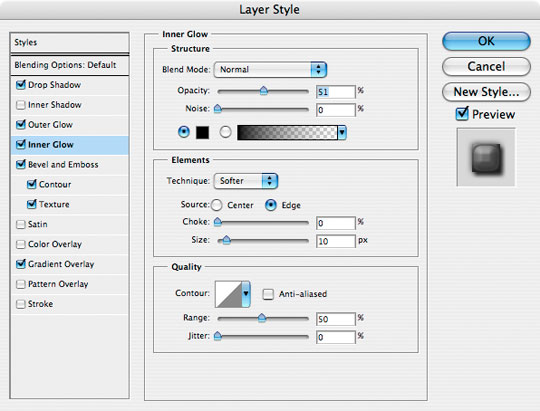
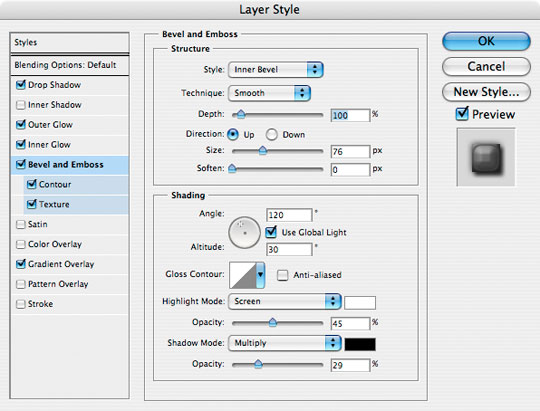
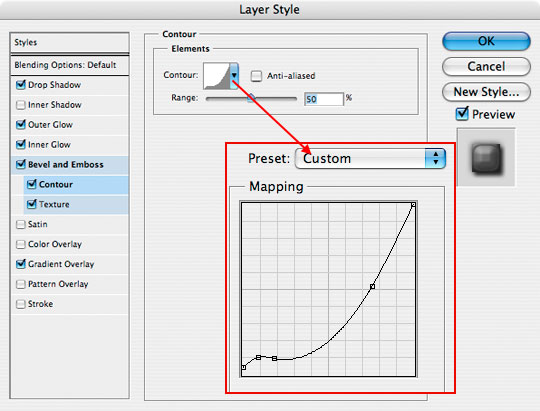
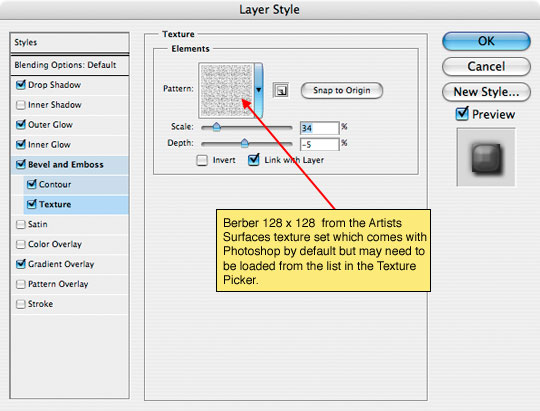
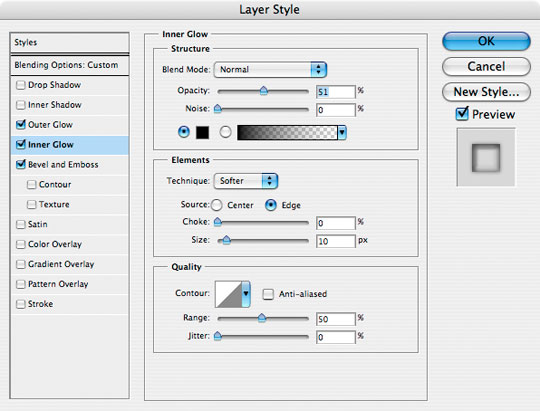
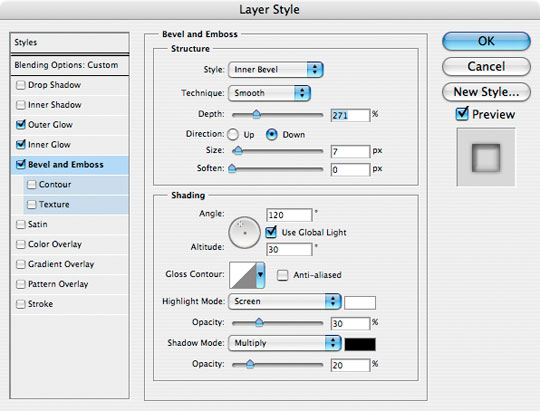
Next we’ll add a bunch of layer styles to give the Base layer the desired look. You can take creative liberties here, but these are the settings that looked best to my eye. Remember that the center will be covered up so we’re not too worried about how it looks. Hold on tight, we’ve got 7 styles to apply. Pay special attention to the Contour style as I’ve modified the shape of the contour to give the Bevel and Emboss the correct shape.
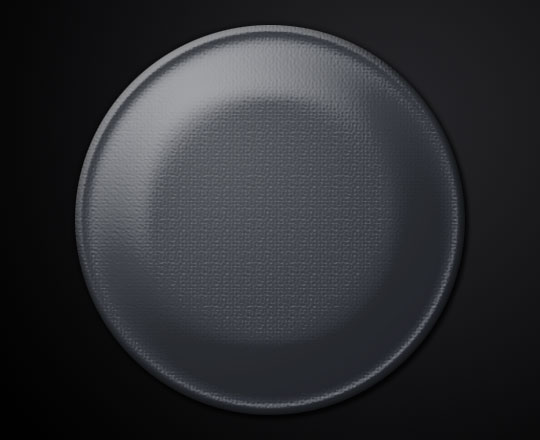
Step 3
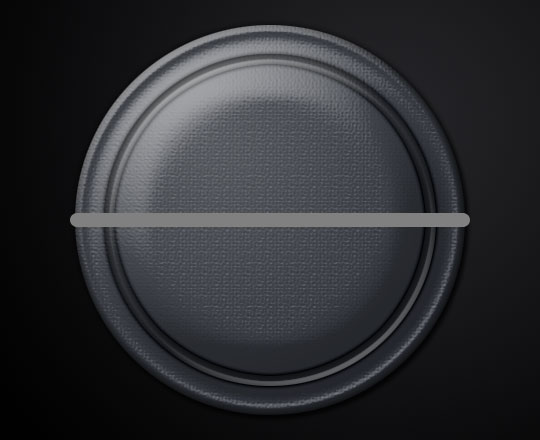
If you followed along closely, the Base layer should now look something like this.
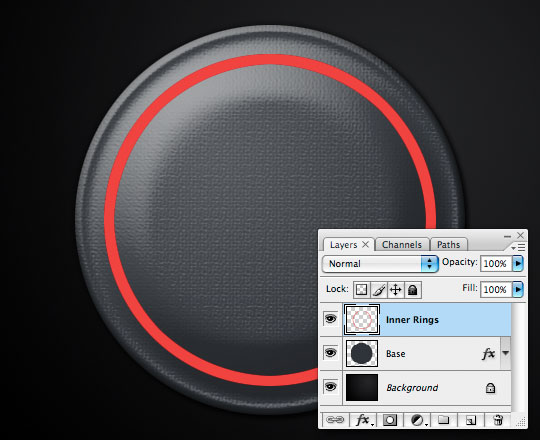
Step 4
Create a new layer called Inner Rings, on this layer select a circle 332×332, fill it with any color you’d like (we’ll set the fill to 0% so color doesn’t matter), contract your selection by 10 pixels by choosing Select>Modify>Contract from the main menu and press Delete (PC: Backspace) to remove the inner area then deselect by pressing Command-D (PC: Ctrl-D).
Center the ring by pressing V to invoke the Move tool, Command-A (PC: Ctrl-A) to select the entire canvas and then using the center buttons we talked about in Step 1, center the ring on the canvas.
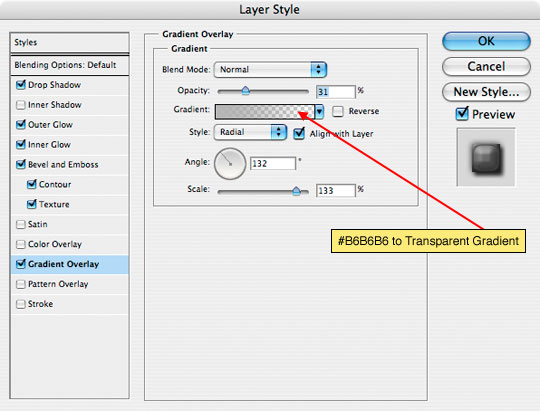
Step 5
In the layers palette, drop the Fill opacity to 0% and add the following layer styles.
Step 6
Now we’re going to create the large points which go around the base of our object. Create a new layer (don’t name it yet because we’re going to duplicate and rotate it a few times first). Switch to the custom shape tool by pressing the U key, then select the Rounded Rectangle option, set the Radius to 7 pixels, switch the foreground color to #808080 and then drag a 400×14 pixel Rounded Rectangle onto the stage. Don’t forget to center the object when you’re done creating it.
Because the corner radius is set to 7 pixels and we’re creating a 14 pixel tall object, the ends will come out perfectly round. Yeah, math is cool.
(*note: Again, open up the Info palette by choosing Window>Info from the main menu and you’ll be able to see the exact size of any shape or selection as you create it.)
Step 7
Now I’m going to cut a radius from the center of this object by creating an Elliptical selection with the Elliptical Marquee tool which measures 408×25 and I’ll position it at the top of our round edge rectangle and press Delete (PC: Backspace) to remove the overlapping area of my selection.

Step 8
With the Marquee tool still selected I’ll then use the Down Arrow key to move the selection to the bottom of the object and remove the same arc. When I’m done I’ll press Command-D (PC: Ctrl-D) to deselect. You should now have something like this.

Step 9
Now we’ll use this layer to create the rest of the marks around the perimeter of the base. I’ll show you how to do this really easily so pay attention here.
Press Command-J (PC: Ctrl-J) to duplicate the layer. Press Command-T (PC: Ctrl-T) to invoke the Free Transform tool. Holding the Shift key to constrain the rotation of the object, rotate it counter clockwise until you reach the second constraining point (each constrained rotation point is 15°, so we’re going to rotate a total of 30°). When you’ve rotated the object into position press Return (PC: Enter) to commit the transformation.
Ok, here comes the cool part. We can repeat this Duplicate and Transform process with a simple keyboard shortcut! Press Command-Option-Shift-T (PC: Ctrl-Alt-Shift-T) and Photoshop will automatically duplicate the layer and rotate it just like we did before. Do this 4 times and you’ll have all the perimeter marks done.

Step 10
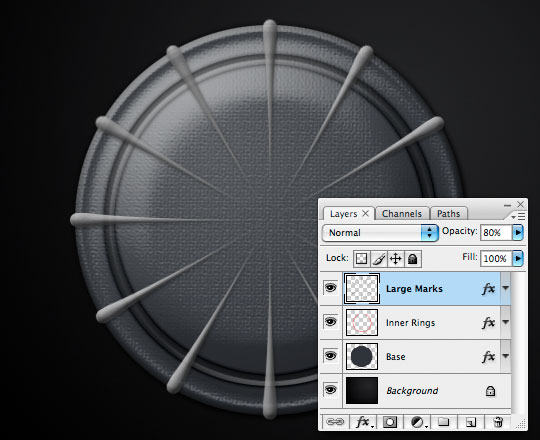
Ok, with all those marks made, lets select all 5 layers that we just made and press Command-E (PC: Ctrl-E) to merge those selected layers. I’ll name this new merged layer Large Marks.
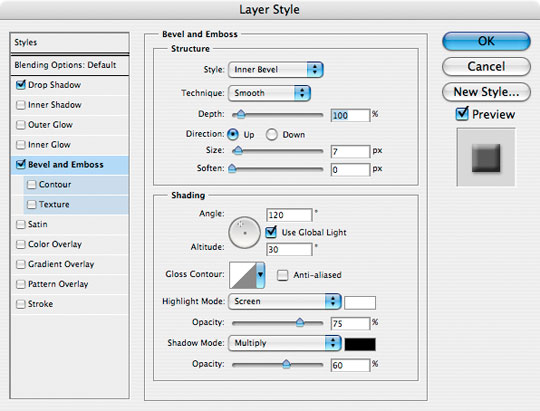
Like just about every object in this tutorial, we’re going to add a few layer styles. This time a simple Drop Shadow and Bevel and Emboss is all we’ll need.

Step 11
The overall effect of this layer is a touch too abrupt for my tastes, so I also lowered the layer Opacity to 80%, but I’m sure once we’ve reduced the size of our orb it probably won’t make much difference… the OCD makes me do this stuff, what can I say? Anyway, here’s where we are so far.
Step 12
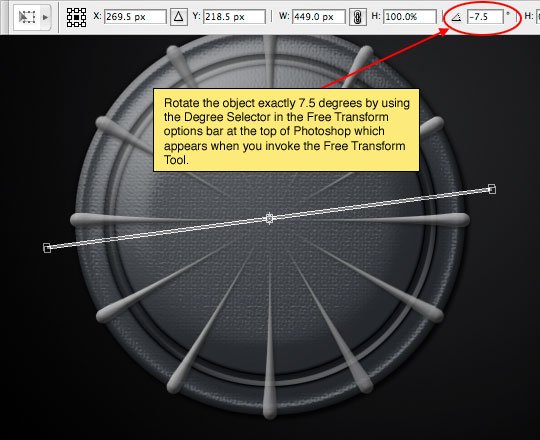
We’ll want to add a series of secondary marks between the large ones, but for cleanliness sake we’re going to mask them to the Base layer. Click on the Base layer and create a new layer above it (again, no need to go naming it since we’ll be creating a bunch more and merging them).
Create a Rectangular selection wider than the Base but only 3 pixels high and fill it with any color you’d like. Obviously we don’t want our first small mark to be on top of the large marks we just made, and since our large marks are 30° apart, lets place our small marks at 7.5° increments so they fit between the large ones nicely and we’ll have 3 small marks for every large one. Press Command-T to invoke the Free Transform tool and rotate the object -7.5°. The easy way to make sure it’s exactly -7.5° is to use the Degree field in the Transformation Options at the top of Photoshop.
Step 13
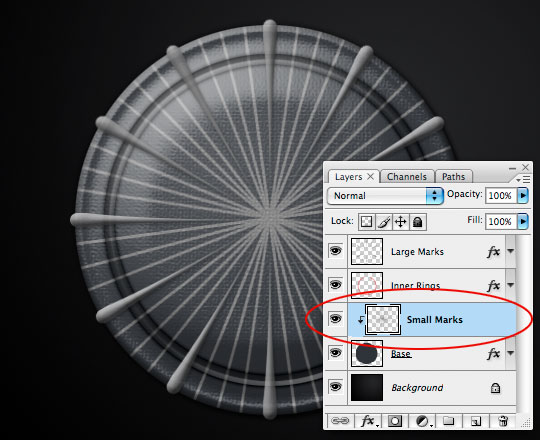
Using what you learned in Step 9, center the object on the stage and duplicate and transform this layer until you’ve got 3 small lines between every large one. Then merge all those layers and call the merged layer Small Marks. To clean up the edges lets also create a clipping mask from the Small Marks layer to the Base layer by Command-Clicking (PC: Right-Clicking) on the Small Marks layer and choosing Create Clipping Mask from the menu.
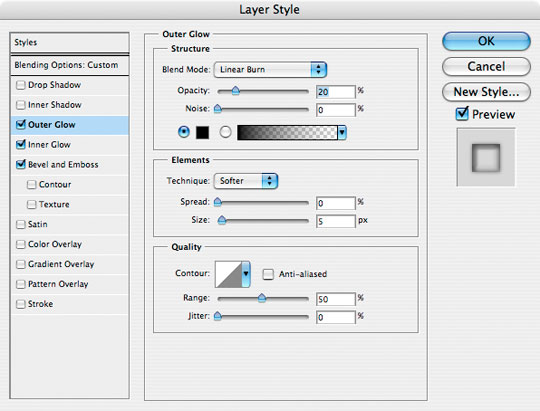
Step 14
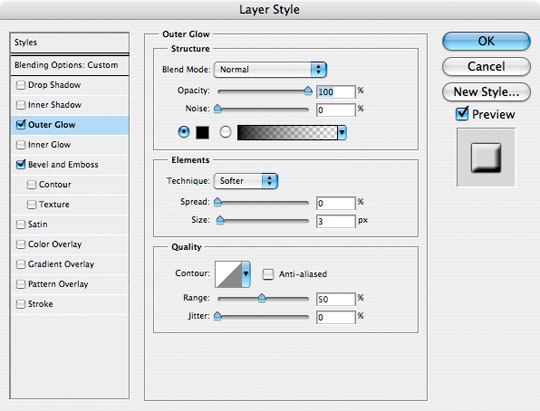
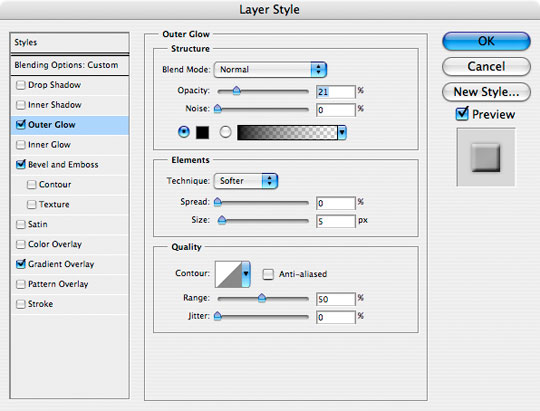
Drop the Small Marks layer’s Fill opacity to 0% and add the following Outer Glow and Bevel and Emboss layer styles.

Step 15
Its now time to add the big orange orb that will sit on top of the mess we’ve just made. Click on the Large Marks layer (or whatever you called the top layer in your file) and create a new layer above it called Orange Orb. On this new layer create an Elliptical selection 285×285 pixels and fill it with #fB9F0E. Deselect and center.
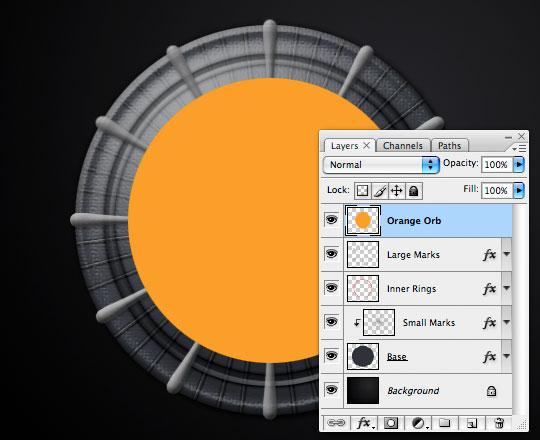
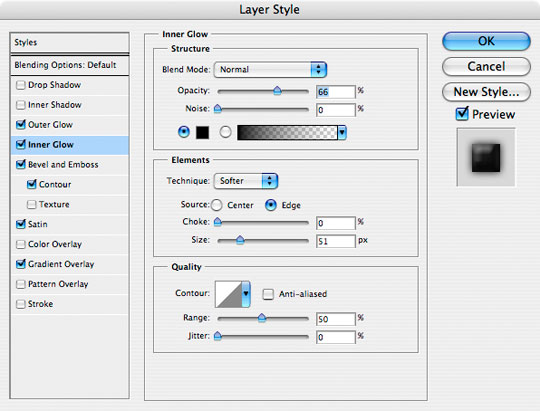
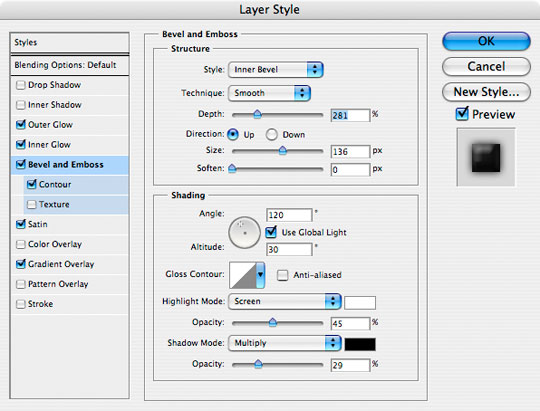
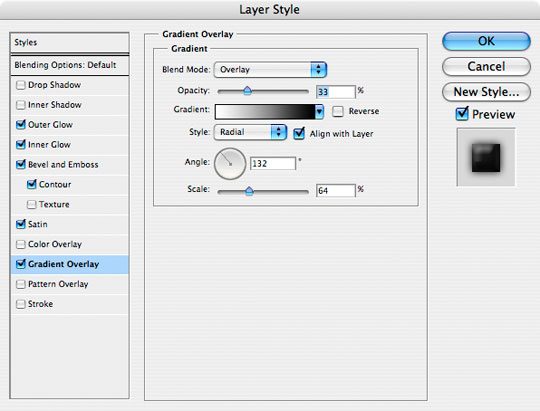
Step 16
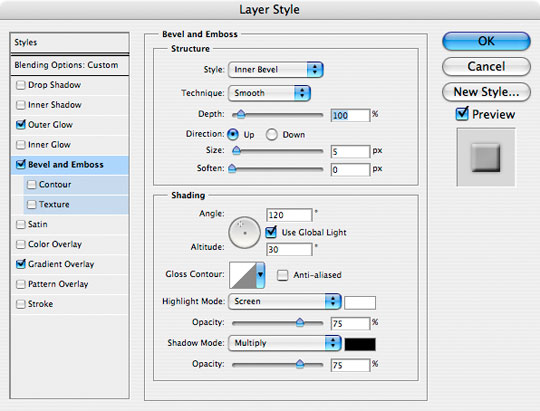
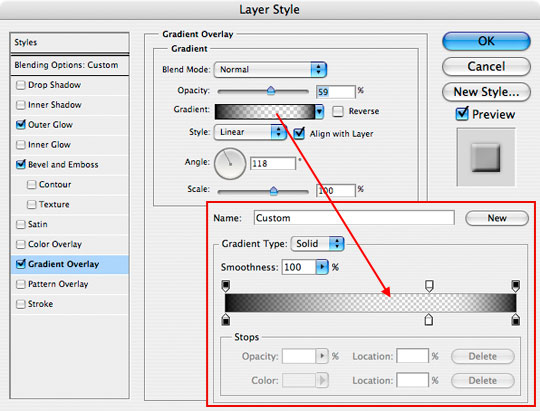
Yep, you guessed it… It’s time for another long list of Layer Styles! These will give the Orange Orb layer depth, shadows and a really cool effect using the Satin layer style. Check every setting to make sure you get everything right the first time. Here we go…


Step 17
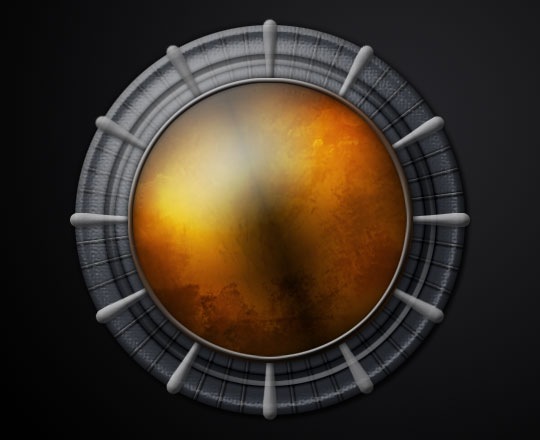
If you got it all right, your orb should look something like this.
Step 18
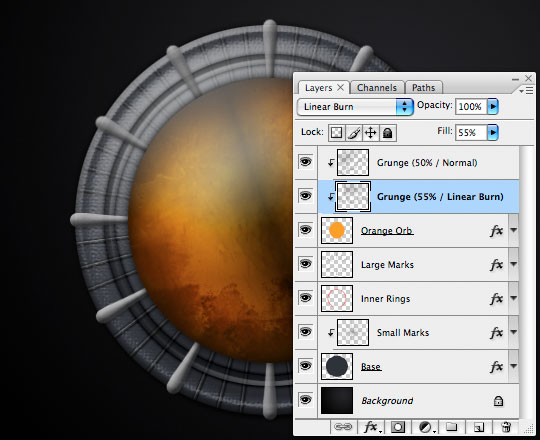
I want my orb to have a little more variation, so I’ve created two layers and painted on them with some of my grunge brushes. One layer is 50% Opacity with a blend mode of Normal, the other is set to 55% Opacity with a Blend Mode of Linear Burn. I’ve created clipping masks for both Grunge layers to the Orange Orb layer. This step isn’t necessary and is really a matter of personal taste, so have fun with it or choose to leave it alone, it’s up to you boss.
Step 19
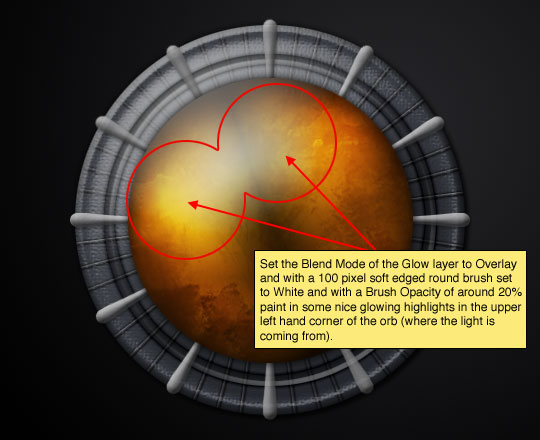
Now lets add a little glow to the upper left of our orb. Create a new layer above the Grunge layers (if you created them, otherwise at the top of the document is fine) and name it Glow. Change the Blend Mode of the layer to Overlay and with the 100 pixel soft edged round brush set to White and an opacity of around 20% paint in some glowing highlights.
Step 20
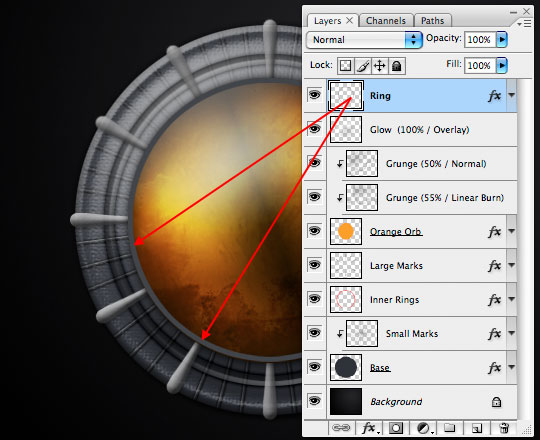
Lastly lets create a ring around the edge or our orange orb to anchor it to the lower piece of the project. Create a new layer at the top of the document called Ring. Load the Orange Orb layer as a selection by holding down the Command (PC: Ctrl) key and clicking on the Orange Orb layer’s thumbnail in the Layers palette (the Ring layer should remain selected as the working layer in the layers palette). Fill the selection with #5A5756 and then contract the selection by 5 pixels by choosing Select>Modify>Contract from the main menu and delete the contents inside the selection leaving a nice 5 pixel ring around the orange orb.
Step 21
Drop the layer’s Fill opacity to 40% and add the following three layer styles.
Step 22
And that’s it folks! I hope you learned something along the way.
Step 23
Before I created my final image I grouped all the layers comprising the orb and dial together by selecting them all and pressing Command-G (PC: Ctrl-G), then converted the Group to a Smart Object by Command-Clicking (PC: Right-Clicking) on the Group and choosing the Convert To Smart Object option (CS3+ Only). I also added a tiny white-to-transparent radial gradient highlight on a layer above the Glow layer to add a little more reflective quality to the orb.
Lesson Files + Additional Resources
Download the free .PSD file and other lesson files Right Here.
Tell Your Friends
More in Graphic Design


54 Responses to Glowing Orb With Dial
anderson
December 20th, 2010 at 1:15 am
super cool,i like it.
Ken
January 3rd, 2011 at 9:22 am
This tutorial has a lot of nice techniques that can be used in other art works. Thanks for sharing.
anganette
January 12th, 2011 at 11:56 pm
Thanks Again! Your tutorials are addicting. Ditto to Kara’s coments. Thank YOU!
Richard
August 8th, 2011 at 1:22 pm
Great tut, technique will be invaluable for making clock faces. The hands can be put on rotate able layers. Thanks.