
 Photos – Part 1")

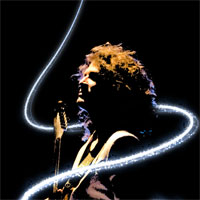
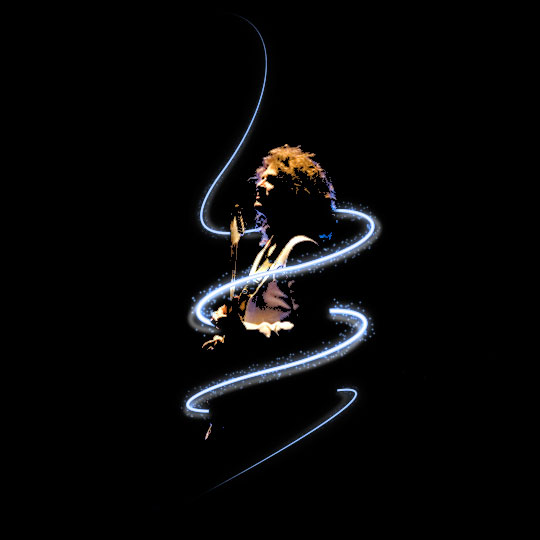
Electrifying Glow Album Art
In this tutorial we will use the pen tool, paths brushes and brush dynamics along with a neat little trick using thresholds to create a cool album cover look.Introduction
This tutorial is a bit involved and assumes that you are proficient enough in Photoshop to follow along without me holding your hand. That being said, lets jump right in.
Step 1
I took this photo at a show The Killers played at Madison Square Garden in New York this past summer… packed house, great crowd… anyway, here’s the photo. The image is included in the lesson files available for download at the end of the tutorial.
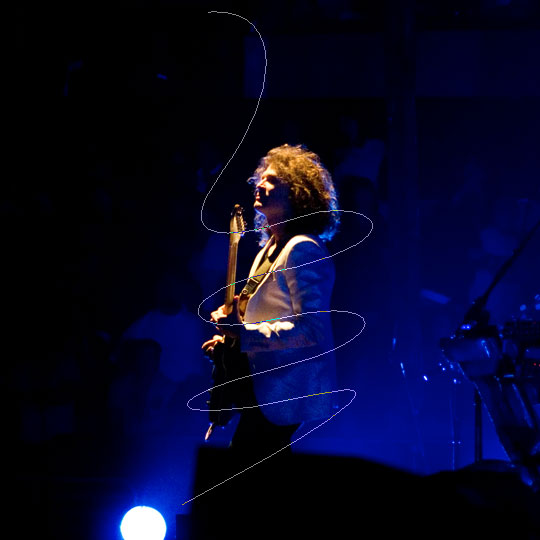
Lets first start by drawing a nice curvy path with the pen tool that we’ll use as our main wrapping glow line. In the Paths palette be sure to rename the path so you don’t loose it when we create a new one.
Step 2
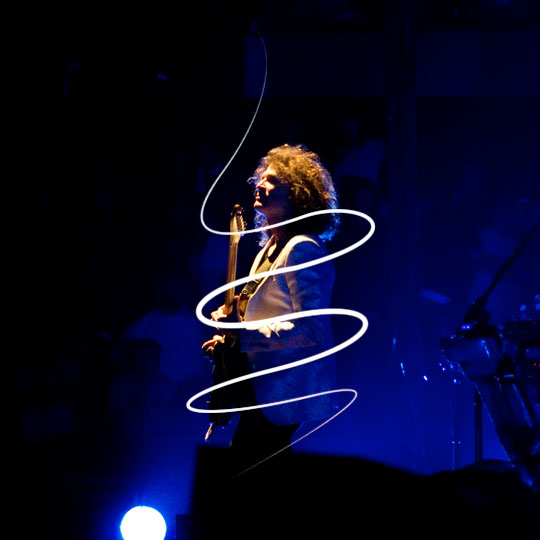
Create a new layer called "First Stroke" and switch to the Brush tool. Choose the 5 pixel round brush with hard edges, set the foreground color to white and click back to the Pen tool. Now simply Right-Click (Mac: Control-Click) anywhere on the path and choose Stroke Path. When the dialog box pops up choose Brush and Simulate Pressure. The pressure simulation will ensure that the stroke tapers off at each end.
Step 3
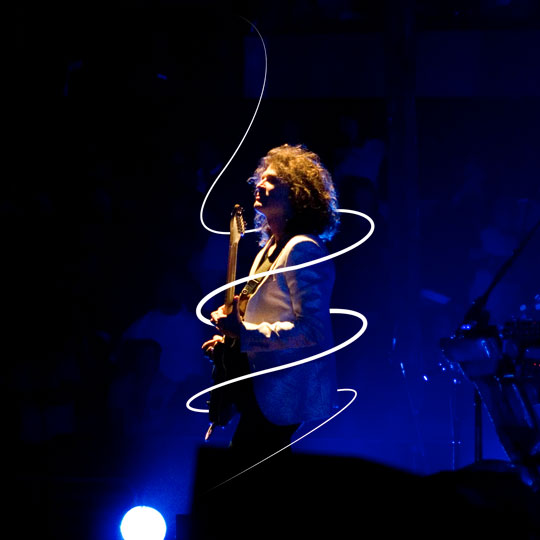
With your tool of choice remove the sections along the stroke that should be behind your subject. I use the Pen tool.
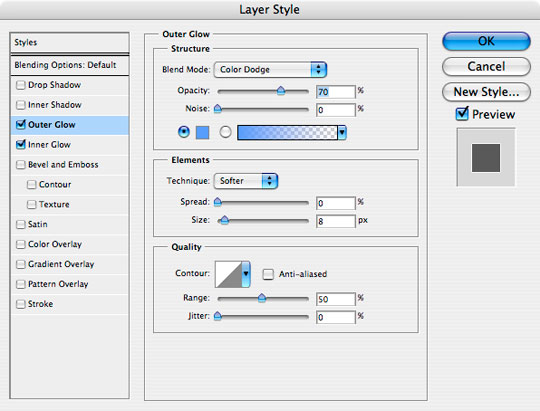
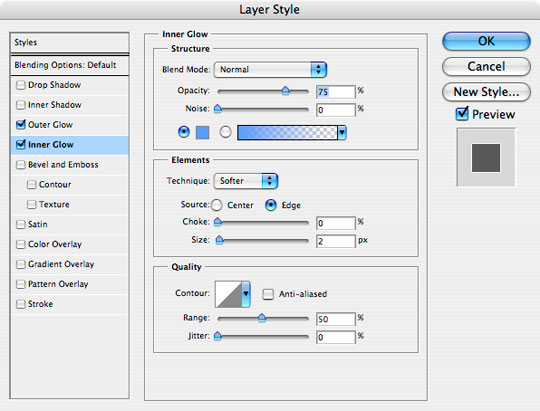
Step 4
Add an Inner and Outer Glow as shown below. The blue color I’m using in both styles is #6d9bff. This will be the only layer style we’ll be using and we’ll copy and paste this one onto subsequent layers as we go.
Step 5
Duplicate the "First Stroke" layer, clear the layer styles and add a 6px Gaussian Blur. This will add an additional glowing effect around the original stroke.

Step 6
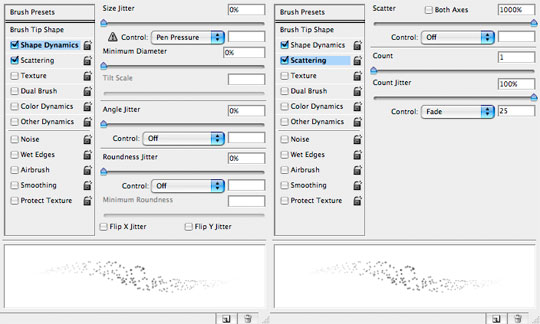
Create a new layer called "Particles", activate the Path we created earlier and switch to the Brush tool. Choose a round brush of 3 pixels with a hardness of 0%, then under the Brushes palette set Shape Dynamics and Scattering to the following. (*note: make sure your foreground color is still white)
Step 7
Switch back to the Pen tool and stroke the path just like before, then remove the overlapping sections. This time the eraser tool will probably be the easiest way to remove the overlapping dots.
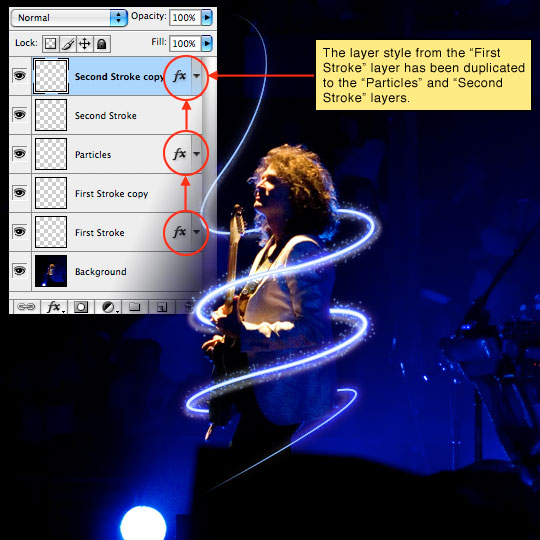
Copy the layer style from the "First Stroke" layer and paste them into the "Particles" layer. (*note: This can be done easily by holding down the Option (PC: Alt) key while clicking and dragging the style icon from one layer to the other.)
Step 8
Create a new layer called "Second Stroke", create a new path similar but not the same as the original with the Pen tool (or duplicate the earlier path and change it a little) then repeat steps 2-5 but this time use a 3 pixel brush and reduce your Gaussian Blur to 3 on the copy layer. Play with a lower opacity on these layers until the effect looks right to you and don’t forget to copy the layer style onto the "Second Stroke" layer.
Step 9
Now that the glow effects have been completed it’s time to really have some fun with this image.
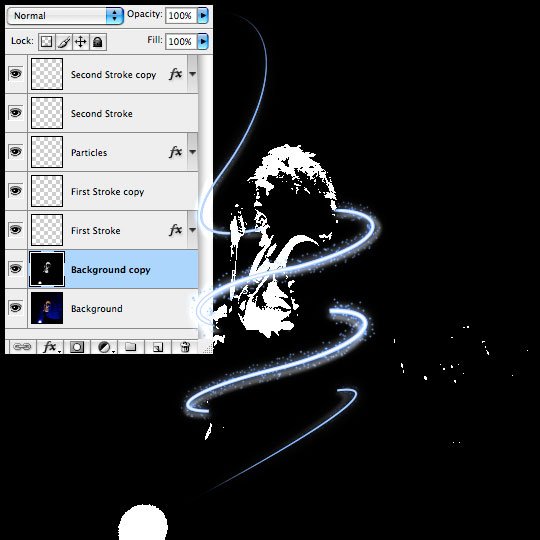
Click on the Background layer and duplicate it by pressing Command-J (PC: Ctrl-J). Choose Image>Adjustments>Threshold from the main menu and use a setting around 85. This will obviously vary depending on your application of the technique.
Step 10
Grab the Magic Wand tool by pressing W and then click anywhere in the field of black. This may not have selected all the black if there are isolated pockets so choose Select>Similar from the main menu to ensure all the black pixels are selected.
Invert the selection by pressing Command-Shift-I (PC: Ctrl-Shift-I) then drag the layer to the trash and select the Background layer. (*note: your selection will still be active.
Step 11
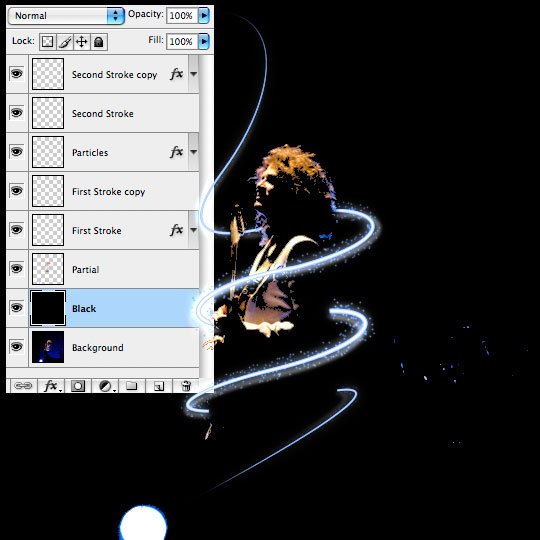
Duplicate the selected area by pressing Command-J (PC: Ctrl-J). This will create a new layer with just the selection copied onto it. Call this layer "Partial".
The selection will be gone and it won’t look like anything has happened, so create a new layer between the "Partial" layer and the "Background" layer, call it "Black" and fill the entire layer with black.
Step 12
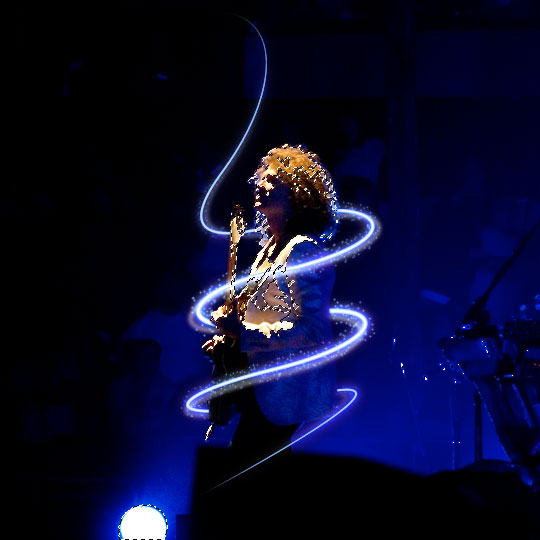
Click back to the "Partial" layer and use the eraser to remove all those annoying artifacts outside the artwork that we want to keep.
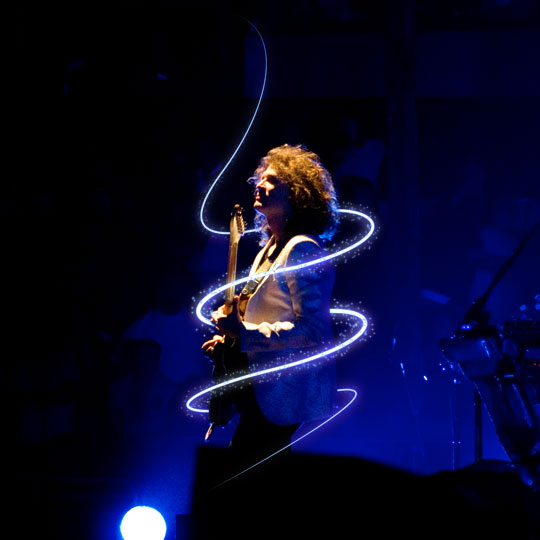
Step 13
For my finished image I added the graphic as an CD album cover.

Lesson Files + Additional Resources
Download the free .PSD file and other lesson files Right Here.
Tell Your Friends
More in Graphic Design


41 Responses to Electrifying Glow Album Art
Rori
February 15th, 2008 at 12:35 pm
This looks SWEET. I’m so excited to try it!!!
Chad
February 16th, 2008 at 10:18 am
Another cool effect! Great photograph too. The Killers ROCK!!
j
March 14th, 2008 at 3:13 pm
this looks awesome, can’t wait to try it out.
Kari
April 4th, 2008 at 9:28 am
Fantastic effect. Looks very cool! Thank you for sharing.
Mi?Ö¬°ka
April 20th, 2008 at 12:58 am
Hi, that`s nice work ;-). Great tip! Hm, i have one question, how can i make step 2 with taper ends ??? Thank you very much for your advice.
Mi?Ö¬°ka
April 20th, 2008 at 1:05 am
Coz when i choose ” Brush ” and ” Simulate pressure ” the ends not taper. Where is a problem?
HERO
April 20th, 2008 at 9:20 am
Mi?Ö¬°ka, open your Brushes palette (Windows>Brushes) and make sure that the Shape Dynamics box is checked and that the Size Jitter control is set to Pen Pressure. That should solve your problem.
ph15h
May 22nd, 2008 at 10:11 pm
=/ my favorite tutorial from you. =D
tavitooo
July 11th, 2008 at 4:17 pm
Wow it is so beautifull!!!!!!!! rules!
Jenna
July 23rd, 2008 at 1:49 am
Wow, this turned out so well! Thank you so much, it’s beautiful. Especially with the threshold selection trick at the end!
Juan Pablo
July 25th, 2008 at 10:29 pm
Whoa! Congratulations! This is a great tutorial! And I love The Killers too…
However I’m not sure of how you erase sections of your stroke with the Pen Tool for step 3 :(
Thanks! This is great!
HERO
July 25th, 2008 at 10:58 pm
JUAN PABLO,
You can use the marquee tool to select areas of the stroke, you could use the eraser tool, or to be more precise you can trace the edges of your subject in that area with the Pen tool then convert the path to a selection which will allow you to delete the selected area. Hope that helps.
Rich
September 11th, 2008 at 5:36 am
Awesome tutorial, really easy to follow as well! And The Killers are awesome too!
liliana
September 13th, 2008 at 4:52 pm
thanks !!! you are a master!!!
LadyUranus
September 13th, 2008 at 10:48 pm
This was a great tutorial. I had trouble with mine because the image was high quality and looked odd with the threshold deleted… But I desaturated and changed the Curve, which made it cooler.
One of the few tutorials where lower quality image = better result!
Lol
September 14th, 2008 at 9:28 am
OMG so nice!
But 1 thing, I don’t understand step 1. How do I use the pen tool? If I use it, you see white things… :S
HERO
September 14th, 2008 at 10:22 am
LOL, You’ve got to set your pen tool to “Paths” in the Pen Tool Options bar that appears at the top of Photoshop when you have the Pen tool active. Right now you’ve got it set to “Shapes” and that’s your problem.
Tran
September 14th, 2008 at 3:31 pm
hi, i’m a newbie to ps. I’m stuck at step 11. How do i fill the entire layer with black? plz help i want to get over this great tut :D
HERO
September 14th, 2008 at 3:35 pm
TRAN, Once you’ve created the new layer press the D key to reset the foreground color to black, then simply press Option-Delete (PC: Alt-Backspace) to fill the layer with black.
Jakub
November 10th, 2008 at 1:03 pm
Thanks a lot for that tutorial! It’s awesome!
William
January 29th, 2009 at 10:57 pm
sure to try this one!
Roberta
February 24th, 2009 at 10:00 am
How do you draw with the pen tool without any colour fill?
Thanks
HERO
February 24th, 2009 at 11:51 am
ROBERTA, In the Options bar at the top of Photoshop make sure you’ve chosen the Paths icon rather than the Shape Layer icon.
uday jadhav
April 1st, 2009 at 4:19 am
super, i like it this method, thanks
liliana
April 19th, 2009 at 8:19 pm
so nice thanks angain!!
Mana
April 24th, 2009 at 1:14 pm
I love this, but I have a question.
When I’m using the pen tool, I can’t help but to make annoying straight lines that I can’t manage to smooth out, so It doesn’t really look like a curve. How do I eliminate this?
HERO
April 27th, 2009 at 5:39 pm
MANA, The trick is to click and drag when you create a new point. Dragging away from the point will give you “handles” that you can then use to modify the curves in your paths.
Sonu
July 1st, 2009 at 1:50 am
nice i learn so many things from this….
SufStar
July 13th, 2009 at 3:32 am
What’s the name of the font is with The Killers
HERO
July 13th, 2009 at 11:32 am
SUFSTAR, the font is called Queer.
BrushThis
September 29th, 2009 at 7:16 pm
Thank you for explaining how to get such an energetic, realistic sense of light. Can’t wait to put into practice.
Ben K
December 31st, 2009 at 7:55 am
Anyone interested in this should check out this set of PHOTOSHOP ACTIONS. Basically you can just design your covers in Photoshop, then run an action to turn your art into a CD or BOOK etc etc.
http://www.coveractionpro.com/232.html
I bought it a month ago and it’s been totally worth the money.
Alan Garner
January 6th, 2010 at 9:13 am
This is CLASSIC!
Charlotte and Ryan Hopewell (Charles)
January 26th, 2010 at 4:39 am
This is too easy
album art
February 4th, 2010 at 1:41 am
Thank you very much for your step by step tutorial.
Design+
February 5th, 2010 at 6:37 am
this is perfect!
thank you very much for this tutorial. :-)
Rupi
February 19th, 2010 at 8:20 am
Check out: http://www.zuhause.li/electric-glow/
Thanks for this great tutorial!
Humm
March 25th, 2010 at 2:12 am
Comment in Ref To:
“Lol
September 14th, 2008 at 9:28 am
OMG so nice!
But 1 thing, I don’t understand step 1. How do I use the pen tool? If I use it, you see white things… :S”
To Answer This Question….
In Photoshop CS4,
Once Your Photo is complete.
Select the Pen Tool,
Right Click the path Line.
Click Delete.
Photo will be complete without the Line..
Another Tip:
“not sure how you erase sections of your stroke with the Pen Tool for step 3”
Make it easy on yourself for the time being at least until you learn the technique of erasing with the pen tool.
Simply use the eraser tool, be sure to select the proper size of eraser tip which works best for the area size you are working with.
Hope this helps.
Thanks for the Tut!!
Great work!
anup
April 5th, 2010 at 11:56 pm
that is nice bro
nikhil
July 15th, 2010 at 4:26 am
thanks for sharing such descriptive tutorial..
sirc
March 8th, 2011 at 8:03 am
nice tutorial hope ill become as good as you when time comes.. ^_^ more powers to this site…