


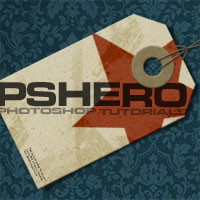
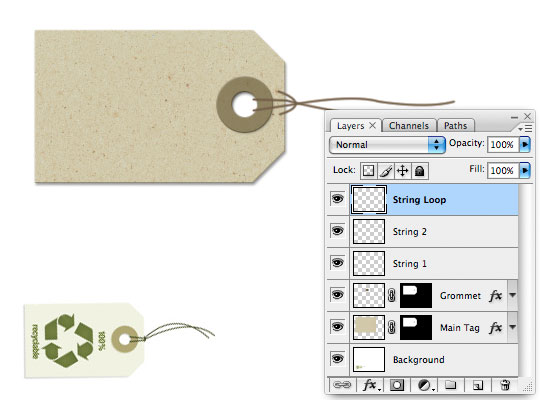
Custom Hang Tag
It seems like everywhere I look these days designers are using more and more handmade objects in their work. From pencil sketches and fabric scans to paper scraps and household odds and ends these items are making their way into our work. In this Photoshop tutorial you'll learn how to create a retail hang tag.Step 1
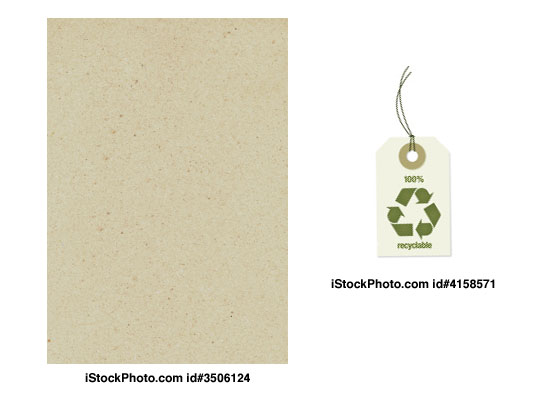
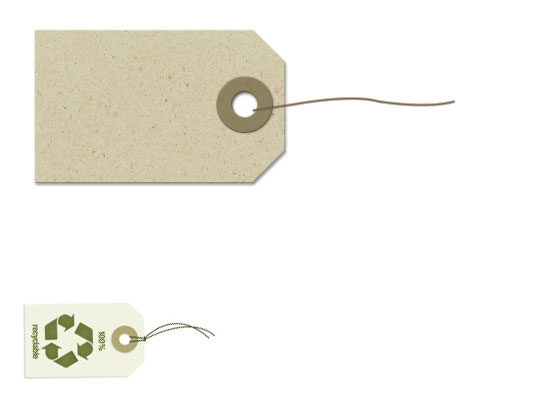
As always I recommend using a little reference material when you’re creating something from scratch that actually exists in the physical world. For today’s lesson I’m using two pieces I found at iStockPhoto, one for the card-stock background and one for the hang tag. By entering the item ID into the iStockPhoto search you can pull up the exact images I’m using.
In this lesson we’ll be using a photo of actual card-stock for the project. If you’d like to learn how to create this effect from scratch check out my Cardboard And Torn Paper Business Card tutorial.
Step 2
Our first step will be to organize these items on the stage. I’ve merged the reference tag from iStock with the background layer for convenience. (The .PSD file at the end of the lesson will contain both original comp pieces from iStock). I’ve also rotated the card-stock background.

Step 3
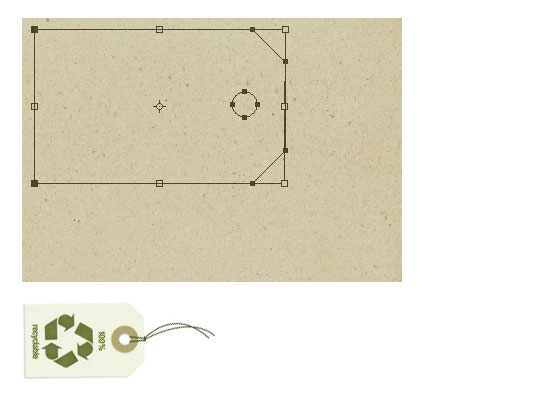
Lets go ahead and create the shape of our tag by tracing the outline of the reference tag with the Pen tool. This will be easy since the outline of the tag is all straight lines. Press the P key to invoke the pen tool and click your way around the outside of the tag until you end up back at your start point.
(*note: This is easier if you zoo in on the tag for a better view.)
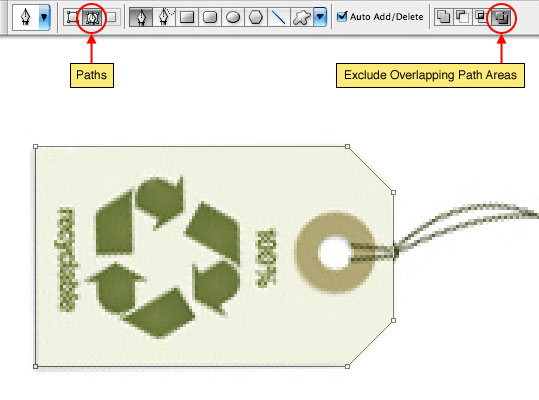
Step 4
Before we go any further lets click over to the Paths tab in the Layers palette (or by choosing Window>Paths from the main menu) and lets name our path. The reason for this is that if we create a new working path now without naming the one we just created we risk loosing the initial path because if we don’t name it Photoshop assumes we’re done with it.

Step 5
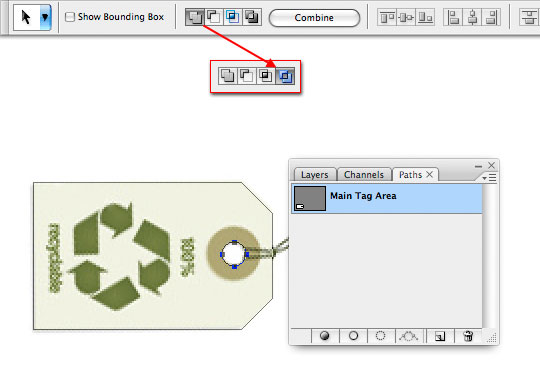
While we still have the Paths tab open and our Main Tag Area path selected lets also add the hole. Press the U key to invoke the Custom Shape tool, in the options bar at the top of Photoshop make sure that the tool is set to Paths, choose the Ellipse tool and make sure the Exclude Overlapping Path Areas icon is selected.
Holding down the Shift key to constrain the circle, click and drag a circular path onto the stage where the hole in the tag is.
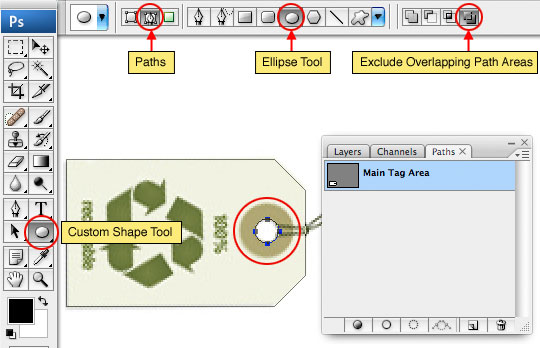
Step 6
Sometimes despite our best efforts to do things in the correct order Photoshop can have a mind of it’s own so lets double check and make sure this new circular path indeed has the Exclude Overlapping Paths option actually chosen. Press the A key to switch to the Direct Selection tool and take a look at the options bar at the top of Photoshop. Mine actually had defaulted to the Add To Shape Area option rather than retaining the Exclude Overlapping setting. If this is the case for you, just go ahead and click on the Exclude Overlapping Path Areas icon to switch it. We do this to make sure that the hole is actually cutout of the tag.
Step 7
Switch back to the layer tag and with the Direct Selection tool still selected click and drag around the entire path area to select both paths. Move the path over the top of the background texture and press Command-T (PC: Ctrl-T) to invoke the Free Transform tool (yes it works with paths too). Make sure to hold the Shift key as you grab one of the corners of the transform box to constrain the path as you transform it to the size you want to use. Hit the Return (PC: Enter) key when you’ve resized the path to commit the transformation.
Step 8
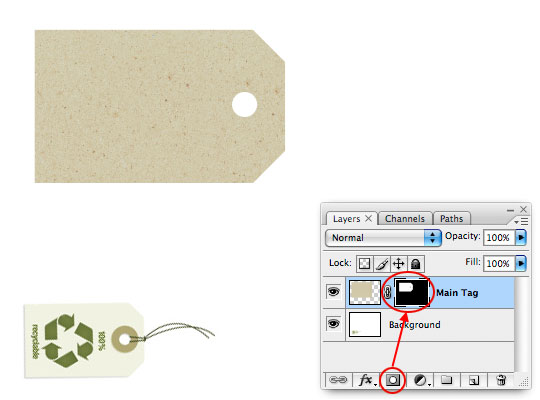
We can convert the selected path to a selection by simply pressing Command-Return (PC: Ctrl-Enter) and then convert the selection to a Layer Mask by clicking the Add Layer Mask icon at the bottom of the Layers palette. (*note: make sure you’ve got the Main Tag layer selected before doing this or the layer mask won’t be applied to the right layer.)
Step 9
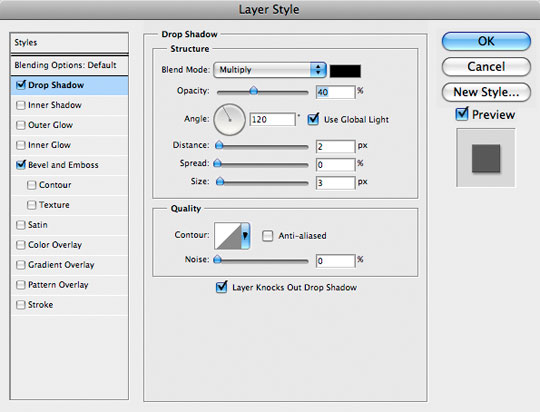
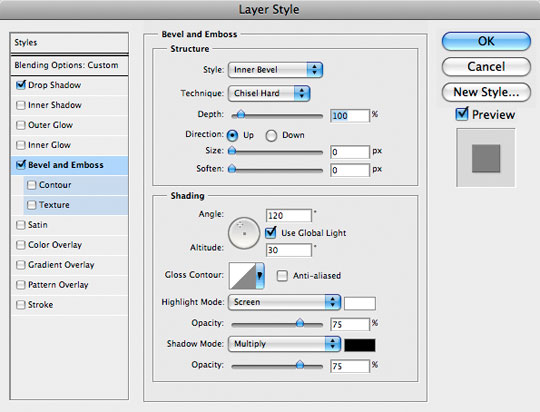
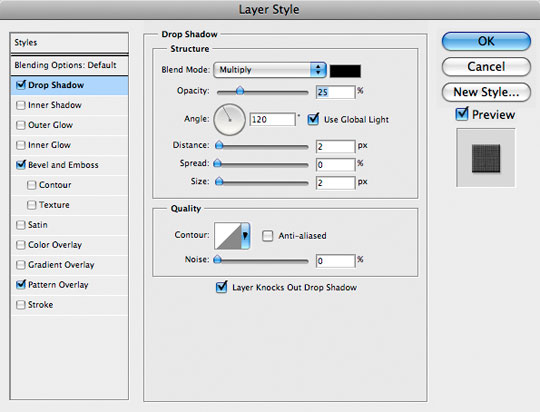
While we’re on this Main Tag layer lets go ahead and add a couple of Layer Styles to it. Command-Click (PC: Right-Click) on the layer and choose Blending Options to bring up the Layer Styles dialog and add the following two styles.
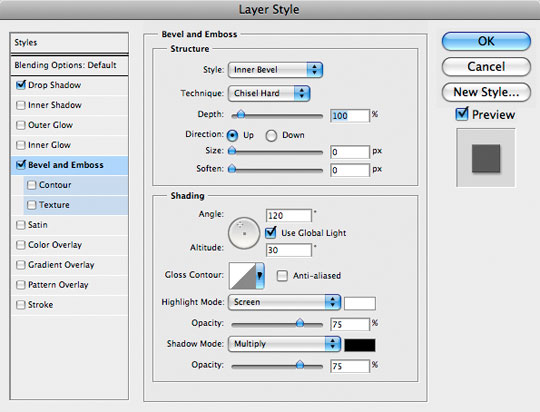
Step 10
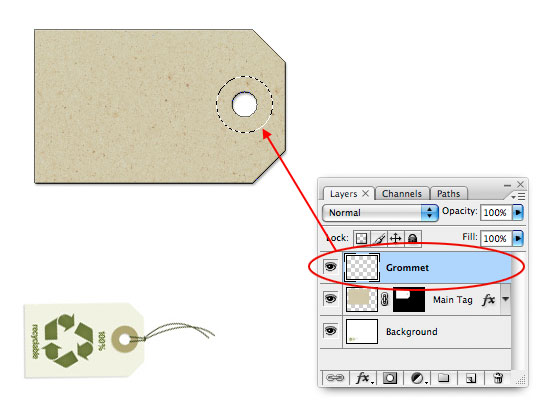
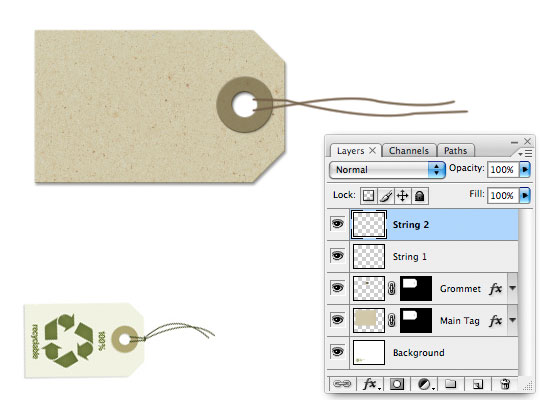
Create a new layer above the Main Tag layer by clicking the Create New Layer icon at the bottom of the Layers palette or by using the keyboard shortcut Command-Shift-N (PC: Ctrl-Shift-N), call this layer Grommet.
Press the M key to switch to the Marquee tool, use the fly out menu in the Tools bar to switch to the Elliptical Marquee tool or you can use the keyboard shortcut Shift-M (PC: Shift-M) to switch between Rectangular and Elliptical once the Marquee tool is selected. Click and drag a selection where the reinforcement grommet will live around the hole in the tag.
Step 11
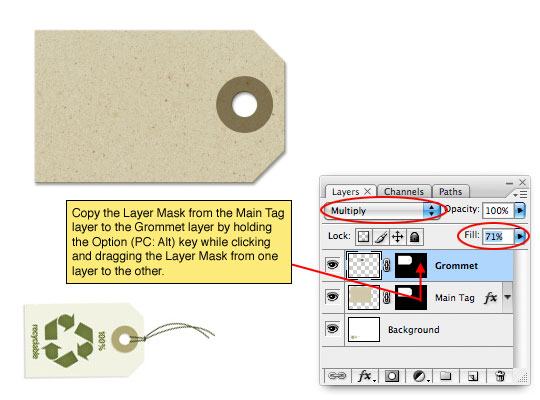
Click the foreground swatch in the Layers palette and change the color to #706340 and click OK, then fill the selection with this new foreground color by pressing Option-Delete (PC: Alt-Backspace).
Lets copy the layer mask from the Main Tag layer to the Grommet layer by holding down the Option (PC: Alt) key and clicking and dragging the layer mask (in the Layers palette) from the Main Tag layer to the Grommet layer. Lets also change the grommet’s layer Blend Mode to Multiply and lower the Fill opacity to 70%.
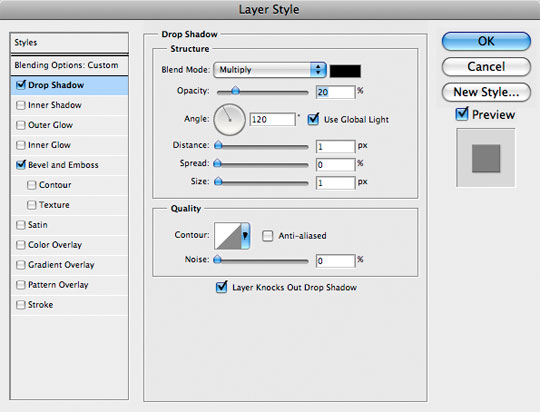
Step 12
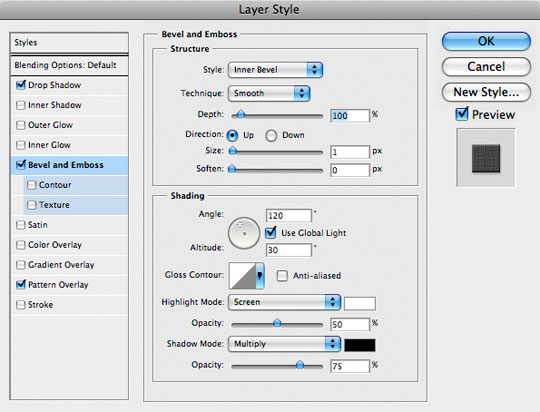
Just like we did in Step 9 lets go ahead and give the Grommet layer a few Layer Styles of it’s own.
Step 13
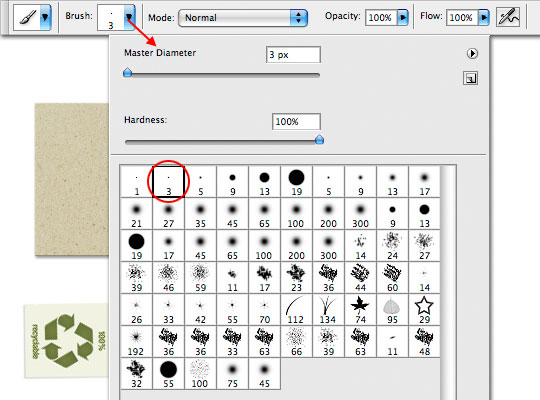
It’s time to add some string to our tag. We’ll do this by drawing a few separate paths and then stroking the path with a brush so lets first press the B key to switch to the Brush tool and we’re going to choose a round hard edged brush with a radius of 3 pixels.
Step 14
Create a new layer called String 1. Change the foreground color to #735e47 and press the P key to switch to the Pen tool. Using the Pen tool click and drag a path onto the stage that will represent our first piece of string coming from the opening of the hole.

Step 15
With the Pen tool still selected Control-Click (PC: Right-Click) on the path and select Stroke Path. Choose Brush from the dialog and make sure Pen Pressure is not checked then click OK. Pressing Command-H (PC: Ctrl-H) when you’re finished will hide the path so you can see what you’ve done.
Step 16
Repeat Steps 14-15 on a new layer called String 2.
Step 17
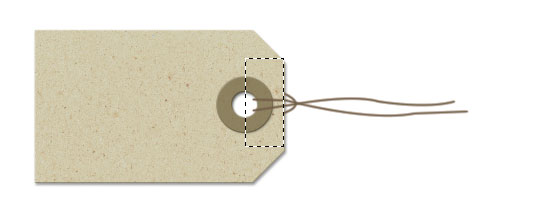
And one last time lets create a path and stroke it to create the loop that wraps from behind the tag around the two strings we just created. I’ll call this layer String Loop. I’m going to draw this path overlapping the tag and we’ll trim it in Step 18.
Step 18
Press M to switch to the Marquee tool, make sure the Rectangular Marquee is selected and then click and drag a selection to the edge of the tag (where we need to cut our loop of string). Press Delete (PC: Backspace) to remove the overlapping string then deselect by pressing Command-D (PC: Ctrl-D).
Step 19
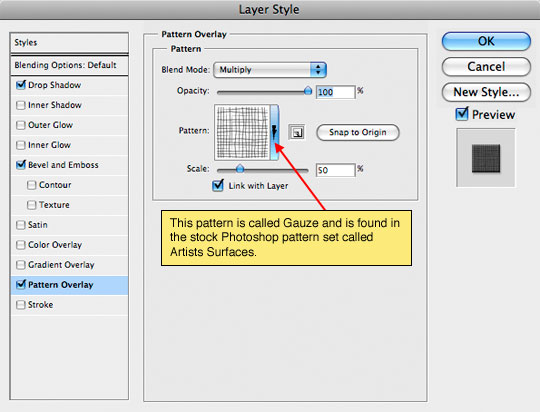
To add a little more realism lets add a Drop Shadow, Bevel & Emboss and Pattern Overlay to our string. You can add these layer styles to any of the String layers and then by holding down the Option (PC: Alt) key you can click and drag the layer style from one layer to the next (just like we did with Layer Masks earlier) to add the same style to all 3 String layers.
(*note: The Pattern Overlay is actually overkill for such a small piece of string, but if you’re creating this at 300ppi for a print project it will add the slightest bit of texture to the string and actually adds to the look nicely. Obviously at 300ppi you’ll need to adjust all the layer styles accordingly as well.)
Step 20
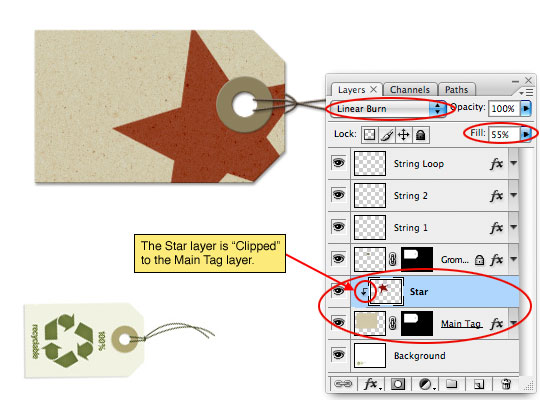
Now that our tag is complete it’s time to put something on it. We’ll want to put the the graphics that will be on the hang tag just above the Main Tag layer and it’s a good idea to create clipping masks from all those layers back to the Main Tag layer so that any graphic that extends beyond the edges of the tag will retain the shape and edge effects of the tag itself.
I’ll start by throwing in the obligatory PSHERO star logo by creating a new layer just above the Main Tag layer and calling it Star. I’ve got the logo star saved as a custom shape so I’ll just throw it onto my layer and position it above the tag as desired. Then by Command-Clicking (PC: Right-Clicking) on the layer and choosing Create Clipping Mask I can use the Main Tag layer as a mask for the Star layer. I also switched the layer Blend Mode to Linear Burn and lowered the Fill opacity to 55% to make it look more like the star was printed onto the card.
(*note: By placing the star behind the Grommet layer which has Fill opacity to 70% I could see the star through the grommet, I didn’t like this look so I raised the Fill opacity of the Grommet layer back to 100% and lightened the color a little.)
Step 21
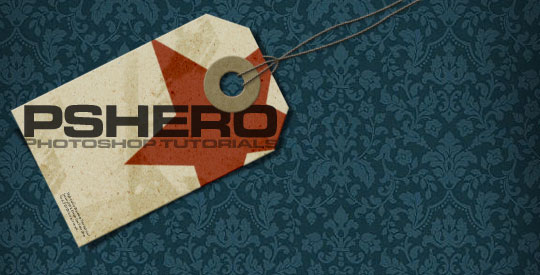
I’ll repeat Step 20 a few more times adding text and a little bit of paint with a grunge brush to get to my final image, and yes, all this is included in the download at the end of the lesson. If you want more instruction on how to age and distress in Photoshop you should check out these tutorials:
Creating Old Paper With Custom Brushes
Create An Old Envelope
Antique Ace Of Spades
Lesson Files + Additional Resources
Download the free .PSD file and other lesson files Right Here.
Tell Your Friends
More in Graphic Design


46 Responses to Custom Hang Tag
Galo
July 10th, 2008 at 4:52 pm
Very good!, Try to do myself
mr. diggles
July 10th, 2008 at 5:41 pm
um, done.
i need to make up some toe tags.
have you ever had a chicka with juggs come up to you and say “you are my photoshop hero”?
i will pay someone if i have to damn it.
HERO
July 10th, 2008 at 5:48 pm
Hey DIGGLES!
Yeah, that’s happened a few times. Not surprisingly it was worth every cent.
Paulo Sales
July 11th, 2008 at 1:54 am
path tricks…well done!
final image looks pretty fine…more please!
Josep Viciana
July 11th, 2008 at 2:19 am
Wow, perfect.
Thanks.
Jeff
July 11th, 2008 at 9:22 am
thanks for this tutorial!
Bill Goodman
July 11th, 2008 at 1:52 pm
once again awesome!
S Madsen
July 15th, 2008 at 9:26 am
Hi there.. GREAT TUT.. But i have a question though.. How do I check off the pen pressure. I’ve searched and searched but can’t seem to find a solution.. With the pen pressure on the strings look rather strange ; ) Thanks in advance.. (I’m using CS2)
HERO
July 15th, 2008 at 9:35 am
S MADSEN,
The “Simulate Pressure” checkbox will come up when you Command-Click (PC: Ctrl-Click) on the path (with the pen tool selected) and choose Stroke Path. The Stroke Path dialog box pops up and lets you choose the tool you’d like to stroke the path with (which should be set to Brush), and the Simulate Pressure check box appears below it.
The only other place you might want to check is in the Brushes palette (choose Window>Brushes from the main menu). There’s a menu item in there called Shape Dynamics and you’ll want to make sure that the box next to it is NOT checked. Inside the Shape Dynamics box is a sub-setting called Size Jitter which has a few different settings but I think by default it’s set to Pen Pressure. If the Shape Dynamics box was checked then by default this Pen Pressure setting would be applied to your brush automatically. So I’d suggest going in and turning this setting to Off (which will become the new default) to avoid future unwanted occurrences.
S Madsen
July 15th, 2008 at 10:40 am
Thank you very much.. Quite helpfull! You truly have the best PS-tuts on the net (that I know of). I’m not exactly following them on the spot always but they are quite good inspiration, I went for a slightly more grunged look. Thank you and Cheers from Madsen, Denmark
HERO
July 15th, 2008 at 11:51 am
MADSEN,
I’m glad that helped. Thanks so much for the compliments and for sending me your final result as well! Keep up the good work.
.coldainz
July 17th, 2008 at 4:11 am
ough, dude you’re my truly hero, great tag >.< (and I thought some time ago I can do something good in PS, shame…)
CHU-CHU
July 17th, 2008 at 8:10 am
Hi there! just found this awesome site two weeks ago, and i tell you, this is the best photoshop tutorials site ive ever seen!! nice and well explained tutorials, very detailed, i really like your work HERO! your the man! i hope i can be as good as you :D Cheers!!!
Zephyr
July 19th, 2008 at 9:11 pm
Hey Hero !
Nice tutorial !
I’d loved it =)
Thx !
Shane
July 20th, 2008 at 11:51 am
I like this tutorial very much. Thanks for posting and putting in the effort.
BlastBalastik
July 21st, 2008 at 12:12 pm
Very, very good.
Amazing… more things like that please :D
Carlos
August 6th, 2008 at 10:49 am
sencillo pero excelente
Gill
September 19th, 2008 at 5:36 pm
Hello there ! Great Tutorials as well as the way u put them together. I’ve been trying to reproduce Z final touch you put on z tag with the shadow that gives this bending effect. So I followed your stiker edge peel tuto, but doesn’t work. Could you tell how you did it, that would be nice.
Thanks.
HERO
September 19th, 2008 at 6:20 pm
GILL, try using the technique in the Adding Depth With Shadows tutorial and I think you’ll have better luck!
Gill
September 20th, 2008 at 9:25 am
Thanks a lot ! I followed the tuto. Works great now !
Cheers !!
Gill
Trevor
October 5th, 2008 at 7:46 am
Really helpful. Never thought of this. Thanks for sharing.
vampyvan
October 6th, 2008 at 12:23 am
u r amazing, i love this website XD
learned a lot
thank you
PJ
November 7th, 2008 at 12:50 pm
Cheers!
This one saved me today!
I was heard saying “maaaan, this guy knows his sh!t” numerous times from the corner of the office this morning. :^) My Christmas web banner now looks solid!
Thank you.
Peter Hallin
November 11th, 2008 at 5:31 am
Great tutorials! Thanks for sharing.
Text Effect
December 9th, 2008 at 1:05 am
wow.. niche :)
rimanere
January 5th, 2009 at 7:57 pm
Hero, Great tutorial but I got stuck on step 7. I wasn’t able to get the hole on the tag. What can be wrong.
Thank you for your help
HERO
January 6th, 2009 at 2:00 pm
RIMANERE, with the circular path selected, make sure that the “Subtract from Selection” icon is selected in the Paths options bar at the top of Photoshop. That should do the trick.
Victor
January 11th, 2009 at 9:30 pm
Thanks Hero,
that tutorial added a really nice touch to my website. Much appreciated.
Victor
jayson david
January 23rd, 2009 at 9:50 pm
I love your site. the tut’s are easily understood and follow, Specially this one.
I know now how to make an awesome looking tag. Thanks to you…
Patrick
February 14th, 2009 at 11:18 am
Superlative tutorial. Your tutorials are written very clearly, concisely and articulately.
Thank-you x 1 billion to power of a google-plex from the thousands upon thousands who accidentally forgot to say thank-you.
Bravissmio.
Chris Haugh
April 6th, 2009 at 3:33 pm
Hey Hero, amazing tut. I just found this site due to a reccomendation from the GoMeida forums. You truly are the PShero with how well versed you are in this element of design. Thanks again
Jen_D
July 21st, 2009 at 6:11 pm
Looks so great and realistic! Beautiful job!!
Ryan
December 8th, 2009 at 11:18 pm
You are my really are my hero!! Searching for a tutorial on how to create a hang tag was a last ditch effort for me. I throw the Hail Mary pass and here you are, catching the ball in the end zone with no time on the clock.
Your tutorial is so thorough that I was able to follow along with only a few minor tweaks as I am using Photoshop CS.
Keep up the fantastic work!!
Poljoprivreda
December 11th, 2009 at 2:23 pm
bravo! excellent.
Sunshinemom
January 13th, 2010 at 10:51 pm
Is it possible to do part of this, save it and do some of the effects later? I tried saving as a jpg file after the main tag was selected and found that I could not proceed much the next day!
HERO
January 17th, 2010 at 11:54 am
SUNSHIINEMOM, Choose File > Save As and make sure you’ve selected the Format:Photoshop option. If you save as .jpg or the like, you won’t be able to come back and edit your file later. Always save as Photoshop (.psd) first.
Sunshinemom
January 17th, 2010 at 9:05 pm
Hey, thanks! I forgot to mention that the problem I mentioned earlier is resolved. I found what I was doing wrong.
Paulo Renato Souza Cunha
January 20th, 2010 at 11:36 am
I’m wordless…
John
April 12th, 2010 at 8:42 am
This is exactly what I have been looking for to use in the new website design. Thanks!
Q Studio
July 8th, 2010 at 6:08 pm
this tutorial is very useful for me. thanks for share this. xxxx
yahoo store designer
November 5th, 2010 at 7:48 pm
really nice. what’s the font you used for PSHERO? thanks
HERO
November 9th, 2010 at 10:25 pm
The font for PSHERO is called Microgramma Bold. It comes in Bold and Medium, both are great.
scrapbook page ideas
December 7th, 2010 at 4:16 am
Excellent tutorial. Will definitely be using this in one of my projects. Thank you.
thebryceisright
March 14th, 2011 at 4:11 pm
Thanks, I was searching and brainstorming for days to try and figure out a decent way to redo the logo for my blog. I went through this tutorial and I really liked the look and the way it turned out. Thank you so much.
Mahad
May 20th, 2011 at 2:05 pm
wowooo…Its verry verry nice..!!! Tahnxxxxx…!!!
soe
October 8th, 2011 at 4:43 am
Hey,
U always make me wonderful!
Thanks again!