


Turn Your Signature Into A Photoshop Custom Shape
In this Photoshop tutorial I'll show you a quick and easy way to convert your signature into a vector Photoshop Custom Shape. This technique also works nicely for converting line drawings to vector as well.Step 1
This tutorial makes the assumption that you have at least a working knowledge of using the Pen tool to manipulate Paths. Also, if you’re planning to play along at home, you’ll need to be able to scan your signature (or take a photo of it) and bring it into Photoshop.
The first step in this process is of course to get your signature from the paper into Photoshop. I recommend signing your name on a fresh sheet of white paper with a black fine point marker like the Sharpie Ultra Fine Point, this will lay down a line dark enough to make the job ahead easier, and because it’s a marker tip, you’ll get line thickness variations that will make the final result even cooler. Although you could use a blue marker and convert it to grayscale later, you’ll get a better starting point if you use black.
Using the highest resolution your scanner can capture, scan your signature into your computer and save it someplace where you’ll know where to find it, then open that new file in Photoshop. I scanned mine at 1200ppi to a .TIFF file.

Step 2
Scans are never perfect, and marker isn’t absolutely consistent, so now we’ll take a few steps to ensure that the signature is as solid as possible.
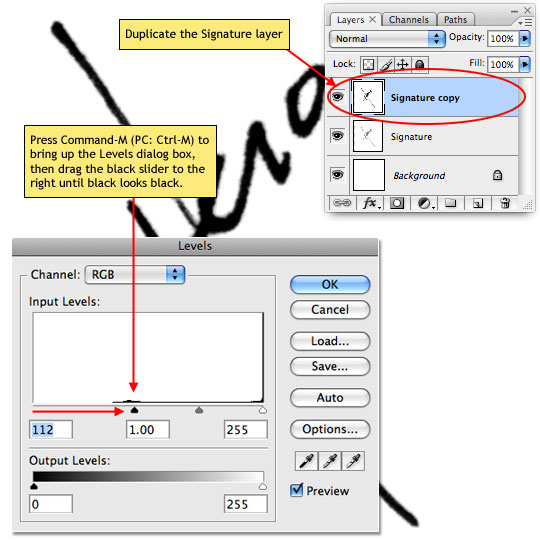
Duplicate the layer with your signature layer (which I renamed Signature) by pressing Command-J (PC: Ctrl-J). With the duplicate layer now selected by default, lets call up the Levels dialog and increase the contrast between the black and white areas of the image. Press Command-L (PC: Ctrl-L) to bring up the Levels dialog and grab the black point slider at the bottom left of the histogram and drag it to the right until sufficient contrast has been achieved.
(*note: If your Layers palette isn’t visible, simple choose Window>Layers from the Main menu.)
Step 3
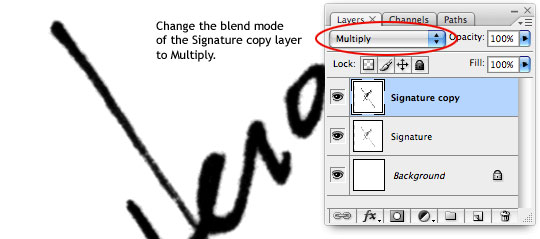
Lets also change the blend mode of the Signature copy layer to Multiply in the Layers palette, this will add the layer below to the mix, completing our darkening process.
Step 4
Now that we’ve got a good dark signature, we need to convert the writing to a selection. Now you could try to select it with the magic wand tool, or by selecting a color range, but I’ve got a much better and more accurate to do this with black and white documents.
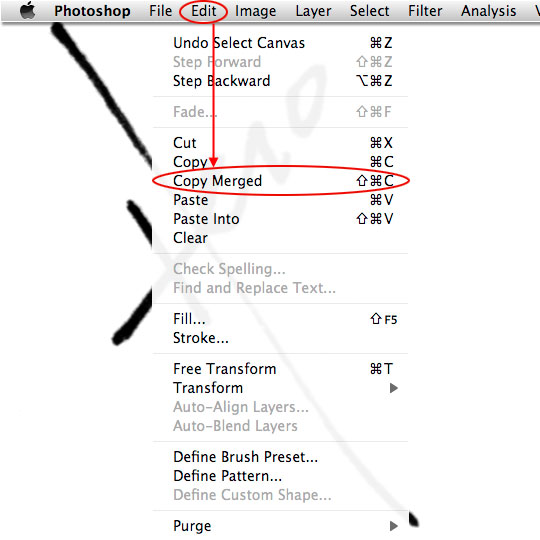
Press Command-A (PC: Ctrl-A) to Select All, then choose Edit>Copy Merged from the main menu, as it’s name suggests, this function will copy the document as you see it and not just what’s on the current layer. Go ahead and deselect when you’re done copying by pressing Command-D (PC: Ctrl-D).
(*note: The keyboard shortcut to Copy Merged is Command-Shift-C (PC: Ctrl-Shift-C) incase you’re as shortcut addicted as I am.)
Step 5
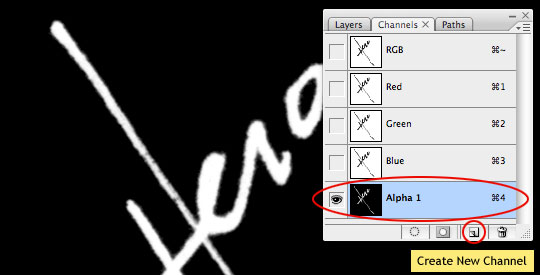
Now that we’ve copied the canvas to the clipboard, lets switch over to the Channels palette (if yours isn’t visible, choose Window>Channels from the main menu). At the bottom of the Channels palette select the Create New Channel icon to create a new Alpha Channel. By default the new channel will automatically be selected, so lets go ahead and paste the image we just copied right into the new channel by pressing Command-V (PC: Ctrl-V).
Before we continue, lets also invert the colors in this new Alpha Channel by pressing Command-I (PC: Ctrl-I) or by choosing Image>Adjustments>Invert from the Main Menu.
Step 6
Now we can easily select the signature by simply holding down the Command (PC: Ctrl) key and clicking on the thumbnail of our new Alpha Channel in the Channels palette.
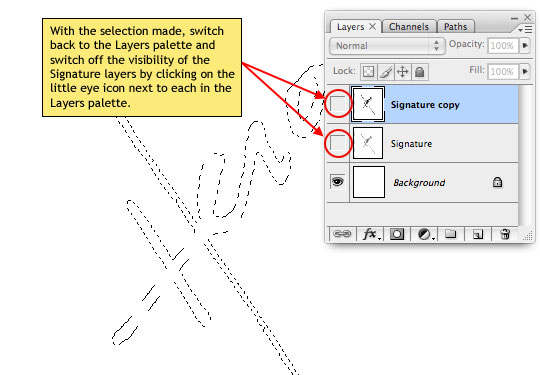
Once the selection is made, click on the top channel (called RGB) to restore the document to standard view and switch back to the Layers palette. Once you’re back to the Layers palette, go ahead and turn off the visibility of the Signature and Signature copy layers by clicking on the little eye icons to the left of each layer thumbnail in the Layers palette. This will make it much easier to see our selection and will help us as we work through the next few steps.
Step 7
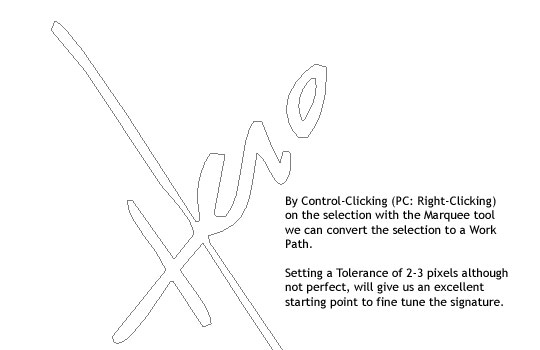
Switch to the Marquee tool by pressing the M key, then Control-Click (PC: Right-Click) anywhere along the "marching ants" of the selection on the stage and choose Make Work Path from the menu that comes up. The Tolerance dialog box will then appear asking how many pixels we wish to use as tolerance for our path, in other words, how exactly the path should follow the selection. I find that a tolerance of 2-3 pixels usually renders a result that doesn’t require a ton of tweaking after the conversion. Click OK to turn the selection we just created into a Path that we can now manipulate and then convert to our Custom Shape.
Step 8
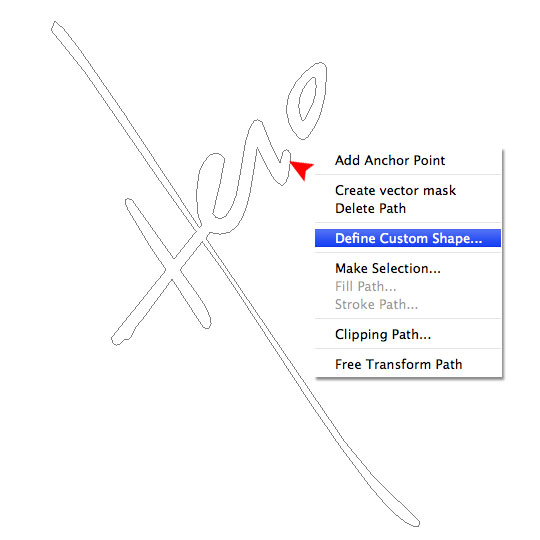
Now it’s time to work with our path. This tweaking can be done using the Pen tool or the Direct Selection tool. I favor leaving the small waves and inconsistencies that give the signature character but I’ll still use the pen tool to straighten out a few lines and remove extraneous points along my paths. If needed, you can also turn on one of the Signature layers if you need a little reference.
Once you’ve gotten your paths modified to your liking and with either the Pen tool, Direct Selection tool or Path Selection Tool active, Control-Click (PC: Right-Click) anywhere along the path and choose Define Custom Shape from the menu that appears.
Step 9
Your custom shape has now been saved and will appear at the bottom of the Custom Shape picker, but lets go one step further and save the signature as a Custom Shape Set for safe keeping because if you were to select Reset Shapes from the Custom Shapes menu right now you’d loose all your hard work.
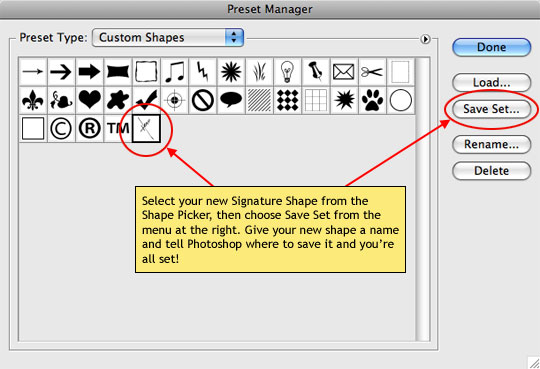
From the main menu choose Edit>Preset Manager. When the Preset Manager appears, choose Custom Shapes from the drop-down menu at the top of the box, then navigate to the end of the thumbnail samples to find the shape you just created (new shapes are always added to the end of the list). Click on your new shape to select it, then click the Save Set button at the right of the dialog box. Give your signature a name you’ll remember, pick a location to save to and click OK and you’re all set.
(*note: Be sure to backup the custom shapes you’ve created so if you ever change computers or have to re-load Photoshop you don’t loose them. You can learn about alternate saving methods for custom Photoshop objects in my Installing And Managing Brushes And Other Presets tutorial.)
Step 10
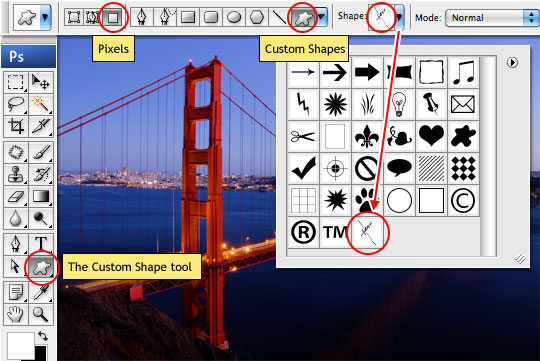
Now it’s time to use your Custom Shape Signature! Open a photo or other document you’d like to sign. I’ll be using this photo I took in San Francisco last year.
Switch to the Custom Shape tool by pressing the U key and make sure that you’ve got the tool set to Pixels and Custom Shape (ie. the blob) in the options bar at the top of Photoshop and of course, choose your new signature custom shape from the Shape Picker.
Step 11
Create a new layer above your photo for your signature to live on by clicking the Add New Layer icon at the bottom of the Layers palette, make sure you’ve set your foreground color to the one you want your signature to be (I chose white) and then click and drag your signature onto the stage making sure to hold down the Shift key to constrain it’s proportions.
And there you have it, your own signature as a vector Custom Shape perfect for signing photos, adding copyright watermarks, forging your wife’s name on your new motorcycle purchase, whatever your little heart desires!
(*note: Since I used my own signature here, no download is available for this lesson… not that you should need one anyway.)

Lesson Files + Additional Resources
There are no file downloads or additional resources for this Photoshop tutorial
Tell Your Friends
More in Graphic Design


44 Responses to Turn Your Signature Into A Photoshop Custom Shape
florian
January 13th, 2009 at 4:43 pm
simple, effective, with a huge bandwith of possible ways to use it…
If you take the best 10 PS-Tutorials of the web, I bet at least half are from your site.
Simple but useful, love it.
Thank you for another great tutorial.
HERO
January 13th, 2009 at 4:47 pm
FLORIAN, Thanks for the kind words, I’m psyched you see the large scale usefulness of the concept!
NetOperator Wibby
January 13th, 2009 at 5:01 pm
This is pretty sick, I love this tutorial. It’s so simple but effective.
Casey L. Jones
January 13th, 2009 at 6:16 pm
Exactly what I’ve been looking for. Thanks!
Shalom & L’Chaim!
Paulo Sales
January 13th, 2009 at 7:20 pm
great job doing that stuff whit alphas…
Congrats Hero, allways on the frontline !
Regards from Lisbon
Tony DeOliveira
January 14th, 2009 at 12:33 am
Hero, once again a great tutorial. All of your tutorials have made my job much easier and much more fun to do. I save all of your tutorials and refer to them when this melon that holds my hat stops working.
Nikola
January 14th, 2009 at 12:43 am
great job! thank You Hero! Greetings from Serbia
AskMe
January 14th, 2009 at 10:21 am
Hero, yours are far and away the best Photoshop tutorials I’ve managed to find on the web. I’ve shared your site with several friends. Yours are learning tools and not just techniques to memorize. I’ve read every entry on your site and haven’t even found a grammatical or spelling error. Keep up the stellar work! The web is better because of you. Now where did that tip jar go?
AskMe
January 14th, 2009 at 10:27 am
Uh oh, I think I found a typo… I won’t hold it against you. ;)
There’s plenty of room in the tip jar, everyone. Let’s do our part to keep Hero’s tutorials coming!
HERO
January 14th, 2009 at 10:55 am
Typo? … really? … damn that spellchecker!
Ray
January 19th, 2009 at 9:30 am
Hey Hero,
I’ve been enjoying your tutorials for some months now, learning new tricks with every one of them. Thanks for another cool trick.
*throws some bucks in the cute little piggy*
HERO
January 20th, 2009 at 8:54 am
RAY, I’m glad you’re learning so much… The cute little piggy thanks you!
v-render
January 24th, 2009 at 6:51 am
that is super tip of the year.. you are not hero ..!
you are super hero !
Visions2art
January 26th, 2009 at 11:50 am
I did it the long and hard way last year through extraction. Yours is pretty easy. I am an artist and wanted a gold signature in oil paint that had texture like paint. I love mine, but I will save this to use for my signature on images of my art for web use. It will save much time instead of hand writing copyright and my name over each image. You can see my signature on my website. THANKS!
Kalynn
January 26th, 2009 at 9:40 pm
awesome tutorial! Now I can sign my web artwork with no problems, and in any color, without extra steps, and even better, it’s my own actual handwriting. Thanks for this!
bhargav
January 31st, 2009 at 10:54 pm
he is the best man hero rockssss
Venkat
February 6th, 2009 at 1:02 pm
Great!
Indra
February 10th, 2009 at 3:04 am
Thanks for this!
Ring
February 18th, 2009 at 8:45 pm
Thanks,hero
Leo
February 28th, 2009 at 6:42 am
Thanks for the great tutorial. I’ve always wanted to use my own handwriting as a signature and now I can, thanks to you!
I’ll definitely bookmark this and share with friends!
Lexi
March 6th, 2009 at 6:01 pm
Thanks for this! You make photoshop understandable! : )
indra
April 2nd, 2009 at 9:57 pm
Thanks a lot…
Chris Voeltner
April 19th, 2009 at 5:45 pm
Great tutorial… just one problem… I applied my sig to the picture, but it looks like I still have the “marching ants”, although “not marching”, on the signature.
I used white as well, but it has bad pixel-looking things on the borders of the signature.
edit: it looks like it does it for all of my “blob” shapes…
Help please?
HERO
April 23rd, 2009 at 7:39 am
CHRIS, My guess here is that you’ve got your Custom Shape tool set to “Shape Layers” instead of “Pixels”. Take a look at the Options bar at the top of Photoshop when you’ve got the Custom Shape tool selected. You’ll see a set of 3 icons at the left of the Options bar (Shape Layer, Paths and Pixels). Click on the Pixels icon and try dragging your signature onto the stage again.
MaverickBlogging
April 30th, 2009 at 11:34 pm
Very useful. Thanks for the tutorial.
Zephyr
May 21st, 2009 at 7:26 am
Oh HERO ! I’m here again, very nice tuto, thanks !
Martina
July 4th, 2009 at 3:06 am
Thanks a lot!
Rahuul
July 20th, 2009 at 4:03 am
Hey Hero.
thank you very much.
this is what I have been looking for.
Jake Rocheleau
July 23rd, 2009 at 7:21 am
Sweet post! I’ll definitely bookmark this one to Delicious
April
August 23rd, 2009 at 1:46 pm
Does this work for CS3? My drop-down menu, when I select the path, does not have the option to “define custom shape.” It DOES have “set as smart object,” but that doesn’t seem to do anything similar. Also, when I invert and go back to the RBG viewing mode, the inside of my lines stay black instead of turning white like yours are in the tutorial.
HERO
August 31st, 2009 at 1:21 pm
APRIL, Yes, this works in CS3. Make sure you’ve got either the Pen tool or the Direct Selection or Path Selection tool active (just press the A key to switch to those tools) since often menu items like this are available only under the appropriate tool.
Antonio
September 27th, 2009 at 3:31 pm
Thanks for great tutorial
austin cosmetic dermatology
November 16th, 2009 at 2:24 pm
Extremely creative. Hadn’t thought about this before. I’m glad I stumbled upon this tutorial. Thanks!!!
evilkitty75
November 18th, 2009 at 10:39 pm
So nice that ppl r willin to share there lil tricks… i tried for 2 yrs to figure out how
to save brushes to ABR* so i could share them
n the most frustrating thing was loads knew how to do it but few wanted to share so i made a vid!! lol look me up on youtube n find out how!!!
I LOVE VECTORS!!!
kanacho
January 6th, 2010 at 10:31 am
thank you
I got stuck in bits of it thou
but did it.
keep up the good work
Mikemusic
February 5th, 2010 at 7:24 pm
I’ve seen other tuts but they didn’t deliver the result I was looking for until I followed this one.
Thank you so very much.
canvas paintings
February 17th, 2010 at 3:36 pm
I’ve been looking for a way to do this for ages for my artwork online, thanks ! great stuff keep it up.
Cool
February 22nd, 2010 at 6:33 pm
Thank’s dude it look’s AWESOME!
emlak ilan
March 6th, 2010 at 4:14 am
Uh oh, I think I found a typo… I won’t hold it against you. ;)
There’s plenty of room in the tip jar, everyone. Let’s do our part to keep Hero’s tutorials coming!
flow
April 20th, 2010 at 1:35 pm
you are a legend in the making. my first visit to your site and i’ve learnt a lot already.
i’ll be back!
katerlake
May 10th, 2010 at 1:08 am
Hey, this is an great tutorial. I will test it with Photoshop elements.
Tom
July 13th, 2010 at 3:22 pm
Excellent tutorial. I struggled a little because I’m not that conversant with Photoshop. But I got there in the end and I can now apply my sig to my own photos.
Rick
October 25th, 2010 at 5:31 am
Thanks Hero!
Mubashar Ghuman
October 27th, 2010 at 3:07 am
wow nice and good tutorials