
 Photos – Part 2")

Text In Stitches
I've had quite a few emails since posting the Copper Rivet tutorial asking how I created the stitched text in my final image. So in this Photoshop tutorial I'll show you how to convert text to a path and how to stitch that path using a custom brush set.Introduction
Over the years as a graphic designer I’ve accumulated a wealth of custom brushes, shapes and actions that I keep carefully organized and labeled for future use. The brush set I’ll be sharing with you today has been in my collection for probably five of six years and every once in a while I’ll find a good reason to load it into my brushes palette. If you’ve never done that before, don’t worry, I’ll walk you through it as we go.
If you’re playing along at home you should download the brush set before we get started.
Step 1
Lets go ahead and begin by opening a new document in Photoshop. Mine is 540×300 pixels at 72ppi.
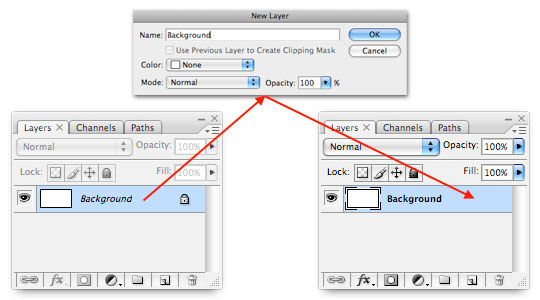
Since stitching on a plain white canvas is a little silly, lets go ahead and spice up the Background layer with a little texture. By default the Background layer in any new Photoshop document is locked, so lets go ahead and double-click on the Background layer in the Layers palette to bring up the Layer Properties dialog box. Simply rename the layer or name it Background once again and hit OK to unlock the layer.
Step 2
Now that our Background layer is unlocked we’re going to add a Pattern Overlay Layer Style to it which will give us a quick and easy denim background to work with.
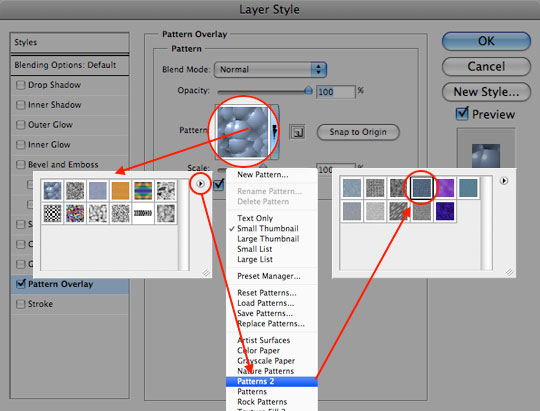
Control-Click (PC: Right-Click) on the Background layer in the Layers palette and choose Blending Options from the menu. This will bring up the Layer Styles dialog box. Click on the Pattern Overlay text in the left column. (You must click on the text and not on the checkbox. Clicking the checkbox will turn the style ON but it won’t give you the options for the style, so it is important to click on the text so we can modify the Pattern Overlay style options.)
Next we need to load a new set of Patterns into the Pattern Picker. Click on the Pattern swatch to reveal the Pattern Picker, then click the little circle with the arrow in it at the top right corner of the picker. Choose "Patterns 2" from the list and click OK to load the new pattern set into the Pattern Picker. Now simply click on the Denim swatch which is the 4th pattern in the set and click OK to close the Layer Styles dialog box and commit the style to the layer.
Yes, I know, this graphic is a mess… but hopefully it gets the point across.
Step 3
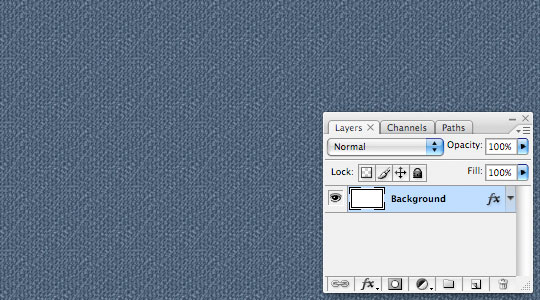
You should now have a background full of denim and a layer style icon in the Background layer of the Layers palette.
Step 4
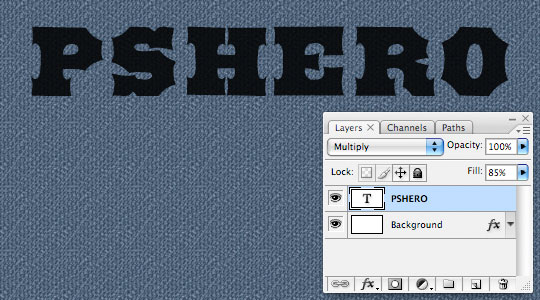
It’s now time to add some text to our document. Press the D key to reset the foreground color to black, then press the T key to invoke the Type tool. Click on the stage to place the cursor and type some text onto it. Notice that when you added the text that Photoshop automatically added a new layer for it.
(*note: To commit the text you can either press the Enter key on the 10-key corner of your standard keyboard or click the Check-Mark in the Text Tool options bar at the top of Photoshop.)
Step 5
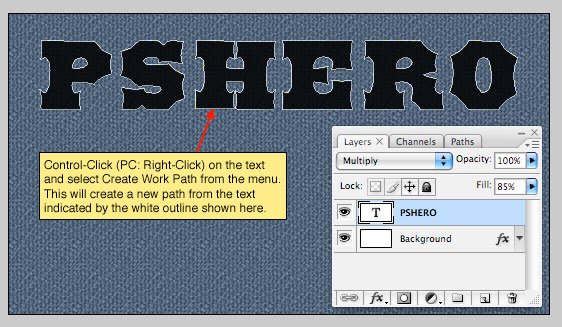
Now that our text is created and while we still have the Type tool chosen we need to create an outline path of the letters. Control-Click (PC: Right-Click) on the text on the stage and choose Create Work Path from the menu. This will create a white outline around each letter indicating that you’ve created a work path (obviously) which we will use later in the lesson to stitch around.
Step 6
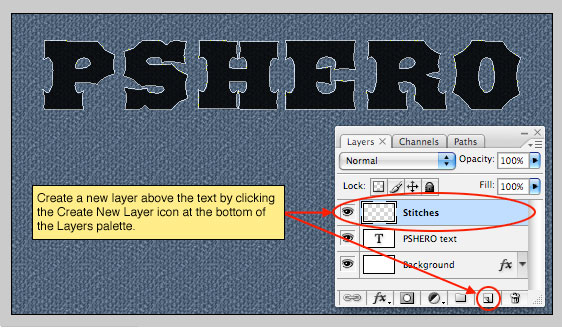
Add a new layer above your text by clicking the Add New Layer icon at the bottom of the layers palette or by using the keyboard shortcut Command-Option-Shift-N (PC: Ctrl-Alt-Shift-N). Rename the layer by Double-Clicking on the layers name in the Layers palette. I called this new layer Stitches.
Step 7
Now it’s time to setup everything in preparation for the stitching, and the first thing we need to do is load the stitching brush set into our Brushes palette. If you haven’t downloaded them yet you’ll want to do it now by clicking HERE. Save the brush set to your desktop or someplace you’ll remember when we go looking for them.
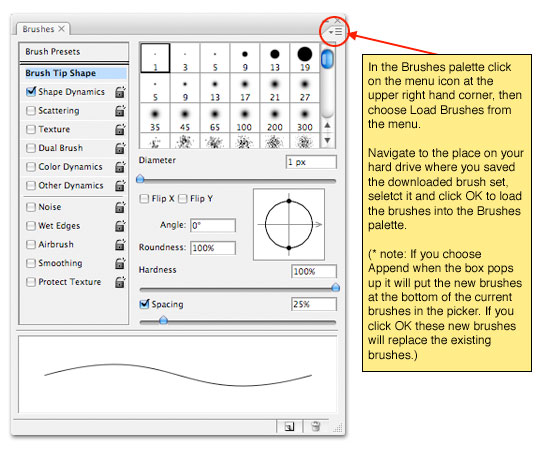
Press the B key to invoke the Brush tool, then bring up the Brushes palette by choosing Window>Brushes from Photoshop’s main menu. In the upper right hand corner of the Brushes palette, click on the options icon and choose Load Brushes from the menu. Navigate to the brush stitches brush set that you just downloaded to your hard drive and click Load. You will then be asked if you want to Append the brushes to the end of your current brushes or if you want to replace the existing brushes by clicking OK. For my example I’m going to replace my existing brushes, but either option works fine.
Step 8
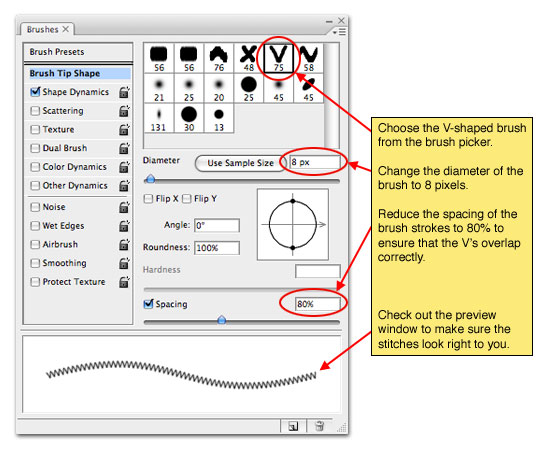
Now that the brush set has been loaded into the Brush Picker lets go ahead and select the V-shaped brush. We’ll need to make a few adjustments to the settings in the Brushes palette for this brush to make it work the way we want.
First off lets reduce the size of the brush to around 8 pixels in the Diameter setting then make sure the Spacing checkbox is checked and that the spacing is set to around 80%. The spacing change makes the V’s overlap enough to look like interlocking stitches.
Step 9
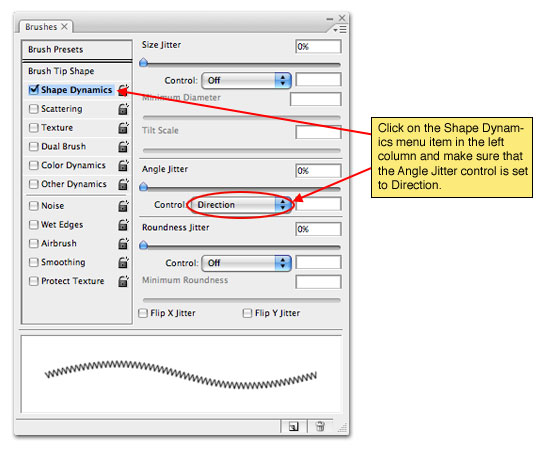
While still in the Brushes palette click down to the Shape Dynamics link on in the menu on the left and make sure that the Angle Jitter control is set to Direction. This will make the brush rotate as it goes around the corners to the different sides of our letters.
Step 10
At last it’s time to make the magic happen. Put on your wizard hat and swap the foreground and background colors by pressing the X key (white should now be showing as the foreground color at the bottom of the Tools palette). Press the P key to switch to the Pen tool and then Command-Click (PC: Right-Click) anywhere on that little white outline that is the Path around the text. Choose "Stroke Path" from the menu, make sure that "Brush" is selected from the drop-down menu and that the Simulate Pressure checkbox is un-checked then click OK.
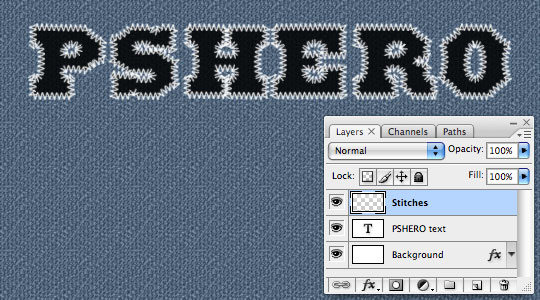
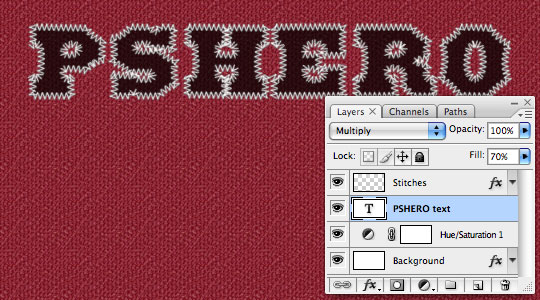
You’ll now see that the brush we chose has been used to stroke the entire path of the text. Since we’re done with the path now you can either click over to the Paths tab in the Layers palette and delete it, or simply press Command-H (PC: Ctrl-H) to hid it.
Step 11
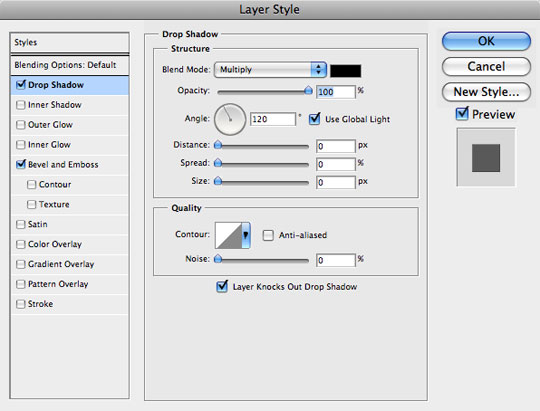
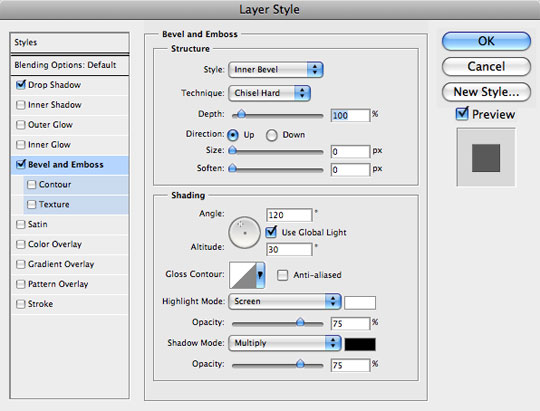
To make the stitches a little more realistic lets go ahead and add a few layer styles to the Stitches layer. Just like we did in Step #1 lets Command-Click (PC: Right-Click) on the Stitches layer and choose Blending Options. Now add a Drop Shadow and a Bevel and Emboss as shown below, be sure to check each setting to make sure you haven’t missed anything then click OK.
The slight Bevel and Emboss will add a little more dimension to the thread while the Drop Shadow will add a touch of shading around the edges.
Step 12
Before we move on let me show you a cool little trick to change the background color. Since the background is a preset color pattern and not an overlay we can’t just change an underlying layer color so we have to resort to other methods. Click on the Background layer in the Layers palette to make it the active working layer. Now lets add an adjustment layer by clicking on the Create A New Fill or Adjustment Layer icon at the bottom of the Layers palette (it’s the circle with half black and half white), choose Hue/Saturation and use these settings (or any that look pretty to you).

Step 13
The last little bit of adjustment I did was to click over to the Text layer in the Layers palette and change it’s Blend Mode to Multiply and it’s Fill opacity to 70%. By doing this we allow a little of the denim texture to come through onto our black letters adding a little depth and realism.
(*note: You could also paste some real fabric into a layer above the Text layer and use a clipping mask to add even more coolness.)
Step 14
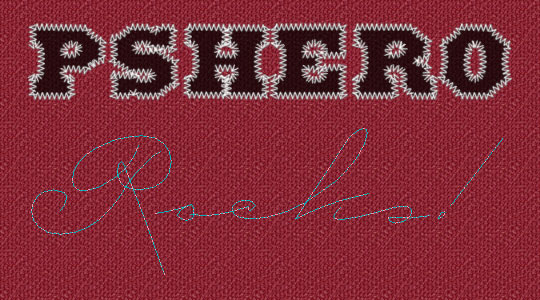
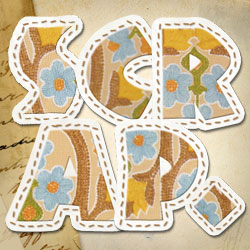
Anytime you’re using a text to create this effect you will always have an outline of the lettering, but what if you just want to stitch letters? Well, if you’ve got a little experience with the Pen tool you can apply this same technique to any number of paths you’ve drawn yourself.
Below I’ve used the pen tool to draw some text.
Step 15
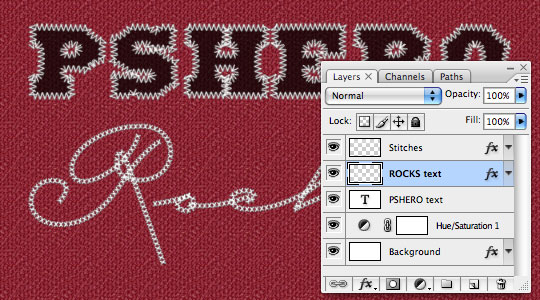
Then I switched to the Brush tool, lowered the diameter of the brush to 6 pixels, switched back to the Pen tool and Stroked the path just like we did back in Step 10.
I then added the same Bevel & Emboss and Drop shadow to this new layer of stitches as we did to the original text.
Step 16
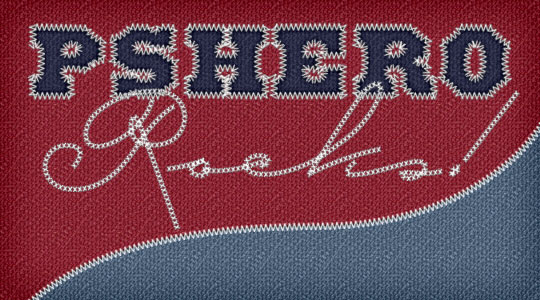
In my final image I simply embellished on the techniques we’ve learned. Check out the .PSD download to view all my final adjustments!
Lesson Files + Additional Resources
Download the free .PSD file and other lesson files Right Here.
Special thanks to Denis Germain from the former eScrappers.com who created this brilliant and useful brush set.
Tell Your Friends
More in Text Effects


128 Responses to Text In Stitches
Raphaël Confiant
April 13th, 2010 at 10:55 pm
Thanks for your tutorial, I’m going to train because it gives a really beautiful made.
alli
June 2nd, 2010 at 10:26 am
thanks! as far as downloading the brushes, i had to option click them – otherwise they were trying to read them as html. but option click and they’ll download.
thanks a lot! really good tutorial.
vj saturday
July 6th, 2010 at 9:48 pm
love it, thanks for the tutorial..
really really good..
Reguina
September 2nd, 2010 at 7:33 am
Thanks for the lessons, I’m from Russia
Mark
September 4th, 2010 at 7:34 pm
hey hero, great stitch effect tutorial. one ? though, how can i turn a vector shape or graphic into a work path to also give the stitch effect? i did it once on a 3 leaf clover design but then i forgot the steps i used to get the stitch outline.
HERO
September 29th, 2010 at 1:06 pm
MARK, You can certainly do this with a vector shape or graphic. Simply place your vector like you normally would, then Command-Click (PC: Ctrl-Click) on the layer’s thumbnail in the Layers Palette to load it as a selection, then choose Select > Modify > Contract and reduce the selection by a margin that’s right for the project, then, with the Marquee tool active, Command-Click (PC: Right-Click) on the path and choose Create Work Path. At this point you should be able to stroke the path just like the tutorial suggests. You could also place your vector as a path and then Free-Transform the path to be smaller, but usually the spacing between the inside and outside paths won’t match up, which is why I use a selection that I can reduce by an exact number of pixels.
Sijith
November 6th, 2010 at 4:48 am
What an Idea!!!!!!!!!
John
November 7th, 2010 at 9:59 am
Thanks for the tutorial, very nice. Very simple, however, I have a problem at Step 8 and 9.
When I select brush V/75 and change the size to 8 and spacing to 80% the preview box shows a curved line with some jagged edges. If I increase the size the stitching becomes a bit more legible. It is as though I have bold enabled on the brushes or something like that. Are there any other PS settings that might interfere with this? Thanks.
HERO
November 9th, 2010 at 10:23 pm
John, It sounds like you’ve got the Pencil tool active not the brush tool, they both live in the Brush Tool flyout of the Tool Bar, that would be the first thing I’d check.
aziz haq
December 10th, 2010 at 6:02 am
Very effective text .
yulycolo
December 13th, 2010 at 8:47 pm
Thanks, for the excellent tutorial and you nice work.
Julia
December 29th, 2010 at 10:03 pm
hey, this was cool, it took me a minute to complete it but it was totally worth it, but how do you reduce the stitch opacity? if that makes sense
Cgbaran
January 22nd, 2011 at 11:36 am
great tutorial thanks
Santhosh
January 23rd, 2011 at 9:02 am
Man !! tat was awesome and was easy to understand :D nice work keep it up !! ur really a hero :P
Taylor
January 24th, 2011 at 12:48 am
Please excuse me for not reading through the TONS of comments to see if anyones asked this already……..but what is the point of the drop shadow and bevel/emboss if both size and distance are going to be set to 0??
Mohamed
January 25th, 2011 at 7:47 pm
wonderful
thanx a lot for this tutorial
Tiffany
February 9th, 2011 at 8:06 am
Fantastic Tutorial!! Thanks for taking the time to write it! btw, your links to the brush maker at the bottom of your post are broken…
HERO
February 9th, 2011 at 8:41 am
TIFFANY, Thanks for letting me know. Looks like that site doesn’t exist anymore. I’ve removed the link. (The brush set is still included in the lesson .zip file at the end of the lesson.)
HERO
February 22nd, 2011 at 9:21 am
TAYLOR, the secret here is that we’ve changed the Technique of the Bevel & Emboss to Chisel Hard, which when set to a size and distance of zero will give a nice sharp 1px bevel and emboss.
AMAL
May 16th, 2011 at 11:13 am
fantastik
Thanks!
mag wong
May 19th, 2011 at 4:36 am
Thanks for the sharing…. Very easy to understand…. It really help me. Thanks a lot.
Cheer~
Sherri
May 21st, 2011 at 9:16 am
Not sure if it is possible but can this be done in Photoshop Elements?
goldenboyz
May 22nd, 2011 at 12:34 pm
really nice looking effect and outcome. the brush stroke of the stitches is so realistic. great job
HERO
June 13th, 2011 at 5:49 am
SHERRI, It’s been a while since I’ve played with Elements but the last time I don’t think it had vector/path capabilities but that may be different now. Chances are that if your version doesn’t have a Pen Tool then it’s not possible in PSE.
Mitsue
June 13th, 2011 at 7:05 pm
Hi thanks a lot for this tutorial I’ve always wanted to learn about stiching in photoshop. and sory for my ignorance but I have absolutely no idea of what to do when you say P key, I mean is that like ctrl+P or shift+p or just p?
thanks!
HERO
June 21st, 2011 at 3:08 pm
MITSUE, If I don’t specify a modifier key (like Ctrl or Alt) then I simply mean the key alone (like the P key to switch to the Pen tool). Switching between tools in the Tools bar is typically done with a single key.
Jen
August 6th, 2011 at 5:39 am
Hi! Thank you for this easy to follow tutorial. Your instructions are so clear and easy to understand. I thoroughly enjoyed doing it. I’m now going to do your “Create a Scrapbook Alphabet” tutorial.
Ray Lukman
October 10th, 2011 at 8:06 am
this is inspiring my work of embroidery digitizing Hero!..i need no embroidered sample but just this awesome display..i really will find this helpful. You’re amazing!..