


Exporting With Zoomify
In this Photoshop tutorial I'll show you a quick and easy way to show off your panorama images using Photoshop's Zoomify feature.Step 1
Sometimes a single photograph just can’t capture the majesty, vastness or sometimes complexity of a scene and the dilemma has plagued photographers for decades. Oh sure, you could go spend your kids college fund and buy a large format panorama camera and then exhaust yourself packing it to every photo shoot just incase the opportunity presented itself… but as anyone who’s ever hiked a 10 mile trail for a photo will tell you, that’d be no fun at all.
Thankfully we live in the digital age where with a little know how and a few simple tools we can take a series of photographs, plug them into our nifty software program and end up with a stunning panoramic photograph. Ok, I know you’re going to ask for a tutorial on stitching panorama shots, so spare me the comments and requests, I’ll put that on my list!
I took a series of 16 vertical photographs of the Luberon valley near Gordes, France a few years back. The native file size of the final image would be equivalent to having been shot with a 36 Megapixel panorama camera (if such a thing existed). Sure, it’s no big deal to print an image of this width, but as you can see from the example below, it’s darn hard to share with my friends via the internet.

Step 2
Luckily, the good folks at Adobe were once faced with the same dilemma and have included a nifty little function for us in Photoshop. Lets take a look at how I’d prepare a photo for the Zoomify technique and then go through the process.
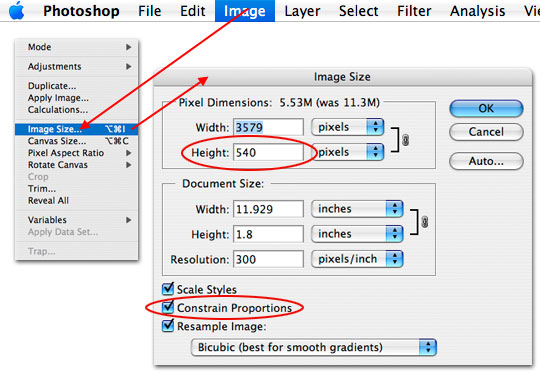
First of all, there’s no way my friends are going to wait for a 460MB file to download, so I need to resize the image to something more practical. Since I know that for this website I don’t like my images to be wider than 540px, and since I also don’t want my buddies to have to zoom in and out of my photo to pan through it, I’m going to choose Image>Image Size from the main menu and constrain the proportions to 540px in height (which makes the image a hefty 3579px wide).
(*note: If the image you create is larger than your final view window, your viewers will have controls available to scroll up and down as well as side to side.)
Step 3
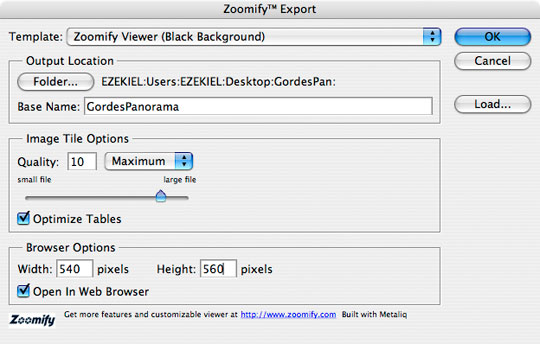
Now that the image is resized, it’s a simple as choosing File>Export>Zoomify from the main menu and setting a few parameters including the background style I’d like behind the image and what size I want the view window to be. It’s important to know that the controls that will appear beneath the image measure 20px tall, so add those 20 pixels to the size of your image if you don’t want any vertical scrolling (so in this case the image height is 540px, so I’ll make the view window 560px tall). You can also choose to have it open the file in a browser when it’s done processing it.
Step 4
And just like that, we’ve got our panorama image placed nicely into a window that we can fit into any webpage for our friends to enjoy. Go ahead, pan around, knock yourself out!
*If you are using an older IE or Netscape browser and can’t see the image below, you may want to consider switching to a more standards compliant (and up to date) browser like Firefox.
(*note: obviously since Photoshop did all the heavy lifting here, there’s no tutorial file needed for this lesson.)
Lesson Files + Additional Resources
There are no file downloads or additional resources for this Photoshop tutorial
Tell Your Friends
More in Tips & Tricks


13 Responses to Exporting With Zoomify
DS
April 24th, 2008 at 11:14 pm
Now were you talikng about IE not being able to see the flash part or a specific picture?
HERO
April 25th, 2008 at 8:23 am
DS, thanks for your question and for the screenshot you sent me. If you can see the photo at the end of the lesson then your browser did what it was supposed to (yours is the IE8 Beta and seems to work fine).
dilirum
April 25th, 2008 at 10:08 am
Holy crap!!! All this time of playing and messing around in PS and another feature that I had no idea existed! That’s frigging’ amazing dude! No more sending my friends 500mb images – haha – j/k the reality is that I ‘d spend all the time to make a fantastic panorama and much like you did at the top of the tut – I’d shrink it down to a ridiculously short height so that the file size isn’t overwhelming and my friends don’t have to scroll left/right. Thanks for a simple yet great tut! I’m wowed!
HERO
April 25th, 2008 at 10:55 am
Dilirum! I’m psyched you found it as exciting as I did. I’ve known about the feature for quite some time but I always seem to forget it about the time that I need it. duh.
Zephyr
April 26th, 2008 at 8:00 am
Hey Hero !
Nice tuto AGAIN :D
But you need to post some tutos more times in a week =0
I like so much and i learn a lot here !
Thanks,
Zephyr =)
HERO
April 26th, 2008 at 8:33 am
Zephyr,
Thanks for the compliments, I’m glad you’re learning a lot! I post as often as I can but many of these tutorials take 6-8 hours or more to create and write so a few a week is as much as I can usually manage.
Zephyr
April 27th, 2008 at 8:47 am
Ohh i know it take MANY AND MANY hours :)
Have you a MSN ?
If yes.. can you send for my e-mail ?
Thx Hero !
Chappy
May 30th, 2008 at 7:58 am
Very cool tip. And I have stayed in Gordes too a few years back!
Chris
June 18th, 2008 at 3:38 am
Man this is awesome, I’ve learnt so much since discovering this website yesterday!
Is this feature only available in CS3? I can’t find it in CS2.
Many thanks!
photo retouching
May 10th, 2009 at 11:05 am
A great resource and a nice website. I will be bookmarking you site as I think it is great!
HERO
August 15th, 2009 at 11:22 am
GUEST, I took 16 shots with the camera held vertically (portrait) but obviously shot the panorama on the horizontal plane. By putting the camera vertical I was able to capture as much of the frame as possible. Hope that clears it up for you.
Photoshop CS5
October 27th, 2009 at 7:48 am
A handy site to follow.
I will come back to you.
Kind regards
PS CS5 Team
houston spa
November 18th, 2009 at 2:32 pm
Gorgeous photo from France, BTW.
Thanks for the tutorial. It helped me in what I was trying to achieve.