Layer Style And Layer Mask Interaction
In this Tips & Tricks tutorial I'm going to show you a neat little trick involving layer styles and the way they relate to layer masks.Step 1
You know how sometimes you think you’re so damn smart… And then you learn something so basic that it makes you feel silly for thinking you were at all smart in the first place? Well, if you’re a long time PS user like me and you don’t know this trick, be prepared to have that feeling.
I never new about this little gem and just had processes in my workflow to compensate, so I can’t say I ever missed it, but now that I know, I use it all the time!
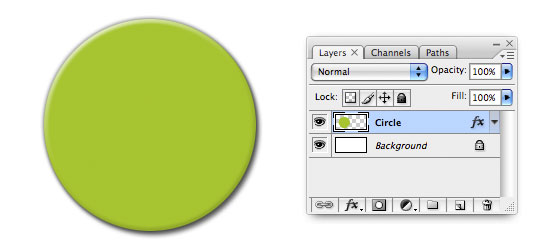
I’ve setup a simple example below to help me demonstrate. I’ve added a new layer and with the Elliptical Marquee tool created and filled a circular selection which I then applied a few simple Layer Styles to (ie. Drop Shadow, Outer Glow and Bevel & Emboss).

Step 2
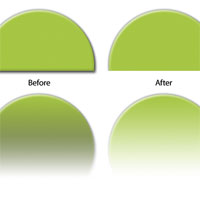
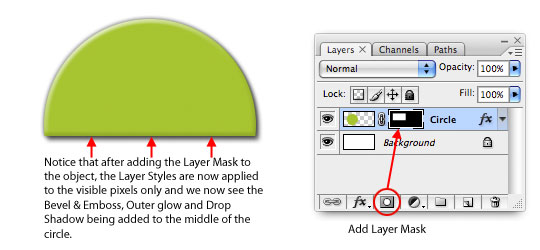
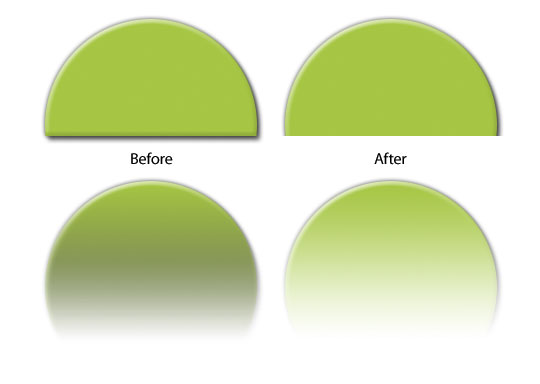
Next, I’ll grab the Rectangular Marquee tool and create a selection around the top of the circle. With that selection made I’ll click the Add Layer Mask icon at the bottom of the Layers palette to add a Layer Mask to this layer. The issue we’re going to solve today now becomes evident. As you can see, not only have I masked the circle, but Photoshop has now automatically adjusted all the layer styles to apply only to the unmasked pixels on the stage. Now, sometimes you want this to happen… But sometimes you don’t.

Step 3
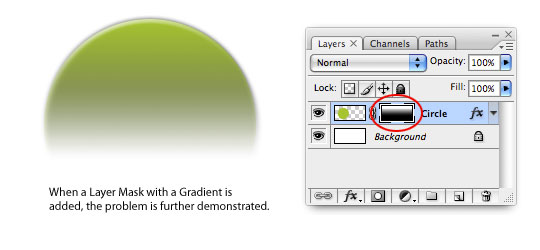
Adding a Gradient to the layer mask to create a fading effect compounds the problem as Photoshop struggles to apply Layer Styles to partially transparent pixels causing the bottom of the circle to take on a blackish look due to blending that’s going on with the underlying Drop Shadow.

Step 4
So here’s the Tip:
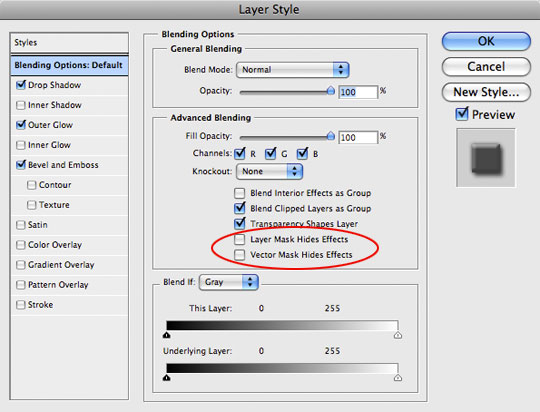
If we open the Layers Styles dialog for the Circle layer back up by double-clicking on its Layer Style icon, we are by default opened to the Blending Options page. You’ll notice that in the center of the dialog is a section called Advanced Blending and inside that area is a feature called Layer Mask Hides Effects. By default this checkbox is not checked. Notice also that the next unchecked box is for Vector Masks, which makes this tip relevant to both types of masks.

Step 5
If I click on the Layer Mask Hides Effects box, you can see that now the mask is independent of the Layer Styles and is applied to the actual pixels on the layer AND the layer style in exactly the same way.
If you already knew this little tip, shame on you for not sharing it with the rest of us… And if you didn’t and are now having that feeling I mentioned, don’t worry, I won’t tell anyone.

Lesson Files + Additional Resources
There are no file downloads or additional resources for this Photoshop tutorial


69 Responses to Layer Style And Layer Mask Interaction
Ulrich
January 29th, 2009 at 10:11 am
NO WAY! I am a 5 year Photoshop user and never even knew this existed. I can’t say how many times I’ve had to work around this problem with extra masking layers. Thanks a million!
NetOperator Wibby
January 29th, 2009 at 11:22 am
Thanks for the tips HERO!
Gail
January 29th, 2009 at 11:27 am
Great tip and tutorial – thank you!
Carter Harkins
January 29th, 2009 at 12:12 pm
Heh. I don’t mind feeling stupid if what I learn saves me time. Thanks for the tip!
ae
January 29th, 2009 at 1:47 pm
Excellent example of when to use that checkbox :)
v-render
January 29th, 2009 at 1:52 pm
great tip !
Eva
January 29th, 2009 at 2:33 pm
Ah, dammit :-)
Sean
January 29th, 2009 at 3:15 pm
wow. i must say this is one of the best and most simple photoshop tricks i’ve ever learned. i’ve ran into this problem far too many times and it would drive me up the bloody wall. Thanks so much for this!
sha
January 29th, 2009 at 4:13 pm
Wow… I was so proud of my workaround which consists in putting the layer in a group and applying the mask to the group itself ! I can’t believe I didn’t know this !
Daniel
January 29th, 2009 at 4:19 pm
Thanks from me as well, I have wondered so long where this option was hidden *dancing!*
HERO
January 29th, 2009 at 4:32 pm
Is it weird to somehow feel better about myself knowing that this was news to you guys too?
Michael Willis
January 29th, 2009 at 4:41 pm
Its never felt so good, to feel so dumb! Thanks.
Paulo Sales
January 29th, 2009 at 6:35 pm
That was sick !
The best tips as usual …
Manu Joseph
January 29th, 2009 at 8:50 pm
Wow… I always used to make a new layer and merge the layer with layer styles into the new one and then apply the mask.. never knew of such an option.. Awesome.. This is so much better..
Kalynn
January 29th, 2009 at 10:49 pm
thanks for sharing this tip! Since I’m still new to Photoshop, you just saved me from having to figure out a workaround! I can already see uses for this in my work.
Kyle
January 30th, 2009 at 2:06 am
VERY useful tip, thanks a lot hero!
Ville
January 30th, 2009 at 3:33 am
Wow thanks a million for this tip!! I’ve been using PS for some 9 years and never noticed :D
Green Sheep
January 30th, 2009 at 6:30 am
I too have perfected a work around method for this problem, but now no longer do I have to do this. Thank you.
beto machado
January 30th, 2009 at 7:46 am
really nice! thanks a lot :)
Pradeep CD
January 30th, 2009 at 8:03 am
Useful to me.
florian
January 31st, 2009 at 8:41 am
as i said before.. Hero.. you have the only tutorials in the net that don’t tell how to get from A to B but explain nicely how to solve common problems.
@ulrich: don’t blame yourself.. I’m working with PS for nearly 10 years now, and I still learn from hero. PS is such a incredibly huge product, that noone can know everything about it. but that’s good too. Helps keeping the enthusiasm and curiosity about the program. It still is my favorite “game” on PC I love to play with for about 10 years now and I think that’s something special.
RUGRLN
February 1st, 2009 at 1:59 am
C?ɬ°n’t believe I never knew that….arrrgh!
Andre
February 1st, 2009 at 11:51 am
Thx, great tip, didn’t know that either.
Nadia
February 3rd, 2009 at 12:34 pm
Wow, i’m kinda a new photoshop user, i just started in december! lol This is a great tip, thx so much hero!
btw, i luv this tut site, it has pretty much all the answers i need! thx <3
abitw
February 4th, 2009 at 10:14 pm
says “oh god” and hides under the table
Danny
February 10th, 2009 at 2:08 am
similar things for drop shadows when you want to hide the shadow for transparent layers…
Scott
February 15th, 2009 at 2:37 pm
I accidently discovered this year. and i totally slapped my forehead and said thank god at the same time!
austin web design
February 20th, 2009 at 2:19 am
thanks for this. I’ve probably overlooked that checkbox countless times and found silly workarounds for no good reason.
michael
February 21st, 2009 at 10:10 pm
wow… photoshop is so huge! It seems like I learn something new everyday!
Viper000
February 23rd, 2009 at 8:45 pm
Another easy way to do this, is to duplicate the layer, hide it, and then in the new copied layer, draw a straight line with a large soft eraser. (0% hardness)
The nice thing with photoshop, is there are an infinite number of ways to accomplish the same task. :)
photofolio
February 24th, 2009 at 8:22 am
More then a decade on PS and didn’t know this trick. *Feels ashamed* Actually the whole ‘advanced blending’ menu is a bit difficult to grasp at first, maybe an idea for a tutorial?
Si
February 25th, 2009 at 4:50 pm
It’s little tips like this which makes blogs such a good learning platform. Thanks for sharing!
KJ
March 1st, 2009 at 4:12 am
Wow, this is exactly what I wanted especially for the partially transparent objects where the drop shadow style leaks in.
I searched for this before but to no avail. If I was having this problem, I was pretty darn sure someone else was having the same in the last howmanyever installments of Photoshop.
Thanks so much for this tutorial =)
KJ
March 1st, 2009 at 4:24 am
Actually, it was “Transparency Shapes Layer” that did the trick under Advanced Blending for me (to keep the drop shadow out from appearing within the transparent graphic), but without this article I probably would have glossed over it. Thanks again.
SSAL
March 4th, 2009 at 11:31 pm
Oh my god~~~~~~~
Thankyou very very mach~~~!!
sclifton
March 10th, 2009 at 5:55 pm
killer, you just saved me alot of time,
and time is money!
ill be back!
genial
March 20th, 2009 at 10:59 am
is that possible?
Tom
March 23rd, 2009 at 9:20 am
Aaah! Oh man I have been trying to solve this forever – THANK YOU. I just did it now in a file I am working on – perfect. I always resorted to copying the background layers and manually masking over the object, which was a real pain.
genial
March 25th, 2009 at 8:39 am
hi ther again…
thnx for all doods… you still my Master here!
mr. diggles
April 15th, 2009 at 7:30 pm
i wish even one of my comments were as good as yours.
well done!
Daryn St. Pierre
April 21st, 2009 at 10:57 am
I can’t even count how many times I’ve completely overlooked this and used a workaround. This is an awesome tip! Thanks!
Travis Seitler
April 25th, 2009 at 8:43 pm
=o
10 years, and I never knew this! Oh, the things I’ve done to try and compensate… and it was all a matter of a couple of simple checkboxes?!
Yeah, I’ve got that feeling now. Thanks. I think… ;)
Polita
April 29th, 2009 at 4:49 am
Heh. I learned something new today, thanks! And I was so proud of myself for having the perfect workaround way for this problem – converting the layer into a Smart Object, then rasterizing it, and then applying whatever mask I want to it. I should have known that Photoshop had offered a solution I guess. I wonder in which version this came out, though.
Aimee
May 3rd, 2009 at 5:05 pm
Wow. I used to do what Manu Joseph did, making another layer and merging them–losing any ability to alter the styles from then forward–and I was SO proud of myself for figuring THAT out!
Way to go. Thanks a bunch!
Deborah Lein
May 12th, 2009 at 2:33 am
My Hero!
matt
June 8th, 2009 at 2:30 pm
I’ve known about this for some time – wish that it worked on masks in layer sets too.
Wijang
July 2nd, 2009 at 3:31 am
Thank’s for ur tip
Oyunlar
July 5th, 2009 at 10:04 pm
Not bad. thanks
Suciu Vlad
July 24th, 2009 at 5:58 am
Can’t believe it. It was there all the time! :)) hehe. thanks
NYPunk88
August 2nd, 2009 at 8:39 pm
Freakin’ awesome man.
oyun
August 10th, 2009 at 8:29 am
perfect!! Thanks!
Tristan
October 25th, 2009 at 10:15 am
Awesome – so simple, yet I hadnt seen it. thanks!!!
original art
December 5th, 2009 at 7:12 am
Thats fantastic brilliant tutorial, easy once you know how, thanks for sharing.
drew j
December 20th, 2009 at 9:36 pm
Photoshop newbie but it looks like this would save me a lot of time. And this would be effective for doing those shiny reflections that Apple is so good at…hooray.
Thanks for all the tuts man!
drew
Annukka
January 18th, 2010 at 6:23 am
It’s not many days ago since I last struggled with this. Thank you for pointing it out. It’s gonna be so easy from now on :)
emlak ilan
March 6th, 2010 at 4:12 am
Great tip and tutorial – thank you!
chantal
March 25th, 2010 at 9:27 am
Hombre! que buen consejo, gracias!
Patrick
May 28th, 2010 at 2:15 pm
Again and again i see the thank you to this issue, for me I new the answer just was not sure how to apply it. Knowledge with out wisdom is useless, thanks for the true explanation of how this works, I saw something for this for tabs at the top of a web page, but it just said do it, now how to make it work correctly.
Scott
July 8th, 2010 at 10:24 am
Wow, so simple I DO feel stupid! Thanks Hero, now I don’t have to use multiple layers “stupidly” to hide the layer effects. Man, I love simple solutions :)
Cheers
floryela
October 25th, 2010 at 12:23 pm
thank you ! great tips !
Leslie Nicole
December 5th, 2010 at 2:57 am
Excellent. Although I’ve known about some of the advanced layer style options, I haven’t explored them enough. Great tip.
MyView
December 8th, 2010 at 3:02 am
HUGE!
thank you hero.
Andrew Buckle
December 14th, 2010 at 10:44 am
Great layer style / mask tutorial tips .. always – always a slightly obscure part of Photoshop
Swoopers
December 14th, 2010 at 8:25 pm
Wow, this is a very easy to follow tutorial, yet the output is fascinating Thank you so much for sharing this info.
health video
January 22nd, 2011 at 8:42 am
gain and again i see the thank you to this issue, for me I new the answer just was not sure how to apply it. Knowledge with out wisdom is useless, thanks for the true explanation of how this works, I saw something for this for tabs at the top of a web page, but it just said do it, now how to make it work correctly.
Vince
February 1st, 2011 at 10:13 am
Good tip!
I knew about that weird lil tick PS had but a way around it would to place that layer into a folder and apply the mask on the folder instead lol
Ghetto but WORKS!
Lakeisha
February 25th, 2011 at 6:45 pm
Thank you for the tip. I’m relearning PS after having a class on it 10 years. I’m glad I found this tip early on.
Arifur Rahman
June 12th, 2011 at 6:33 am
Very useful tips. Thanks for share
Jenna
May 10th, 2012 at 10:41 am
I’m definitely having that feeling! And doubly so since it never occurred to me before to try to find a real solution instead of all my silly workarounds! Thanks!