


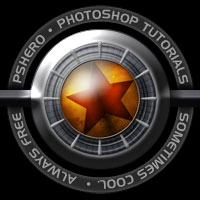
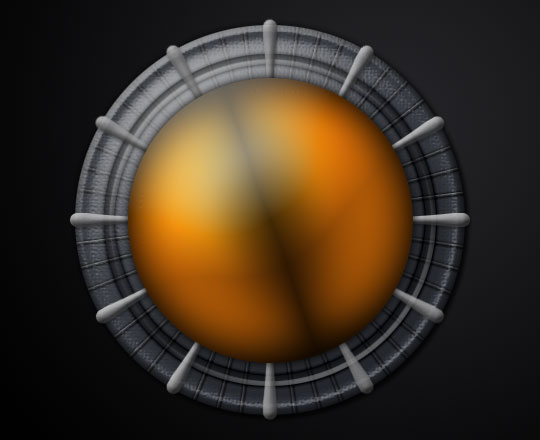
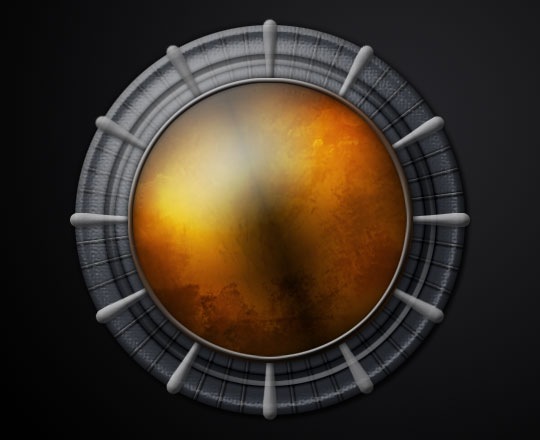
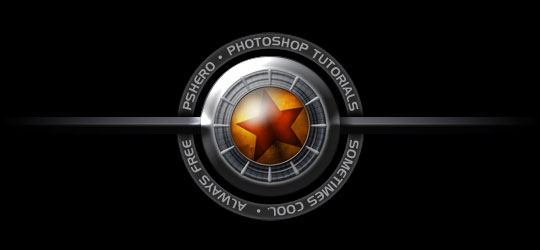
Glowing Orb With Dial
In this Photoshop tutorial we'll be experimenting with layers and styles to create a cool glowing orb and dial effect.Step 1
I’m starting with a document size of 540×400 at 72ppi and I’ve laid down a radial gradient in the background from #242427 to #005400.
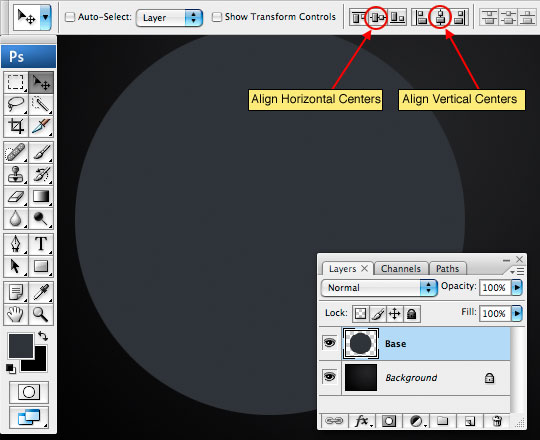
On a new layer which I’ll name Base I’ve created a perfectly round Elliptical Selection 390x390px and filled it with #2F323A and deselected. At this point I’m going to press Command-A (PC: Ctrl-A) to select the entire canvas, then V to switch to the Move tool. Using the Align Horizontal Centers and Align Vertical Centers buttons in the Move tool options bar at the top of Photoshop I’m going to center the circle on the stage. This step is very important because everything in the layers above will also use this centering technique to insure symmetry. So when I tell you to "Center" an object later in the lesson, you’ll know what I mean. Got it? Good.
(*note: If you haven’t selected the canvas, the centering buttons will be disabled.)
(*note: if you open up the Info palette by choosing Window>Info from the main menu, you’ll be able to see the exact size of any shape or selection as you create it. I promise this be useful in this lesson!)
Step 2
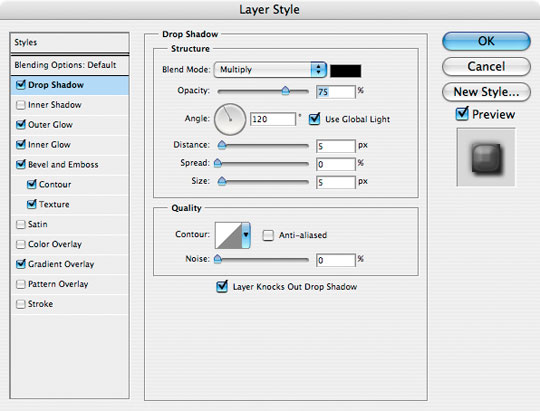
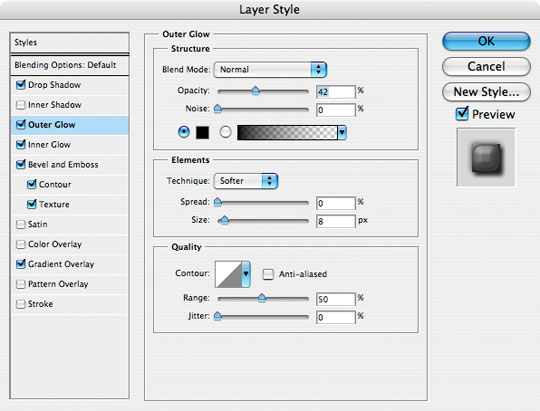
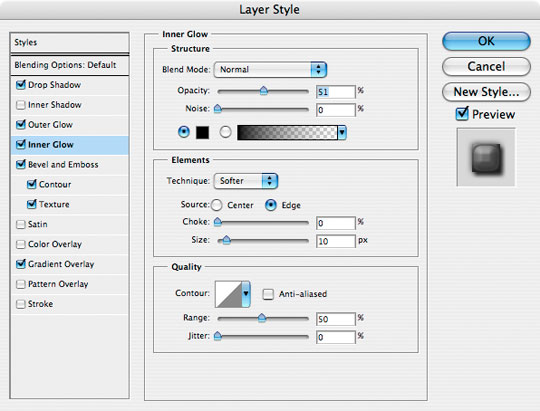
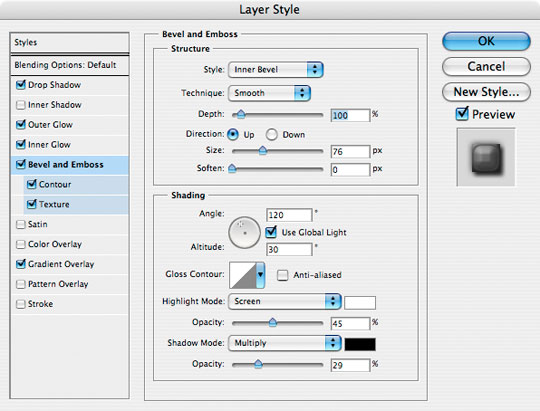
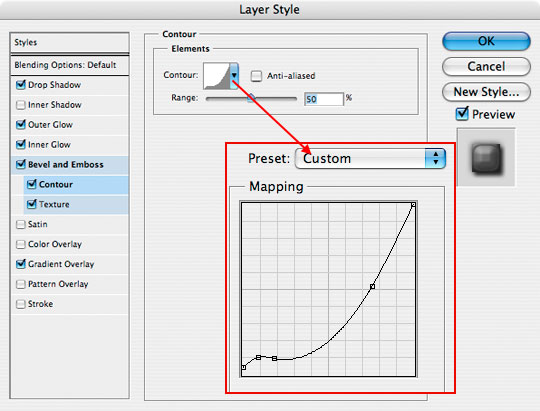
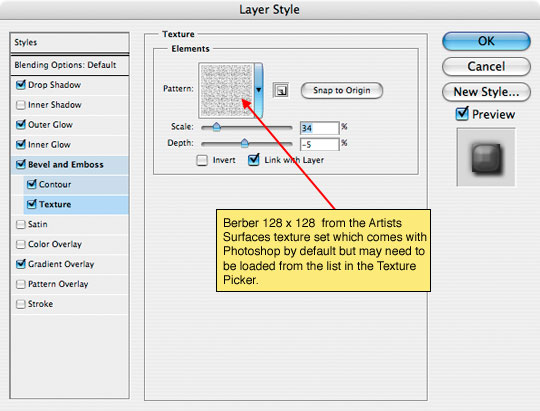
Next we’ll add a bunch of layer styles to give the Base layer the desired look. You can take creative liberties here, but these are the settings that looked best to my eye. Remember that the center will be covered up so we’re not too worried about how it looks. Hold on tight, we’ve got 7 styles to apply. Pay special attention to the Contour style as I’ve modified the shape of the contour to give the Bevel and Emboss the correct shape.
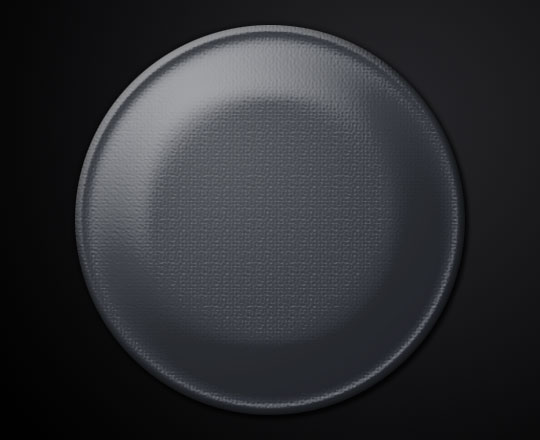
Step 3
If you followed along closely, the Base layer should now look something like this.
Step 4
Create a new layer called Inner Rings, on this layer select a circle 332×332, fill it with any color you’d like (we’ll set the fill to 0% so color doesn’t matter), contract your selection by 10 pixels by choosing Select>Modify>Contract from the main menu and press Delete (PC: Backspace) to remove the inner area then deselect by pressing Command-D (PC: Ctrl-D).
Center the ring by pressing V to invoke the Move tool, Command-A (PC: Ctrl-A) to select the entire canvas and then using the center buttons we talked about in Step 1, center the ring on the canvas.
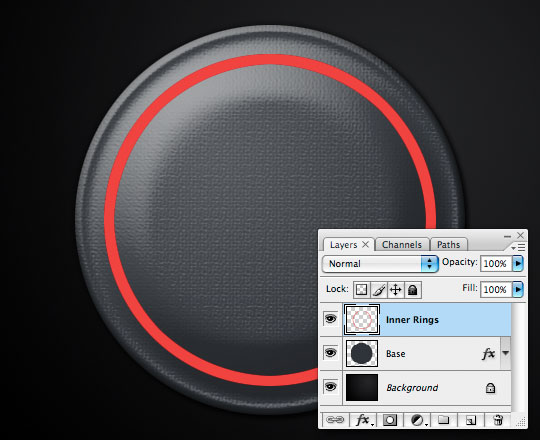
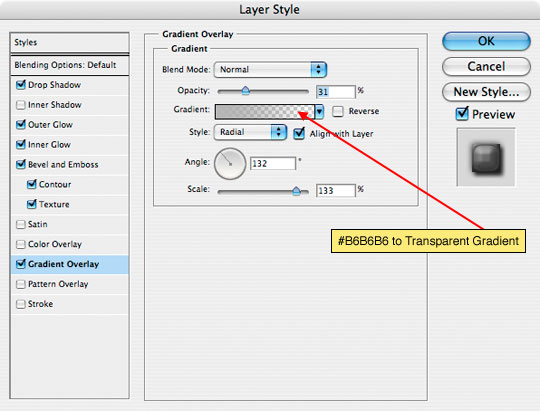
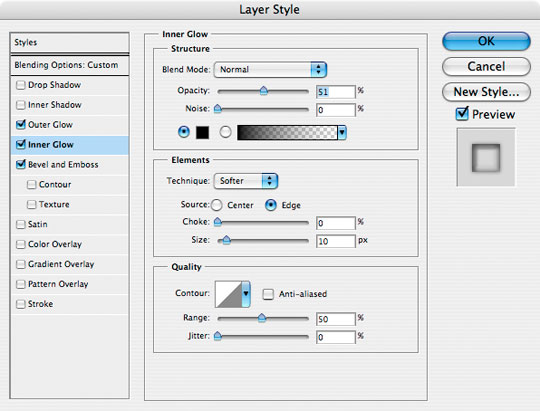
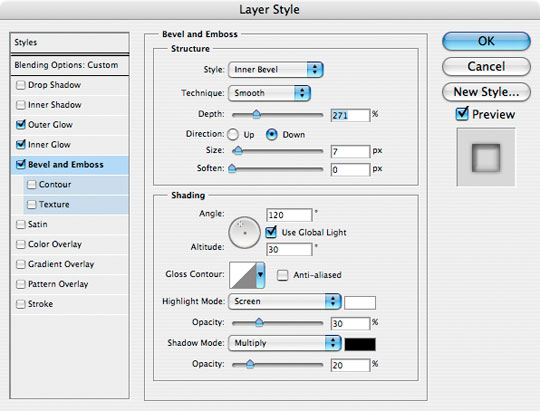
Step 5
In the layers palette, drop the Fill opacity to 0% and add the following layer styles.
Step 6
Now we’re going to create the large points which go around the base of our object. Create a new layer (don’t name it yet because we’re going to duplicate and rotate it a few times first). Switch to the custom shape tool by pressing the U key, then select the Rounded Rectangle option, set the Radius to 7 pixels, switch the foreground color to #808080 and then drag a 400×14 pixel Rounded Rectangle onto the stage. Don’t forget to center the object when you’re done creating it.
Because the corner radius is set to 7 pixels and we’re creating a 14 pixel tall object, the ends will come out perfectly round. Yeah, math is cool.
(*note: Again, open up the Info palette by choosing Window>Info from the main menu and you’ll be able to see the exact size of any shape or selection as you create it.)
Step 7
Now I’m going to cut a radius from the center of this object by creating an Elliptical selection with the Elliptical Marquee tool which measures 408×25 and I’ll position it at the top of our round edge rectangle and press Delete (PC: Backspace) to remove the overlapping area of my selection.

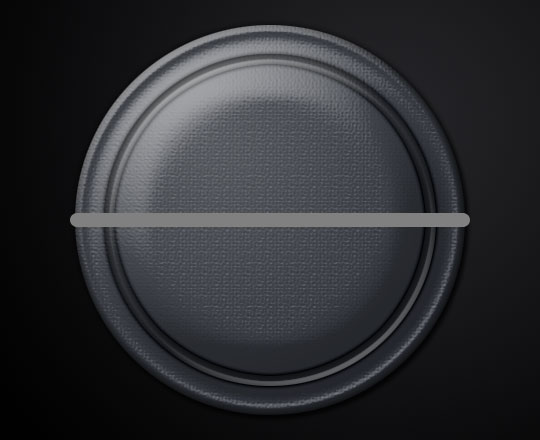
Step 8
With the Marquee tool still selected I’ll then use the Down Arrow key to move the selection to the bottom of the object and remove the same arc. When I’m done I’ll press Command-D (PC: Ctrl-D) to deselect. You should now have something like this.

Step 9
Now we’ll use this layer to create the rest of the marks around the perimeter of the base. I’ll show you how to do this really easily so pay attention here.
Press Command-J (PC: Ctrl-J) to duplicate the layer. Press Command-T (PC: Ctrl-T) to invoke the Free Transform tool. Holding the Shift key to constrain the rotation of the object, rotate it counter clockwise until you reach the second constraining point (each constrained rotation point is 15°, so we’re going to rotate a total of 30°). When you’ve rotated the object into position press Return (PC: Enter) to commit the transformation.
Ok, here comes the cool part. We can repeat this Duplicate and Transform process with a simple keyboard shortcut! Press Command-Option-Shift-T (PC: Ctrl-Alt-Shift-T) and Photoshop will automatically duplicate the layer and rotate it just like we did before. Do this 4 times and you’ll have all the perimeter marks done.

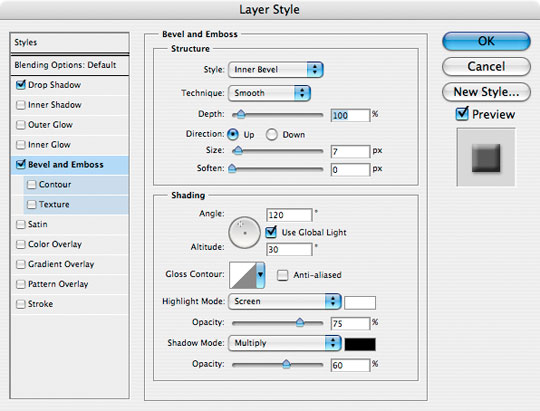
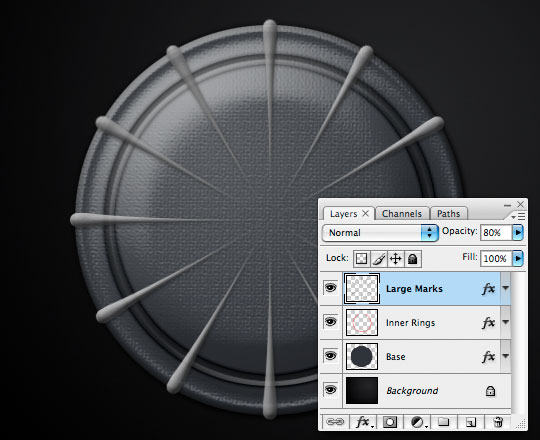
Step 10
Ok, with all those marks made, lets select all 5 layers that we just made and press Command-E (PC: Ctrl-E) to merge those selected layers. I’ll name this new merged layer Large Marks.
Like just about every object in this tutorial, we’re going to add a few layer styles. This time a simple Drop Shadow and Bevel and Emboss is all we’ll need.

Step 11
The overall effect of this layer is a touch too abrupt for my tastes, so I also lowered the layer Opacity to 80%, but I’m sure once we’ve reduced the size of our orb it probably won’t make much difference… the OCD makes me do this stuff, what can I say? Anyway, here’s where we are so far.
Step 12
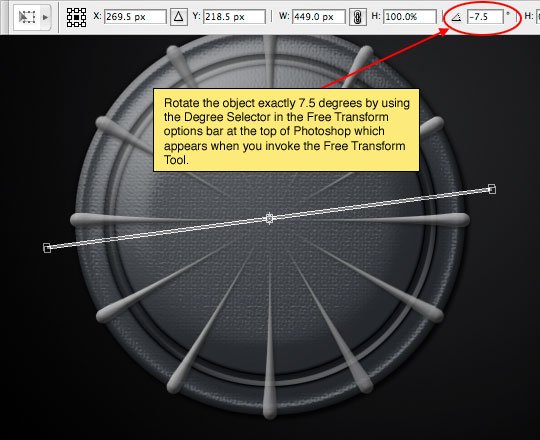
We’ll want to add a series of secondary marks between the large ones, but for cleanliness sake we’re going to mask them to the Base layer. Click on the Base layer and create a new layer above it (again, no need to go naming it since we’ll be creating a bunch more and merging them).
Create a Rectangular selection wider than the Base but only 3 pixels high and fill it with any color you’d like. Obviously we don’t want our first small mark to be on top of the large marks we just made, and since our large marks are 30° apart, lets place our small marks at 7.5° increments so they fit between the large ones nicely and we’ll have 3 small marks for every large one. Press Command-T to invoke the Free Transform tool and rotate the object -7.5°. The easy way to make sure it’s exactly -7.5° is to use the Degree field in the Transformation Options at the top of Photoshop.
Step 13
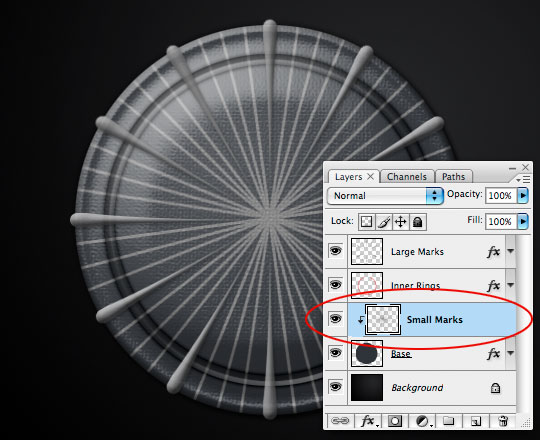
Using what you learned in Step 9, center the object on the stage and duplicate and transform this layer until you’ve got 3 small lines between every large one. Then merge all those layers and call the merged layer Small Marks. To clean up the edges lets also create a clipping mask from the Small Marks layer to the Base layer by Command-Clicking (PC: Right-Clicking) on the Small Marks layer and choosing Create Clipping Mask from the menu.
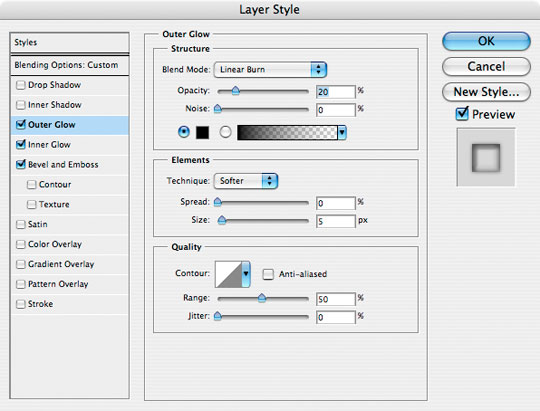
Step 14
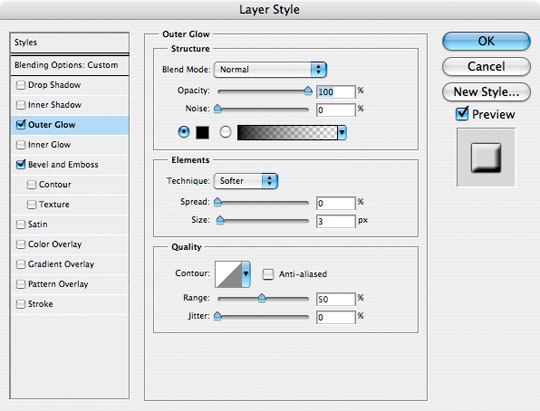
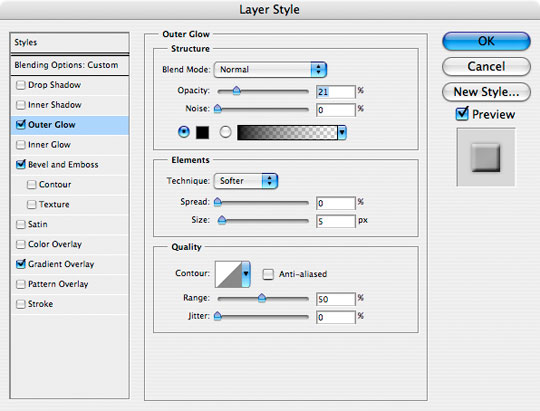
Drop the Small Marks layer’s Fill opacity to 0% and add the following Outer Glow and Bevel and Emboss layer styles.

Step 15
Its now time to add the big orange orb that will sit on top of the mess we’ve just made. Click on the Large Marks layer (or whatever you called the top layer in your file) and create a new layer above it called Orange Orb. On this new layer create an Elliptical selection 285×285 pixels and fill it with #fB9F0E. Deselect and center.
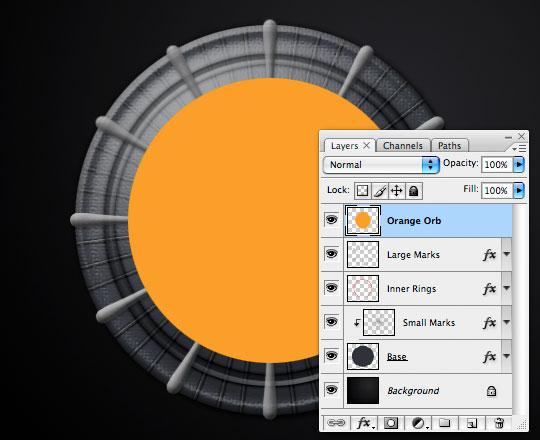
Step 16
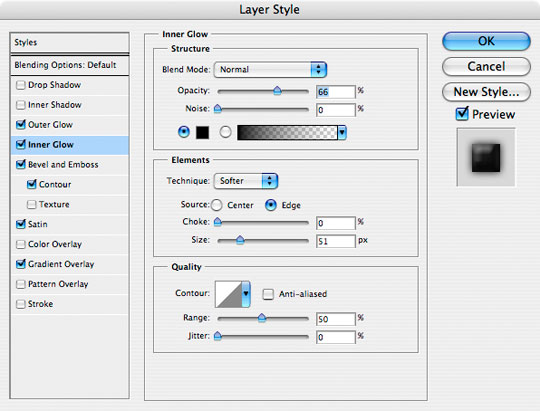
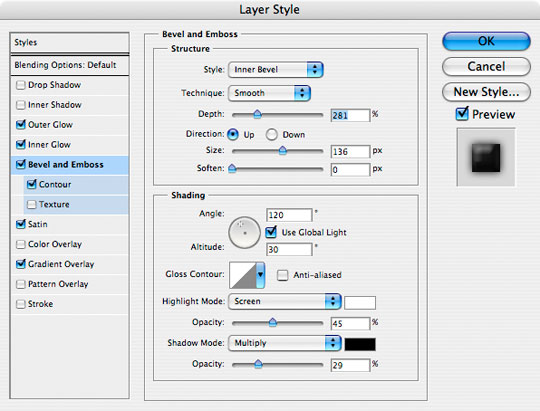
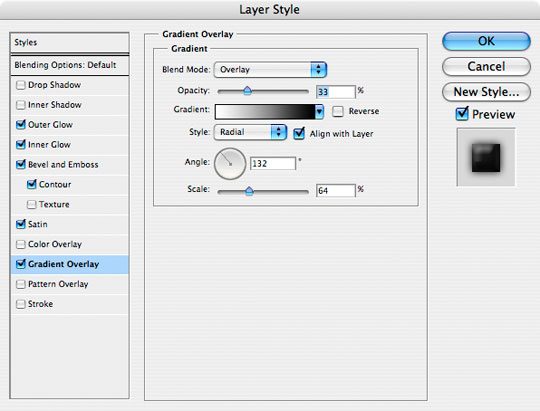
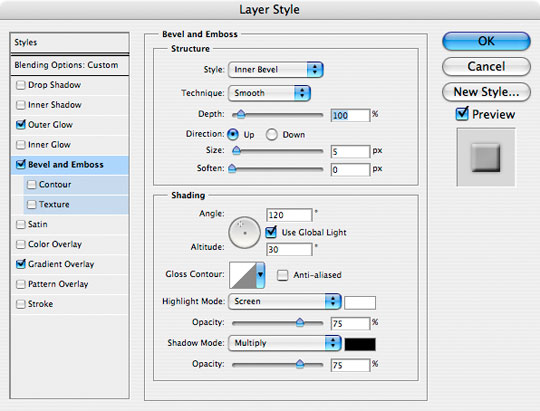
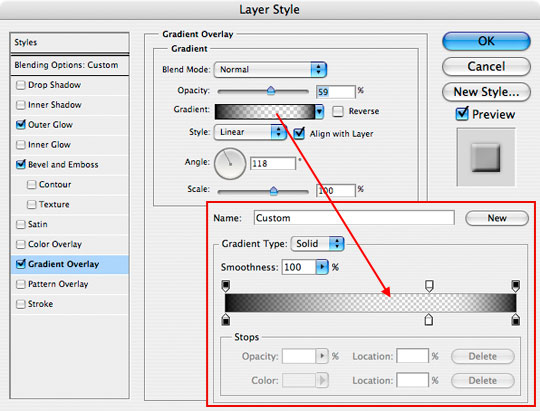
Yep, you guessed it… It’s time for another long list of Layer Styles! These will give the Orange Orb layer depth, shadows and a really cool effect using the Satin layer style. Check every setting to make sure you get everything right the first time. Here we go…


Step 17
If you got it all right, your orb should look something like this.
Step 18
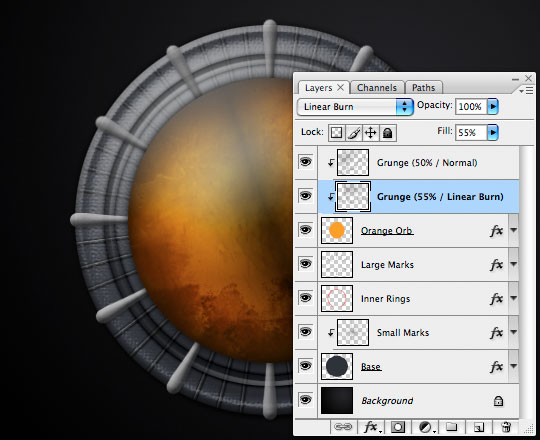
I want my orb to have a little more variation, so I’ve created two layers and painted on them with some of my grunge brushes. One layer is 50% Opacity with a blend mode of Normal, the other is set to 55% Opacity with a Blend Mode of Linear Burn. I’ve created clipping masks for both Grunge layers to the Orange Orb layer. This step isn’t necessary and is really a matter of personal taste, so have fun with it or choose to leave it alone, it’s up to you boss.
Step 19
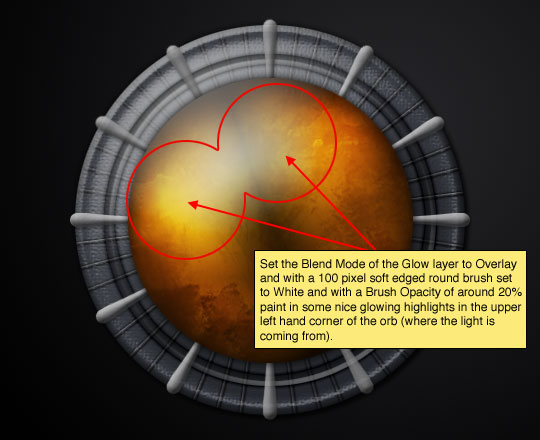
Now lets add a little glow to the upper left of our orb. Create a new layer above the Grunge layers (if you created them, otherwise at the top of the document is fine) and name it Glow. Change the Blend Mode of the layer to Overlay and with the 100 pixel soft edged round brush set to White and an opacity of around 20% paint in some glowing highlights.
Step 20
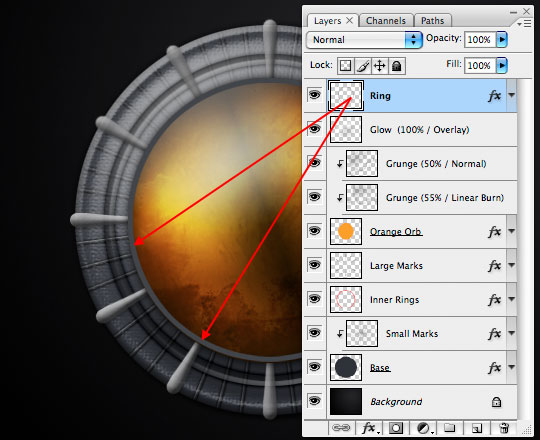
Lastly lets create a ring around the edge or our orange orb to anchor it to the lower piece of the project. Create a new layer at the top of the document called Ring. Load the Orange Orb layer as a selection by holding down the Command (PC: Ctrl) key and clicking on the Orange Orb layer’s thumbnail in the Layers palette (the Ring layer should remain selected as the working layer in the layers palette). Fill the selection with #5A5756 and then contract the selection by 5 pixels by choosing Select>Modify>Contract from the main menu and delete the contents inside the selection leaving a nice 5 pixel ring around the orange orb.
Step 21
Drop the layer’s Fill opacity to 40% and add the following three layer styles.
Step 22
And that’s it folks! I hope you learned something along the way.
Step 23
Before I created my final image I grouped all the layers comprising the orb and dial together by selecting them all and pressing Command-G (PC: Ctrl-G), then converted the Group to a Smart Object by Command-Clicking (PC: Right-Clicking) on the Group and choosing the Convert To Smart Object option (CS3+ Only). I also added a tiny white-to-transparent radial gradient highlight on a layer above the Glow layer to add a little more reflective quality to the orb.
Lesson Files + Additional Resources
Download the free .PSD file and other lesson files Right Here.
Tell Your Friends
More in Graphic Design


54 Responses to Glowing Orb With Dial
karamela
May 28th, 2008 at 7:22 pm
wow … fantastic !!!! thanks or as we say in Portugal: Obrigado
ph15h
May 28th, 2008 at 10:20 pm
That’s pretty sweet. Wish I had a little icon to call my own. =/ Stars are awesome. lol
dilirum
May 29th, 2008 at 4:47 am
Beautifully done.
Tom
May 30th, 2008 at 1:13 am
Useful tut for very nice effects ! Thanks !
AskMe
May 30th, 2008 at 7:57 am
This is a great tutorial for learning how to combine layer styles to create the right look. Very well done as usual. Thank you for your hard work.
Eric
May 30th, 2008 at 2:24 pm
Photoshop Hero… This is a question. I hit some button that turns the outside “Paste Board” part of the window, which is normally grey… to Black. Now I didn’t change modes, by hitting the F key, i know that one… it is driving me nuts… how do I get it back to grey, I do a lot of things that are black, and now I can’t see where the image ends, when I expand the area of the window. That would be amazing if you email me and let me know what to do… its stupid and bugging me to death!! Or anyone?? any clue?
thanks,
e
HERO
May 30th, 2008 at 2:36 pm
ERIC,
This is an easy one.
Enter Maximized Screen Mode (which is the one that’s usually grey), obviously you’ve got to have a document open to do this. Then just Command-Click (PC: Right-Click) in the area that’s supposed to be gray and a little dialog box will pop up asking if you want the background to be gray, black or custom color. Pick gray and you’re back in business!
You can also pick a custom foreground color, switch to the paint bucket tool (In the Gradient Tool flyout menu) and then SHIFT-Click on the gray background to change it to that color.
In case you didn’t know, you can scroll through all the screen modes by just pressing the F key over and over.
Erika
May 31st, 2008 at 9:11 am
This is awesome!
s.b.works
June 1st, 2008 at 11:09 am
I used to think that Photoshop was simply for giving effects to images, and nothing more than that. But this website totally changed my mind. I usually use Illustrator for drawing, but Illustrator was often giving me a hard time in making realistic images ’cause its filters don’t work too well. But now I use Photoshop instead. Thanks to the author(s) of this website, for giving us these tutorials. Not too many people would do this for free, you know.
Lisa
June 5th, 2008 at 7:14 pm
http://i69.photobucket.com/albums/i48/broj1834/Fallensword/artbutton.png
^^There’s my outcome. I shrank it down quite a bit, but I’m so excited about how it came out! Thanks for this tutorial, it rocks!
Kara
June 5th, 2008 at 10:17 pm
Thanks for all your hard work on sharing your knowledge with us, especially for me – I’m such a “paint-by-numbers” type of person. Your skills are unbelievable! I hope to see more tutorials like these, where you create cool grungy type of designs from scratch.
HERO
June 5th, 2008 at 10:35 pm
KARA,
You’re absolutely welcome. I’m always stoked when someone finds what I’m doing here useful!
Doug
June 12th, 2008 at 9:25 am
How did you make your Star for this
HERO
June 12th, 2008 at 9:33 am
DOUG,
The Star is the PSHERO logo star and it’s a custom shape I keep in my Custom Shapes palette to plug into spots just like this. I placed the red star above the Orb layer and gave it an inner glow with a color of black and a blend mode of normal then lowered the Fill opacity a bit to make it blend in. Hope that helps.
hot
June 16th, 2008 at 3:06 am
thanks
TXT
July 2nd, 2008 at 2:19 am
I cant understand the part with the gradient. Becuse my gradient makes a circle and the outer surface of the circle remains white. Some help pls:D
HERO
July 3rd, 2008 at 10:54 am
TXT,
You need to pay careful attention to all the settings in the example. My guess is that you didn’t change your Gradient Blend Mode to OVERLAY.
sil
July 7th, 2008 at 11:02 am
awesome, really stunning, thank you very much, thanx tothis tut I know what I can archieve with simple layers and the power of bevels and contours.
thanx ;)
LinkTree
July 8th, 2008 at 8:28 pm
Firstly I want to say thank you for this great and useful tutorial.
I am a starter designer and I was wondering if you could help me with a problem that I have…
I couldn’t find the texture that you mentioned (Berber) anywhere and in my photoshop I have only a few very simple textures and patterns.
Please tell me where I can find the texture you mentioned.
Thank you,
LinkTree
HERO
July 8th, 2008 at 9:54 pm
LINKTREE,
When you have the Pattern Picker up (and you only see a few patterns) click on the little arrow inside the circle at the upper right corner of the dialog box, this will open a fly-out menu where you can load additional pattern sets native to Photoshop.
LinkTree
July 8th, 2008 at 10:21 pm
Yes thank you although you were very fast with the answer (didn’t expect that) I already found it.
Now i just need to find the brushes that you used on the orb.
LinkTree
July 9th, 2008 at 12:17 am
Here’s my orb. ^__^
Quickpost this image to Myspace, Digg, Facebook, and others!
I am very satisfied although it isn’t as great as yours but I will get better with time.
taking that I am a complete novice and i made something like this it means that you are a great teacher
and I bet your guides will help anyone who is interested in learning graphic designing.
LinkTree
July 9th, 2008 at 12:21 am
I am sorry about the double post but I really wanted you to see my result.
http://img150.imageshack.us/img150/7325/myorbzu9.jpg
HERO
July 9th, 2008 at 8:36 am
LINKTREE,
Very nice work. Looks like you got it exactly right! Thanks for sharing.
Gzkz
July 12th, 2008 at 6:01 pm
that works – easy one – cool practice – always nice to read your tuto.
Jayjay402
August 3rd, 2008 at 11:29 am
Awesome tut, thanx! =]
gemini
September 9th, 2008 at 2:49 am
hero..first of all i wanna thank you for the knowledge you’ve shared..I learned a lot and the great things is that as a first timer in this field of digital art, I proved something to myself that I can keep up with your skills the moment I finished your tutorial and made the Orb identical as yours..Now the problem is that I was so confused how did you put the red star in your orb..You failed to mention it in your tutorial..Could I get the info from you?..by the way, Thanks Hero!
HERO
September 9th, 2008 at 12:39 pm
GEMENI,
I created a new layer directly above the Orange Orb layer (clipped beneath the two grunge layers) and placed the star on that layer. Then I added an Inner Glow layer style to the star set to Normal and the color is Black. Adjust the size of the inner glow to get the edges nice and darkened. I hope that helps.
Kanchan
September 27th, 2008 at 8:34 am
Cool tutorial. This one’s proved real helpful to me. Keep up the good job!!
xiaozhang
November 11th, 2008 at 10:05 am
thank you! nice work.
FIDIAS
November 22nd, 2008 at 4:07 am
Most excellent tutorial and impressive result, not to mention the learning along the way.
Could you please advise how you made the horizontal angles and the external bars that pass under them, in your own logo?
Many thanks.
Fidias
pearlie
December 3rd, 2008 at 7:11 pm
New to this site, but as soon as I saw this tut, I had to try it. Mine came out slightly different, but close to yours. I also added a bacground layer of a space shot. Thanks so much for the lessons in this tut, PSHero!
;-)
Achmad Syarif
December 5th, 2008 at 5:03 am
I so wanna use the techniques in my future projects. Thanks, you are the hero!
Jeff
January 1st, 2009 at 9:08 am
Awesome tutorial, good to practice blending options. I’m a bit frustrated with one thing though: that metal ring you added on your final pic, with the horizontal metal bar… How did you manage to do that? On the middle left side of the disk, it seems to follow the shape of the horizontal bar, I have no idea how you did that! :/
If i could have a hint or something, would be great ^^
All in all, great tutorial mate
Cheers
Gunnie
January 1st, 2009 at 4:38 pm
Thanks allot for this tutorial! :D
I’ve learned numerous of things, going to check out the rest of yours ^^
I cheated a bit, and used a pic of Venus as a addition to the grunge.
If you don’t mind so will I use this as a clan logo ^^
Lonnie
January 2nd, 2009 at 2:50 pm
Very nice tut there m8.I really do appreciate it.I learned allot from it.
William
January 29th, 2009 at 10:46 pm
WoW!! u made my day!! i been looking for this tutorial! Thanks man. great work. keep it up. :D
Skip
February 10th, 2009 at 11:16 pm
FANTASTIC! Thank you.
Surajit
February 13th, 2009 at 12:55 pm
Thanks allot Awesome.
endog
February 19th, 2009 at 12:30 am
its a very great n an inspiring tut…thanks…a lot
sc10
February 19th, 2009 at 3:26 am
i only have photoshop elements 7.0 i can’t create anything like this right? HELP!
caly
March 24th, 2009 at 10:07 pm
wow , is so great .thanks alot , know iknow how to do some magic using cs..
Suzana
April 25th, 2009 at 7:34 am
In reply to SC10 you can create this tutorial it in photoshop7 all the elements used here are standard ……..
Such an amazing tutorial thank you soooo much xxxxxx
Linda
May 28th, 2009 at 2:23 pm
Amazing! I have used your tutorials before and I am getting some mad skills thanks to you, however, I have a rather dumb question : how do you make your text wrap to a round shape? I know that you can type and then use the create warped text tool on arc, but I am trying to design a round sticker label 1.5 in. and I cannot get my text to be exactly the size I want. Its either too wide or distorted. Help!
HERO
June 4th, 2009 at 11:28 am
LINDA, I’d suggest creating a path along the line that you need your text to follow, then use the Text On A Path tool (in the Type Tool flyout menu). You’ll get a much more desirable result.
evilkitty75
November 19th, 2009 at 11:06 pm
I made 1 it looks soooooooooooooooooooo kool thankyou!!!! xxxx
HW
December 31st, 2009 at 10:05 pm
Thanks for this tutorial. Very useful and I learned a lot! Thanks.
Cyndi
April 16th, 2010 at 2:06 am
Thanks for the GREAT tuts, I’ve done most of them & have learned so much! :D
Ann
April 20th, 2010 at 3:22 am
Wow, I love how you use the keyboard shortcuts, – I have always strived to use
them myself. Here I learned several useful, new ones plus had gaps from a former PS course filled. Fabulous! You´re my favourite tut writer, – thank you so much Hero!!
Ann
himanshu
May 23rd, 2010 at 10:42 pm
amazing tutorial, but i have a problem, I have photoshop elements and the layer styles are very minimum. Is it possible to make this thing in elements. Or i have to get one full photoshop?