


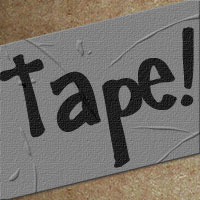
Virtual Duct Tape
In this tutorial we will create a cool virtual duct tape effect using the texturizer and layer styles tools.Step 1
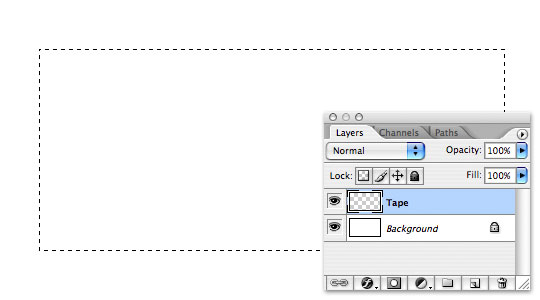
Open a new document in Photoshop, mine is 540 x 300 at 72ppi.
Create a new layer by pressing the new layer icon at the bottom of the layers palette, it’s the one next to the little trash can that looks like a piece of paper with a corner folded back. (*note: If your layers palette isn’t visible, choose Window>Layers from the main menu.)
Double click on the layer name and rename it "Tape". Select the Rectangular Marquee tool by pressing the M key, and drag out a nice tape sized selection on the stage.
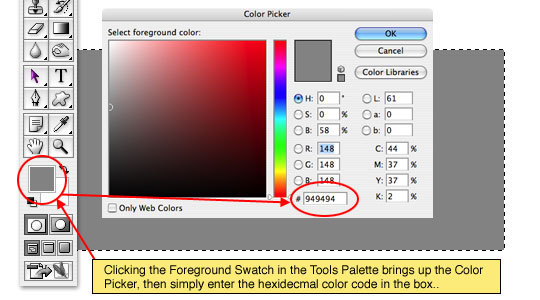
Step 2
From the Tools bar click on the Foreground Swatch and change the color to #949494 and click OK. Now fill the selection you’ve made with the new gray foreground color by pressing Option-Delete (PC: Alt-Backspace) then press Command-D (PC: Ctrl-D) to deselect.
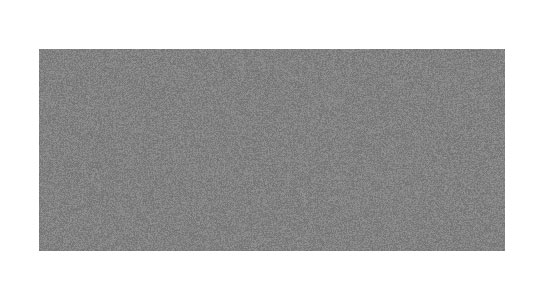
Step 3
Next lets add some color variation to the tape by adding some noise. First press the D key to reset the foreground and background colors to black and white, then choose Filter>Noise>Add Noise from the main menu. Set the Amount to 6% and make sure that Uniform and Monochromatic are checked then click OK.
Step 4
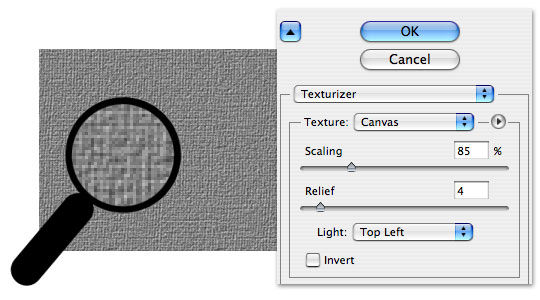
Now lets add some texture to the "Tape" layer by selecting Filter>Texture>Texturizer from the main menu. This will bring up the Texturizer interface where you will add the following settings: Texture: Canvas, Scaling: 85%, Relief: 4 and Light to Top Left then click OK.
This effect is a little too harsh however so lets go ahead and choose Edit>Fade Texturizer from the main menu and enter 50% and click OK.
Step 5
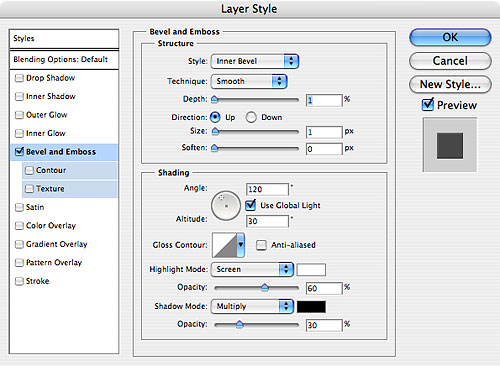
Things are looking good, but we’re still shy of the duct tape texture we’re shooting for, so we are going to add a layer style to the "Text" layer by either double clicking to the right of the layer’s name or by right clicking (Mac: Control-Click) on the layer and choose Blending Options which will bring up the Layer Style dialog box.
Click on Bevel and Emboss in the right hand column and enter the following settings then continue to the next step without clicking OK.
Step 6
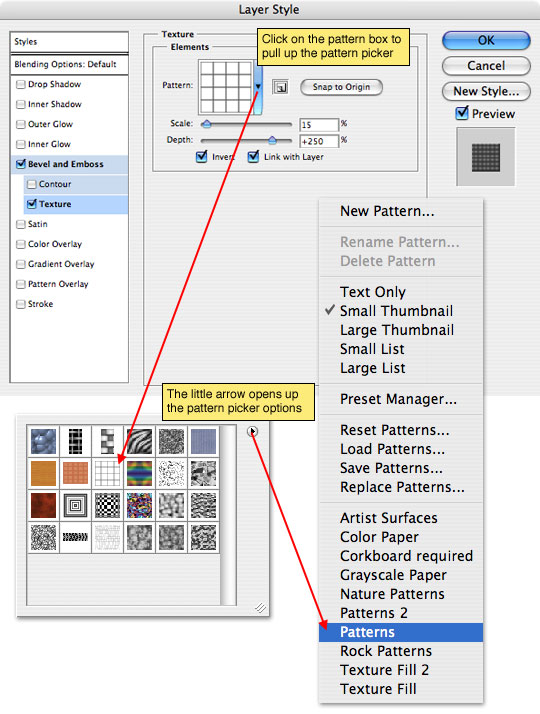
In the Bevel and Emboss section click on the Texture option. By clicking on the Pattern area you can bring up the pattern picker, then by clicking on the right facing arrow in the top right corner choose Patterns from the menu, this will add these swatches to the texture picker. The pattern we’re looking for is called Tiles-Smooth (*note: it looks like a grid as shown in the following graphic).
Set the Scale to around 15% and the Depth to +250, click the Invert checkbox and click OK.
Step 7
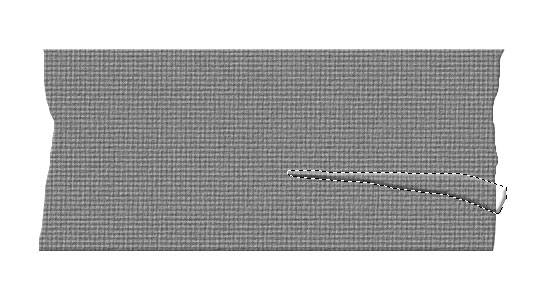
With the Lasso tool selected from the Tools bar by pressing the L key, make a selection along the right hand edge of the tape so it looks like it’s been torn off and press Delete (PC: Backspace), then repeat on the left edge.
(*note: You can use the Burn and Dodge tools from the Tools bar set to a low opacity around 30% along the torn edges to give the effect of lifting edges.)

Step 8
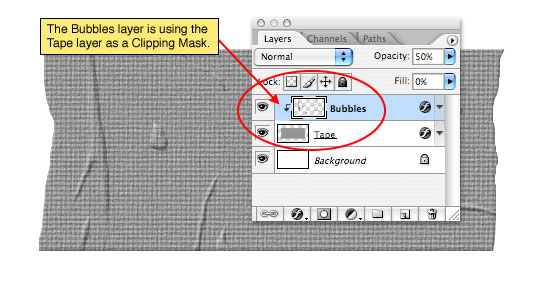
We all know that tape, especially duct tape never goes down without a few wrinkles and bubbles, so lets make some of those now.
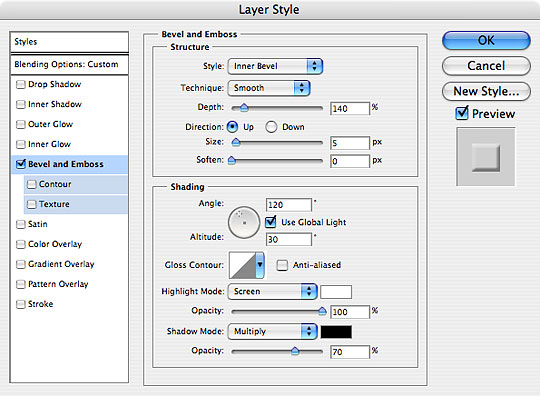
Add a new layer by clicking the New Layer icon at the bottom of the layers palette just like we did before and name it "Bubbles". Pull up the Layer Styles dialog by double clicking on the layer thumbnail. In the Blending Options section change the Opacity to 50% and the Fill Opacity to 0% . Next click on the Bevel and Emboss section and change the Depth value to 140% and down at the bottom change the Highlight Opacity to 100% and the Shadow Opacity to 70%. When you click OK you will notice that nothing visible has happened to the layer, this is because the layer is still empty so there is nothing for the layer style to effect.
Step 9
With the lasso tool selected by pressing the L key draw the first wrinkle onto the tape then press Command-Delete (PC: Ctrl-Delete) to fill the selection with the foreground color which should still be set to black. (*note: Because we lowered the Fill Opacity in the layer’s Blending Options to 0% no color will actually show up here, so all you will see is the Bevel and Emboss effect.)
Step 10
Now go ahead and repeat step 9 until you are happy with your wrinkles and bubbles. Don’t worry about letting your wrinkles extend beyond the tape area, we will solve that problem in the next step.
(*note: You could also use a small diameter round brush to draw in your wrinkles and bubbles to add a varied effect.)

Step 11
Lets solve the problem of the extending bubbles by choosing Layer>Create Clipping Mask from the main menu. By creating a clipping mask we are telling Photoshop to only show the areas of the "Bubble" layer that are overlapping the "Tape" layer.
Step 12
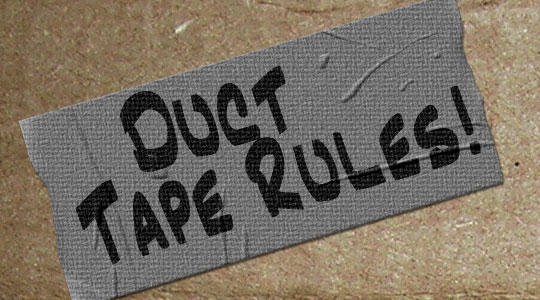
In my final example I added some black text on a new layer above the "Bubbles" layer and changed the layer blend mode to Overlay to get the effect of writing on the tape and a cardboard background.
Lesson Files + Additional Resources
Download the free .PSD file and other lesson files Right Here.
Tell Your Friends
More in Graphic Design


22 Responses to Virtual Duct Tape
Chad
December 9th, 2007 at 7:47 am
Cool tutorial and so easy! I’ll be using this for something in the future for sure. Thanks.
Rori
February 15th, 2008 at 12:41 pm
Dude, this is so COOL!
aronil
April 9th, 2008 at 8:19 pm
you rock!!! you’re tutorials are amazing and exactly what i need. I’ve linked you btw to my site. :) Keep it man
Valerie
June 11th, 2008 at 1:35 pm
Just wondering what font the marker-looking text is. That’s cool.
HERO
June 11th, 2008 at 10:03 pm
VALERIE,
The marker font is called Jazz Text Extended. Do a Google search and you should be able to find a few places to download it for free.
Roger
June 13th, 2008 at 8:38 am
Pretty Cool Tuts! Thanx man.
Playful_cyanide
June 15th, 2008 at 6:00 pm
Hey. Thanks for the great tut. I’ve been using Gimp for a while, but getting into Ps. And I love the font.
kris
July 18th, 2008 at 4:42 am
thanks fot the tut, it’s great, and thanks for the font name, i’ll definetly use it :D
Will Knot B Revealed
September 8th, 2008 at 1:49 pm
Perfecto!
Anthony
September 26th, 2008 at 6:13 pm
l0000kz soooo realistic man!! thx! xD
Genilson
October 10th, 2008 at 6:05 am
Simples,f?ɬ°cil e realista!
Parabens e obrigado por esse tuto! :D
Jason
October 10th, 2008 at 4:56 pm
your tuts are the ill ish… this website is just what i was looking for to take my pshoppin’ to the next level. my new skills will go good with the 300D i just acquired after i learn how to use the mother… Thanks for sharing.
denacho
October 15th, 2008 at 3:01 pm
loved it! would make a great masthead!
Jami
January 13th, 2009 at 9:05 am
Absoulutley beautiful. duct tape never looked so good.
Rusty
June 8th, 2009 at 11:46 am
I use CS3 and got to step 58. Things went south from there. Don’t know what I did wrong but the layer style isn’t showing like yours is. Oh well, another failure for me I guess.
It does look cool though and I would like to be able to use it.
HERO
June 9th, 2009 at 12:59 pm
RUSTY, step 58? … if you can tell me where you get stuck I’ll do what I can to help you out.
chrissy lim
October 30th, 2009 at 6:15 am
Thank you so much for the tutorial and sharing the PSD. I’ve used your duct tape (with slight mods) on my personal site above. I hope this is ok. You’re awesome xxx
evilkitty75
November 15th, 2009 at 7:13 pm
hehe i love this 1 ya i do n i made a nice piece o tape
thxxxx
John Joy
February 15th, 2010 at 1:49 pm
hey man, great job you’re a great help. I really wanna learn how to make a cork board in Ps can you please put up a tutorial for that??
Keep up the outstanding job and best of luck!!
nó_òbe
February 15th, 2010 at 2:45 pm
Absolutely adorable teaching Hero, thank you so much! Even for clueless beginner like me easy to follow. Following you here is like hitting fast forward, leaving me speechless how much there´s to create with layer-styles! Any chance you could give some advice on how to make fabric folds? (trying to bring a jeans to life here ;o))
Keep on with the brilliant work, it´s so much appreciated!
HERO
February 15th, 2010 at 3:04 pm
nó_òbe, You might take a look at my Virtual Letterman Jacket tutorial to learn how to use the displace filter to bend/wrinkle fabric.
nó_òbe
February 16th, 2010 at 8:29 am
D´OH! shame on me! promise to read all before requesting again :/ thanks for pointing out.