

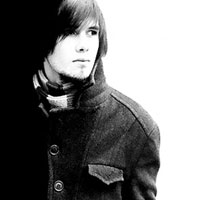
High Contrast Black And White Ad
It seems like cool black and white photo effects are all the rage lately. Movie posters, magazine ads and album covers have all sported this effect with great results. In this Photoshop tutorial I'll show you how to create this effect using Channels.Step 1
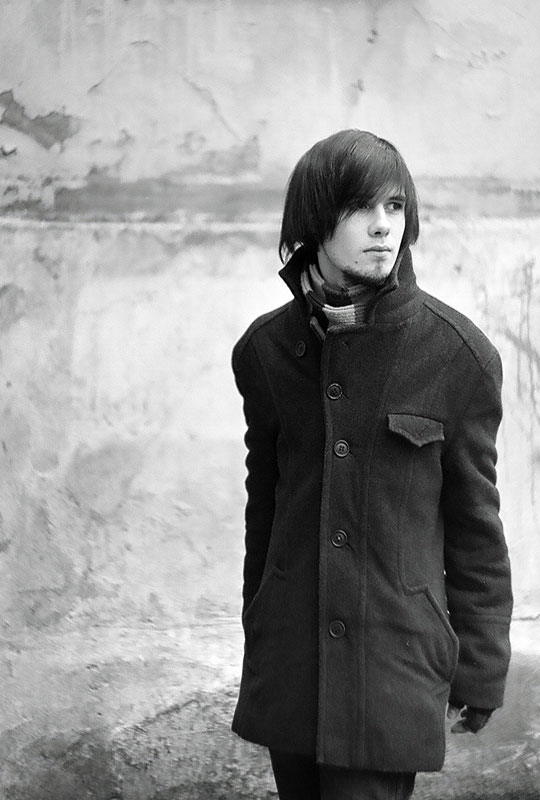
The first trick to this effect is to choose the right photo, one with a defined light source and lots of interest. The photo doesn’t have to start black and white, but you’ll need to convert your photo before we get started.
I’ve opened a new document and pasted the photo into it, creating a new layer above the default Background layer which is filled with white (also by default)
Step 2
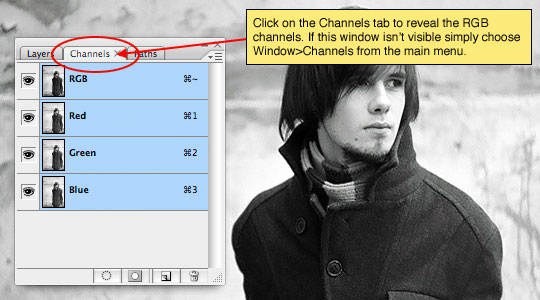
In the layers palette lets switch over to the Channels tab.
(*note: For the sake of saving space some of these steps will display a cropped version of my image.)
Step 3
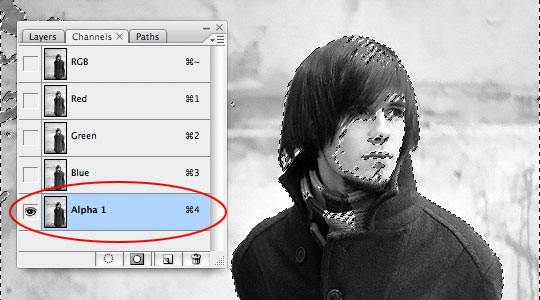
Now lets load the images Luminosity by holding down the Command (PC: Ctrl) key and clicking on the RGB thumbnail here in the Channels palette. The luminosity is the measurement of white that each pixel holds, so by loading the luminosity we’ve effectively loaded only the "lightness" of the image.
Now lets add a new Alpha Channel by clicking the Create New Channel button at the bottom of the Channels palette. This will also select the new channel which will be called Alpha 1 and hide the other channels by default.

Step 4
Press the D key to reset the foreground and background colors to black and white respectively. Now lets fill the selection with white (which is the background color) by pressing Command-Delete (PC: Ctrl-Backspace). What you should end up with is something that looks exactly like the original image. Don’t release your selection just yet, we’ve got more to do with it.
Step 5
Next lets fill the opposite pixels with black. To do this choose Select>Inverse from the main menu or use the keyboard Command-Shift-I (PC: Ctrl-Shift-I) to invert the selection. Press Option-Delete (PC: Alt-Backspace) to fill the selection with black. This will effectively darken the blacks in the image.
STOP! … I see you there, reaching for the Command-D to deselect! … Don’t do it! We’re not done with this selection yet. Gosh!
Step 6
Lets invert the selection one last time just like we did before by choosing Select>Inverse or by using the keyboard shortcut you learned in Step 5.
Ok, now we’re going to fill the selection with white once again, but this time lets press the keyboard shortcut three (3) times to really blow out the whites. Hold down the Command (PC: Ctrl) key once again and hit Delete (PC: Backspace) three times. And now Mr. Smarty Pants, go ahead and desect by pressing Command-D (PC: Ctrl-D)
Step 7
At this point everything’s going to look a little washed out and won’t have much contrast, but not to worry, we’re about to fix that.
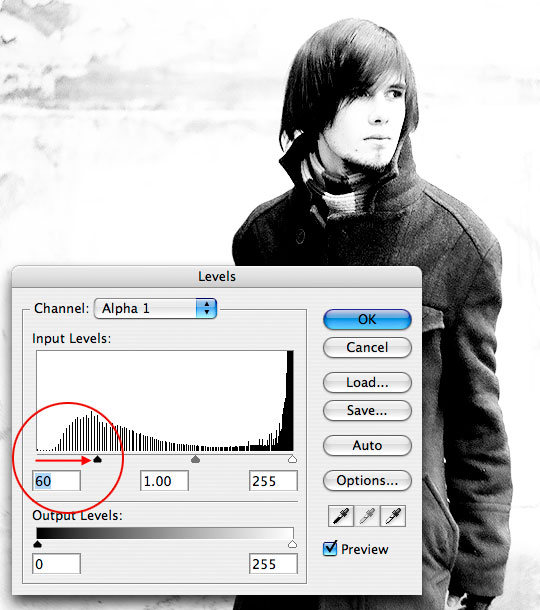
While still in the Channels palette and with the Alpha 1 channel selected press Command-L (PC: Ctrl-L) to bring up the Levels dialog box. Grab the far left arrow beneath the Levels histogram (this is the one that represents the black point of the image), drag it towards the right until the contrast returns to the image. This is a "to taste" adjustment, but I found that a setting of 60 worked nicely to restore my blacks to where they ought to be.
Step 8
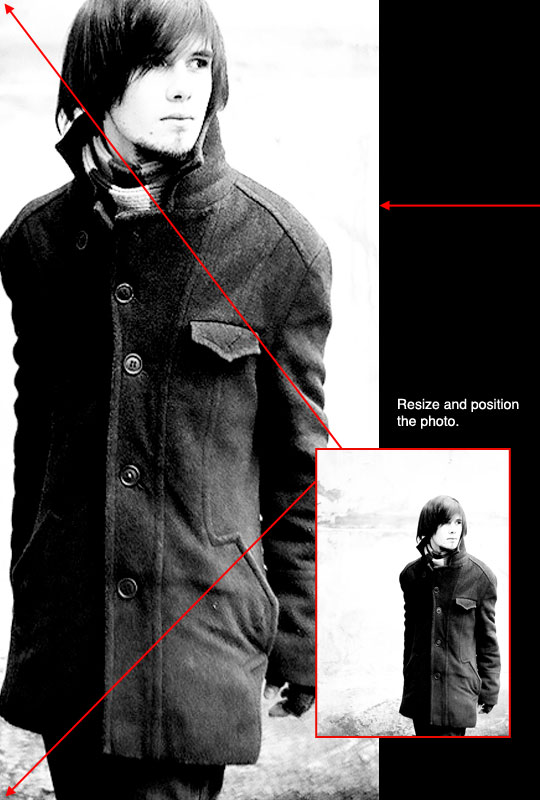
Now I’m going to press Command-T (PC: Ctrl-T) to invoke the Free Transform function and enlarge and reposition my guy where I want him to be for my ad. The trick here is to choose a size and orientation that allows us to black out one side and white out the other. Finding the spot where black and white will connect is what’s coming next.
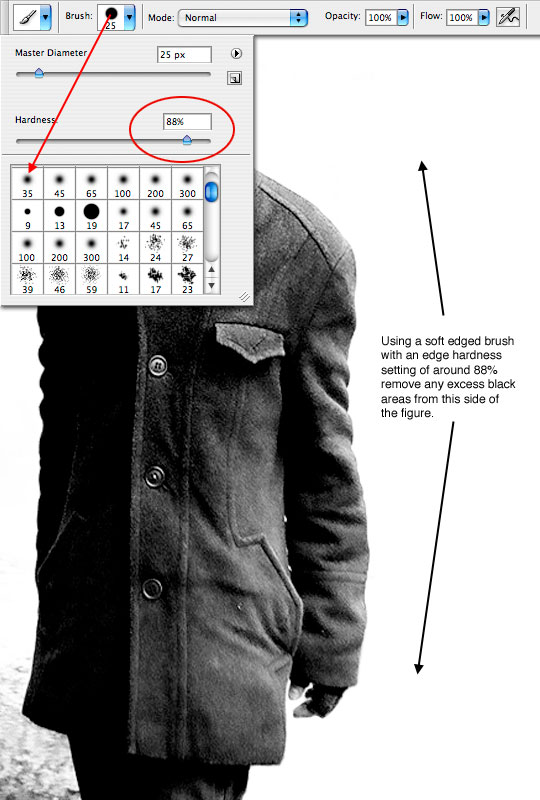
Step 9
Now I’m going to grab the Brush tool by pressing the B key and then I’ll press X to switch my foreground and background colors, effectively making white the foreground color. With a variety of brush sizes I’m going to paint out all the remnants of black in the areas to the right of my figure as shown below.
I’ve found that using a round soft edged brush with an edge hardness of about 88% allows me to paint very close to my subject without lightening the edges of his form. Use the Bracket keys [ and ] to enlarge or shrink your brush as you work. You can also Zoom in and out by using the keyboard shortcut Command (PC: Ctrl) and the plus (+) and minus (-) keys. Holding down the Spacebar will give you the Hand tool and allow you to move around your zoomed image.
Step 10
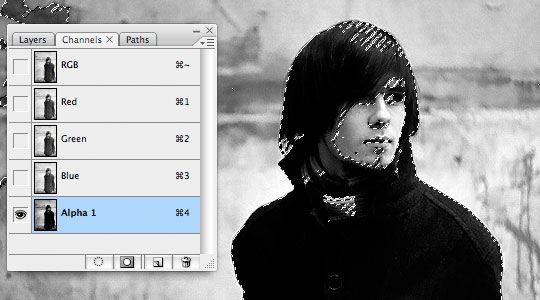
Now that we’ve got the right side nice and white, lets press the X key to return black to it’s position as foreground color and using the same brushes and techniques blacken the left side of the figure. This is where a little imagination works wonders because you’ve got to find the spot where you’re going to break your figure out of the shadows and let his highlights start to come through.

Step 11
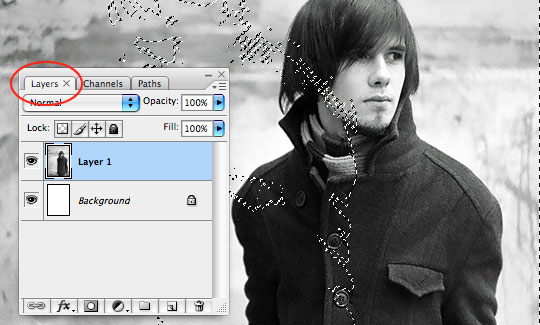
It’s about time to get out of the Channels palette and back to our working document so lets load the Luminosity of our Alpha 1 channel by holding down the Command (PC: Ctrl) key and clicking on the channels thumbnail in the Channels palette.
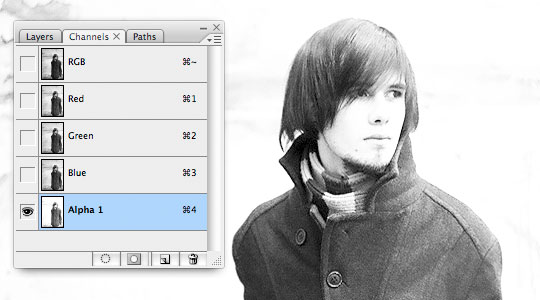
Now click on the RGB composite channel at the top of the Channels palette to turn the standard channels back on and switch back to the Layers tab at the top of the palette. This will return us to our working document and surprisingly you’ll discover that nothing we’ve done has effected our original image.
Step 12
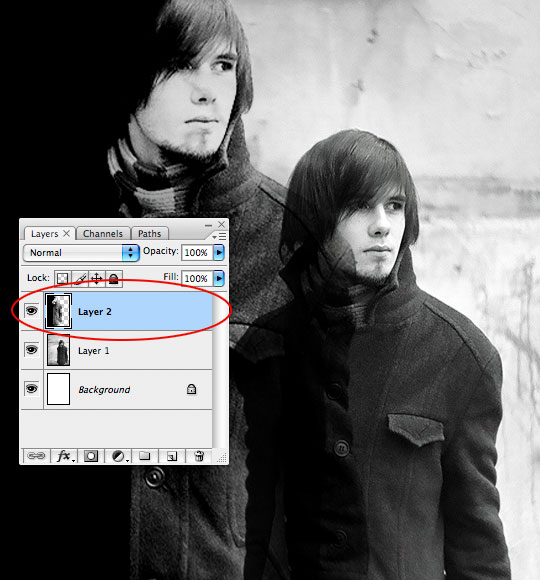
Currently we have the luminosity loaded as a selection, but what we really want here is the opposite (the shadows) loaded, so lets use what we’ve learned and choose Select>Inverse from the main menu to flip the selection.
Create a new layer by pressing the Create a New Layer button at the bottom of the Layers palette and then fill the selection with black by pressing Option-Delete (PC: Alt-Backspace). At this point we’re done with the selection, so go ahead and press Command-D (PC: Ctrl-D) to deselect.
Step 13
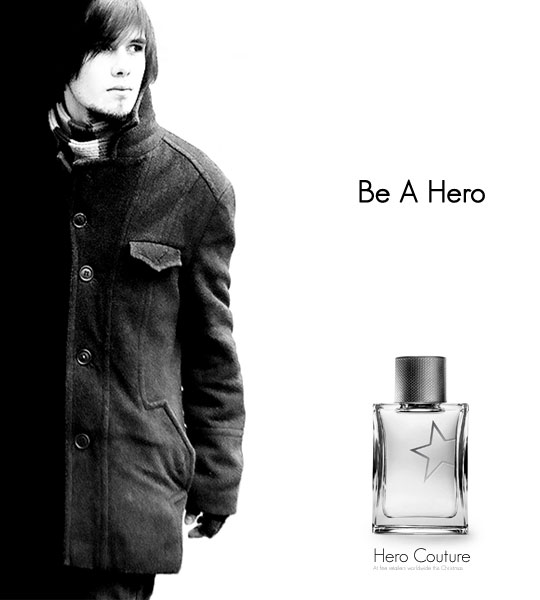
At this juncture we’re finished with our original image, so lets go ahead and drag that layer to the trash. This leaves us with just the white background layer and the layer we just filled with black. The effect is now complete and you’re free to use either the white space to the right or the black space to the left to add copy or additional elements.
Lesson Files + Additional Resources
Download the free .PSD file and other lesson files Right Here.
Tell Your Friends
More in Photo Effects


37 Responses to High Contrast Black And White Ad
D. Carreira
June 11th, 2008 at 1:29 am
Wow!
I think can create a brand with my name :D
Adam
June 11th, 2008 at 7:11 am
oh man that is wicked, i love clever layouts like that, i had great fun in making strong visual layouts during my college projects, and this is fantastic, great photo to work from too
always lovn your work :)
HERO
June 11th, 2008 at 7:37 am
Thanks ADAM. I’m glad you enjoyed it.
Rick
June 11th, 2008 at 8:38 am
Heh, reminds me a bit of the Scarface posters, which only makes it cooler.
Paulo Sales
June 11th, 2008 at 2:08 pm
congrats once again…this spot is in my oppinion , on the top 3 photoshop tuts in the web…and made only by one person…
great tutorials..nice concepts..and well presented…
well…thkz..and keep on excelent work !
HERO
June 11th, 2008 at 10:04 pm
Thanks for the compliments PAULO! You’re still my favorite reader!
HERO
June 11th, 2008 at 10:09 pm
Rick,
That’s funny, I hadn’t made that Scareface connection until you mentioned it… then I felt a little silly for not making the connection, but man, that was a cool show.
Jad Graphics
June 13th, 2008 at 3:33 pm
Great Tutorial. Also, one question? Do you use a CMS for this website?
HERO
June 13th, 2008 at 8:40 pm
JAD,
I use the most current version of WordPress as the CMS for this site.
crazyhunk
June 14th, 2008 at 1:40 am
wow… really good tut…
thanx a lot m8…
gozde
June 15th, 2008 at 2:13 pm
Hey, I just find you site and tutorials are great..
Thanks a lot for sharing..
Janek
June 15th, 2008 at 9:30 pm
Wow, great tutorial. This is awesome!
Mothership
June 15th, 2008 at 10:04 pm
The writing in the article is very reminiscent of an actual conversation, and as such explains the ‘why’ as well as the ‘how’, which goes a long way as to helping the underlying design decisions. A good example of this is the conversation re: brushes in step 9.
A very educational tutorial. Thank you.
also, the “STOP” under step 5 was right on the button (excuse the pun!), too.
Spotty110
June 19th, 2008 at 9:05 am
Thank you so much for all those more than great tutorials!
I’m learning loads in here!
I tried this one, too, but with PS7 I am a little lost – things won’t work the way you described them…! And I have no clue how to get this thing going! Any hints?
Jenny
June 22nd, 2008 at 11:55 pm
that is awesome. ima try it.
Matthew Schultz
June 23rd, 2008 at 11:27 am
Stunning dude. This is amazing, one of your best. I absolutely love this site, and I’m not even a Photoshop user (PaintShopPro is cheap!). Great job, keep it up!
artattoo
July 2nd, 2008 at 8:03 am
simply, this is a marvelous tutorial…. I just like it so much
THNX
Sealy Mattresses
July 2nd, 2008 at 9:01 am
Wow, really cool ad and helpful tutorial, thank you so much for this.
Casey L. Jones
July 24th, 2008 at 5:12 am
Loved this tutorial! Here is my result:
Je Suis Couture.
?ß‚Äò?æ
July 27th, 2008 at 9:27 am
really cool work, very beatiful, but I have a little problem,what’s the fonts that you use in this tutorial. I’m glad you can help me. thank you very much.you’re hero in my heart.
?ß‚Äò?æ
July 27th, 2008 at 9:41 am
I have known the fonts, Geosantslight. thank you.
Pedro
December 25th, 2008 at 9:20 am
Well done mate that is amazing!
zakaria
January 20th, 2009 at 5:07 am
waw i really want to thank you cause i spent a lot of time in looking for this tuto it’s amazing thank you
Megan
February 15th, 2009 at 5:33 pm
Thanks for the tut :D
Just one question..
At the end, when make the RGB and rest of the channels appear again, the Alpha 1 appears red and the original pic appears. I’ve tried everything but can’t figure out why it does that..when I continue the steps like that I don’t get the correct finished product =(
HERO
February 16th, 2009 at 9:03 am
MEGAN, In your Channels palette, just click on the little eye icon next to the Alpha 1 channel to turn it off.
CMYK
September 1st, 2009 at 5:04 am
Veryy nice tutorial!
thanksss 4 sharing!
Arman
October 16th, 2009 at 8:47 am
Ok got it…. thanks a tonne
Ezra
February 6th, 2010 at 3:47 pm
Thanks, this was great tutotial.
aakash
February 16th, 2010 at 10:10 pm
superb tut ..
thx man ..
Afzal
March 15th, 2010 at 4:14 pm
Hey Hero,
Wonderful tutorial.
This site was recommended to me by fellow UK-based photographers via Photography Forum.
Wishing you further success and fame.
dhiren
March 29th, 2010 at 10:17 am
Awsome work……. i m not a photoshop artist but guys like u inspire me a lot…. thanks a lot dude… u rock. keep up the good work… thanks …. ur a true hero…
blackiris
June 8th, 2010 at 5:56 pm
Hero! These are such great tuts. I learn a ton of great PS techniques and about being a better photographer in general. Glad I found you site, dude!
Rodrigo
July 1st, 2010 at 1:58 pm
Excellent. Very professional tecnique. Thank you!
King subash
August 24th, 2010 at 10:57 pm
Totally awesome!
Arman
November 12th, 2010 at 3:49 am
hi there…. im a huge fan and follower of ur work since long.
I am stuck with this query, pls if u could guide me, i’d be very grateful.
Is there any way of changing or deleting the F stop of the lens after image is shot… on photoshop or some other software.
pls let me know as its v imp. to me..
thanks,
Arman
HERO
November 20th, 2010 at 1:47 pm
ARMAN, The easiest way to do this is to copy the image into a new empty file and then re-save it.
Lojra
December 3rd, 2010 at 11:40 am
Great Tutorial. Thank you ;)