


Creative Edges Using Smart Filters
In this Photoshop tutorial I'll show you how to make some cool edge effects using the power of Smart Objects and Smart Filters in Photoshop CS3.Step 1
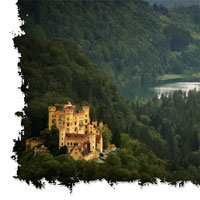
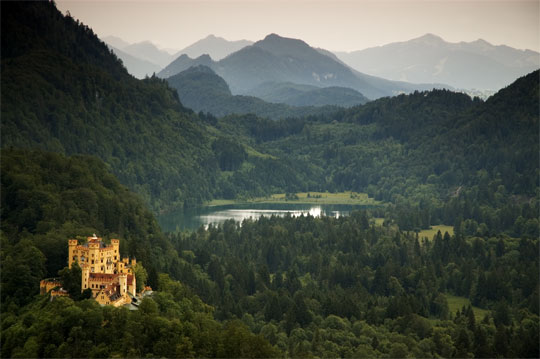
First things first, lets go ahead and open a photo, I took this one while on a photography trip through Europe of the Hohenschwangau castle in Germany. It had been raining all day and as the sun set, the showers subsided for about half an hour… just enough time to get a few great photos.
Step 2
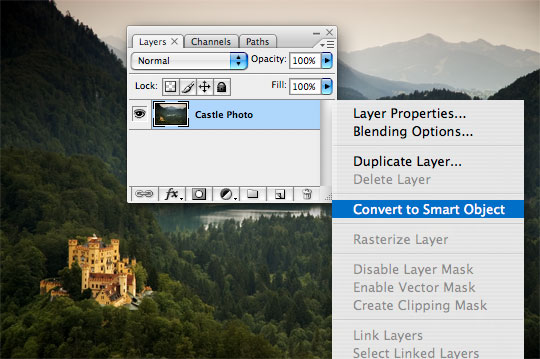
Now lets start by converting the photo to a smart object by Right-Clicking (Mac: Control-Click) on the layer in the layers palette and choose Convert To Smart Object.
(*note: You can also convert to smart object from the main menu by choosing Layer>Smart Objects>Convert To Smart Object )
Step 3
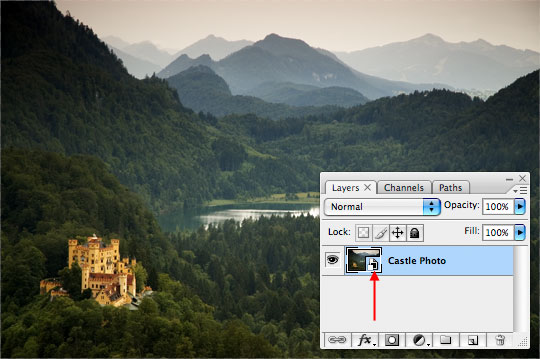
You can see by the Smart Object icon now showing in the thumbnail area of the Layers palette that this layer is indeed a Smart Object and by double-clicking on the smart object icon you can edit the object from within the file.
Step 4
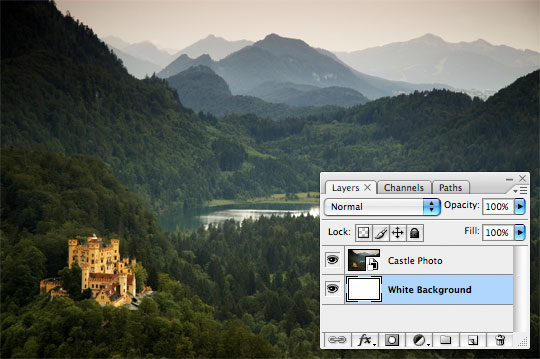
Now lets place a layer below the current layer by holding down the Command (PC: Ctrl) key while clicking the new layer button at the bottom of the Layers palette.
Press D to reset the foreground/background colors to black/white, then fill the layer with white by pressing Command-Delete (PC: Ctrl-Backspace). You won’t see any change in the image because the layer is behind the photo layer, but notice that the thumbnail in the layers palette has now been filled with white.
Step 5
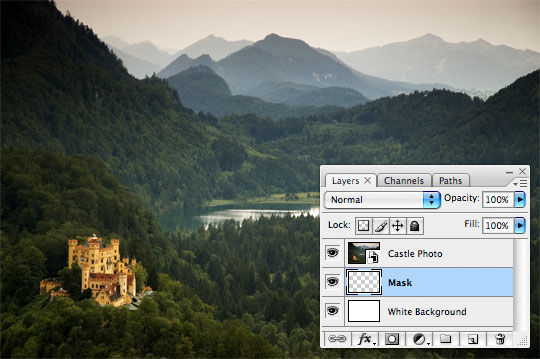
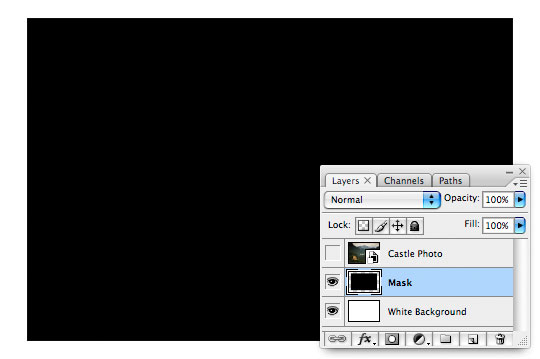
Create a new layer between the White Background and the Photo layers by clicking the new layer button at the bottom of the Layers palette. Double click the layer name in the layers palette and rename it Mask.
Step 6
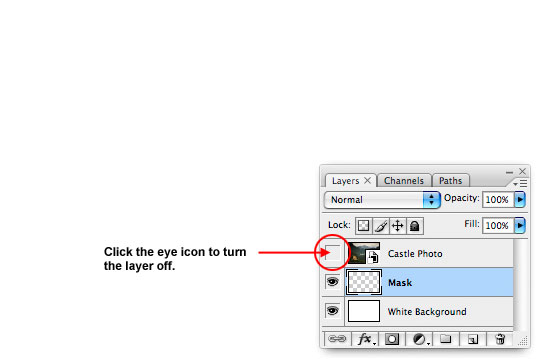
Lets click the little Eye icon next to our photo layer in the layers palette to turn off the layer so we can see what we’re doing on the Mask layer.
Step 7
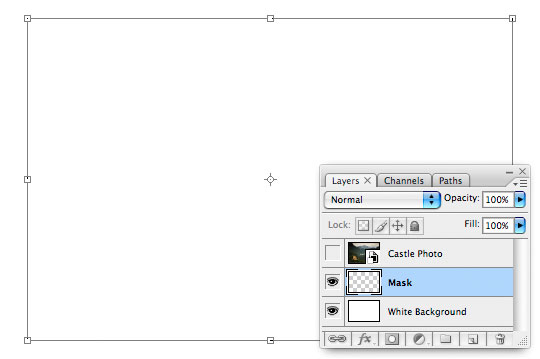
Now that we can see what we’re doing, lets press Command-A (PC: Ctrl-A) to Select All, then choose Select>Transform Selection from the main menu. This will give the standard transform handles placed at the corners and sides of the selection. Drag the corners in until your desired crop is achieved.
(*note: by holding down Option-Shift (PC: Alt-Shift) while dragging one corner, all the other corners will follow.)
Step 8
When your selection is sized, press Return (PC: Enter) to commit the transformation and return the selection to it’s dancing dotted line form. Now simply press Option-Delete (PC: Alt-Backspace) to fill the selection with Black, and Command-D (PC: Ctrl-D) to deselect.
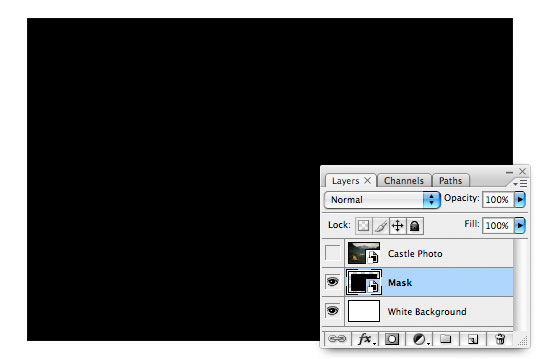
Step 9
Now, just like we did in Step 2, convert the layer to a smart object by Control-Clicking (PC: Right-Click) and choose Convert To Smart Object. The layer thumbnail in the layers palette will now also have the smart object icon.
Step 10
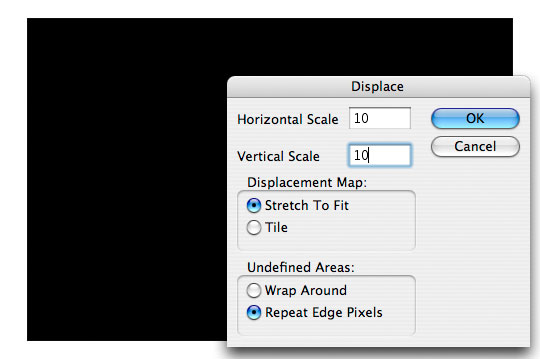
Now that the layer is a Smart Object, we can go ahead and apply a Smart Filter to it. The advantage of using Smart Filters over just applying all these steps to the image without creating Smart Objects is the ability we have to return and edit the object at a later time with ease.
From the main menu, choose Filter>Distort>Displace to bring up the Displace filter menu. For this example lets leave the settings at the default values shown below and click OK to move to the next step.
Step 11
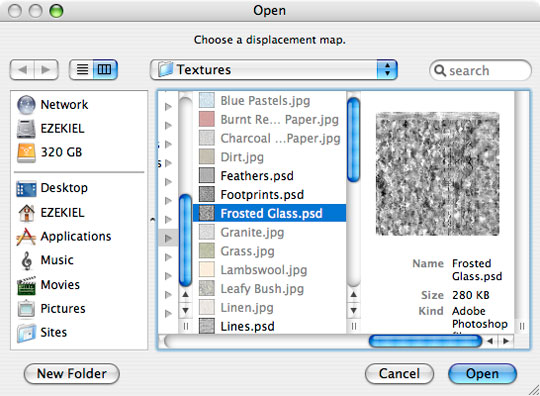
Now we need to navigate to a file which we will use as the Displacement Map. Luckily, Photoshop has a nice selection to choose from built right in. Navigate to your Photoshop CS3 application folder, then to Presets>Textures and find the file called Frosted Glass.psd. Choose this file and click Open.
Step 12
Your file should now look like this.
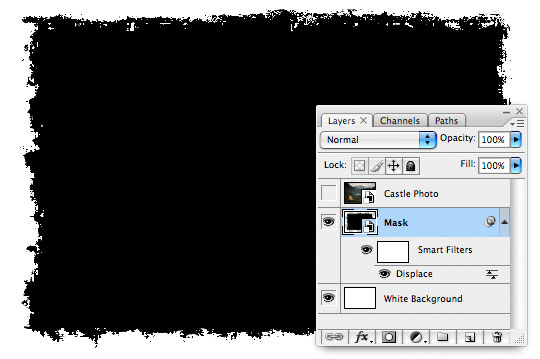
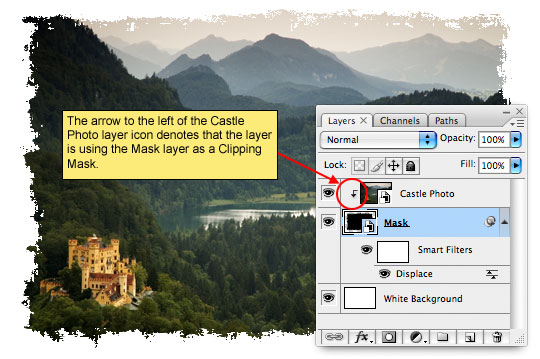
Step 13
Lets go ahead and turn our photo layer back on by clicking in the empty box next to it’s thumbnail in the Layers palette (remember we turned it off the same way back in step 6).
Now right click on the Photo layer and choose Create Clipping Mask. This will link the Photo layer and the Mask layer together, showing only the parts of the Photo layer which overlap the Mask layer.
Step 14
We’ve created a great little effect here, but the neatest part is that by clicking on any of the features (ie. the Displace Smart Filter or the Photograph) we can change both on the fly and apply them to the file easily OR we can swap out the photo altogether.
Try Double-Clicking on the Displace smart filter and choosing a different Displacement Map, or Control-Click (PC: Right-Click) on the Photo layer and choose Replace Content, which will allow you to browse for another photo to replace the current photo with.

Lesson Files + Additional Resources
Download the free .PSD file and other lesson files Right Here.
Tell Your Friends
More in Photo Effects


24 Responses to Creative Edges Using Smart Filters
mr. diggles
March 12th, 2008 at 9:08 am
you better bet your mouse finger i will be using this technique.
Kat
March 15th, 2008 at 2:03 am
Wasn’t this featured on Photoshop User TV? :)
HERO
March 15th, 2008 at 4:55 am
Kat,
Could have been. I learned the technique from a wedding photographer friend of mine and thought it was too good not to share.
Lukasz Pason
March 17th, 2008 at 8:26 am
This is going to be a technique I will use for so many things!! Thanks for this!
natlozt
March 19th, 2008 at 1:39 pm
Thanks for this simple but great tutorial.
Abhisek
May 6th, 2008 at 9:53 am
I am falling in love with this site!
?ß‚Äò?æzone
July 22nd, 2008 at 7:45 pm
very very good,clearly steps, to ps newer,this great,thank you very much.
Tyler
August 14th, 2008 at 2:33 pm
This is what I have been looking for. Could you use a set of images in a photo gallery with the border around it so that it seems that only the photos are changing and not the border? I would be glad to receive any advice or suggestions.
HERO
August 14th, 2008 at 8:02 pm
Tyler,
I’m sure you could do that given that all the images were either horizontal or vertical. If you ignore the IE6 users you could use CSS to place a .png file of just the photo edge effect with a transparent center on a higher z-index than your image. That’d probably be cool.
Kalynn
September 11th, 2008 at 2:55 pm
I have fallen in love with this technique. My only problem is when I go to apply the Displace filter, I get a pop up that says I have to rasterize the selection first. Is this because I’m still using CS2?
HERO
September 11th, 2008 at 4:29 pm
KALYNN, It’s possible that it’s a CS2 thing, but I can’t be sure. I don’t remember every getting that dialog before. If you rasterize the selection does it work ok?
Kalynn
September 12th, 2008 at 9:45 pm
yep, works fine when I rasterize it. I just can’t go back and edit it easily. I just save the file as a .psd with all the layers and then I can edit and change it. I’m probably doing it the hard way, but I’m still very new to Photoshop, so I haven’t figured out all the shortcuts yet.
Daniel
November 21st, 2008 at 10:51 pm
Awesome, it is just the effect I was looking for! Keep on, your tutorials are by far… the most clear and awesome I’ve ever seen.
Thanks!
Ray Gagliardi
June 10th, 2009 at 12:44 pm
Best Photoshop tutorial I have ever seen.
You’re the best.
thanks.
Ray
rajtheeba,
June 21st, 2009 at 6:24 am
merci tr?®s simple efficace et jolie ;)
Neil
January 18th, 2010 at 10:04 pm
LUV IT! It works! It’s made to be simple so it seems to be simple!
I’m not telling the MASTER ANYTHING but I found you can blur the mask to get nice soft edges.
Robby Stathem
February 14th, 2010 at 6:32 pm
This is a sweet technique; thanks for sharing with us all!
It’s got that grungy kind of style; very coolio! :)
evelyn
March 8th, 2010 at 7:36 am
nicee, but where should I get the frosted glass psd?? Should I download it??
Lil’ bit confused on it… :)
thx Hero for sharing…
HERO
March 11th, 2010 at 12:45 pm
EVELYN, The Frosted Glass .psd file comes with Photoshop. All you need to do is navigate to it on your hard drive as per my instructions. If you’re using a version of PS other than CS3 which the tutorial was written in, this file may have moved or be called something different. The folks at Adobe tend to do this upon version switches.
Powderhound
April 29th, 2010 at 6:16 am
fantastic , clear and simple instructions for a great effect, thanks ill be using this a lot
kitINstLOUIS
July 7th, 2010 at 9:33 am
Thanks, Hero, for your generosity in sharing these techniques with us. I’m not able to get up and around so much these days, but I’m able to keep my creative side active by doing some design work for my business by making ads and rock show posters. We have 20 or so shows a month, so I’m able to learn a lot more about how to use Photoshop (CS3) now. Your tutorials are fantastic, and although I’d hate to be deprived of having your work at hand, I, too think you might benefit from writing a book. I’m a writer, let me know if I can help.
Walla
August 3rd, 2011 at 9:36 am
Thanks for the this. I am using CS5 (Students Edition) and cannot find the textures folder. Any Hints?
James
October 2nd, 2011 at 9:23 am
This is great!
Had the same problem with CS5. Some old textures and plugins have been removed. You can find them here… http://www.adobe.com/support/downloads/detail.jsp?ftpID=4688
I also have a problem in CS5 where the Distort (and most filters) are disabled with both smart objects and just regular layers. Had to convert a new document and copy the image over. Must be some kind of image mode/format issue coming in from LightRoom?
James
October 2nd, 2011 at 11:51 am
Got the filters menu to work, turns out if it’s set to a 16-bit image, you can’t use all the filters.