


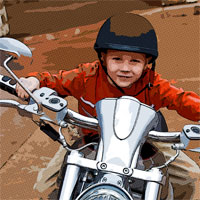
Comic Book Photo Effect
In this Photoshop tutorial I'll show you how to add a comic book effect to an ordinary photo using a few layers, the Cutout and Poster Edges filters and a few different layer blend modes.Introduction
This is a little technique I picked up at Photoshop World and have tweaked to my own preferences. Because each photo is different you’ll want to experiment a little with the settings to get your best result. I’ve found that although this technique can be used for most photos, there are certain ones that have a much more pleasing final result.
Step 1
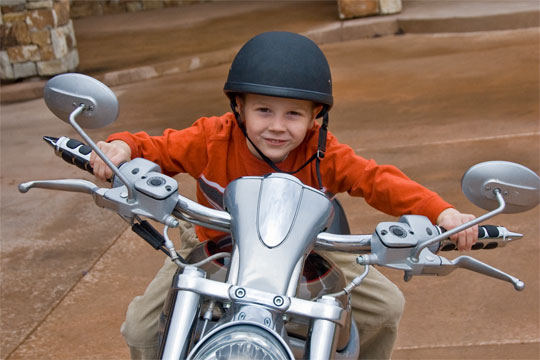
Although this effect can be applied to any image with decent results, I recommend starting with a fairly large photo (mine is 2160x1440px). We’ll be using the Color Halftone filter later in the lesson which has a 4 pixel minimum diameter and if your starting image is too small you’ll end up with more of a polka dot effect than anything resembling a comic book effect. Obviously I’ll have to resize my large image for each step in the tutorial and I’ve reiszed the .PSD download at the end of the lesson after applying the effects at the large scale.
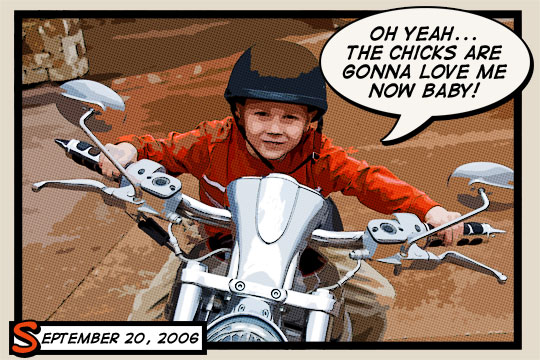
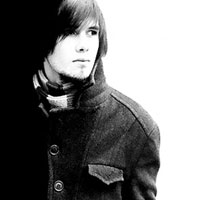
All that being said, lets jump right in and build some setup layers. My photo is of my six year old nephew who was obviously getting a little too comfortable on uncle HERO’s Harley.
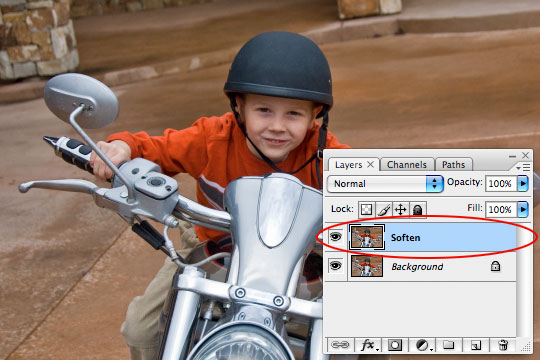
Step 2
The first order of business will be to duplicate the original photo layer by pressing Command-J (PC: Ctrl-J). We will be duplicating the layer a few times, so memorize the keyboard shortcut now. Name this new layer Soften.
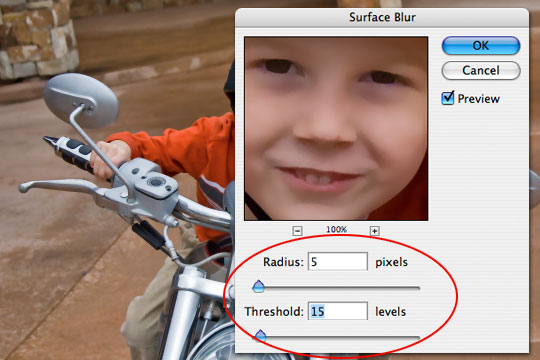
Step 3
As it’s name implies, we will now soften this layer using a blur filter. Normally I prefer the Gaussian blur but for this tutorial we need the edges of our subject to stay crisp so we’ll be using the Surface Blur filter. Click Filter>Blur>Surface Blur from the main menu to bring up the Surface Blur dialog box. For this particular image size I’ve found that a Radius of 5 and a Threshold of 15 works nicely. Click OK when you’re done.
Step 4
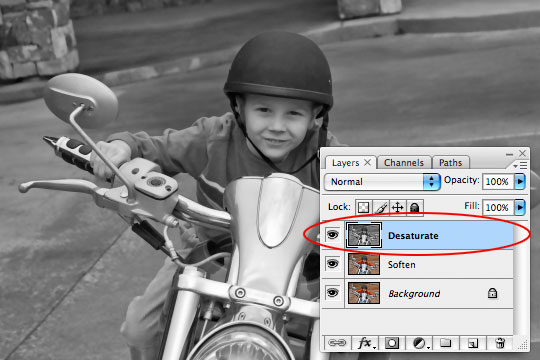
For the moment we’re done with the Soften layer but we need the effect to also be visible on our next layer so lets duplicate the layer (I said we’d be doing it… do you remember the keyboard shortcut?). Call this new layer Desaturated and like it’s name implies we’ll be desaturating it. Choose Image>Adjustments>Desaturate to strip the color from the layer or simply use the keyboard shortcut Command-Shift-U (PC: Ctrl-Shift-U).
Step 5
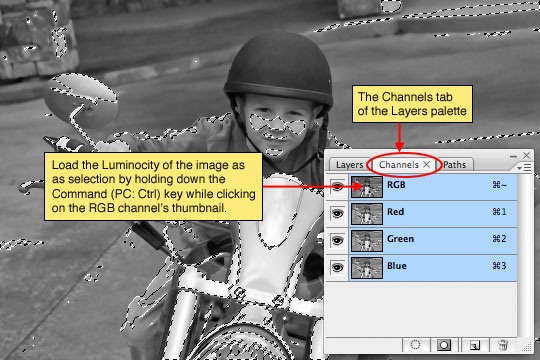
Create a new layer by clicking the Create New Layer icon at the bottom of the layers palette. Name this layer Halftone.
Now we need to load the luminosity of our image as a selection and the easiest way to do this is to switch over to the Channels tab in the Layers palette and holding down the Command (PC: Ctrl) key while clicking on the RGB Channel’s layer icon.
Step 6
With the luminosity loaded as a selection, click back over to the Layers tab in the Layers palette and make sure that the new Halftone layer is selected. The Luminosity of the image is most simply described as the lightness of the image. What we actually want to do however is select the exact opposite (the darkness of the image), so lets invert the selection by choosing Select>Inverse from the main menu or by pressing the keyboard shortcut Command-Shift-I (PC: Ctrl-Shift-I).
Press the D key to set your foreground color to black and then fill the selection by pressing Option-Delete (PC: Alt-Backspace). Now we can release the selection (ie. deselect) by pressing Command-D (PC: Ctrl-D).
Step 7
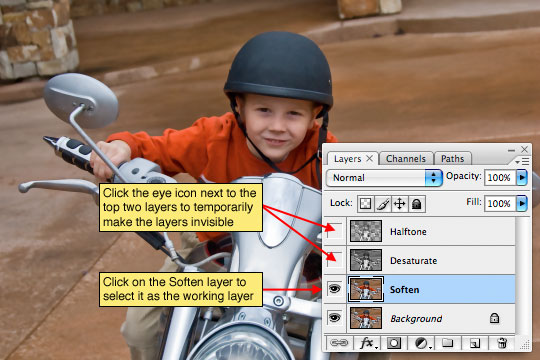
Our setup is now complete and we can get to work on creating the effect. For the moment lets turn off the top two layers by clicking the little eye icon next to each in the layers palette and lets click on the Soften layer to select it as the layer we’ll be working on first.
Step 8
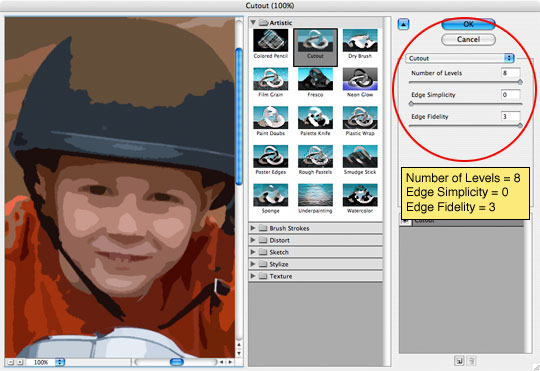
The Soften layer will be acting as the color layer for the comic book effect, but at the moment it contains far too much detail so lets use one of Photoshop’s Artistic filters to consolidate the color a little. From the main menu choose Filter>Artistic>Cutout.
The Filter window will appear with the Cutout settings visible. Set the Number of Levels to 8, the Edge Simplicity to 0 and the Edge Fidelity to 3. Click OK when you’re done.
(*note: If you have color bleed issues in this step, you can use the Posterize Edges filter instead with settings 2, 0, 2. This will yield a similar result while keeping color bleeding to a minimum.)
Step 9
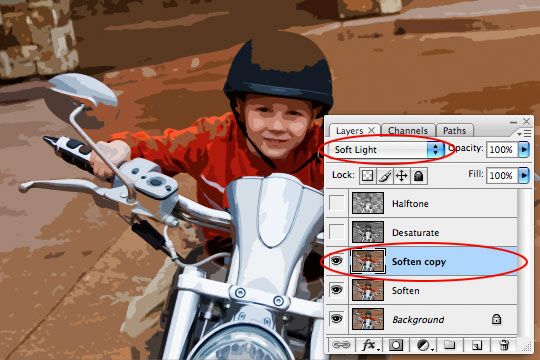
Since the Cutout filter has dulled our color and typically comic book colors are quite vivid, lets press Command-J (PC: Ctrl-J) to duplicate the layer and then switch the new layer’s Blend Mode to Soft Light, effectively giving our colors more vibrance.
Step 10
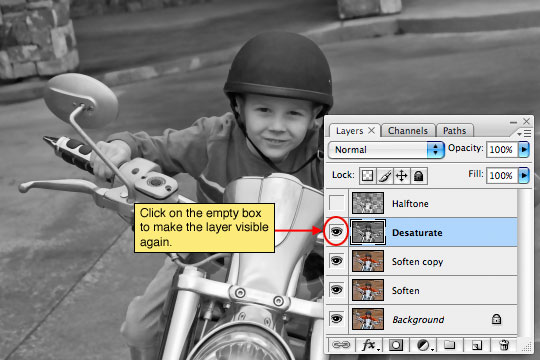
We’re now done with the Soften layers so click the Desaturate layer to select it and then make it visible again by clicking the empty box next to the layer icon where we clicked the eye icon in Step 7.
Step 11
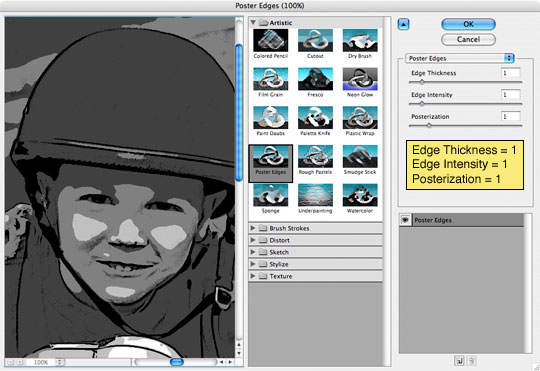
The Desaturate layer will now become the black outlines for our comic book effect. We will be using another of the Artistic filters called Poster Edges. From the main menu choose Filter>Artistic>Poster Edges to bring the Artistic filter window back up with the Poster Edges options visible. Set all 3 options to 1 and click OK.
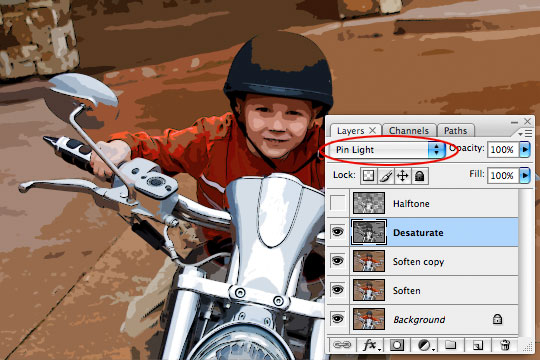
Step 12
Lets now change the layer’s Blend Mode to Pin Light so we can get the color to show through from the layers behind while keeping the edge outlines we just created.
Step 13
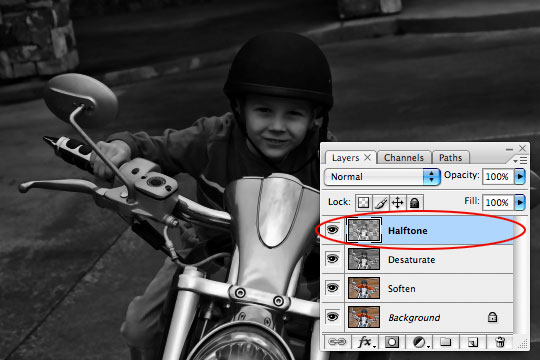
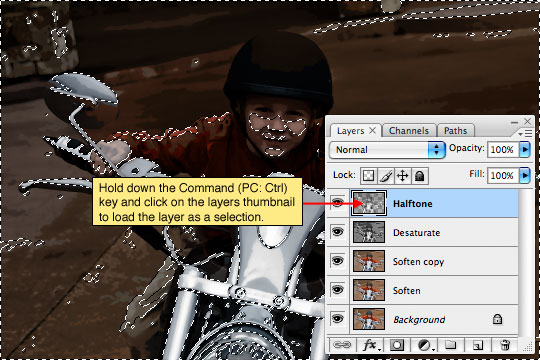
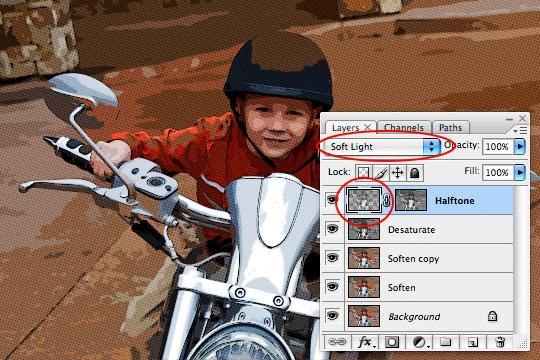
We’re now done with the Desaturate layer, so lets click up to the Halftone layer and make it visible by clicking in the empty box to the left of the layer thumbnail just like we did with the Desaturate layer in Step 10.
This effect has a few steps so follow along closely. First lets load the layer as a selection by holding down the Command (PC: Ctrl) key and clicking on the layer thumbnail in the Layers palette.
Step 14
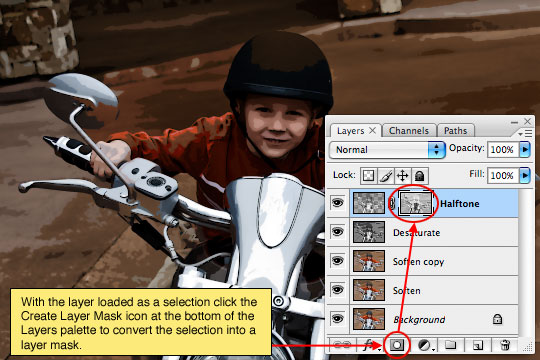
With the layer loaded as a selection click the Create Layer Mask icon at the bottom of the Layers palette to convert the selection to a layer mask.
Step 15
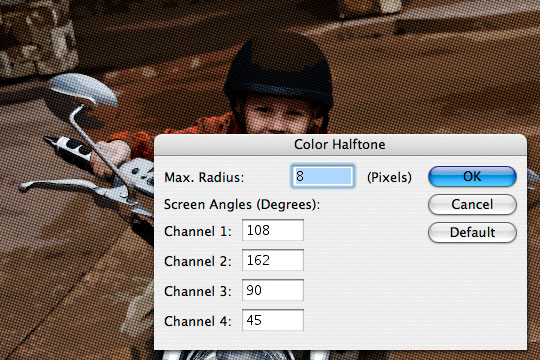
The layer mask on the Halftone layer should now be selected, you can tell because it will have small black brackets around it indicating that it is the selected working area of the layer.
Now it’s time to create the halftone dot pattern that will complete the comic book look for our photo. From the main menu choose Filter>Pixelate>Color Halftone. For the size of my image I’m going to use a setting of 8 Pixels for the Maximum Radius setting, depending on the size of your photo you may have to play with this value to get a result that looks right. The minimum pixel value for the Maximum Radius setting is 4 pixels which is why it is important to start with a large image to begin with, otherwise you’ll end up with something that looks like polka dots threw up all over it.
Step 16
Because we’re working on a layer mask and not directly on the layer this effect will look much better if we invert the layer mask. Do this now by simply pressing Command-I (PC: Ctrl-I).
We’re now done working with the layer mask, so lets click on the layer’s actual thumbnail to switch our working area back to the actual layer. You’ll notice that the brackets that were around the layer mask thumbnail before are now around the layer thumbnail now. Lets also change the way this layer interacts with the layers below by changing the layers Blend Mode to Soft Light allowing more of the color to come through while nicely retaining the halftone effect.
Step 17
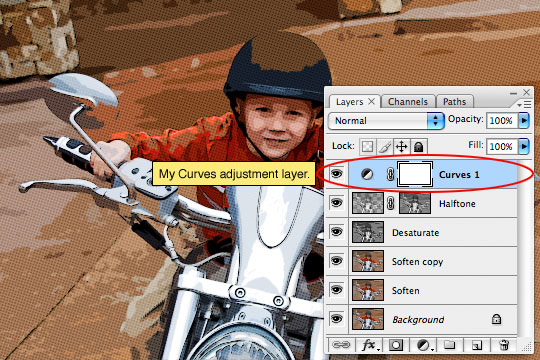
This overall effect sometimes ends up producing an image that’s a little darker than I prefer, so to remedy this I’m going to add a Curves Adjustment layer by clicking on the Create New Fill or Adjustment Layer icon at the bottom of the layers palette (it’s the one that looks like a circle that’s split into two halves) and by choosing Curves from the menu. This will open up the Curves dialog box where I’ll grab the center point of the line and drag it up and to the left just a little to lighten the mid tones of the image while leaving the black and white points where they are.

Step 18
So my layers palette and image now look like this.
Step 19
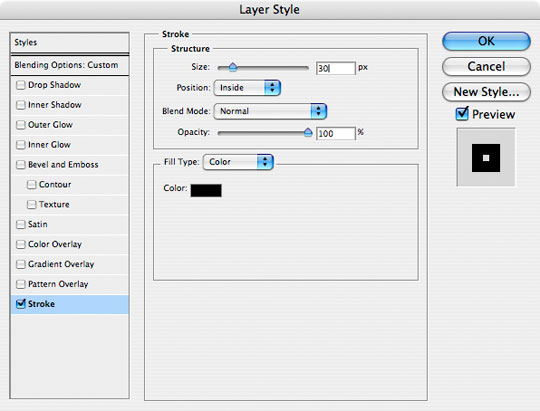
Lets create a nice black outline around our photo. Create a new layer called Outline, fill the layer with the foreground color by pressing Option-Delete (PC: Atl-Backspace), don’t worry about the color because next we’ll lower it’s Fill opacity to 0% and add the following Stroke layer style to create the outline.
Step 20
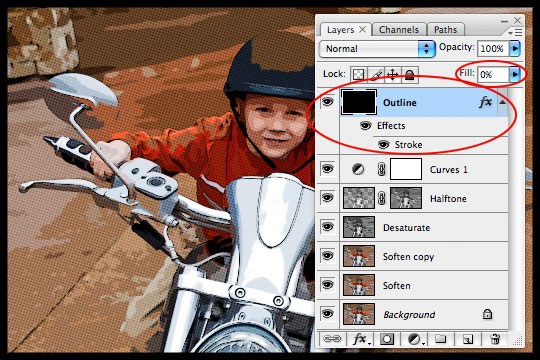
Here’s my image with the Stroke applied.
Step 21
For my final image I added a few captions using a nice comic book font called Digital Strip which I’ve included in the tutorial download, or you can choose from a nice variety of other comic book fonts at DaFont.com.
Lesson Files + Additional Resources
Download the free .PSD file and other lesson files Right Here.
Tell Your Friends
More in Photo Effects


52 Responses to Comic Book Photo Effect
Casey L. Jones
May 13th, 2008 at 12:08 pm
Wow, such an awesome effect! I’m going to try using this on some of my nephew’s photos.
dilirum
May 14th, 2008 at 4:10 am
I love it. I have actually fairly recently been playing with similar techniques which I’d found on other tutorial sites. I think I like your end result better – of course it may just depend on the original photo. The lighting and colors in your original are pretty great. Thanks for sharing!
Zephyr
May 14th, 2008 at 10:05 am
Ahahahahaha !
I loved it =D
Thanks again Hero !
Booy
May 14th, 2008 at 11:17 am
Fabulous! Your “subject” is a mighty cute little guy. His mother should be proud he’s now a comic book chic magnet!
Mchilly
May 18th, 2008 at 10:20 pm
Nice caption lol and really cute little man. Great work!
Trevor
May 22nd, 2008 at 8:24 pm
Amazing tutorial. I will definitely use this and show people your great tutorial.
Missy
May 23rd, 2008 at 4:01 pm
One minute my kid is writing comics, the next thing you know, he is one! He is one intentional little man!
da boss lady
June 10th, 2008 at 5:47 pm
I LOVE DIS IMAGE I WANT TO CREATE ONE MYSELF
Dave
August 4th, 2008 at 5:15 am
Love this tutorial & so easy to follow, keep up the great work!
Andrea
September 12th, 2008 at 12:18 pm
Ohhhh, fantastic…Very impressive…Thanksssssss
Paul
September 25th, 2008 at 8:02 am
Thats great, Thanks so much for this tutorial. was just what i was looking for.
Don
October 21st, 2008 at 5:12 pm
Great tutorial!! However, when I did this to my own photograph the black outline didn’t show up but my layers palette looked identical to the example. Anyone know why this happened (or didn’t happen)??
HERO
October 21st, 2008 at 7:00 pm
DON,
t’s likely that you just forgot to change the Stroke position to INSIDE, which is why it’s not showing up. Check your layer style and make sure it’s set accordingly. You might also want to check to make sure you dropped the layer’s FILL to 0% and not it’s OPACITY.
NetOperator Wibby
October 29th, 2008 at 6:24 am
This was a great tutorial, I’m glad I found it.
No Reimer Reason
October 29th, 2008 at 11:23 pm
I really enjoyed this tutorial and it was very easy to follow. Thank you so much for sharing! :)
Gabriela
November 10th, 2008 at 8:59 pm
Great Tutorial!
I made a post on my site to show this great tutorial.
The post brings you to this page :D
I hope you don’t mind, and if you do email me and i will take it down as soon as possible.
Thank you
HERO
November 11th, 2008 at 10:38 am
GABRIELA,
Links back to PSHERO are always appreciated! Thanks!
Alicia
November 25th, 2008 at 1:53 pm
That ROCKED and it was fun.
Nadia
February 3rd, 2009 at 12:48 pm
This is really cool effect! Thx for sharing it! :D
Darren
February 6th, 2009 at 3:36 pm
This process looks fairly straight forward with specific settings, values, etc.
Can this be automated like a macro or something so I can open a picture, press a key, and *poof*…done. ?
Thanks for the tut though, my kids pics look awesome and they love it. ‘Dad, you’re the coolest!’ I’m a hero again. ;)
HERO
February 7th, 2009 at 10:38 am
DARREN, you can absolutely automate something like this using Photoshop Actions. I’ll put this on my list of upcoming tutorials to write!
Waone
February 14th, 2009 at 4:57 am
Ok..Cool!!
berlin
March 2nd, 2009 at 8:41 am
Gut!
Stinky Pants Al
March 2nd, 2009 at 6:05 pm
Thank you for putting together such a clear and easy to follow tutorial, which delivers brilliant results.
cek
March 5th, 2009 at 8:45 am
this shit is just amazing
cokwn
March 9th, 2009 at 7:34 am
this really worked! I cant believe it!
christopher
March 20th, 2009 at 3:58 am
dis tutorial is awesome..tnx it helps a lot..i will try dis to my photo of my daughter..
Patrick
March 22nd, 2009 at 6:59 pm
I was kind of hoping for something with less steps but once you do it a few times it`ll seem like nothing I`m sure.
Thanks for taking the time and putting in the extra effort to make an indepth guide.
papsikel
April 5th, 2009 at 12:30 am
lol wow i did it as i read it and it looks aswesome!thanks!
Alanna
April 26th, 2009 at 2:04 am
Here’s how mine ended out :)
http://www.flickr.com/photos/alanna-banana/3473258589/
meems
May 4th, 2009 at 12:07 am
Great tutorial! Exactly the thing i was looking for! thanks for sharing!
I am using an ancient PS 6.0 (haven’t gotten around to dishing out the dough for the latest versions) so only issue I had was there’s no Pinlight blend mode (I used Overlay). Looks similar but I suspect it might have made a difference.
che
June 18th, 2009 at 7:10 am
I’m stuck at Step 6 –>
Press the D key to set your foreground color to black and then fill the selection by pressing Option-Delete
So I just have to press the D key? And where can I find ‘Option – Delete’ ? I can’t find it anywhere! Thanks
HERO
June 20th, 2009 at 5:00 pm
CHE, Yes, just press the D key to reset the Foreground/Background colors. There is no Option-Delete key, those are two keys Option and Delete (or Alt and Backspace if you’re a PC user)
RichP
June 26th, 2009 at 8:29 am
Really great tutorial. I had to quickly create some comic-style images for work, with nowhere near enough time to hand-draw them, and if done with good quality photos this technique works brilliantly. Thanks again – lifesaver!
Josh W
July 8th, 2009 at 3:22 am
Brilliant tutorial! Easy to follow, and with great results!
Linda
August 16th, 2009 at 7:22 pm
Great tut! I set my the actions to record on Photoshop so now I can make comics on the fly!
LINDA SCHILDMAN
September 17th, 2009 at 6:04 pm
I’ve practiced on dozens of tutorials and your tutorial is one of the best I’ve used.
I got great results the first time.
Thank You.
Decent Banners
October 6th, 2009 at 7:42 pm
Easy to follow, and with great result :)
Heather @ PSD Tutor Roo
October 16th, 2009 at 11:01 am
What a clever technique. I don’t know if kids would have the patience for this, but it seems like it would be a fun way for them to create a comic book of their summer vacation or adventures at camp.
Clare
November 19th, 2009 at 7:07 pm
Great, thanks! Really well done and good instructions.
I’ve played around a bit myself with Photoshop and Nik filters and got some interesting results.
paul
January 10th, 2010 at 9:06 am
your tutorial is the best, thanks for sharing
jeprie
February 3rd, 2010 at 9:18 am
wow, nice tuts. im searching this technique and its great to find it here.
been a while not coming here. so you’re doin some redesign. minimalis and looks great. i can read the tuts easier this way. thank you.
pollywog
March 21st, 2010 at 6:47 pm
Only discovered your blog a couple days ago but Thanx bro…you’re the man !
and thanx Linda for suggesting record the steps as actions:)
here’s my efforts
http://pollywannacracka.blogspot.com/2010/03/shout-out-to-hero.html
JR
March 28th, 2010 at 1:56 pm
Thanks, great tutorial! I enjoyed it very much!!
That’s one of my results:
http://www.flickr.com/photos/jrzgz/4470251745/
Football Manager
April 20th, 2010 at 2:57 am
wow, nice tuts. im searching this technique and its great to find it here.
Joanna
April 20th, 2010 at 10:22 am
Just discovered your site – great tutorial! I’m not sure if I missed something – using Photoshop CS2 and can’t get step 14 to look like yours. It creates a second icon but it’s blank so the Filter>Pixelate>Color Halftone doesn’t do anything. . .
Stephan
June 6th, 2010 at 3:18 pm
Schweet tutorial…. just recorded it as an action and testing it on ’bout… ALL of my photos :D
Clipping Path India
June 22nd, 2010 at 4:10 am
I tried it but its seems a little bit difficult for me.Thanks for sharing.
angkycelo from INDONESIA
December 25th, 2010 at 11:07 am
nice tutorial
Kamil
June 16th, 2011 at 3:04 am
The best tutorial of that kind I ever saw! Many thanks, you saved my ass!