


Basic Graduated Neutral Density Filter
In this Photoshop tutorial I'll show you how to achieve the effect of using a Graduated Neutral Density filter to make a sky more dramatic using one simple Gradient layer and the Soft Light layer blend mode.Introduction
It is important for me to point out before we get started that Photoshop is no substitute for making proper adjustments and using all the tools you have available while shooting in the field. Although we can replicate many filters you may put on your lens post-capture, this particular technique is second best to using an actual Gradated Neutral Density (ND) filter at the time of capture. Often times using the Grad ND filter in the field prevents blown out highlights that are simply not recoverable after the fact because they were never captured to begin with.
Now let me put my soap box away so we can get to the tutorial.
Step 1
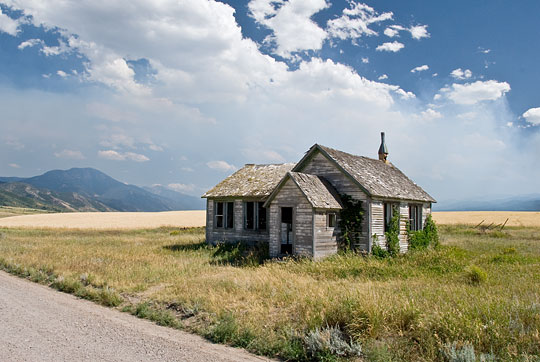
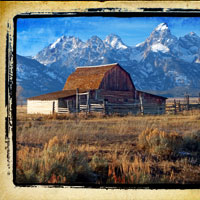
Here is a shot Mrs. HERO took while driving through Swan Valley, Idaho last year. I’ve made no prior adjustments to this image so as not to detract from the effect. Traditionally (because this was shot as a RAW file) I would make most of my adjustments using the Photoshop Camera RAW interface prior to bringing the photo into Photoshop, but for the sake of instruction, here is the unadjusted image.
Step 2
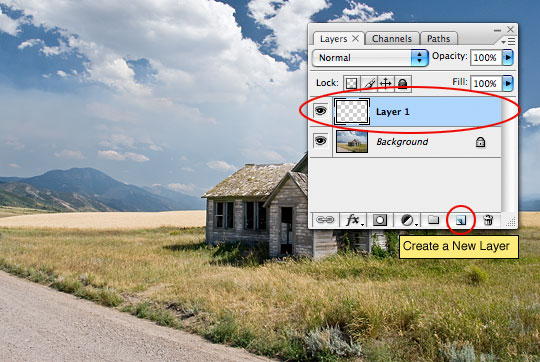
Lets add a new layer by clicking the Create New Layer icon at the bottom of the Layers palette. (*note: If you’re Layers palette isn’t visible, open it by choosing Window>Layers from the main menu.)
Step 3
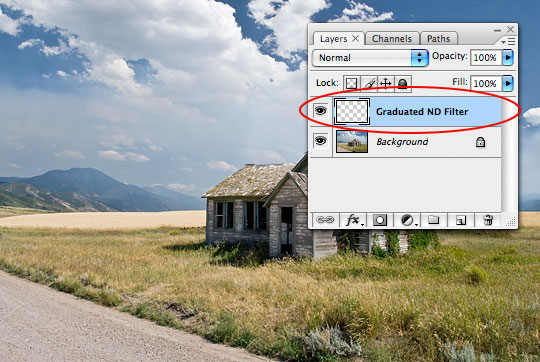
Although this file will only be 2 layers, it’s a good practice to name each layer correctly. Double click on the new layer (which is by default called Layer 1) and change it’s name to something more appropriate like Graduated ND Filter.
Step 4
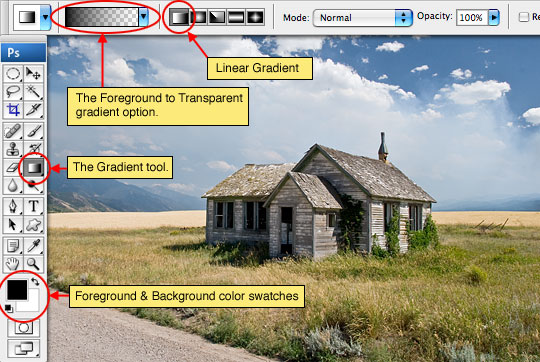
Reset the foreground and background colors to their default black and white setting by pressing the D key. (If your Tools palette isn’t visible, open it by choosing Window>Tools from the main menu.)
Switch to the Gradient tool by pressing the G key and make sure that the gradient is set to Foreground to Transparent in the Gradient Options bar which has now appeared at the top of Photoshop. Also check to make sure that the Linear Gradient icon is selected. (If you have no idea what I just said, see the diagram below)
Step 5
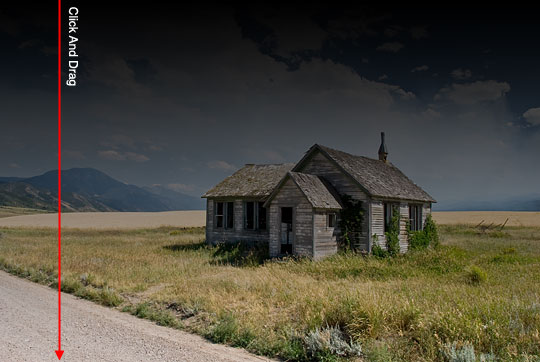
With the Gradient tool now selected click and drag in a straight line from the top of the photo to the bottom. (*note: Holding down the Shift key while dragging will keep the gradient in a perfectly straight line.)
Step 6
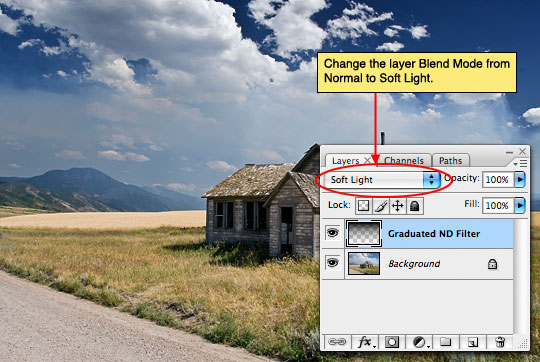
Lets redirect our attention back to the Layers palette and change the layer Blend Mode from Normal to Soft Light.
The Soft Light blend mode darkens or lightens the colors depending on the blend color. The effect is similar to shining a diffused spotlight on the image. If the blend color (light source) is lighter than 50% gray, the image is lightened, as if it were dodged. If the blend color is darker than 50% gray, the image is darkened, as if it were burned in. Painting with pure black or white produces a distinctly darker or lighter area but does not result in pure black or white.
Step 7
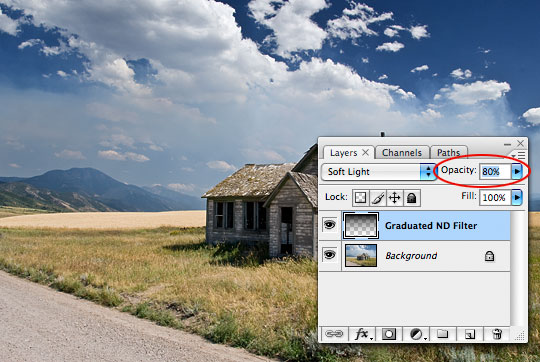
At times this effect is a bit too heavy. If that’s the case, simply lower the layer’s Opacity (found right next to where we just changed the Blend Mode in the layers palette). For my image a setting of 80% Opacity seemed right.
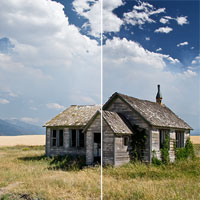
Step 8
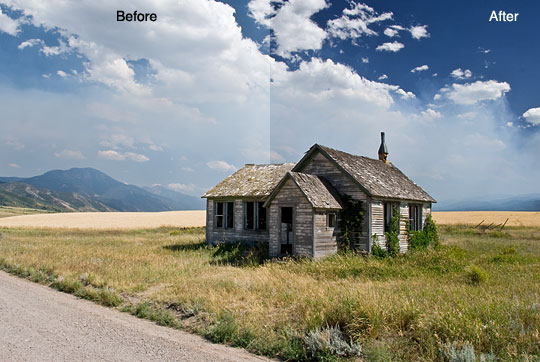
Here is the split screen before and after. Notice how much more dramatic the sky is from the original and how much more vivid the blue has become.
Step 9
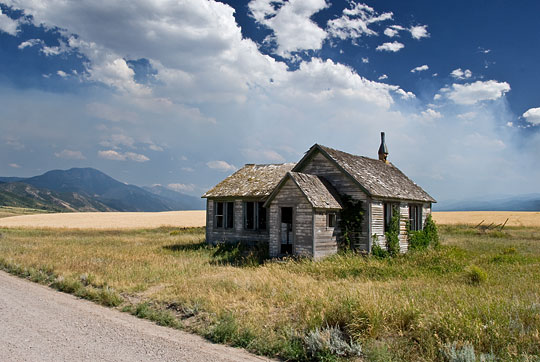
And the final result.
(*note: because this exercise used only one simple layer, there is no file download needed for this tutorial.)
Lesson Files + Additional Resources
There are no file downloads or additional resources for this Photoshop tutorial
Tell Your Friends
More in Photo Effects


34 Responses to Basic Graduated Neutral Density Filter
Molly
March 25th, 2008 at 2:59 pm
Cool! Thanks. These are great and very simple.
dubaibilly
March 25th, 2008 at 9:40 pm
I really do find your tutorials easy to follow and I’m learning a lot. Thanks.
DB
Vincent
March 25th, 2008 at 10:59 pm
Wow, I loved this tutorial. Seems simple and it makes the photo look great! Thanks a bunch!
EvilOlive
March 26th, 2008 at 6:41 am
Great and easy to follow tut, great to use for making pictures look better. Good job and keep up the good work!
Brian Lang
March 26th, 2008 at 1:23 pm
Very nice! I’ll be trying it on some disappointing photos I took of Mount Robson (BC) a while back.
Greg G
March 26th, 2008 at 1:49 pm
Can’t wait to try this out. That adds so much depth. Great job!
crestind
March 27th, 2008 at 9:30 am
Great tutorial and great site!
josh
March 27th, 2008 at 4:34 pm
I just want to comment on how cool this website is. Pro tips for free Pshero for me!!
Will
March 28th, 2008 at 5:31 am
Wow, very simple yet very effective, this has really added to some of my shots. It’s a shame all the other tutorial sites aren’t this beautiful and helpful at the same time. Compliments to Mrs Hero, that’s a very nice photo there. Keep up the good work!
James
March 28th, 2008 at 8:10 am
Hurry up with the next tutorial!!!
mr. diggles
March 28th, 2008 at 9:15 am
i learned a lot on this one. no surprise there. i learn on all of your tutorials.
HERO
March 28th, 2008 at 9:40 am
Patients young James… it’s coming soon enough.
Web Design Studio
April 7th, 2008 at 12:24 am
I actually used this technique when designing a clients website. I am not much a image modifier, however this particular client requested some image manipulation and I had to do some R&D…thanks.
Rodrigo
May 3rd, 2008 at 9:40 pm
It?Ǭ¥s incredible how a little thing like that can change a photo, pshero you?Ǭ¥re a real hero
TV Guide
May 9th, 2008 at 8:26 am
Really cool tips. TY so much
Palm trees
May 25th, 2008 at 2:13 pm
great tutorial!! You definitely have the gift of teaching. The steps are so easy to follow. God bless
Schwingding
July 22nd, 2008 at 8:28 am
You are very, very good at writing these tutorials in a manner a newbie can understand. I wish I had found your stuff while I was learning the basics, as I gave up in frustration on many tutorials not as well written.
gina
September 8th, 2008 at 11:24 am
hero, im a scrapbooker and beginner in photography.. i really appreciate your techniques.. enjoying them a lot! Thanks a lot for sharing your talents. :) Hope to learn from you more on elements and photo editing..
Natalia
September 11th, 2008 at 11:05 am
PsHero Thanks!
So simple, so perfect.
Great!
nugui
September 25th, 2008 at 9:06 pm
so simple and yet so usefull!
great tutorial, you helped me a lot! thank you so much!
John Finkelde
September 29th, 2008 at 2:58 am
Brilliant thank you
Ibrahim
November 24th, 2008 at 3:35 am
Great tips thank’s :)
Doaa
December 9th, 2008 at 12:46 pm
Thanks alot! that was useful!
Green Sheep
January 13th, 2009 at 11:49 am
Thanks for this very useful tutorial, it has really brought some of my work to life! :)
Harris
February 12th, 2009 at 6:04 am
Bloody good thanks.
Peter
April 1st, 2009 at 4:10 am
Funny – this is exactly what I needed for some cake (!) photos I’m doing – really brought them alive.
I think they’re actually slightly easier to do with a gradient adjustment layer?
retoucher77
June 4th, 2009 at 6:42 am
simple, yet fantastic. great tutorial, thank you!
wilson etrata
July 16th, 2009 at 8:45 am
i find photoshop so frustrating until i found your site. thanks!
Gary
July 22nd, 2009 at 6:12 pm
Love this tip! I’ve been trying to figure this out on my own… this works SO much better.
One addition, if you set the background colour to 50% grey (instead of white) when you create the grad, then the bottom of the photo will stay exactly as it was…
Bob
October 10th, 2009 at 2:42 pm
Great tip. The presentation was great and it was easily understood and demonstrated. Please provide more of these friendly to user tips.
Alice Schear
November 21st, 2009 at 2:04 pm
Wow! Thank you so much. I knew I had read something about how to do this, but when I came upon a need to do it today, I couldn’t remember how. Your tutorial was a life saver!
Alice
Mike Eilbeck
February 6th, 2010 at 10:17 am
After a web search, this ND Grad tutorial was by far the best. Very clear and concise. Thank you very much!
James
April 14th, 2010 at 4:10 am
nice tutorial. what would i do without stumble upon?
Carl
June 5th, 2010 at 10:39 pm
Thank you!! this one was easy to learn.