


Hero Header Part I
I've had quite a few requests for a tutorial on how I created the previous pshero.com site header, so this tutorial will cover creating the background and red bars of the project.Introduction
I’m stoked to have a nice list of requests to work from this week. I’ve had several folks ask about how I created the header background seen in the previous site header, so today we’re going to explore the wonderful world of Pattern Overlays, Gradient Overlays, Noise and a few other nifty little tricks that you may find useful.
This tutorial will cover creating the background and red bars of the header.
A very special thanks to Mr. Diggles and Brian from dbClay.com. You boys know why.
Step 1
Lets open a new document and get rolling. Because I’m working in this limited space I’m going to use a document width of 540px, but if you’re building an actual header, you’ll probably want to make your wider and 350px high will be plenty.
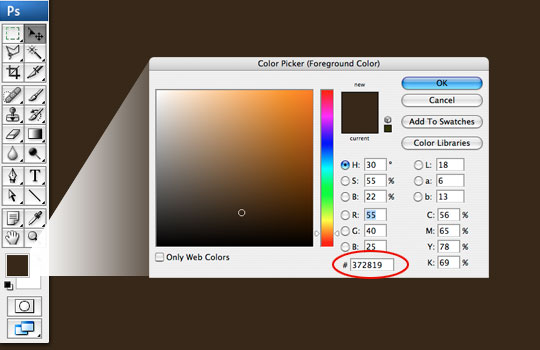
Click on the foreground swatch in your Tools bar and enter the RGB code #372819 in the field at the bottom of the Color Picker to change the color to a nice brown. Now simply hit Command-Delete (PC: Alt-Backspace) which is the keyboard shortcut to fill the stage (or a selection) with the foreground color.
Step 2
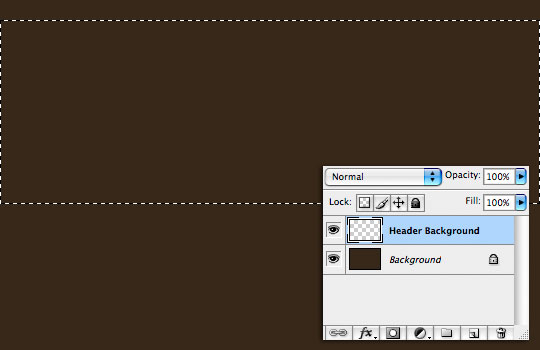
Create a new layer by clicking the New Layer icon at the bottom of the Layers palette. If your layers palette isn’t visible, open it by choosing Window>Layers from the main menu. Double click on the layers name and rename it Header Background.
When you create a new layer, it will automatically be selected as your working layer. Press the M key to choose the Rectangular Marquee tool and drag a selection across the stage which will be used to create the background area of the header that contains all those pretty swirls. The height of my selection is 185px.
(*note: If you choose Window>Info from the main menu, the Info palette will open up and you can see exactly what size selection you are creating as you go.)
Step 3
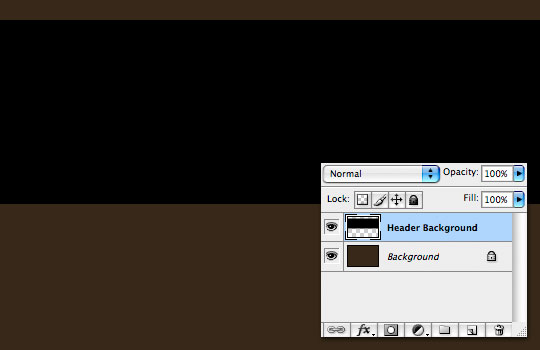
Press the D key to reset the foreground color to black, then fill the selection by pressing Command-Delete (PC: Ctrl-Backspace) just like we did in Step 1. Then press Command-D (PC: Ctrl-D) to deselect.
Step 4
For this step you’re going to need to download a new Photoshop Pattern file. I’ve included this file in the download at the end of the lesson or you can download it by itself here. Once you’ve downloaded the pattern, you’ll need to place it in the Applications>Photoshop>Presets>Patterns folder on Mac, and the PC path should be quite similar.
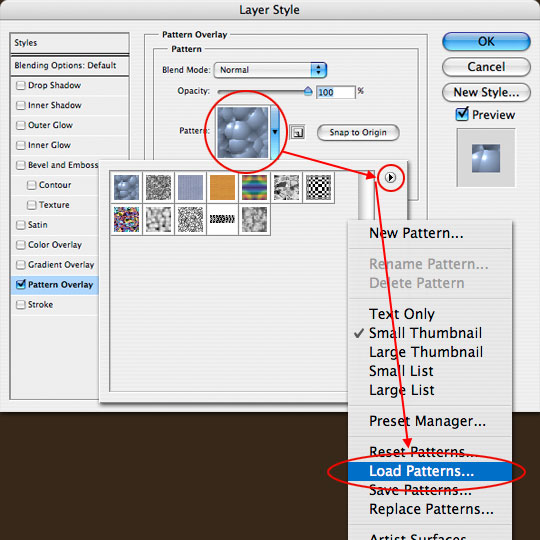
Now we are going to load and apply this style to our layer. Either double-click to the right of this layer’s name in the layers palette or Control-Click (PC: Right-Click) on the layer and choose Blending Options to bring up the Layer Styles dialog box. Choose Pattern Overlay from the Styles list on the right. Click on the pattern swatch to open the Pattern Picker, then click the little circle with the arrow in the upper right hand corner. Now you can see all the options available for the Pattern Picker, choose Load Pattern. Now simply navigate to where you placed the pattern at the beginning of this step and click OK. This will load the pattern into your Pattern Picker (right at the end). Now just choose it and the Pattern Picker will close.
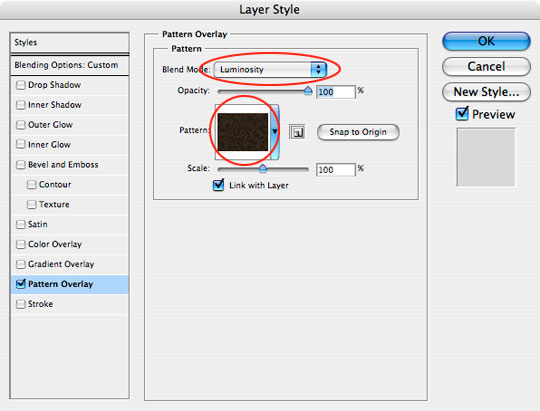
Step 5
You’ll see that the pattern you chose is now active in the Pattern window. Change the Blend mode to Luminosity.
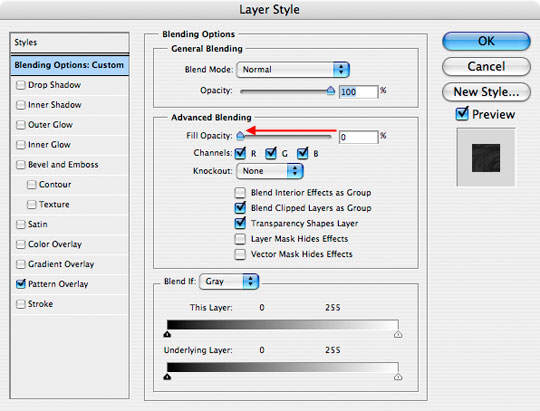
Step 6
Select Blending Options from the Style list at the left and move the Fill slider all the way to the left to reduce the layer’s Fill Opacity to 0%.
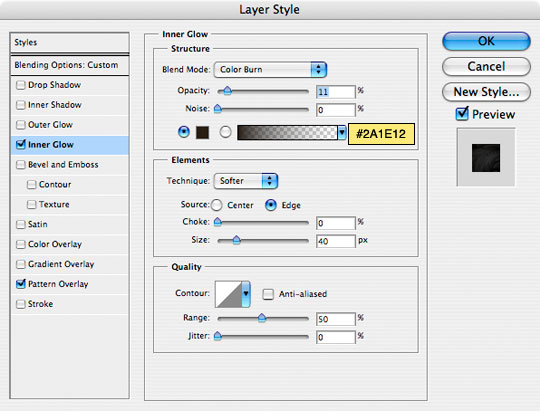
Step 7
Next select the Inner Glow style and add the following settings. This is what adds the nice edge burn effect you see in the header. When you’re done, click OK to commit the layer style and return to the document.
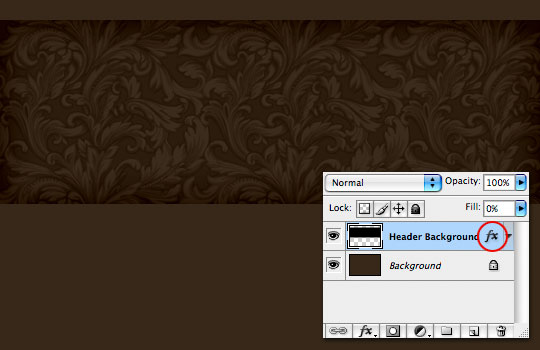
Step 8
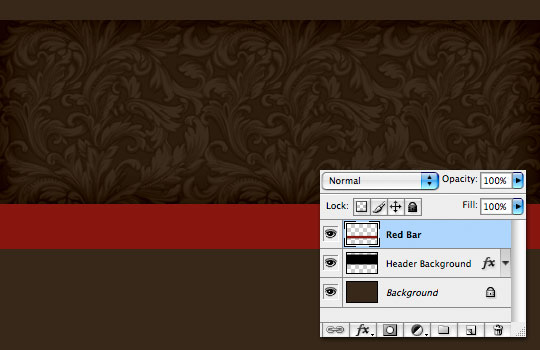
You’ll notice that the Header Background layer now has a Layer Style icon. Your header should now look something like the one below.
Step 9
Create a new layer and call it Red Bar. With the Rectangular Marquee tool draw out a nice selection below the Header Background (mine is 45px high), fill it with #88160F, and press Command-D (PC: Ctrl-D) to deselect.
Step 10
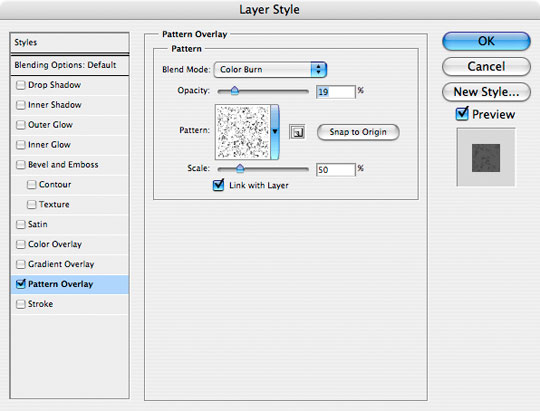
Next, open the Layer Styles dialog box just like we did in Step 4, choose Pattern Overlay. Just like we did in our earlier step, we’re going to load a pattern set into the Pattern Picker. This time though, we’re going to use a stock pattern set called Texture Fill 2 which you’ll find in the drop down menu where we loaded our pattern in Step 4. You can either Append (put these patterns at the end of the pattern picker) or you can click OK to replace all the current patterns with the new one. Either is fine.
Find and select the pattern called Sparse Basic Noise by holding your mouse over each pattern until it’s name appears. And use the following settings. Then set a Gradient Overlay using the settings that follow.
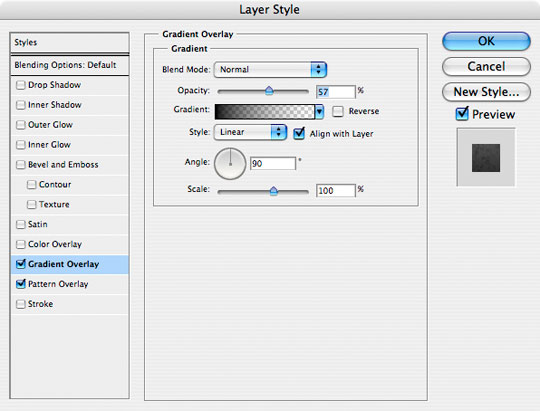
Step 11
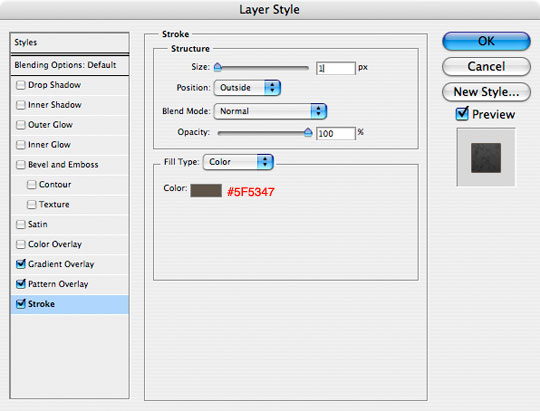
Lastly, add the following 1 pixel Stroke and click OK.
(*note: in my header I used a double outline created by using the Single Row marquee tool available in the Rectangular Marquee tool’s expanded menu with a 1 pixel gap between them.)
Step 12
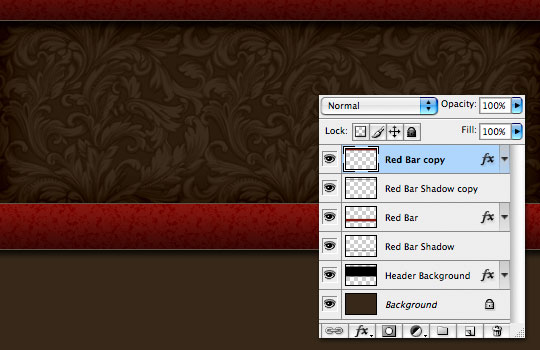
Now lets duplicate our Red Bar layer by pressing Command-J (PC: Ctrl-J). This will create a new layer directly above the Red Bar layer called Red Bar copy.
Press the V key to switch to the move tool then click and drag this new red bar to the top of the header until it looks like the one below.

Step 13
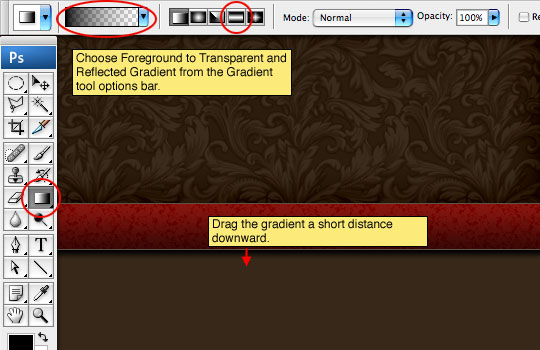
Now lets add a shadow below the bottom Red Bar layer. Click on the Header Background layer and then add a new layer above it by clicking the Add New Layer icon at the bottom of the Layers palette. Rename the layer Red Bar Shadow.
Switch to the Gradient tool by pressing the G key and make sure the foreground color is set to black by simply pressing the D key. In the Gradient tool options that appear across the top of the screen, make sure that Foreground to Transparent is selected as well as Reflected Gradient. On the stage drag a short vertical line from the bottom of the Red Bar downward to create the gradient shadow.
Step 14
Lets put the same shadow below the top bar by repeating the process then drop the opacity of both shadow layers to 80% in the layers palette. You can do this by duplicating the layer and moving the gradient up, or by creating a new layer and a new gradient.
Step 15
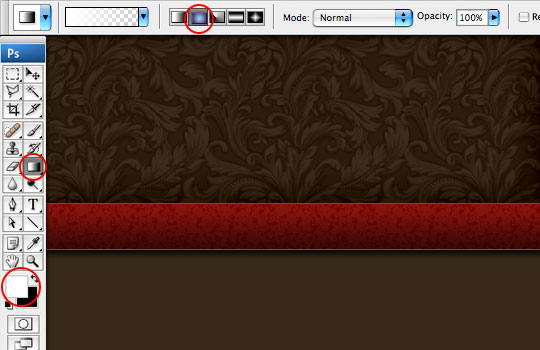
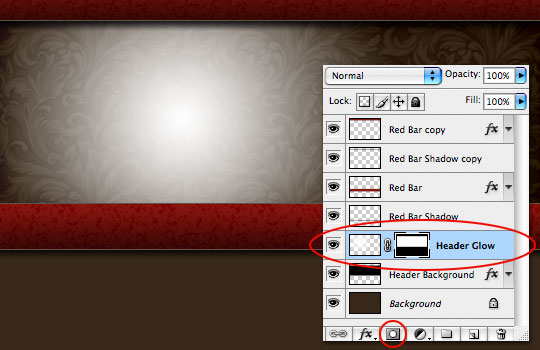
The last thing we are going to do is place a radial gradient into the header to create the glow behind the logo area.
Create a new layer above the Header Background layer and name it Header Glow. Press the X key to switch the foreground and background colors, now making white the foreground color. Choose the Gradient tool again by pressing the G key and this time make sure that Radial Gradient is selected from the Gradient Options.
Step 16
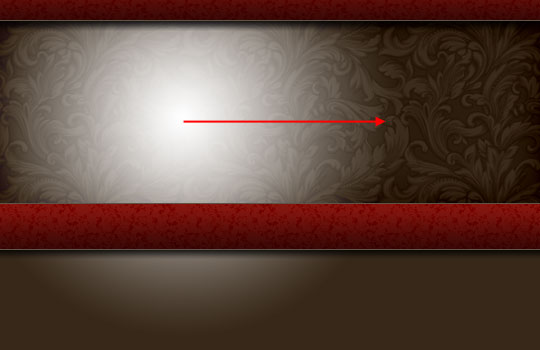
Click and drag a nice radial gradient onto the stage where you think the glow should live. Don’t worry that it extends beyond the Header Background, we’ll fix that in the next step.
Step 17
Ok, now listen very carefully. We are going to create a layer mask on the Header Glow layer by loading the Header Background layer as a selection so follow along.
To load the selection, hold down the Command (PC: Ctrl) key and click on the thumbnail for the Header Background layer. Cool right?
Ok, now make sure that the Header Glow layer is your active layer (it will be highlighted). Then click the Add Layer Mask button at the bottom of the layers palette (it’s the one that looks like a circle inside a rectangle). Your selection will be converted to a layer mask and the layer mask icon will appear on the Header Glow layer.
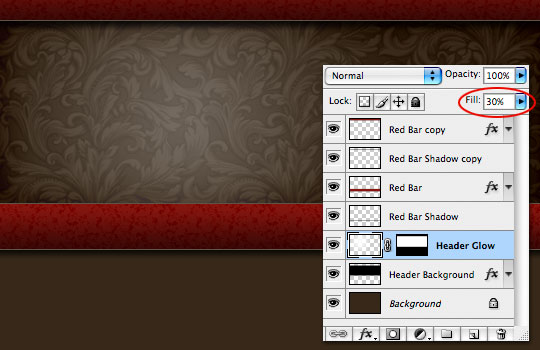
Step 18
Obviously this white gradient is much too bright, so the last step is to simply drop the Header Glow layer’s Fill opacity down to around 30%.
Step 19
Great work! Click here for Hero Header Part II where I’ll show you how I created the old paper and logo star that complete the header graphic!

Lesson Files + Additional Resources
Download the free .PSD file and other lesson files Right Here.
Tell Your Friends
More in Graphic Design


59 Responses to Hero Header Part I
Iceman7
March 17th, 2008 at 9:59 pm
Funnily that was the first thing I wanted to know when I first visited your site. That header had me gazing at it for a long time trying to figure out the possible ways you could have come up with that elegant look.
Great stuff. Love your work and tutorials.
sonson
March 17th, 2008 at 11:51 pm
I love the header, theme, and tutorials. This is one of my new favorite sites. Looking forward to Part 2.
jul
March 18th, 2008 at 6:08 am
Nice website! Like it.
Bill Goodman
March 18th, 2008 at 8:22 am
This site is so cool it has me craving for more! MORE MORE MORE!!!!!!
Jeremy
March 18th, 2008 at 9:59 am
Amazing site. More tutorials, please! Can’t…stop…reading…
Dedra
March 18th, 2008 at 5:52 pm
Wonderful site. I really like your bright arrows on the screen shots. Very helpful. Thank you for your time and effort to bring this to us.
Jack
March 19th, 2008 at 9:24 am
I deeply appreciate your commitment to bringing great photoshop tutorials and psd files to the masses.
Keep up the great work!
GhostBoots
March 19th, 2008 at 1:23 pm
Wow! Great Website, your tutorials are fantastic, easy to follow. Thank you for sharing your knowledge/talent. Great Job!
mr. diggles
March 20th, 2008 at 9:27 am
it is a rarity in this day and age to see talented people give away their secrets for the sake of the passion. it is projects like this site that help other grow and become more interested in sharing their gifts.
deep thoughts,
by jack handy
see mr. hero – i am not the only one who thinks your site is totally tubular.
HERO
March 20th, 2008 at 12:50 pm
I Love You Mr. Diggles!
Orland
March 21st, 2008 at 10:54 am
Thanks hero, you are the best. The tutorial is simple to follow and well explain.
peace
CM
March 23rd, 2008 at 11:12 pm
Absolutely wonderful! I love this site. Great lessons.
Thanks for your help.
Best,
CM
Sebastian
March 25th, 2008 at 10:11 pm
Can we get a demo on how to make the background pattern? It is awesome. I have found some tutorials on how to make patterns but nothing nearly so intricate and beautiful. Love the tutorials!
that guy
March 29th, 2008 at 8:06 pm
I agree with ‘sebastian’, great tutorial, but could you go into greater depth on how to make the background pattern?
cheers
HERO
March 29th, 2008 at 10:26 pm
Sebastian and That Guy,
In my years as a graphic designer I’ve sort of “accumulated” files of these sorts of things throughout the years, one of which is repeating backgrounds (which as you can see, come in very handy). The one used in this header was a pattern that I picked up somewhere along the way and not one I created especially for this project.
I will however put the idea of creating a background pattern like this into my To Do list of tutorials for an upcoming lesson.
Matrich
April 4th, 2008 at 12:13 am
I would also like to add my voice to have a demo on how to create a pattern. It will give more value.
However, thanks so much for the tutorials you are putting up.
decimus
April 4th, 2008 at 1:46 am
Great tut and the way of presenting it!
regards
Yuri
April 7th, 2008 at 8:25 am
Love your style. The tutorial is really good.
Tim
April 7th, 2008 at 2:35 pm
Very nice tutorial. Great tutorials! Thanks.
Alba
April 14th, 2008 at 6:51 am
A very nice tutorial, very easy and the most important very helpful. Tank You.
Abhisek
April 15th, 2008 at 2:49 am
Thanks for this awesome tutorial. Really enjoyed reading it.
Lori
April 15th, 2008 at 11:57 pm
your tut is amazing! i couldn’t download the pattern tho? thanks!
HERO
April 16th, 2008 at 7:13 am
Lori, the .pat file download should have worked, but it’s possible it’s a browser issue so I’ve zipped it and changed the link. It should work without a hitch now.
Lori
April 17th, 2008 at 12:51 am
yay! it worked! thank you so much for taking the time to do that. im PUMPED to run thru this now!! you are a good teacher!
thanks again!
Josh
April 17th, 2008 at 4:53 pm
Where can we find more patterns?
Lori
April 19th, 2008 at 6:42 am
Josh, google “Adobe Photoshop Patterns” you will find a ton. :)
Lily
June 15th, 2008 at 6:37 pm
Damn, I came back here to ask if you could do a tutorial on how you made the brown background but i just read your comments on it. If you could, when you have time, see if you can post one similar to it? I’m sure all of us would appreciate it :) :)
Furious Photographer
June 27th, 2008 at 11:20 am
Oh my goodness! That is so awesome! This will surely put some umph~! in my wedding photography website. Thanks!
Peter
July 1st, 2008 at 2:43 am
Very nice tutorial. Thxs for inspiration! Time to create a new bg-pattern…
Olly
July 18th, 2008 at 5:42 pm
Great tutorial, really gives an insight into various techniques!
I was curious how you created the pattern you use as the background. Did you create it yourself, or download it?
Thanks for the great site, keep it up!
HERO
July 18th, 2008 at 9:01 pm
OLLY,
To be quite honest I’m not sure where this particular pattern came from. I’ve always kept a folder of backgrounds as a resource and add to it whenever I find or create something I like. There are tons of free patterns floating around out there, and some in places you’d never think to look. I find awesome swatches on fabric store websites, wallpaper warehouses… just about anywhere that patterns can be used. I don’t believe this is one I created myself though.
Boomtastic
July 21st, 2008 at 10:48 pm
Love it, Mr PS Hero, just for this tutorial im sending some starving kid a letter and some money, that’s better than buying you a dragon (this only counts since im seriously doing this) cause you are actually changing kids lives. Your design just made the world a little bit of a better place. Plus the next homeless guy i see im buying dinner. Not giving money (thats a cop out) but rather asking him if hes hungry and would like something to eat then sitting with him and talking to him while we eat together. Unless he says no, in which case it will be the first homeless person that accepts. Im sending you pics of this too. Thats how inspired i am.
Paul
September 25th, 2008 at 5:11 pm
this site should be called “psgod” not “pshero”! Thanks very much for sharing your incredible grasp of ps.
thetattoodesign
October 23rd, 2008 at 3:47 pm
Very nice tutorial. Thanks for inspiration Time to create that.
Pratik
December 28th, 2008 at 11:12 pm
very good tutrioal
Thanks
Lauren
January 20th, 2009 at 11:08 am
Hero, I don’t think you could even understand how greatly I appreciate your tutorials! I have learned so much about photoshop from the few tutorials I have done. I enjoy how everything is explained so clearly! I am designing a menu for a restaurant and I have used many of your tutorials for the design… They are a huge help! Thank you sssooo much!!
Atak Teknoloji
January 26th, 2009 at 5:04 am
nice work. thanks.
Raymond Selda
February 21st, 2009 at 1:35 am
Your tutorials are very addictive Hero! I’ve learned yet again some new techniques. I know that there are lot of ways to achieve a certain effect but yours I think is more efficient.
Thank you so much for sharing your tricks. You and your site will always be an inspiration.
Charly
April 6th, 2009 at 7:33 pm
congratulations hero I love your page … have a lot of quality in your work … All are well done …. you visit often … thanks for sharing your talent
photo retouching
May 11th, 2009 at 8:49 am
A really funky looking header, given me some ideas for my new site. THanks!
Ann
May 28th, 2009 at 5:46 pm
Great looking effect. You write some of the best tutorials out there.
daniel carlton
November 11th, 2009 at 4:31 am
hi hero. i’ve never seen photoshop tutorials so well done, in every way. i’m bookmarking your page, and as soon as i get out of design school and have real income, i’m going to tip the hero, and tip well! not only are your tuts thoroughly thorough, the results are amazing! keep it up!
Jamshid
January 17th, 2010 at 11:02 am
Thank, very good tutorial
Zavrab
January 19th, 2010 at 12:51 am
good tutorial, thanks, me like
Will Hull
February 26th, 2010 at 8:33 am
Thanks for the great header tutorial. I utilized it for my personal portfolio Web site at http://www.willhull.com/ along with this tutorial (http://bit.ly/5OsVvB).
I was also able to integrate jQuery/jFlow and WordPress into the design seamlessly.
What do you think? Did it turn out well?
HERO
February 28th, 2010 at 7:27 pm
Looks nice WILL, thanks for sharing.
RH+
March 7th, 2010 at 12:17 pm
I will try as soon as possible, useful, Thank you for your work.
Mel McCaleb
March 15th, 2010 at 10:10 pm
Help!!! What version of Photoshop are you using? I’m using a trial version of Photoshop Elements 8 and can’t follow the tutorial. Thanks!
HERO
March 17th, 2010 at 4:45 pm
MEL, This lesson was created using Photoshop CS3. It’s possible that your version of Elements doesn’t have all the tools needed for this lesson or that they’re in a different place or simplified. Photoshop Elements is the little brother to “Big Boy Photoshop” and as such has been distilled down to a more basic configuration and this may be the problem in this case. Sorry to be the bearer of bad news.
Mel McCaleb
March 17th, 2010 at 10:52 pm
Thanks so much. Couldn’t find trial version of CS3 so I downloaded trial version of CS4 and was able to follow along fine. I went on to the 2nd part of this tutorial and found that I had a problem with the transform selection tool. You are using a star and I’m trying to use a cross. It doesn’t expand uniformly around the cross. Any suggestions?