
 Photos – Part 2")


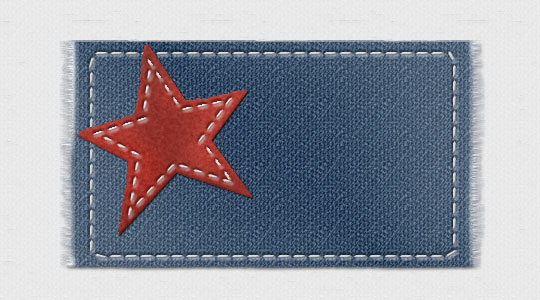
Frayed Denim Patch With Stitches
In this Photoshop tutorial we will be creating a denim textured patch with stitching. This technique uses the Fill command, a few artistic filters, Wind and a few basic layer styles.Step 1
Hey gang! Today’s tutorial is a little bit on the digital scrapbooking side, but there are some really great tricks along the way, so lets open up a new document and get started. Mine is 540×300 at 72ppi.
The first thing we want to do is create the denim background which we’ll be working with. Now, we could go through the hast le of creating layers of fibers and complex patterns, but Photoshop has a great denim pattern built right in.
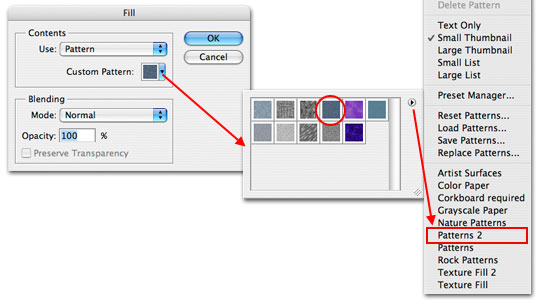
Create a new layer and from the main menu choose Edit>Fill which will bring up the Fill dialog box. Choose Pattern from the Contents option then select the swatch to open the Custom Pattern selector. There is a little arrow in a circle at the top right corner of the Custom Pattern Selector and if you click it a nice long menu of options appears. The pattern set we want to load is called Patterns 2. You can either append (tack these patterns onto the bottom of all the custom patterns you’ve already got loaded), or you can just click OK to replace all the current patterns with this new pattern set.
With the pattern set loaded, find the pattern called Denim and click OK.
Step 2
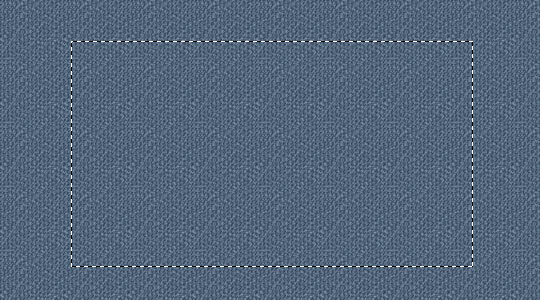
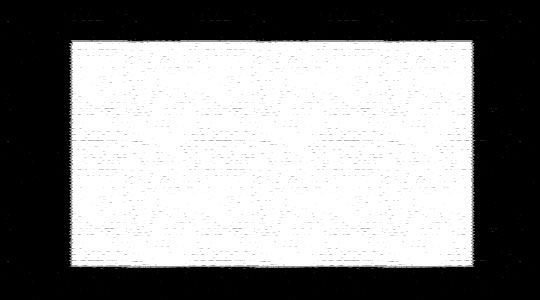
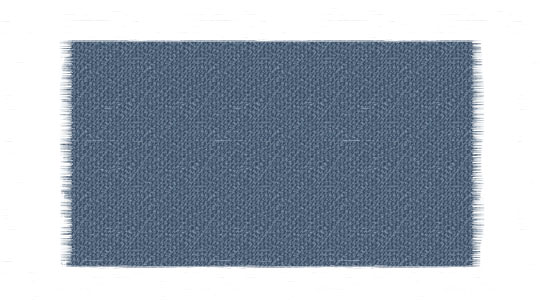
If you did everything right you’ll have a stage full of denim.
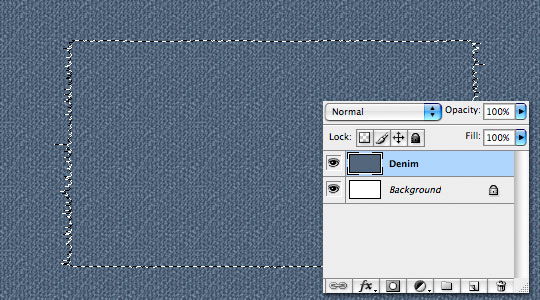
Press the M key to switch to the Rectangular Marquee tool and drag out a selection where you want your denim patch to live.
Step 3
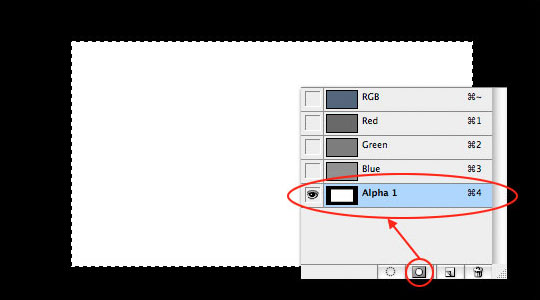
With our selection made, lets now switch over to the Channels tab in the Layers Palette. (*note: If your layers palette isn’t visible choose Window>Layers from the main menu.)
Now lets click on the little button at the bottom of the Channels palette called Save Selection As Channel. This will create a new Alpha channel from our selection.
Click on the new Alpha 1 layer then Press Command-D (PC: Ctrl-D) to deselect.
Step 4
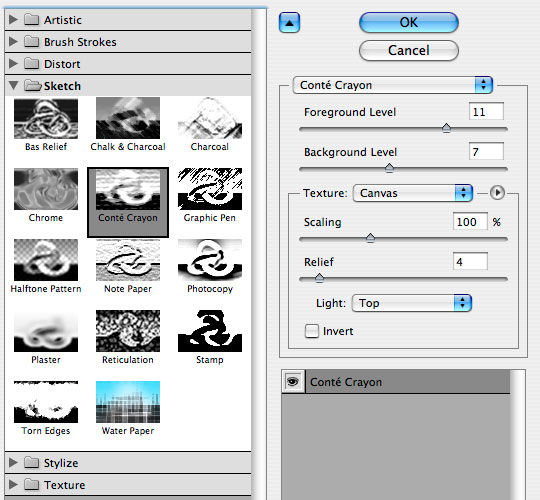
Now we’re going to add a few filters to this Alpha Channel. The first effect will give us a little bit of edge grunge. Choose Filter>Filter Gallery to pull up all the available filters. From the Sketch styles choose Conte Crayon with the following settings.
Step 5
If you followed along like a good little monkey your Alpha Channel should now look like this.
Step 6
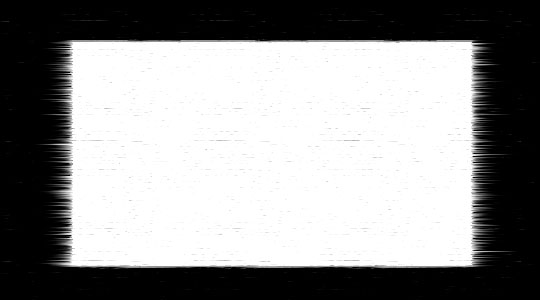
Now it’s time to add the second filter to our Alpha Channel. From the main menu choose Filter>Stylize>Wind to bring up the Wind options dialog where you will choose Wind and From The Right from the options and click OK.
Now repeat this step except this time choose From The Left which will give you this final result.
Step 7
Lets create a selection of our Alpha Channel by holding down the Command (PC: Ctrl) key and clicking on the layer thumbnail of the Alpha 1 Channels Layer.
Switch back to the Layers tab in the Layers palette and choose the Denim layer we created earlier.
Step 8
Create a Layer Mask of this selection by choosing the Create Layer mask icon from the bottom of the Layers palette (*note: it’s the one that looks like a rectangle with a circle inside it.)
Step 9
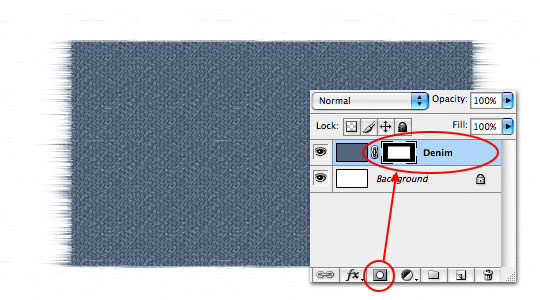
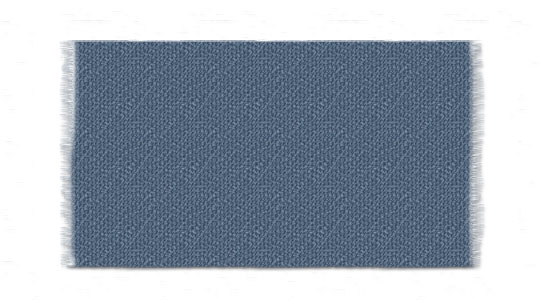
Now with the Layer Mask selected, use a black brush to paint down the right and left edges where the Wind filter was applied until the ends look more like realistic threads fraying from the piece of denim. Remember that the edges don’t have to be even.
Step 10
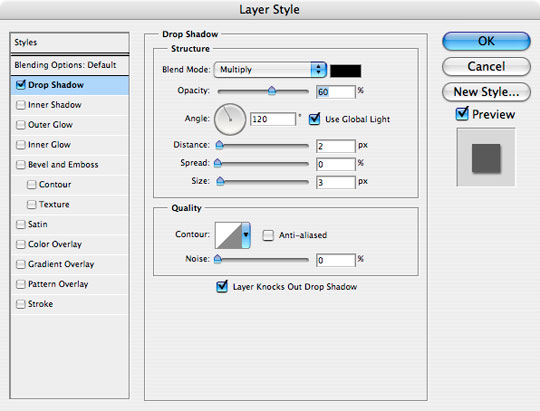
Add a slight drop shadow to this layer.
Step 11
We will now color the right and left edges white to create the look of fraying thread.
Create a new layer and call it Edges. If you hold down the Option (PC: Alt) key and click and drag the layer mask from the Denim layer up to the new Edges layer, it will make a copy of that Layer Mask on the Edges layer.

Step 12
Making sure the layer thumbnail (and not the Layer Mask) is selected by clicking on it, use a white brush to paint along the edges of the fabric until your edges look like the ones below.
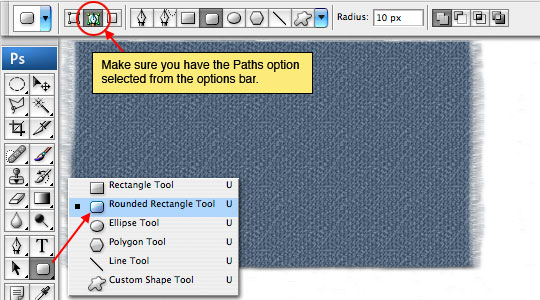
Step 13
Create a new layer above the Edges layer called Stitches. Press U to select the Custom Shape tool and from the fly out menu choose the Rounded Rectangle Tool. Make sure that the drawing style is set to Paths in the Options toolbar as shown below.
Step 14
Drag out a nice sized path for our stitches to follow.
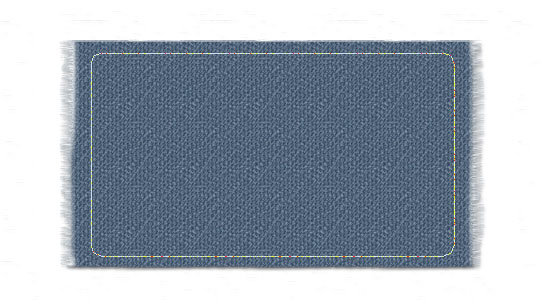
Step 15
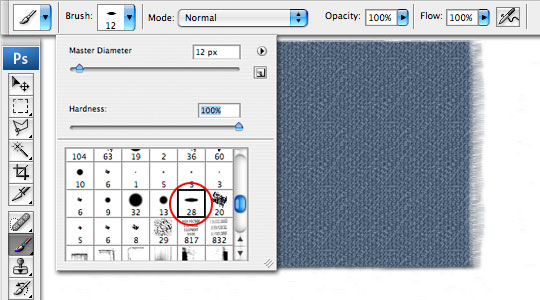
Press the B key to invoke the Brush tool and choose the brush called Charcoal Flat from the Brushes menu. Set the Master Diameter to 12px and the Hardness to 100%.
Step 16
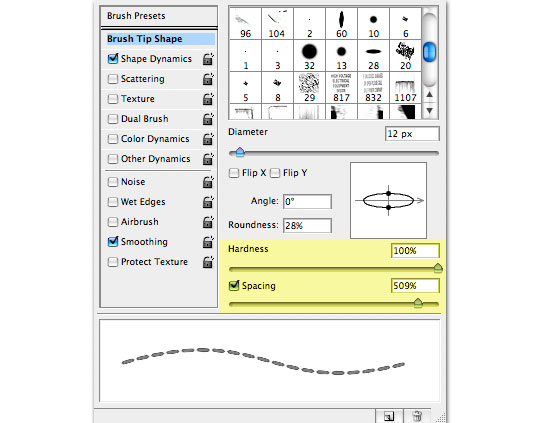
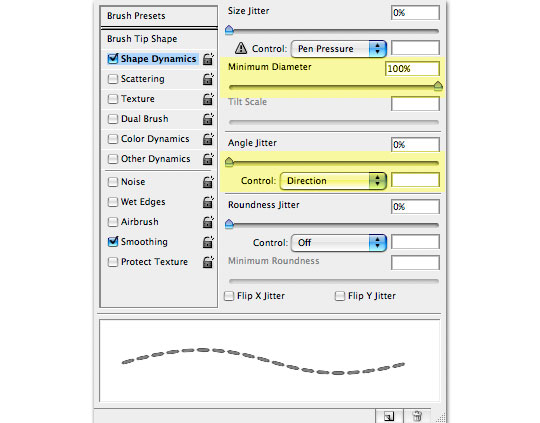
Open the Brushes window from the main menu (Window>Brushes) and make the following adjustments.
Step 17
Now that the brush is all set up, press the P key to invoke the Pen tool and Control-Click (PC: Right-Click) on the Rounded Rectangular path we placed on the stage in Step 14. From the menu that pops up choose Stroke Path and then choose Brush. Because of the settings that we made in Step 16 when we stroke the path with the brush it places perfectly spaced stitches which follow our path exactly.
If you wish to hide the path at this point simply press Command-H (PC: Ctrl-H).

Step 18
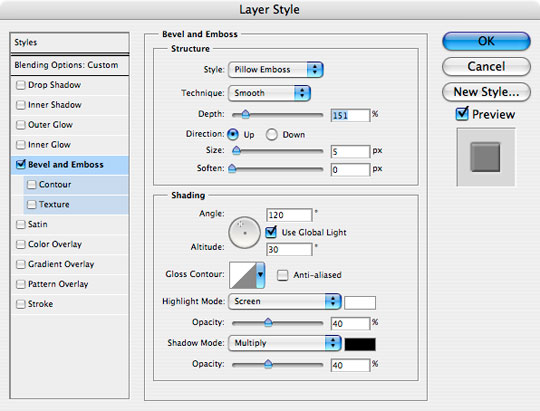
Add a slight Bevel and Emboss layer style with the following settings and then drop the Stitches layer Fill opacity down to 70% to tone down the stitching a little bit.
Step 19
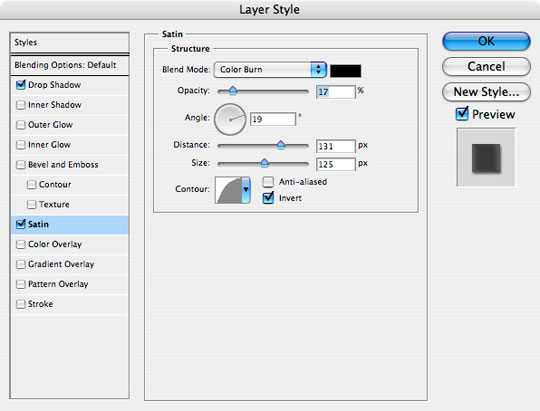
The last thing I might do is go back to our Denim layer and add a Satin layer style to give the denim a little more realistic tonal variation like this:
Step 20
And there you go kids! Another fun Photoshop tutorial and a few more tools you’ve now got a little experience with. Great Job!
Lesson Files + Additional Resources
Download the free .PSD file and other lesson files Right Here.
Tell Your Friends
More in Graphic Design


53 Responses to Frayed Denim Patch With Stitches
Orland
March 17th, 2008 at 3:20 pm
awesome tutorial. Thank you so much for your time to put together this wonderful tutorials. Peace
HERO
March 17th, 2008 at 3:23 pm
Orland,
Thanks so much for the comment. All the time I spend on the site is worth it when I have people like you come visit.
Dedra
March 18th, 2008 at 6:00 pm
Hero- wow. I can think of so many uses for this. Thanks for posting this for us.
HERO
March 18th, 2008 at 6:53 pm
It’s my pleasure Dedra. I’m glad you liked it.
pleazourwolf
March 23rd, 2008 at 1:04 am
WOw hun ty sooo very much! lol I’m new to learning photoshop so things get alittle crazy. But you made this dummie proof hun really tyvm stay blessed Pleazourwolf!!!! BIGG UPS TO U!
Learning
May 12th, 2008 at 7:30 am
Thanks for this great tutorial however I can’t seem to evoke the same brush tool as you.. waaa :-( and I do not seem to have the same brushes either.. any suggestions? Thanks again.. still learning. :-)
Learning
May 12th, 2008 at 10:27 am
I managed to find the brush but there is no option for spacing.. please help. :-) Thanks.
Learning
May 12th, 2008 at 10:45 am
Hi again.. finally found that too, haha.. bye :-)
Lily
June 11th, 2008 at 2:00 am
Great tutorial. Just wanted to let you know incase you want to fix it, in step 6 you’ve got “choose from the right” twice instead of “choose from the left” the second time.
HERO
June 11th, 2008 at 7:35 am
LILY,
Thanks for catching that! I’ve fixed it.
Nok
June 26th, 2008 at 8:40 am
Thank you so much for sharing this tutorial. !
CradledFiction
July 20th, 2008 at 6:21 am
Thank you so much for this great tutorial! It was exactly what I needed for the layout for my new domain; I’ll be linking back to your site once I get mine up and running again.
-Anni aka CradledFiction
Tess
July 29th, 2008 at 5:47 am
Was sent to you from NBK and I’m a beginner. I do think that I might have a chance after trying to learn PS for quite sometime. Your tutorials are graphic and it helps a lot to follow albeit I do it slowly! Hope you do more and THANKS A LOT!
tchild
November 6th, 2008 at 6:23 am
I came across this site a few weeks back and thought it to be one killer site…..LOVE this work. Will we see any work on cs4?
HERO
November 6th, 2008 at 9:25 am
TCHILD,
Glad you like the site! And yes, I’ll be starting work on some CS4 lessons in the near future, though I like to give my readers a little time to get the program before I start putting out tutorials that only a handful of them are equipped to try. I’ll probably mix them in here and there as time progresses. Thanks for asking!
shona tiger
November 14th, 2008 at 1:01 pm
Thank you for your tuts, always learn a great deal about how to use photoshop (not to mention my enjoyment of the dry humour that’s often hidden in them). Rather like the new look to the site- the header is also something I learnt in one of your tuts :) Please keep ’em coming.
MD
November 17th, 2008 at 9:24 am
One of the realy detailed and well explained tutorials, hope to see more .
Thanks .
PS Quilter
December 17th, 2008 at 10:27 pm
Making lots of monkey sounds over this one. LOL
Thanks HERO for taking the time to share this!
I’ll be glad to stop by and read more of your tuts.
Thanks :)
Subash Aryal
December 22nd, 2008 at 4:00 am
Thanks for the great stitching technique ! I used in text.. :-)
Wynd
December 29th, 2008 at 2:43 pm
also how might i get the top and bottom edges frayed if i was going for a patch look?
HERO
December 30th, 2008 at 11:27 am
WYND, Since the Wind filter only “blows” from the right or left, you’ll need to rotate your patch 90 degrees (Edit>Transform>Rotate 90), apply Wind from the right and left and then rotate the patch back to it’s original position.
Efren
January 23rd, 2009 at 1:59 pm
Hi Hero,
I think your page is the best photoshop tutorials page I have found so far and I like the style of all the graphics that you create. I have done this one, but at 300 dpi since I want to use the denim style for a brochure, but when I print it looks different and you cannot see the pattern and the stitches are very small. What I have done wrong?
Thanks
HERO
January 23rd, 2009 at 7:51 pm
EFREN, Because you’re working in 300ppi instead of 72, everything you make will need to be sized up accordingly. Bigger stitches, and you’ll need to increase the size of the pattern by actually applying it to a layer instead of as a fill. In the Pattern Overlay layer style dialog there is a slider for pattern size.
Sabine
March 24th, 2009 at 4:27 am
Also a very great tutorial. But also one question, where do i get the brush you use?
Hugs
Sabine
HERO
March 24th, 2009 at 8:16 am
SABINE, The brush used in the tutorial is one of brushes included with Photoshop. If you don’t see it in your brushes palette load the Calligraphic Brush Set from the default brush sets.
Sabine
March 24th, 2009 at 10:29 am
Thank you so much :) and thank you for your great Tutorials.
Hugs
Sabine
MAsum
April 4th, 2009 at 1:06 pm
coooooolllll! what a great tutorial awesome tutorial. i was looking for this type of tutorial. nice job.keep it up!
Ceejays
April 7th, 2009 at 11:09 am
Great learning tut for me. Thanks so much for your great tutorial.
V2
April 10th, 2009 at 12:54 am
I can see why you call yourself hero. This is top notch stuff man, I’m blown away.
I found the charcoal flat as a Dry Media brush, however. Maybe its a CS3 thing? either way, no biggie :)
jonny
May 7th, 2009 at 11:30 am
this is so helpful yall
Chris
May 24th, 2009 at 12:44 pm
wow is all I can say. I have learned so much from all of your tutorials. When I forget, I pop back to one of the tutorials and apply it to what i am working on. Thank you for helping us explore the tools and fun that can be had with CS3!!
Alex Torres
July 15th, 2009 at 4:44 pm
excuse my bad english but man congratulations on great work and thank you very much that you do not know how much I helped ATT Alex Torres of Brazil
Laura
July 21st, 2009 at 9:57 pm
Hero – how can you apply stitches to text to create an Aeropostle-type effect? (Their t’s have sewn on letters.) I hope you know what I mean. :)
Great stuff…
Milka
July 28th, 2009 at 4:15 pm
I am so glad I have stumbled onto your website! Thank you for all the wonderful tutorials. I am having trouble locating this brush – is it supposed to be available in the Calligraphic Brush Set in CS4?
HERO
July 31st, 2009 at 10:10 am
MILKA, The 28px ovalized brush used for the stitches is actually part of the Dry Media Brushes set and yes, it comes with Photoshop CS4 (and just about every previous version as well).
Vorpall
August 15th, 2009 at 11:38 pm
Hero, thanks for your tutorial! I found it very useful! The great job once again! It’s made from scratch but looks pretty realistic! And I wonna say thanks for your nice website. I’m learning the Photoshop for only a week and your tutorials help me to understand and enjoy the process. Sorry for bad english :)
Phillip
January 2nd, 2010 at 8:35 am
Thanks… for this most helpful site
regards
phillip
Remi
February 3rd, 2010 at 5:49 pm
thanks alot for this brilliant tutorial, I used it to create torn hessian and added ripple to the edges to create twisted loose threads
Jessica
March 24th, 2010 at 9:39 am
Oh thank you thank you thank you! Just what I needed for this months Mega Kit! You Rock!
EC
April 18th, 2010 at 10:42 pm
I just can’t do step 9. I have no idea why but I cannot use a black brush to do the edges on that layer mask. It appears as a white or denim patterned brush stroke only.I can paint black on every layer but the mask. What am I doing wrong? I have attempted the tutorial several times but can’t get it right.
HERO
April 21st, 2010 at 10:08 am
EC, make sure you’ve clicked the Layer Mask to make it the active working area (there will be little brackets around the layer mask icon in the Layers palette. If you have colors available in your tools bar palette, you don’t have the mask selected.
BeatCH
May 14th, 2010 at 12:47 pm
Wow, thanks for a great tutorial! Your directions was very easy to follow, and it was fun too!
Matt Sepeta
May 17th, 2010 at 6:53 pm
Excellent! Thanks a bunch
Margaret
June 3rd, 2010 at 1:33 pm
A simpler way to do the stitching for step 19 is to click on the path tab, then click the “stroke path with brush” which is the second icon to the right at the bottom of that tab. Then take your work path and drag it to the trash can. Voila! Stitches in a click!
Sandy
July 3rd, 2010 at 5:34 am
Nice toute.. i am taking enjoy with this effect
thanks.
Mmrr
July 12th, 2010 at 3:00 pm
Thanks for this tutorial, you would not believe how hard it is to find a patch tutorial these days… i’ve been searching for a good 2 hours and finally found this… lucky for me because I need this type of effect for a business card i’m making.
chi_mode
July 17th, 2010 at 12:50 pm
Wow Hero… your tutorials are the finest and easiest to understand of any photoshop tutorial websites I found on the net. Awesome.
Thanks a bunch for every tutorials.
Joyce
October 17th, 2010 at 5:33 pm
Thank you for writing this tutorial, and having the psd file for download, this saves me a lot of time. Thanks.
kenichifc
December 14th, 2010 at 9:43 pm
thanks for tutorial. Love it, simple and effective :D
Hikari
March 15th, 2011 at 5:12 am
I’m a photoshop newbie and wondering how to create a denim-textured photoshop border for my digital photo. The tutorial means a lot to me and the stitches look so real.