


Complex Repeating Patterns Part I
I received an overwhelming response to the Creating Custom Patterns and Hero Header Part I tutorials asking for a comprehensive tutorial on creating complex repeating patterns, especially the heavy damask style that I have such an obvious affinity for. This one is for all of you who want so badly to dig even deeper into this technique.Introduction
Though there are multiple ways to get to the same result, for me the following method is the most accurate, detailed and versatile, and unlike other methods it allows unlimited future reworking of the pattern if needed… it’s also requires the most work, so be prepared.
(*note: This tutorial assumes you know how to use the pen tool with a degree of proficiency.)
Step 1
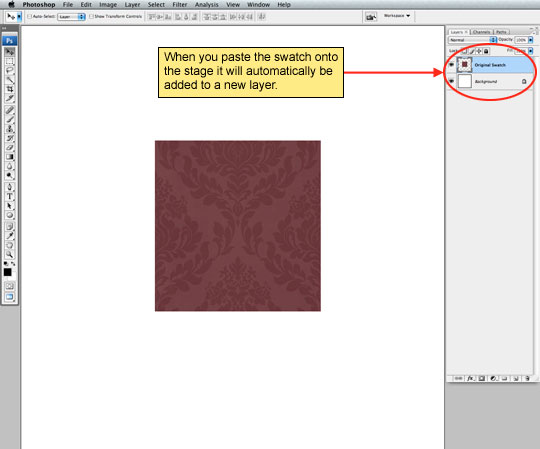
There are a myriad of excellent resources and inspiration for repeating patterns online and anytime I’m creating something this complex I like to at least have a piece of reference material to get me started. In this case I’m going to go wallpaper shopping… yes, actual wallpaper. I paid a visited to the Wallpaper Direct website and did a search for "damask" patterns. Once I found a pattern I thought would make a good starting point I copied the image and pasted it into a new Photoshop document.
To get this swatch for yourself if you’re following along at home follow this link to reach the search page where I found my pattern. Click on the DE067 / Ashdown swatch which will open the popup window showing the pattern repeating in the background (although not exactly perfectly). Command-Click (PC: Right-Click) on the background pattern in the upper left corner of the window and choose "View Background Image", this will show just the .jpg file the page is using as it’s repeating background. Command-Click (PC: Ctrl-Click) on the image and choose "Copy Image" then switch back to Photoshop and press Command-V (PC: Ctrl-V) to paste the pattern onto the stage of a new document.
(*note: I’m using a 1000×1000 pixel document so that I can have plenty of room to work.
Step 2
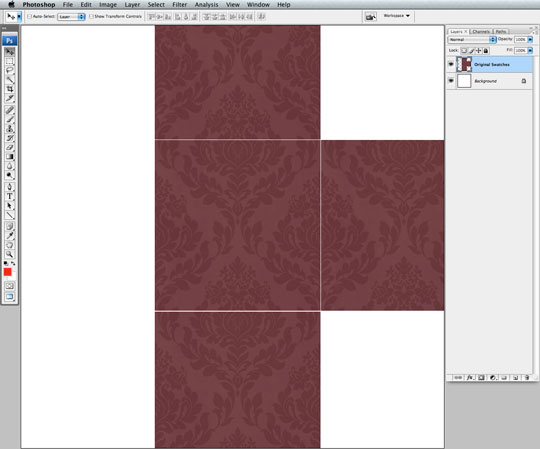
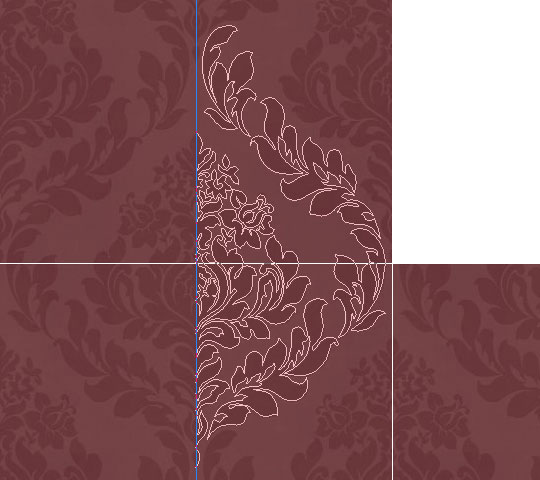
Next lets press Command-J (PC: Ctrl-J) to duplicate the new layer and move the copy to where the next tile in this repeating pattern should go. Repeat this another two times until you’ve created a space where you can see how the pattern is supposed to look on all sides. I’m going to place a copy above, below and off to the right of my initial swatch. If you’re using the same swatch as me, you’ll notice that the edges don’t meet up exactly right (like there are a few edge pixels missing), to compensate for this I’m going to leave a little gap between those spaces so when I trace the pattern everything will actually be in the right place.
To keep things clean select all 4 pattern layers in the layers palette and press Command-E (PC: Ctrl-E) to merge the selected layers into a single layer.
Step 3
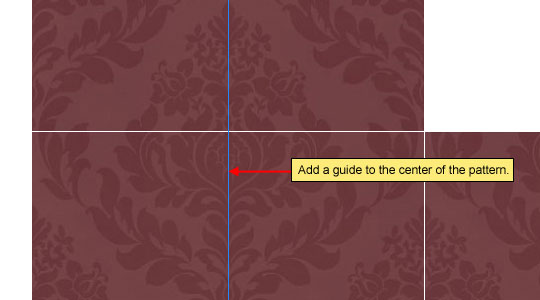
Now that I’ve got a good idea of the flow of the pattern we’ve got one last step in the setup process before we get into creating the new pattern. We’ll be tracing the edges of our source pattern with the pen tool in a minute and since we obviously want our pattern to be perfectly symmetrical lets add a simple vertical guide. If your rulers aren’t visible press Command-R (PC: Ctrl-R) to bring them up and drag a guide onto the stage by clicking on the ruler on the left side of the stage and dragging the guide out to the stage. The guide needs to cut the pattern in half perfectly.
Step 4
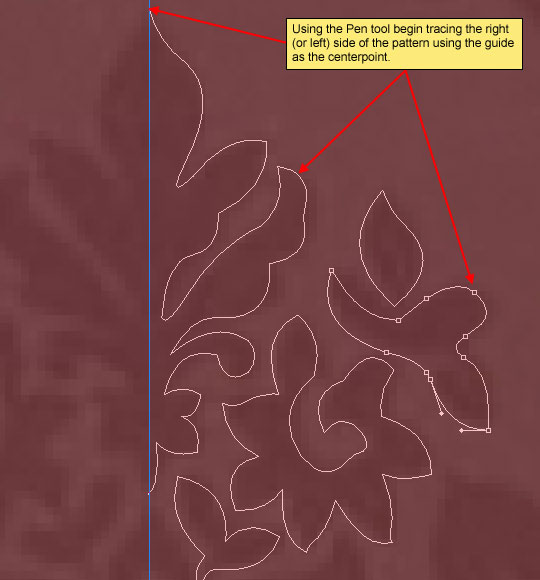
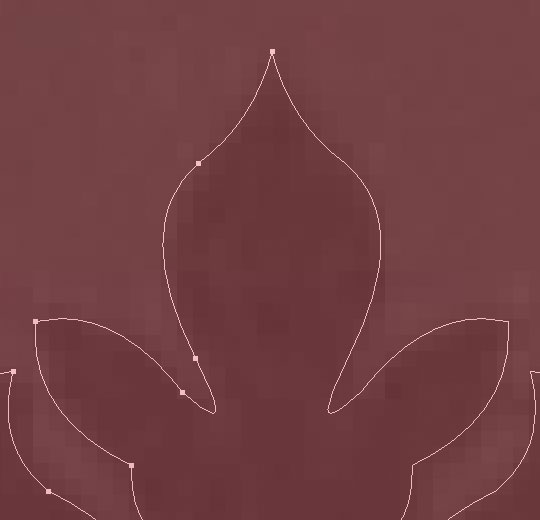
This is where the real work begins. Grab the Pen tool by pressing the P key. Beginning at the top of the pattern place an anchor point on the guide line and begin tracing the right (or left) side of the pattern. I find that zooming in on the area I’m working on makes this easier. Keep in mind that you’re creating a new pattern here and you can take as much liberty or add/subtract as much detail as you see fit. The swatch we’re working on is just a guide and you can deviate as much as you like.
Step 5
Work until you’ve got one side of the pattern completely traced out.
Step 6
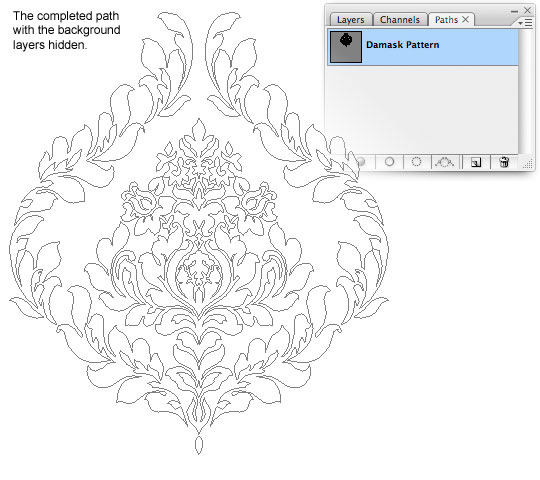
Before we go any further lets click over to the Paths tab in the Layers palette and give our work path a name (if it isn’t visible choose Window>Paths from the main menu). If we were to deselect our path and start a new work path at this point we would loose all that hard work which (speaking from experience) totally sucks. By giving the path a new name we commit it as part of our working document.
Press the A key to switch to the Path Selection tool and drag a selection around the whole path to select the entire thing. You’ll know it’s all selected because every point on the entire path will be selected.

Step 7
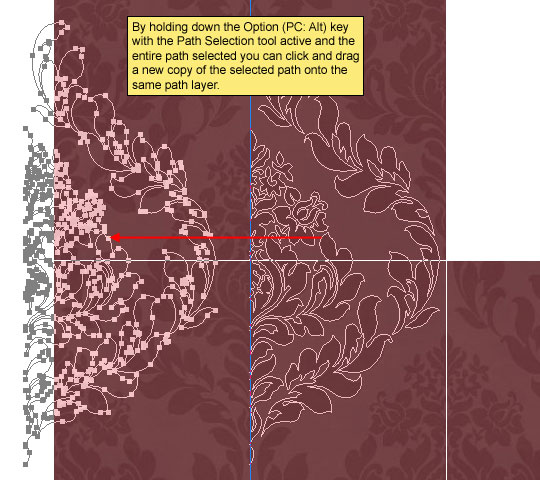
With the whole path selected and the Path Selection tool still active hold down the Option (PC: Alt) key and click and drag the path to duplicate it. This will effectively duplicate our entire path inside the existing path layer. Be sure to drag the copy far enough away from the original that the two are not touching.
(*note: If you press and hold the shift key once you begin to drag/copy the path you can constrain your the line of your drag so it is exactly straight across from the original.)
Step 8
Obviously we need to make this copy of our path face the opposite direction so lets choose Edit>Transform Path>Flip Horizontal from the main menu. Then with the arrow keys move this copied path to meet the other side. You will want to zoom in on one of the junction points as close as possible to make sure that the two paths meet perfectly at the center. I found that hiding the guide made it easier as well.
Step 9
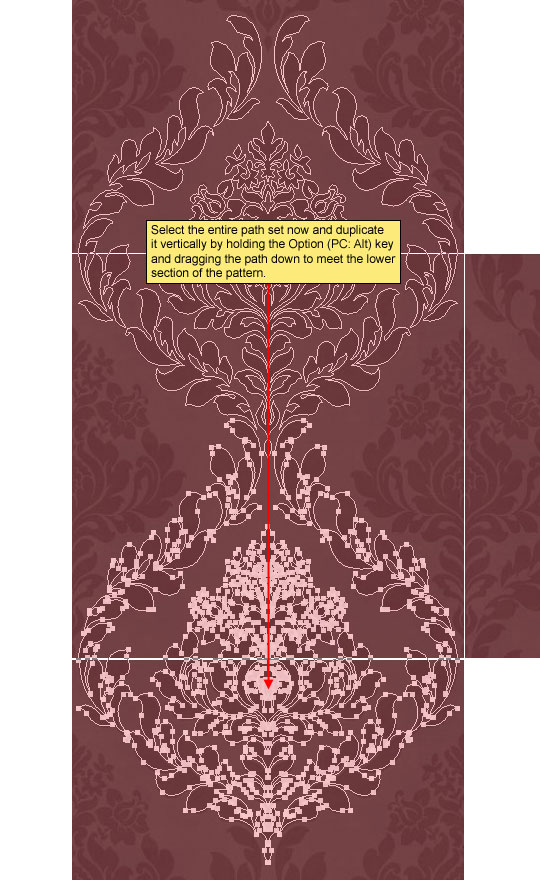
Because this core pattern repeats vertically with a slight overlap, I’m going to now select the entire complete path and duplicate it again (just like before), this time dragging it vertically down until it sits over the source pattern below, slightly overlapping the upper path.
Step 10
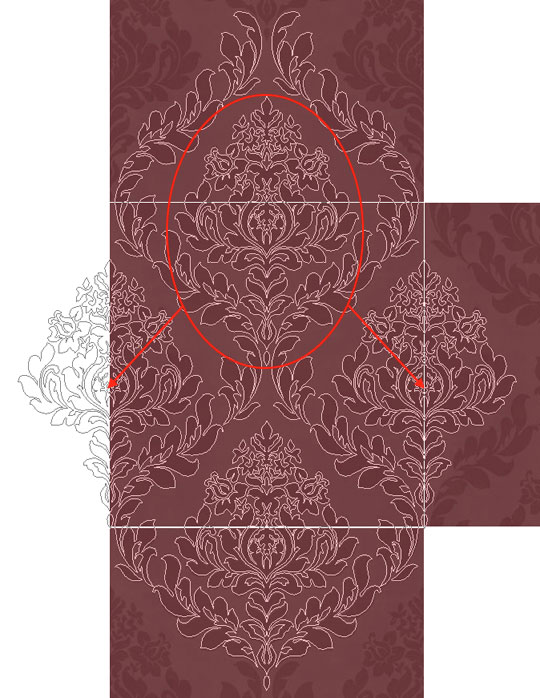
Notice that to the right and left of the main pattern that the center portion of that pattern is repeated on each side. To create these we’ll simply duplicate the path again, remove the leafy outer border and place what’s left to the right and then the left of the main pattern.
(*note: I’d hope you know better than to get this far into a complex project without saving your document, but if not, you ought to do it now!)
Step 11
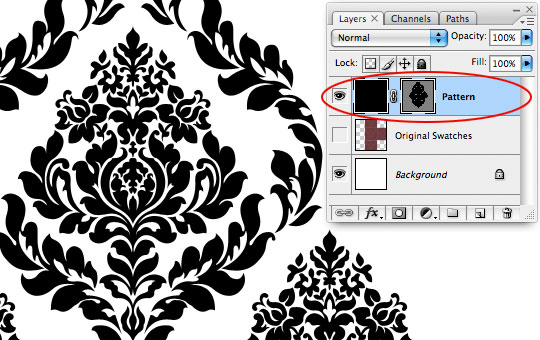
The path layout is now complete so lets switch back to the Layers palette and create a new layer by clicking the Create New Layer icon at the bottom of the Layers palette or by using the keyboard shortcut Command-Shift-N (PC: Ctrl-Shift-N) and call the layer Pattern.
Press the D key to reset the foreground color to black and then fill the layer with black by pressing Option-Delete (PC: Alt-Backspace). Now lets add a Vector Mask to this layer using our path. Press the P key to switch to the Pen tool, Control-Click (PC: Right-Click) on the path and choose Create Vector Mask.
You can now hide or delete the original pattern reference layer because we don’t need it anymore.
Step 12
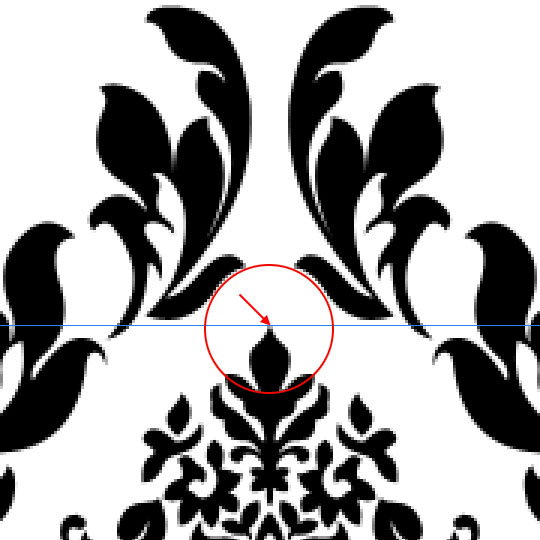
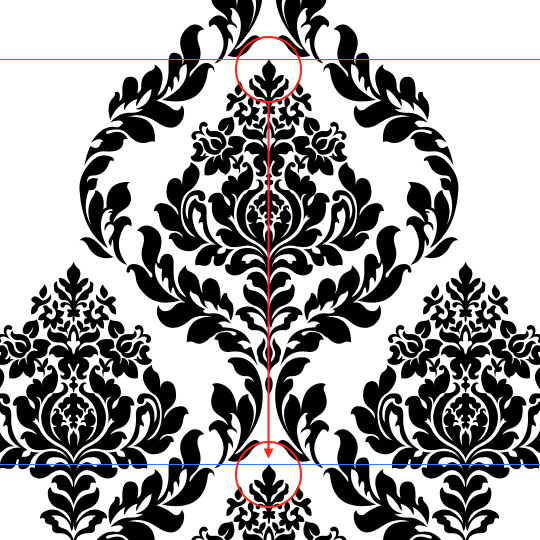
Now that we’ve got the pattern laid out with all it’s parts it’s time to define the center of the pattern that will be our repeating section. We’ll begin by placing a guide at a top point of the pattern. It’s important to choose a spot at the top that’s easy to find and contains all the repeating information. I chose the top of this point to make it easy to find the correlating point in the lower area. It helps a lot placing these guides to zoom in until you can see each pixel.
(*note: Before placing these new guides I chose View>Clear Guides from the main menu to remove the center guide we placed on the stage earlier.)
Step 13
Now scroll down and find that EXACT same point in the lower half of the pattern and place another guide there. Every pixel counts so make sure your guide is placed perfectly.
Step 14
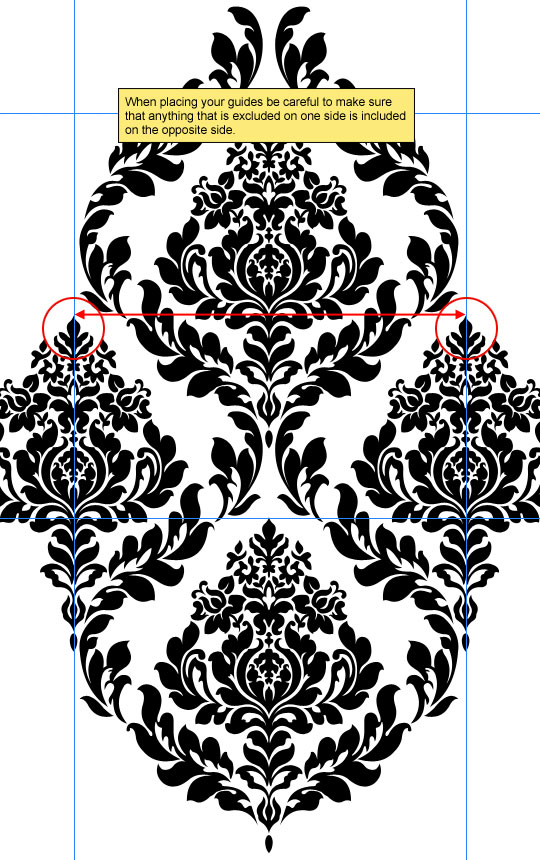
Repeat this process adding guides to the left and right sides of the pattern. Make sure that any parts of the pattern that are outside the guide on the left are inside the guide on the right.
Step 15
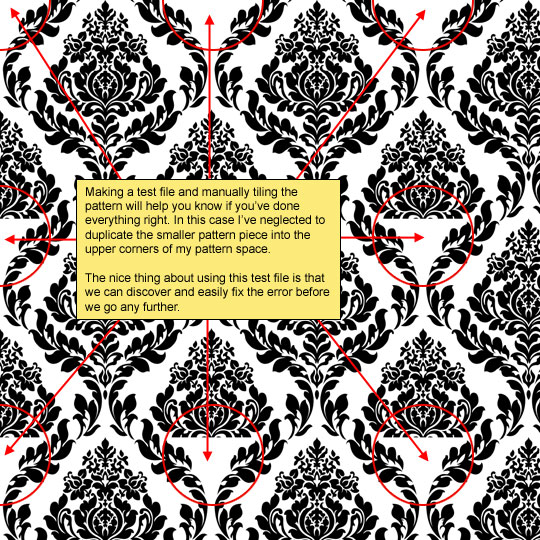
With all my guides placed for the pattern I’ll often create a selection inside my guides of the pattern area, copy the selection and paste it into a large new document where I can duplicate the pasted tile and layout the repeating tiles to make sure everything lines up perfectly. In this case I discovered that a small area at the top corners of my pattern were missing. I show you this oversight to demonstrate how important it is to make this test file before going any further and how easy it is to miss small details in a complex pattern.
Testing your pattern at this stage will save you hours of trouble later.
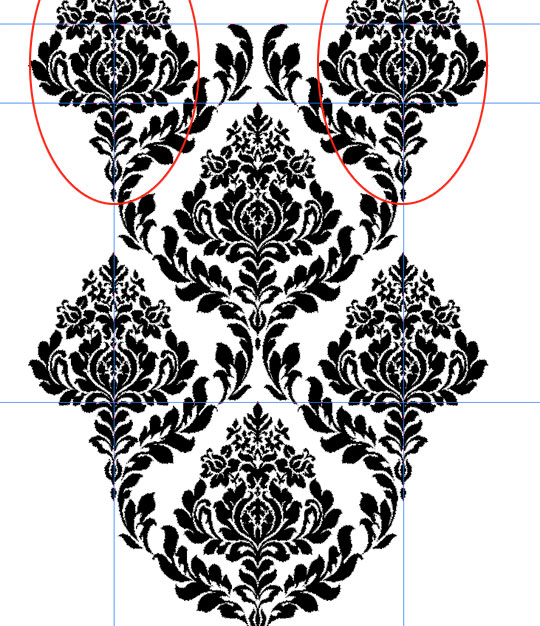
Step 16
By simply deleting the Vector Mask from my layer and adding copies of the smaller side elements to the top of the design back in my Paths layer in the Paths palette, and adding a new Vector Mask including the modified paths I easily remedied the problem.
Step 17
Now that we’ve fixed and tested the pattern to insure that it tiles perfectly it’s time to turn this baby into a Photoshop pattern.
We only want the black areas to be visible on in the pattern so hide the Background layer by clicking the eye icon next to it in the Layers palette and make sure the Pattern layer is selected as the active layer. Press the M key to invoke the Rectangular Marquee tool and drag a selection inside our guided area.

Step 18
Choose Edit>Define Pattern from the main menu, give your pattern a name and click OK. The pattern has been saved and is now available in the Pattern Picker. If you choose Edit>Preset Manager and choose Patterns from the menu you will find your new pattern at the end of the list.


Step 19
You’ve now completed Part I of the tutorial. You can now continue to Complex Repeating Patterns Part II where we’ll add color and texture to create a stunning and versatile repeating pattern.

Lesson Files + Additional Resources
Download the free .PSD file and other lesson files Right Here.
Tell Your Friends
More in Graphic Design


21 Responses to Complex Repeating Patterns Part I
BlastBalastik
July 22nd, 2008 at 4:31 pm
Pretty cool
Amazing tut to make a great pattern.
crazyhunk
July 23rd, 2008 at 3:44 am
wow…. thanx alot…m8…. i really wanted to know how to do this correctly….
u explained every detail….
Paulo Sales
July 23rd, 2008 at 7:20 am
that makes the difference…
fantastic tut…thank you once more.
bill
July 23rd, 2008 at 10:32 am
f’n A!
carlypeas
July 23rd, 2008 at 1:02 pm
Thanks so much for this awesome site! I’m always excited when you post a new tutorial but this one was exactly what I needed right now. I never dreamed it would be so easy (albeit time consuming) to make such complex patterns. I can’t wait for part 2!
Kovi
November 21st, 2008 at 8:37 am
it is very good tutorial
Jessica
January 3rd, 2009 at 12:07 am
I sold so many holiday cards from this pattern! I totally OWE you a HUGE TIP!!!!!
Mardian A>T>Y
April 15th, 2009 at 1:17 am
finally. i found pattern!! Thank you so muchh..!
Alexandra
July 11th, 2009 at 6:47 am
Awesome tutorials!!!!!
Jen_D
July 21st, 2009 at 6:11 pm
Sweet!! You make it look so easy – I can’t wait to try this!! Thanks, this is a great tutorial!!
emerald
July 25th, 2009 at 3:35 pm
<3 — Thanks :)
Sana
August 11th, 2009 at 11:03 am
Great tutorial…
Lauren
October 12th, 2009 at 5:13 pm
Excellent and useful tutorial. The process, even from beggining with a search for “damask” patterns on wallpaper sites, is somewhat similar to how I created Damask Dings1. Thanks for sharing, have a great day :)
Kyle Gallant
October 24th, 2009 at 9:02 am
This was a huge eye opener, thank you very much for this.
Gaurab Luitel
February 14th, 2010 at 10:51 pm
Dherai dami lagyo. very good.
Megan
February 26th, 2010 at 10:38 pm
Thank you so much, what a great tutorial!
To make it 1% easier on your readers, here’s the direct link to the .jpg you’re using for the tutorial:
http://www.wallpaperdirect.co.uk/wdimages/043454full.jpg
Phillip Winn
March 16th, 2010 at 9:44 pm
Step 11 doesn’t work for me. I have paths that look great, but when I ‘Create Vector Mask’ I end up with only a tiny fraction of the pattern filled in. Most of my paths are completely ignored!
I’ve spent a lot of time on this, only to be stymied at step 11. Please help!
Phillip Winn
March 17th, 2010 at 10:40 am
Amazing, amazing stuff! Thanks for this, it’s super-powerful.
HERO
March 17th, 2010 at 4:42 pm
PHILLIP, Your problem is likely stemming from your complex path layout. You need to make sure each path (especially those that are supposed to add or subtract from other paths) have the right properties. Do this:
1) Go ahead and create your new layer, select your paths and convert to Vector Mask
2) Lets start in the top middle where we can see that the paths are filled, but the internal paths aren’t “cutting out” their spots.
3) Select one of those inner paths with the Path Selection Tool and then look up in the Paths Options Bar at the top of Photoshop and make sure that the path is set to “Subtract from Shape Area” instead of “Add to Shape Area” … these are the 4 icons to the left of the Combine button. When you change the path to subtract, it should cut that area out as you’d expect.
4) Continue around your document. If you ever have a path that you change the options of and nothing happens, try cutting (Ctrl-X) and then Pasting (Ctrl-V) the path from and then back into it’s position, this will clear up the issue. Think of it like this… Subtraction paths need to sit on top of Addition paths, and if the order they were added to the overall composition is backwards they’ll be theoretically “behind”.
Joel
February 16th, 2011 at 11:00 am
Step 15 would be much quicker if you simply used the Offset command.
Menu: Filter > Other > Offset
HERO
February 16th, 2011 at 12:23 pm
Great tip JOEL!