


Comic Book Photo Effect
In this Photoshop tutorial I'll show you how to add a comic book effect to an ordinary photo using a few layers, the Cutout and Poster Edges filters and a few different layer blend modes.Introduction
This is a little technique I picked up at Photoshop World and have tweaked to my own preferences. Because each photo is different you’ll want to experiment a little with the settings to get your best result. I’ve found that although this technique can be used for most photos, there are certain ones that have a much more pleasing final result.
Step 1
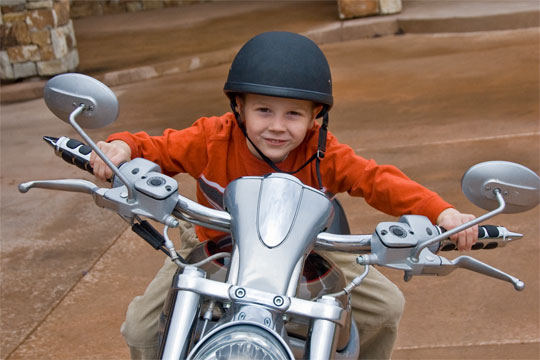
Although this effect can be applied to any image with decent results, I recommend starting with a fairly large photo (mine is 2160x1440px). We’ll be using the Color Halftone filter later in the lesson which has a 4 pixel minimum diameter and if your starting image is too small you’ll end up with more of a polka dot effect than anything resembling a comic book effect. Obviously I’ll have to resize my large image for each step in the tutorial and I’ve reiszed the .PSD download at the end of the lesson after applying the effects at the large scale.
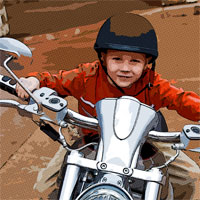
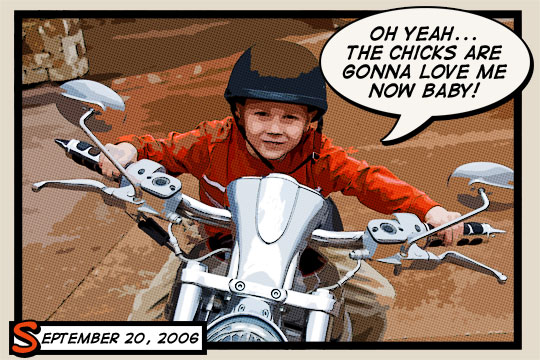
All that being said, lets jump right in and build some setup layers. My photo is of my six year old nephew who was obviously getting a little too comfortable on uncle HERO’s Harley.
Step 2
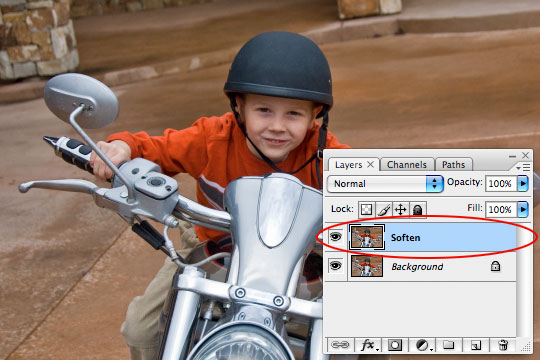
The first order of business will be to duplicate the original photo layer by pressing Command-J (PC: Ctrl-J). We will be duplicating the layer a few times, so memorize the keyboard shortcut now. Name this new layer Soften.
Step 3
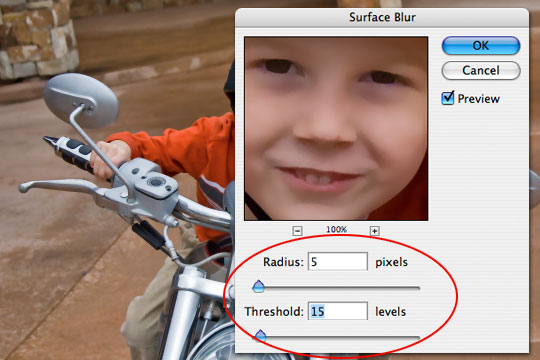
As it’s name implies, we will now soften this layer using a blur filter. Normally I prefer the Gaussian blur but for this tutorial we need the edges of our subject to stay crisp so we’ll be using the Surface Blur filter. Click Filter>Blur>Surface Blur from the main menu to bring up the Surface Blur dialog box. For this particular image size I’ve found that a Radius of 5 and a Threshold of 15 works nicely. Click OK when you’re done.
Step 4
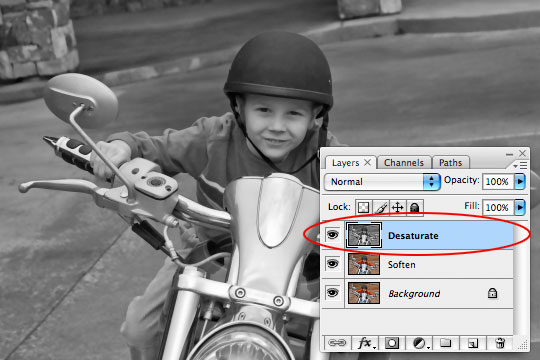
For the moment we’re done with the Soften layer but we need the effect to also be visible on our next layer so lets duplicate the layer (I said we’d be doing it… do you remember the keyboard shortcut?). Call this new layer Desaturated and like it’s name implies we’ll be desaturating it. Choose Image>Adjustments>Desaturate to strip the color from the layer or simply use the keyboard shortcut Command-Shift-U (PC: Ctrl-Shift-U).
Step 5
Create a new layer by clicking the Create New Layer icon at the bottom of the layers palette. Name this layer Halftone.
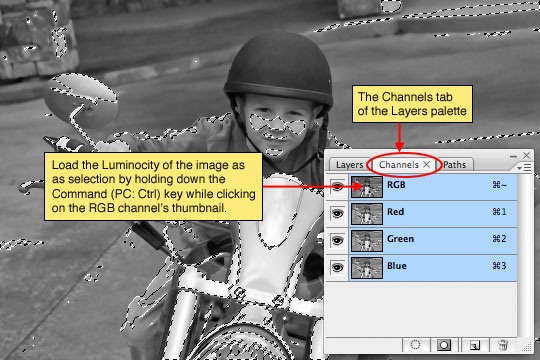
Now we need to load the luminosity of our image as a selection and the easiest way to do this is to switch over to the Channels tab in the Layers palette and holding down the Command (PC: Ctrl) key while clicking on the RGB Channel’s layer icon.
Step 6
With the luminosity loaded as a selection, click back over to the Layers tab in the Layers palette and make sure that the new Halftone layer is selected. The Luminosity of the image is most simply described as the lightness of the image. What we actually want to do however is select the exact opposite (the darkness of the image), so lets invert the selection by choosing Select>Inverse from the main menu or by pressing the keyboard shortcut Command-Shift-I (PC: Ctrl-Shift-I).
Press the D key to set your foreground color to black and then fill the selection by pressing Option-Delete (PC: Alt-Backspace). Now we can release the selection (ie. deselect) by pressing Command-D (PC: Ctrl-D).
Step 7
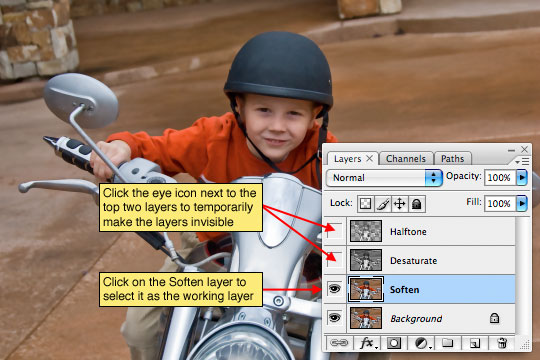
Our setup is now complete and we can get to work on creating the effect. For the moment lets turn off the top two layers by clicking the little eye icon next to each in the layers palette and lets click on the Soften layer to select it as the layer we’ll be working on first.
Step 8
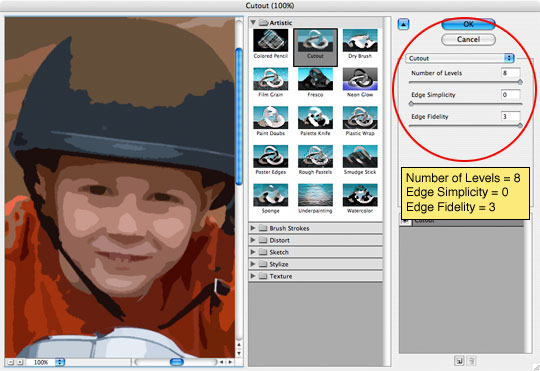
The Soften layer will be acting as the color layer for the comic book effect, but at the moment it contains far too much detail so lets use one of Photoshop’s Artistic filters to consolidate the color a little. From the main menu choose Filter>Artistic>Cutout.
The Filter window will appear with the Cutout settings visible. Set the Number of Levels to 8, the Edge Simplicity to 0 and the Edge Fidelity to 3. Click OK when you’re done.
(*note: If you have color bleed issues in this step, you can use the Posterize Edges filter instead with settings 2, 0, 2. This will yield a similar result while keeping color bleeding to a minimum.)
Step 9
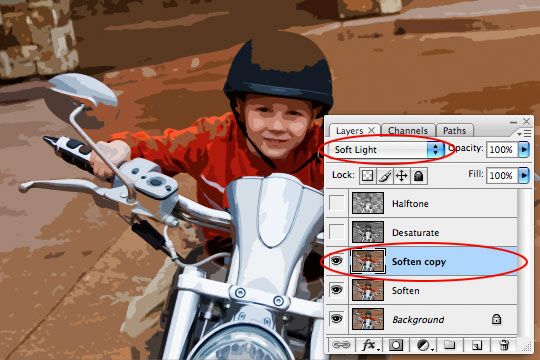
Since the Cutout filter has dulled our color and typically comic book colors are quite vivid, lets press Command-J (PC: Ctrl-J) to duplicate the layer and then switch the new layer’s Blend Mode to Soft Light, effectively giving our colors more vibrance.
Step 10
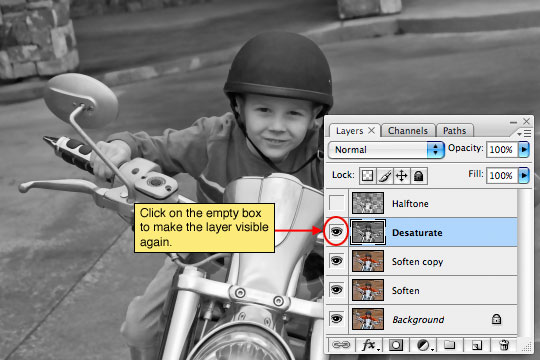
We’re now done with the Soften layers so click the Desaturate layer to select it and then make it visible again by clicking the empty box next to the layer icon where we clicked the eye icon in Step 7.
Step 11
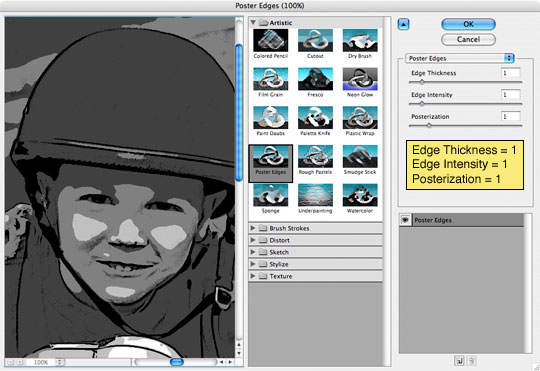
The Desaturate layer will now become the black outlines for our comic book effect. We will be using another of the Artistic filters called Poster Edges. From the main menu choose Filter>Artistic>Poster Edges to bring the Artistic filter window back up with the Poster Edges options visible. Set all 3 options to 1 and click OK.
Step 12
Lets now change the layer’s Blend Mode to Pin Light so we can get the color to show through from the layers behind while keeping the edge outlines we just created.
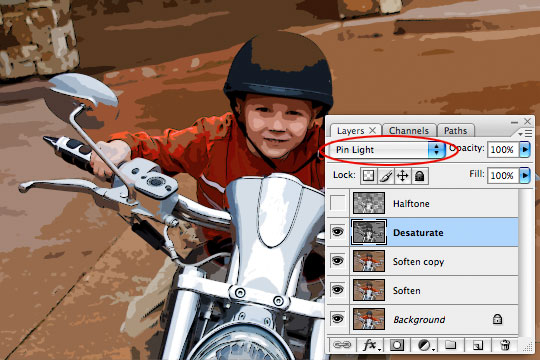
Step 13
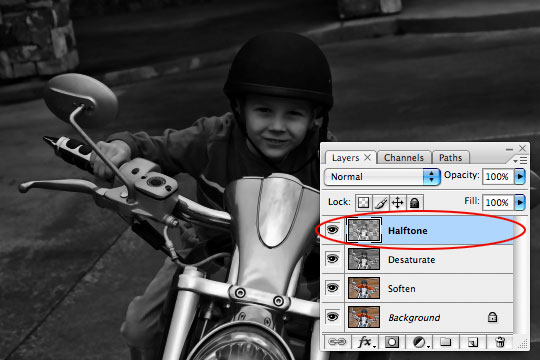
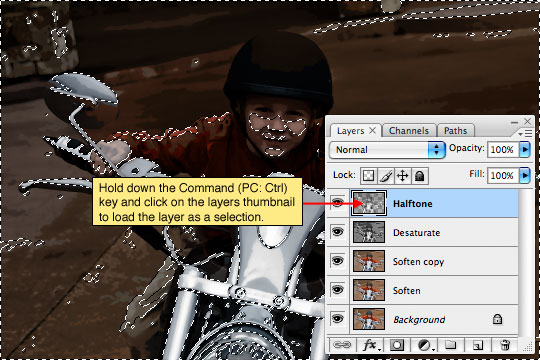
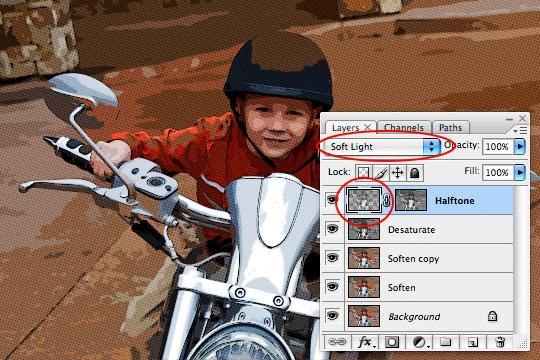
We’re now done with the Desaturate layer, so lets click up to the Halftone layer and make it visible by clicking in the empty box to the left of the layer thumbnail just like we did with the Desaturate layer in Step 10.
This effect has a few steps so follow along closely. First lets load the layer as a selection by holding down the Command (PC: Ctrl) key and clicking on the layer thumbnail in the Layers palette.
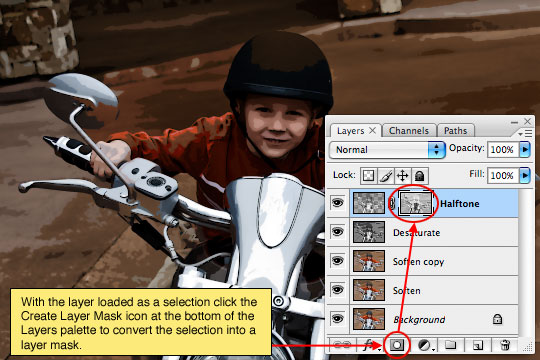
Step 14
With the layer loaded as a selection click the Create Layer Mask icon at the bottom of the Layers palette to convert the selection to a layer mask.
Step 15
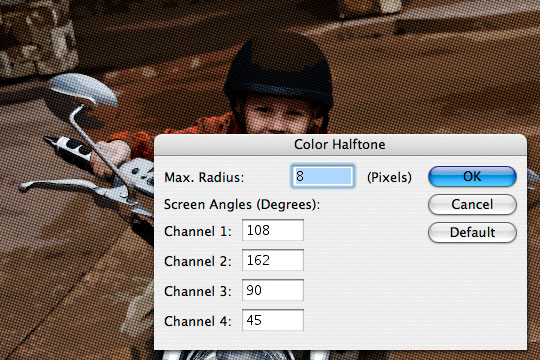
The layer mask on the Halftone layer should now be selected, you can tell because it will have small black brackets around it indicating that it is the selected working area of the layer.
Now it’s time to create the halftone dot pattern that will complete the comic book look for our photo. From the main menu choose Filter>Pixelate>Color Halftone. For the size of my image I’m going to use a setting of 8 Pixels for the Maximum Radius setting, depending on the size of your photo you may have to play with this value to get a result that looks right. The minimum pixel value for the Maximum Radius setting is 4 pixels which is why it is important to start with a large image to begin with, otherwise you’ll end up with something that looks like polka dots threw up all over it.
Step 16
Because we’re working on a layer mask and not directly on the layer this effect will look much better if we invert the layer mask. Do this now by simply pressing Command-I (PC: Ctrl-I).
We’re now done working with the layer mask, so lets click on the layer’s actual thumbnail to switch our working area back to the actual layer. You’ll notice that the brackets that were around the layer mask thumbnail before are now around the layer thumbnail now. Lets also change the way this layer interacts with the layers below by changing the layers Blend Mode to Soft Light allowing more of the color to come through while nicely retaining the halftone effect.
Step 17
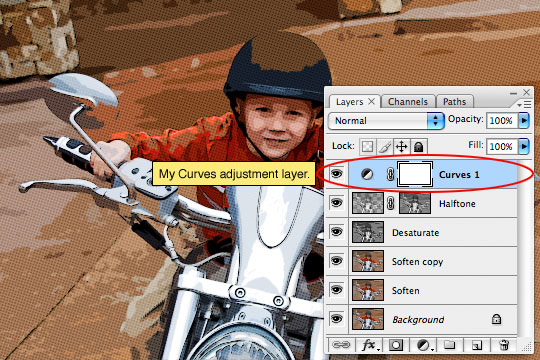
This overall effect sometimes ends up producing an image that’s a little darker than I prefer, so to remedy this I’m going to add a Curves Adjustment layer by clicking on the Create New Fill or Adjustment Layer icon at the bottom of the layers palette (it’s the one that looks like a circle that’s split into two halves) and by choosing Curves from the menu. This will open up the Curves dialog box where I’ll grab the center point of the line and drag it up and to the left just a little to lighten the mid tones of the image while leaving the black and white points where they are.

Step 18
So my layers palette and image now look like this.
Step 19
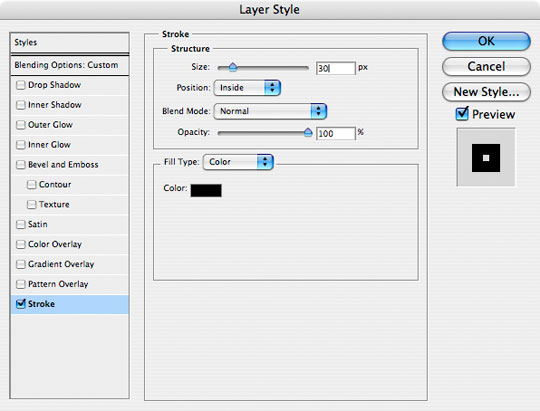
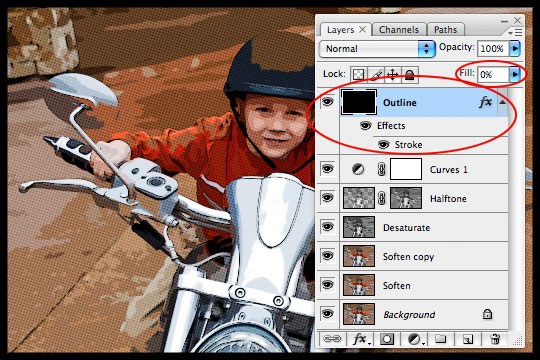
Lets create a nice black outline around our photo. Create a new layer called Outline, fill the layer with the foreground color by pressing Option-Delete (PC: Atl-Backspace), don’t worry about the color because next we’ll lower it’s Fill opacity to 0% and add the following Stroke layer style to create the outline.
Step 20
Here’s my image with the Stroke applied.
Step 21
For my final image I added a few captions using a nice comic book font called Digital Strip which I’ve included in the tutorial download, or you can choose from a nice variety of other comic book fonts at DaFont.com.
Lesson Files + Additional Resources
Download the free .PSD file and other lesson files Right Here.
Tell Your Friends
More in Photo Effects


52 Responses to Comic Book Photo Effect
Mark Armstrong
June 19th, 2011 at 7:51 pm
Totally amazing, one of the best effects I’ve ever come across– thanks a million!
P.S. Are you still doing these tutorials, perhaps on another site?
Robert
September 15th, 2011 at 10:35 am
Very cool effect and easy to follow tutorial! Thanks!