


35mm Slide Mount
In this tutorial we will create a 35mm slide mount using an imported .eps file, layer styles and a few photos of your own.Introduction
I could start this tutorial by instructing you to create a rectangle with rounded edges using the Custom Shape tool with the Rounded Rectangle Tool selected, then have you extract a rectangular hole in the middle using the Rectangular Marquee tool… But it’s easy to get the look wrong so I’ve done a little leg work for you.
Once upon a time I designed the cover of a book for a photographer friend of mine and I used a scattered slide effect to surround the back panel. To get the slide mount exactly right I photographed an actual 35mm slide, imported the photograph into Flash and traced it to get the shape perfect. Yes, I illustrate in Flash.
What I’m getting at here is that I’ve included a SlideMount.eps file in the tutorial files at the bottom of the lesson, this way you can make perfect slide frames of any size anytime. (You’re welcome.)
Step 1
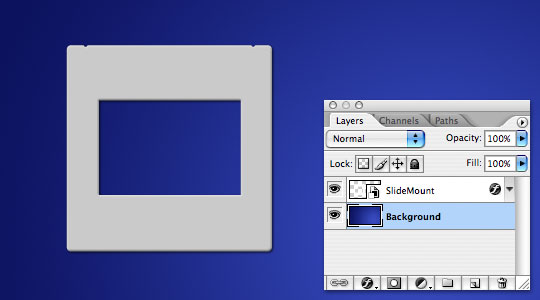
My file is 540×300 and I’m using a radial gradient with foreground/background colors #3649bd and #0c125e respectively to lay down a pretty background for the exercise. Just because it’s practice doesn’t mean it should look like crap.
We’ll be working with light colors in the slide mounts and it’s nice to have a dark background to contrast against.

Step 2
Because I’ve already created a .EPS file for the slide mount, I’m going to Place the SlideMount.eps file into the current document by selecting File>Place from the main menu. This will import the .eps file as a Smart Object, allowing me to re-size it at any time without loss of quality. Once you select the file in the Place dialog Photoshop will import the object to the stage with the Free Transform controls turned on. Drag the corners until the slide is the desired size, then press Return (PC: Enter) to commit the transformation.

Step 3
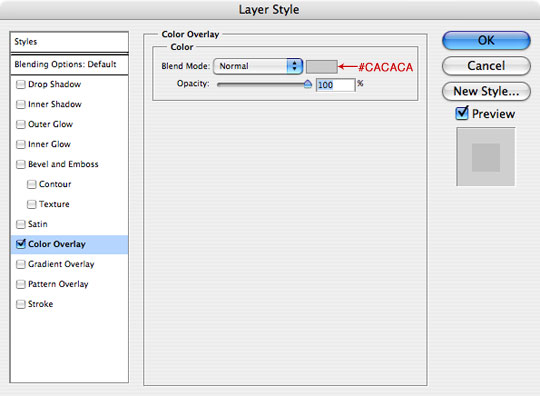
Next we will add some layer styles to this slide to add realism. Double click to the right of the layer’s name in the layers palette OR right click on the layer and select Blending Options to bring up the Layer Style dialog.
Our first order of business is to change the face color of the slide to a more realistic one since most slides aren’t true white. We do this from the Color Overlay dialog. Change the settings to the ones below, then proceed to Step 4 without closing the dialog.
Step 4
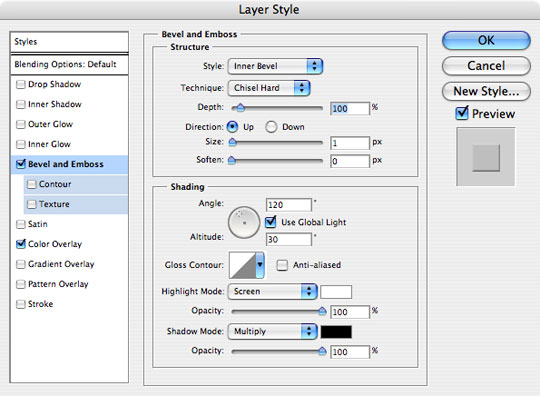
With the Layer Style dialog still open, click on Bevel and Emboss and add the following settings. This will give the edge a more believable quality, adding just a small bevel around the face of the slide mount. Keep the dialog open and proceed to Step 5.
Step 5
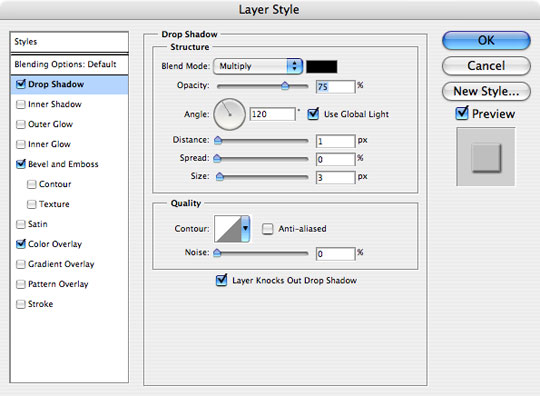
The last and final effect we will be adding to the slide mount is a drop shadow. Use the settings below and click OK to apply the styles to the layer.
Step 6
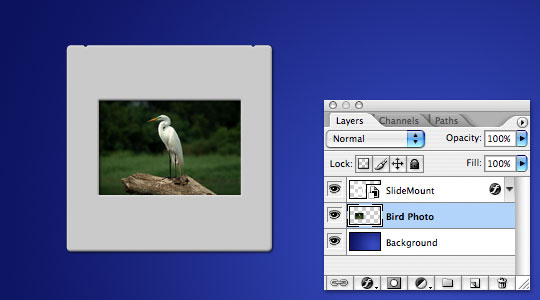
With the slide mount styles set, it’s time to bring in a photo to put inside the mount. For this example I will choose a photograph shot horizontally to fit into the slide mount as it now sits, but you can always rotate the slide mount and use a vertical photograph if it suits your needs better by choosing Edit>Transform>Flip 90° Clockwise from the main menu.
Before opening your photograph, click on the blue Background layer we created back in Step 1 because when we drag our photo file over into this file Photoshop will put the photo on a new layer above the Background layer and below the Slide Mount layer.
Step 7
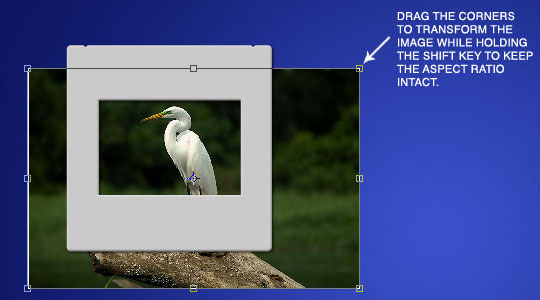
No go ahead and open your photo file and with the Move tool selected by pressing the V key, simply drag and drop your photo into your working file. I’m going to go ahead and guess that your photograph isn’t as small as the opening in the slide mount, so press Command-T (PC: Ctrl-T) to invoke the Free Transform tool (*note: you can also access the Free Transform tool from the main menu by selecting Edit>Free Transform).
While holding the shift key to constrain the proportions of the image, drag the corners in until the image is the right size for the slide frame.
Step 8
Once you’re happy with the re-size of your photo simply press Return (PC: Enter) to commit the transformation. This layer will be named Layer 1 by default by Photoshop but I recommend double clicking on the layer name in the layers palette and re-naming the layer to something more descriptive. In a file with only a few layers it probably doesn’t matter if each layer has a name, but it is a good habit to get into because layers add up quickly in more involved projects and it will be much easier to find your way around if everything has a name.
Step 9
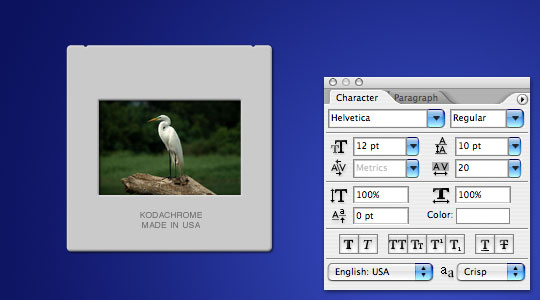
The final step for this example will be to add some text to the slide mount. Most slide mounts will have some sort of embossed or printed text and it ads an element of realism. Click on the Slide Mount layer and switch to the Text tool by pressing the T key. Place the cursor where you want to add the text and click to place the cursor there. Add your text and press Return (PC: Enter) to commit the text. At this point you can change the look and font of the text by changing it in the character palette. (*note: if your character palette isn’t showing, choose Window>Character in the main menu to make it visible.)
If the location of your text is wrong, switch back to the move tool by pressing the V key and move the text to a better spot.
Step 10
Add more slides, rotate and over lap them… have a little fun!

Step 11
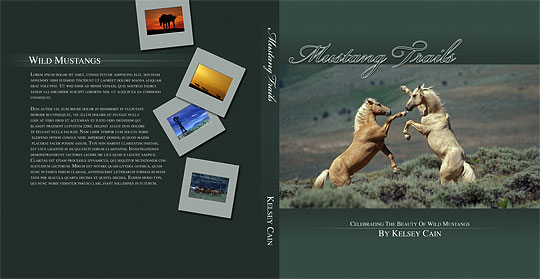
And here’s the layout for the slip cover to the book I mentioned in the intro.
Lesson Files + Additional Resources
Download the free .PSD file and other lesson files Right Here.
Tell Your Friends
More in Graphic Design


8 Responses to 35mm Slide Mount
sphynxylynxy
February 24th, 2009 at 12:05 pm
Wow! Slick, chic and definitely a lot that one can do with this. Really really great.
BTW thank you so much for your effort and thought you put into these tutorials and teaching us newbies.
Jordan Hall
August 2nd, 2009 at 6:37 pm
This is fantastic!
Perfect for the project I am working on.
Thank you for taking the time to lay down such a simple way of creating this look. Also, props on creating the .esp file for us.
Kathy A.
December 6th, 2009 at 12:52 pm
You are, in fact, a Photoshop Hero! This is perfect for my final project in web design. Thanks!
Allen
February 9th, 2010 at 2:37 pm
Thank you very much! these are all very useful!
Colin Stewart
November 19th, 2010 at 8:54 pm
Gracias senor!
Very simple and well explained.
Bobs
January 24th, 2011 at 4:41 pm
Awesome, thanks heaps for the resources, they’re excellent and much appreciated!
chris
February 7th, 2011 at 7:37 pm
many thanks! wonderfully written, as well as your other tutorials! =)
Trishul
August 14th, 2011 at 3:45 am
Many thanks…I’ve used it by following the tutorial and its absolutely awesome. Thanks again :)