


Political Campaign Button
Being election season in the US, I've had quite a few requests for a tutorial on creating political style buttons in Photoshop. One loyal reader wanted to know if it was possible via a single set of Layer Styles, which is what we'll be doing in this lesson.Introduction
Being election season in the US, I’ve had quite a few requests for a tutorial on creating political style buttons in Photoshop. I thought maybe I’d skip this one because there are a few very good tutorials on the subject already out there (I personally prefer the version by Collis over at psdtuts). One loyal reader however, requested a tutorial based strictly on creating the effect through a single set of Layer Styles, which is what we’ll be doing in this lesson.
(*note: This lesson is written for the noobs, so you advanced users might want to skip most of the hand-holding.)
Step 1
Lets begin by opening a new document in Photoshop by selecting File>New from the main menu. My file size for this lesson will be 540px x 350px at 72ppi.
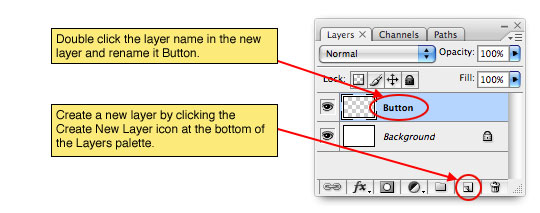
The first order of business will be to create the circular background where our layer styles will live, so lets create a new layer by clicking on the New Layer icon at the bottom of the Layers palette. Double click on the layer name and rename it Button.
(*note: If your Layers palette isn’t visible, choose Window>Layers from the main menu at the top of Photoshop.)
Step 2
Because the Layer Styles we will be applying later in the lesson will be relative to the size of the button we create, it’s important that your working on a button that’s the same size as mine. To ensure all our buttons are the same size, we’ll be setting a fixed size for our selection.
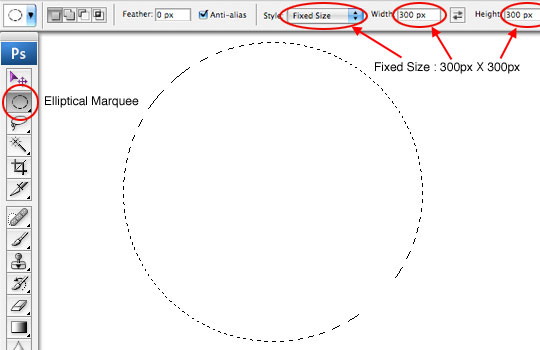
Press the M key to switch to the Rectangular Marquee tool in the Tools palette, then either click and hold your mouse on the Rectangular Marquee tool to access the flyout menu where you can choose the Elliptical Marquee tool, or simply hold the Shift key and press M again (this keyboard shortcut will switch you back and forth between Rectangular and Elliptical marquee tools on the fly).
With the Elliptical Marquee tool now selected lets direct your attention to the tool options bar at the top of Photoshop. From the Style drop-down menu choose Fixed Size, then click in the Width and Height fields and type "300px" for each. You have now set your Marquee tool to create a fixed 300x300px circle, so go ahead and click on the stage to create the selection. Once the selection is made, you may have to click and drag it to a nice central location on the canvas.
Step 3
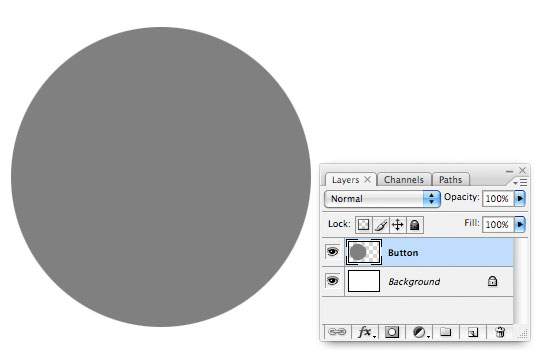
We now need to fill the selection with color, but since we’re going to be adding highlights and shadows via Layer Styles in the preceding steps, lets fill the selection with 50% Gray. From the main menu choose Edit>Fill to bring up the Fill dialog box. From the Use dropdown choose 50% Gray and make sure that the Blending Mode is set to Normal and that the Opacity is at 100% then click OK.
We’re now done with the selection, so simply press Command-D (PC: Ctrl-D) to deselect.
Step 4
Here comes the fun part where we add the effects that will make this flat gray circle pop! Be sure that you pay special attention to each and every setting in the following dialogs as many of the default settings have been changed.
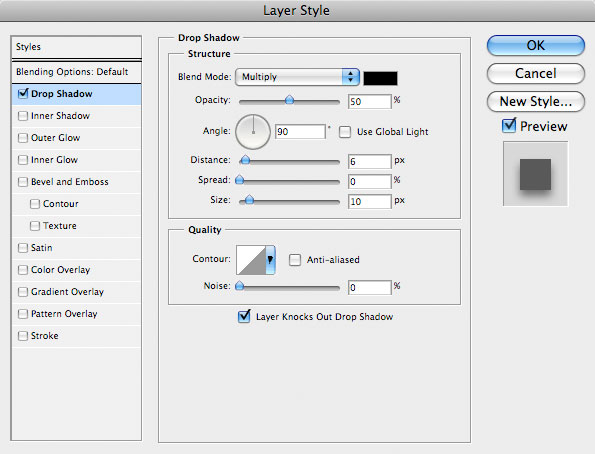
In the layers palette Control-Click (PC: Right-Click) on the Button layer and choose Blending Options from the menu. This will bring up the Layer Styles dialog box. We’ll be adding styles progressively over the next set of steps, so don’t click OK until we’re finished.
Lets begin by adding a drop shadow. Click on the Drop Shadow link in the left side of the Layer Styles dialog to bring up it’s options (*note: In the Layer Styles dialog you always want to click on the text links in the sidebar and not the checkbox because checking the checkbox will turn on the default settings for the style but won’t take you to the options window.) Set your Drop Shadow to these settings and continue to Step 5.
(*note: Make sure the Preview box is checked on the right side of the dialog (under the OK/Cancel buttons) so you can see the styles as they are applied.)
Step 5
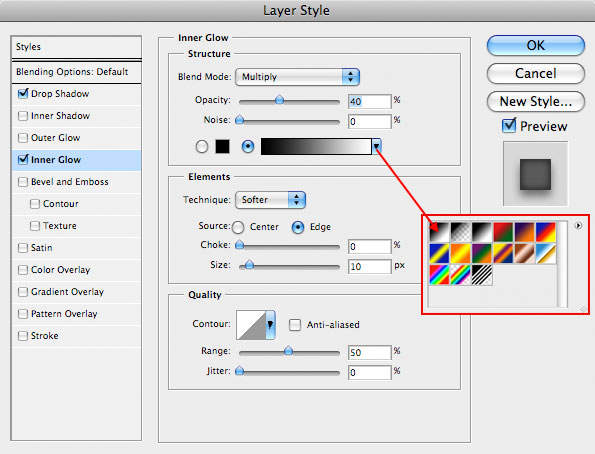
The next effect we’ll add is shading to the entire inner edge of our button using the Inner Glow style. Click on Inner Glow in the effects list on the left and use these settings.
Step 6
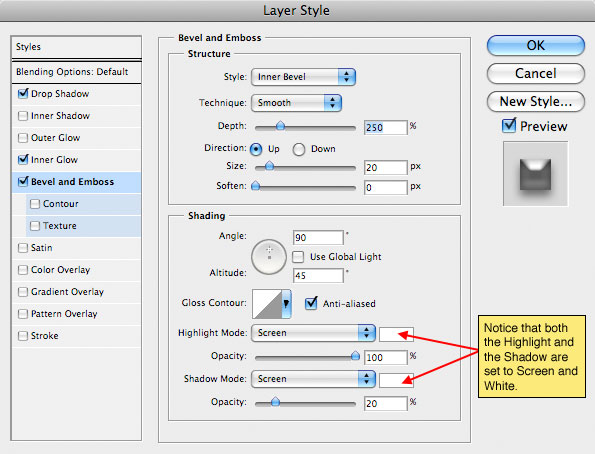
Next we’ll add the rounded edges of the button with the Bevel and Emboss setting, so go ahead and click on Bevel and Emboss in the list at the left. This effect will be added in two stages, first the basic Bevel and Emboss and then the Contour sub-setting in Step 7.
Add the following Bevel and Emboss settings then proceed to the next step. Notice that both the Highlight and Shadow settings are colored white and both have a blend mode of Screen. This creates the upper highlight as well as the muted highlight at the bottom of the button. In the next step we will refine the shape of the Bevel using the Contour sub-setting.
Step 7
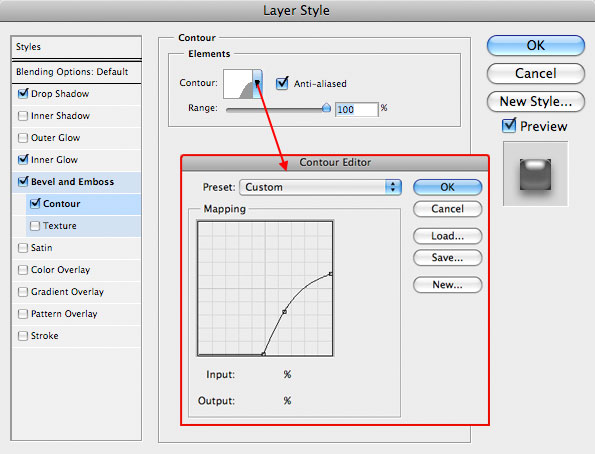
Now lets click on the Contour sub-setting below Bevel and Emboss in the list on the left. The default contour is a Linear contour which looks like a straight line from the lower left to upper right corner. Click directly on the little picture of the contour to open the Contour Editor. Grab the bottom left point with your mouse and drag it half way to the right, then grab the upper left hand point and bring it down about 4/10ths of the way as shown in the image below. Once those two points are set, click along the line to add a new point, then drag that point up and left to create the curve as shown. Click OK when you’re done to return to the Contour options.
Step 8
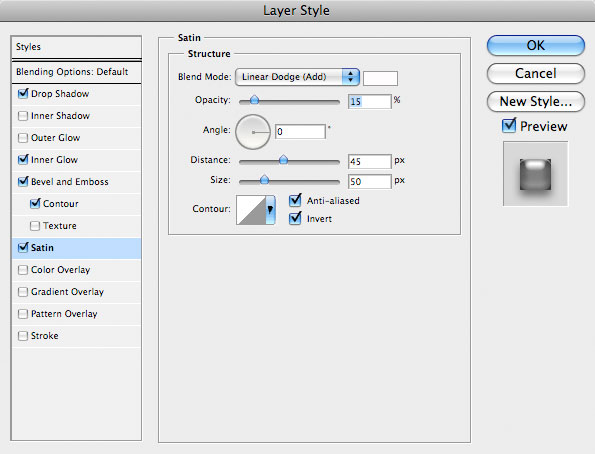
The final effect we’ll be using for our button is the Satin style, so go ahead and click Satin in the list on the left to bring up it’s options. Using the settings below we’ll use the color white to add the slightest bit of light reflection through the middle of the button. If you want to see the difference between the effect with and without the Satin effect, simply set the style settings below, then click the Satin checkbox on the left on and off to see the effect in action.
When you’ve set the options below, go ahead and click OK in the upper right hand corner of the Layer Styles dialog box to commit the styles to your layer and return to the file.
Step 9
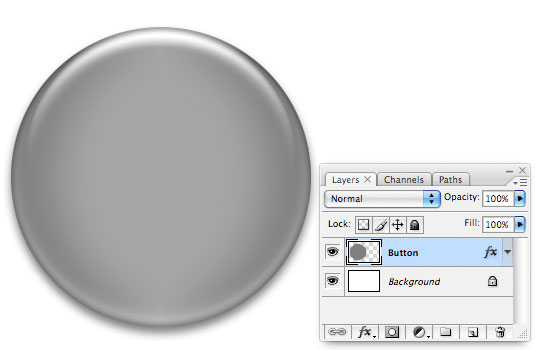
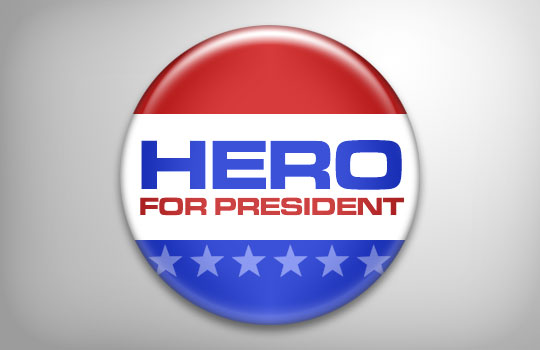
If you were a good student and followed along with each step correctly your button should now look like this.
Step 10
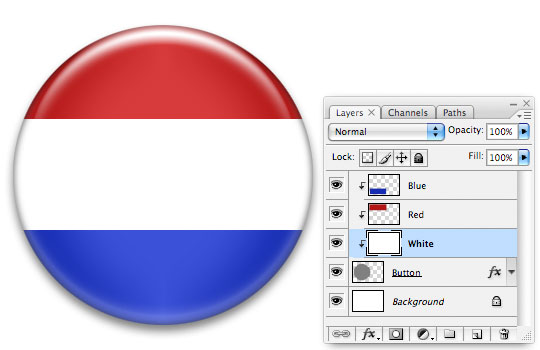
Now that the Button layer has all the required Layer Styles applied, it’s time to get busy decorating the button. For the time being lets leave the Button background color gray. Create a new layer by clicking the Create New Layer icon at the bottom of the Layers palette (just like we did in Step 1). Rename this layer Red.
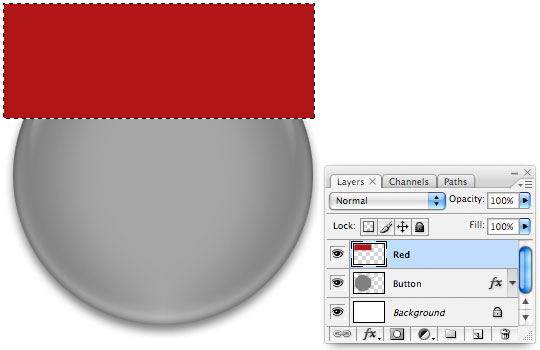
Since this is a political button, lets add some red, white and blue action to it. Click on the foreground color swatch in the Tools palette to bring up the Color Picker. Pick a nice red color like #b11515 and click OK.
Press the M key to switch back to the Marquee tool (if you’re not already there). If the Elliptical Marquee is still set as the active Marquee tool, switch back to the Rectangular Marquee with the keyboard shortcut Shift-M. With the Rectangular Marquee tool now active, drag out a nice sized rectangle around the top of the button and press Option-Delete (PC: Alt-Backspace) to fill the selection with red.
Step 11
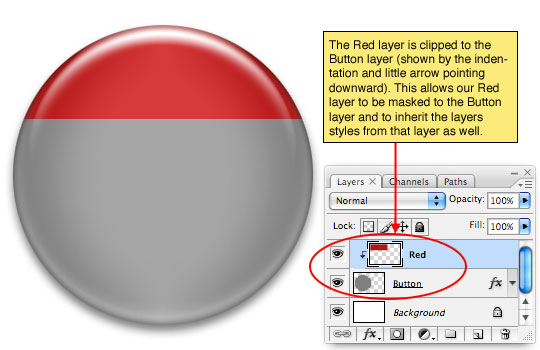
Obviously this Red rectangle layer needs to be modified to interact correctly with the Button layer, so lets press Command-D (PC: Ctrl-D) to deselect and then simply Control-Click (PC: Right-Click) on the Red layer and choose Create Clipping Mask from the menu. This will cause the Red layer to be masked to the Button layer and it will inherit all the layer styles we applied to the Button layer as well. You’ll know the layer is being clipped to the Button layer because it will be indented in the Layers palette with a little arrow pointing to the layer it’s clipped to.
Step 12
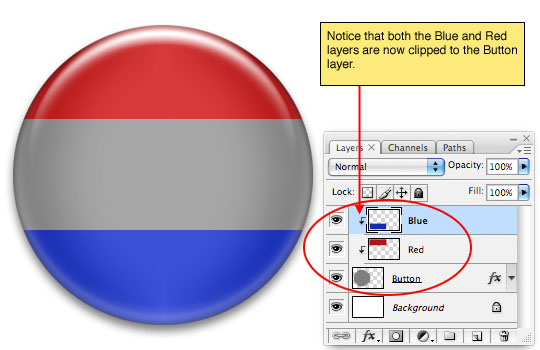
Repeat Step 11 a second time to create a new layer called Blue, draw a rectangle around the bottom of the button, fill it with a nice blue color like #152bb1 and clip it to the Button layer by choosing Create Clipping Mask.
(*note: Creating a Clipping Mask on a layer above a layer that’s already clipped to a preceding layer will clip that layer with the previously clipped layer as well. See below.)
Step 13
It’s time to get rid of that 50% gray we’re seeing in the middle of the button, don’t you think? Click on the Button layer in the Layers palette and then click the Create New Layer icon at the bottom of the Layers palette to add a new layer above it. Notice that the new layer is automatically added inside the clipping mask because the layers above it are already clipped to the Button layer. Name this new layer White, press the D key to reset the foreground and background colors to black and white, then simply press Command-Delete (PC: Ctrl-Backspace) to fill the entire layer with white.
Step 14
Now it’s just a matter of adding some text and other graphics to the mix to get the desired look. Remember to clip every subsequent layer so that the layer styles from the Button layer will be applied to them as well.
Thanks for playing along, I hope you learned something about the flexibility of Layer Styles!
Lesson Files + Additional Resources
Download the free .PSD file and other lesson files Right Here.
Tell Your Friends
More in Graphic Design


25 Responses to Political Campaign Button
Curetonian
November 3rd, 2008 at 10:11 pm
Great work Hero. Never realised quite how simple this is. Im sure this technique can be applied to countless other ideas. Keep it up!
Paulo Sales
November 4th, 2008 at 3:49 am
well hero, if those 2 guys teach like you do, maybe your country will be a better example of liberty.
Of course you have my vote, nice and simple stuff here, it looks like a captain america shield.
Welcome back again!
Regards from Portugal*
*Where is this spot lifting?
Palomino
November 4th, 2008 at 4:47 am
First of all sorry for my English, I’m from Belarus and it’s a bit hard for me to speak English :)
I like this tutor. In spite there are lot’s of tuts about creaing buttons, I found some interesting techniques.
Thanks, Hero :)
boghi
November 4th, 2008 at 6:31 am
Very nice and easy.
Use simple and effective methods.
Your strength is precisely this.
Congratulations.
BlastBalastik
November 4th, 2008 at 11:15 am
Amazing tutorial as always…
crazyhunk
November 4th, 2008 at 7:57 pm
welcome back m8…..
misses u and ur tuts….. ;)
Dilirum
November 5th, 2008 at 3:54 am
Excellent work my American friend! I wrote you in on my ballet.
Adam
November 5th, 2008 at 11:02 am
Designed for Obama? ;-)
Ghost Boots
November 5th, 2008 at 2:24 pm
Fantastic! Thanks for sharing your knowledge!
cainschen
November 6th, 2008 at 3:11 pm
I’d vote for you too! Love the button.
Akiva Feinstein
November 6th, 2008 at 11:54 pm
Simple, but taught me a lot of useful techniques. Thanks again!
FleetingBeauty
November 7th, 2008 at 4:30 pm
I am in love with your site! I wish you had a new tutorial everyday!!
Tom Ross
November 10th, 2008 at 7:53 am
Great use of the clipping mask function. Useful tut :)
Paulo Sales
November 11th, 2008 at 5:11 pm
nice change…great header !
this change deserves a new tut about it…
HERO
November 11th, 2008 at 8:45 pm
Thanks PAULO. Good to see your comments as always!
anon
December 11th, 2008 at 9:47 pm
What font is that?
HERO
December 13th, 2008 at 5:59 pm
ANON, The font is called Microgramma Bold.
Stephen
January 11th, 2009 at 9:30 am
A always a great tutorial – you’re a regular bookmark for me now :)
Green Sheep
January 13th, 2009 at 5:44 am
Thanks Hero, This was a brilliant tut I just needed this for a project that I was doing. Really easy to follow as always. Even though I’ve been using photoshop for a good 4/5 years I know I can always find new techniques here! Thank you!
Elepzia
February 9th, 2009 at 8:35 pm
Wow I just got really amazed , I just started using photoshop last week and started searching for tutorials and I saw this one and it was really easy I got exactly as the picture so thankyou so much I hope you continue making more tutorials I will recommend this site to some friends
Blue
April 28th, 2009 at 5:01 pm
Thanks for the tips. Everything was helpful and easy to follow.
JD Teal
September 27th, 2009 at 10:54 pm
Thanks for the great tutorial!!
Andrew Lechlak
January 16th, 2010 at 8:27 pm
Awesome tutorial :D
Swopper Stuhl
December 3rd, 2010 at 11:14 am
Nice button … not only for policatal campaigns but also useful for fan based and other button uses .. thanks for sharing :)
TallerAlexis
May 11th, 2011 at 8:18 am
Great! I copied it for a friend of mine, University Professor, and she is happy with her badge, using it as email signature :-)) Thank you!