


Vintage Photo Corners
In this Photoshop tutorial I'll show you how to create those great old time photo corners while exploring in depth the Bevel and Emboss filter with it's Contour feature. We'll also use various Layer Styles and Blend Modes for our final result.(*note: This tutorial assumes that you have a basic working knowledge of how to use the Pen tool to create and bend paths.)
Step 1
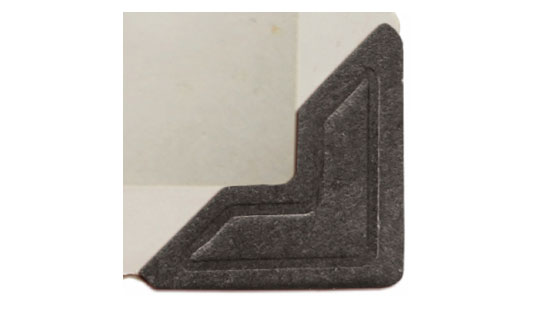
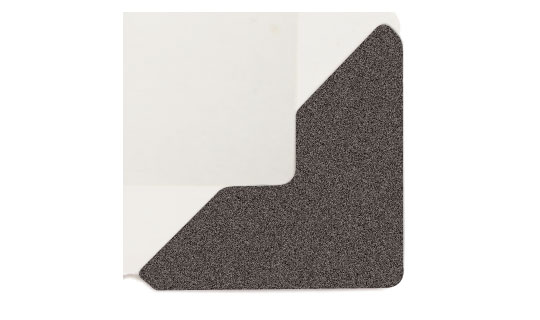
As always, when trying to create a digital version of something that already exists in the world, I like to have a piece of reference material. In this case it’s a photo I downloaded from iStockPhoto. If you’d like to get the same image to follow along (although I am including a small clipping of the image for this tutorial) you can enter the product id 4836864 in the iStock search field.
I’ve clipped down the image to just one of the photo corners because once we’ve created one, it’s simply a matter of duplicating and rotating it to create the others. We’ll also be creating our corner on a large scale so we can downsize it to fit any application in the future.
Step 2
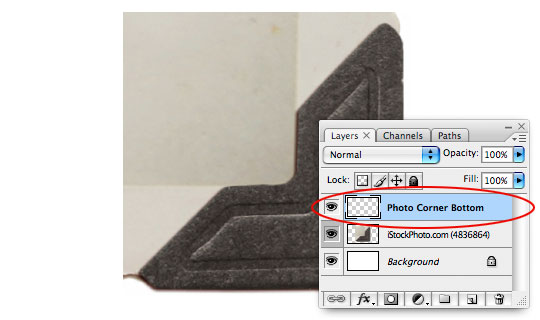
Lets get things started by creating a new layer by clicking the Create New Layer icon at the bottom of the Layers palette. I’m going to rename this layer Photo Corner Bottom by double clicking on the layer’s name in the Layers palette.
(*note: If your Layers palette isn’t visible choose Window>Layers from the main menu.)
Step 3
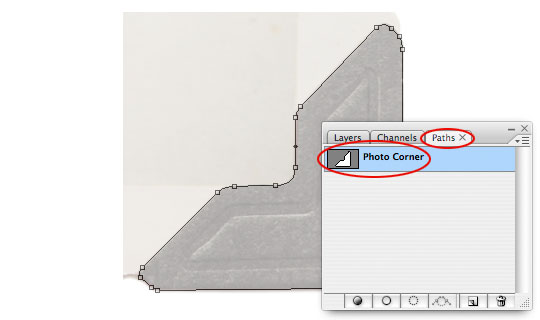
We’re really only using this piece of reference material to get the basic shape of the photo corner, so lets trace it now by pressing the P key to invoke the Pen tool. Trace the entire outline of the photo corner until you have a completed path encompassing the whole thing. In the example below I’ve lowered the opacity of the original photo to make my path easier to see.

Step 4
It’s always a good idea once you’ve created a path to switch over to the Paths tab in the Layers palette and rename the path. This also avoids loosing the path when a new "working path" is created.
Switch back to the Layers palette when you’re done.
Step 5
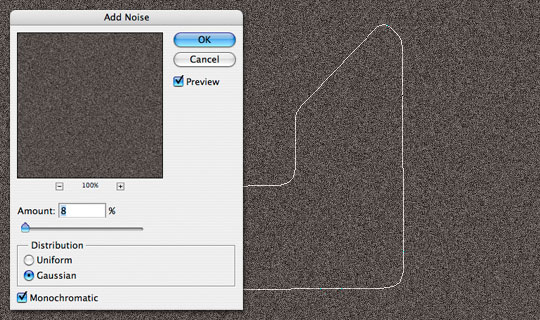
Change the foreground and background colors in the Tools bar to #554e4b and #3a3430 respectively and press Option-Delete (PC: Alt-Backspace) to fill the entire layer with the foreground color.
Now lets add some variation to the color. Choose Filter>Noise>Add Noise from the main menu and use a setting of 8%, Gaussian and make sure the Monochromatic box is checked then click OK.
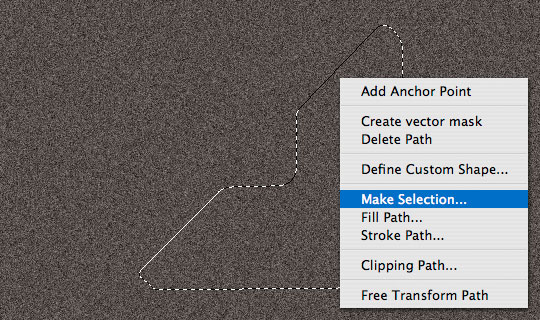
Step 6
Now lets convert the path we created in Step 3 to a selection by pressing the P key to invoke the Pen tool again, then Control-Click (PC: Right Click) on the path and choose Make Selection. In some versions of Photoshop this will be followed by a Make Selection dialog box, choose a Feather Radius of 0, make sure the Anti-aliased checkbox is checked and that New Selection is selected then click OK.
Step 7
Since we want to delete everything BUT what’s inside our current selection, lets go ahead and invert the selection by choosing Select>Inverse from the main menu (or you can use the keyboard shortcut Command-Shift-I (PC: Ctrl-Shift-I)).
Now simply press Delete (PC: Backspace) to remove the excess color and press Command-D (PC: Ctrl-D) to deselect.
Step 8
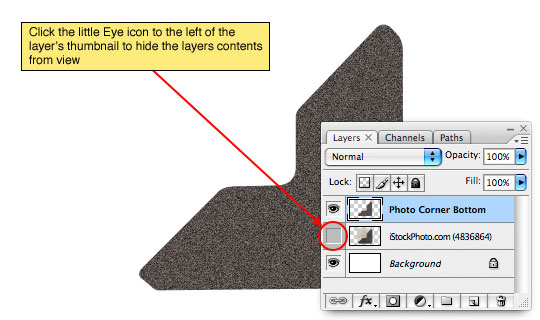
At this point we’re done with our reference layer, so we can either delete it or simply click the little eye icon to the left of it’s layer thumbnail in the Layers palette to hide it.
Step 9
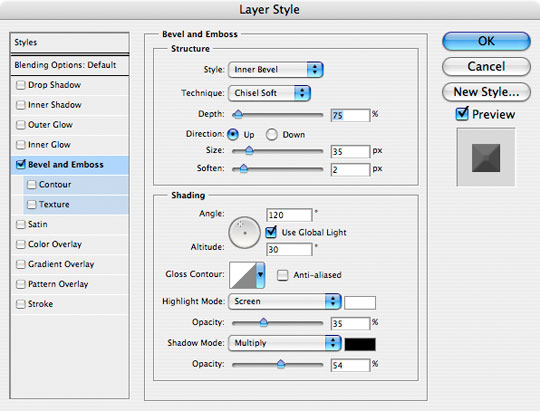
Now it’s time to dig into the layer styles for this layer and really bring out some neat little details. Open the Layer Styles dialog box by Control-Clicking (PC: Right Clicking) on the layer and choosing Blending Options from the menu.
The first Layer Style we will be applying will be the Bevel and Emboss style, so choose Bevel and Emboss from the list on the left of the dialog box and apply the following settings. (*note: Click on the WORDS Bevel and Emboss to bring up it’s options. If you only check the checkbox it will apply a basic Bevel and Emboss without giving you all the options.)
Step 10
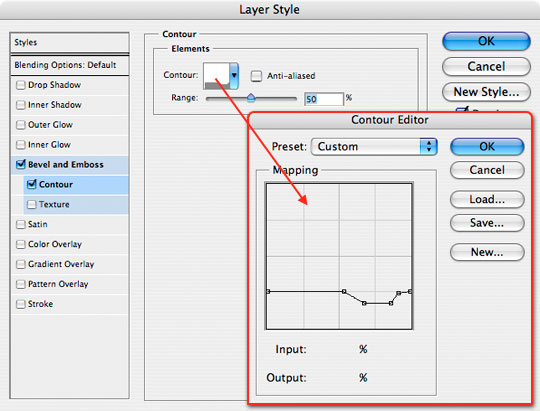
The second part of the Bevel and Emboss technique will determine how the effect is applied and for this exercise it’s really the point of the whole thing. Click down to the Contour Layer Style (right below Bevel and Emboss) to display it’s options. The contour of the Bevel is how we’ll give the photo corner it’s center impression.
Click on the Contour thumbnail inside the Contour dialog and move/add points until your contour profile looks like mine below.
Step 11
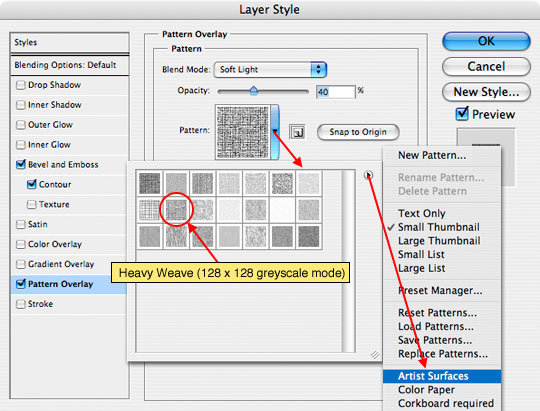
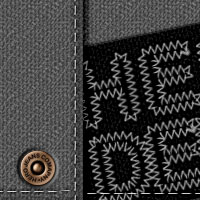
The final layer style we’re going to add is a little texture to the photo corner. Click on the Pattern Overlay layer style option and use the following settings. I am using the Heavy Weave (128×128 pixel grayscale mode) texture found in the Artists Surfaces pattern set. You can access these by opening the Pattern Picker by clicking on the pattern icon, then click on the little arrow in a circle located in the upper right corner of the Pattern Picker, choose the Artists Surfaces option and you can either load just this pattern set or you can append your current patterns and add this set to the end of the list.
When you’re done applying the Pattern Overlay go ahead and click OK to commit the Layer Styles and close the dialog box.
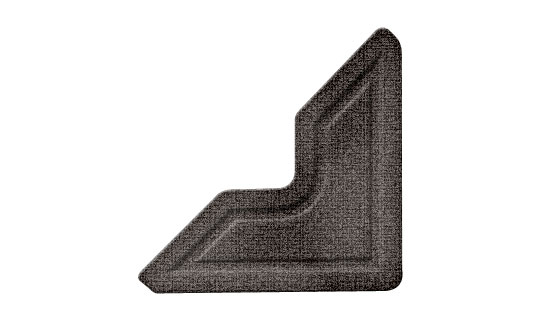
Step 12
After applying the layer styles here’s what my photo corner looks like so far. Notice how the Contour that we built in the Layer Style creates a nicely embossed center area inside the photo corner.

Step 13
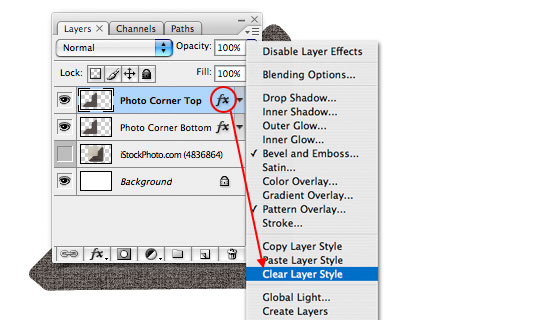
Because of the way we had to create the center Contour we weren’t able to add any definition or contour to the edges of the photo corner. For this we’re going to use another layer but we need it have the same base shape as our current layer. To achieve this lets duplicate the current layer by pressing Command-J (PC: Ctrl-J) and lets name this new layer Photo Corner Top.
Obviously we don’t want to use the same set of Layer Styles, so go ahead and Control-Click (PC: Right Click) on the Layer Styles icon to the left of the layers name in the layers palette and choose Clear Layer Style from the menu.
Step 14
Lets start by lowering the layer’s Fill opacity in the Layers palette to 0%, this will make the color pixels of the layer invisible while still allowing the Layer Styles we’re about to add to show through, basically allowing us to add a new set of layer styles on top of the ones for the layer below.
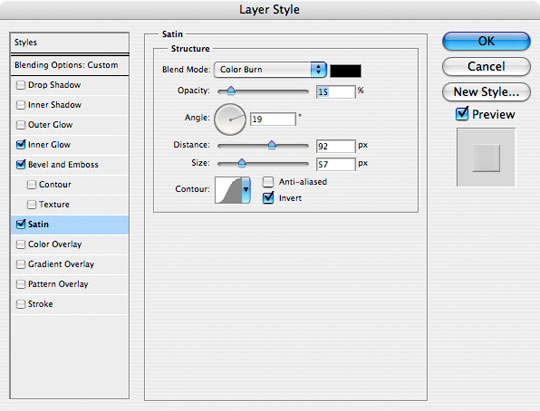
Open the Layer Styles dialog like we did in Step 9 and add the following three styles.


Step 15
Let me explain what we just did. With the Inner Glow set to black and Color Burn we were able to darken the edges all the way around the object. With the small Bevel and Emboss we added dimension to the edges of the object. And with the Satin effect set to black and Color Burn we added a nice little dark streak through the middle of the photo corner which gave the effect of it being a little older and faded in some spots.
Here’s how the photo corner should look now.
Step 16
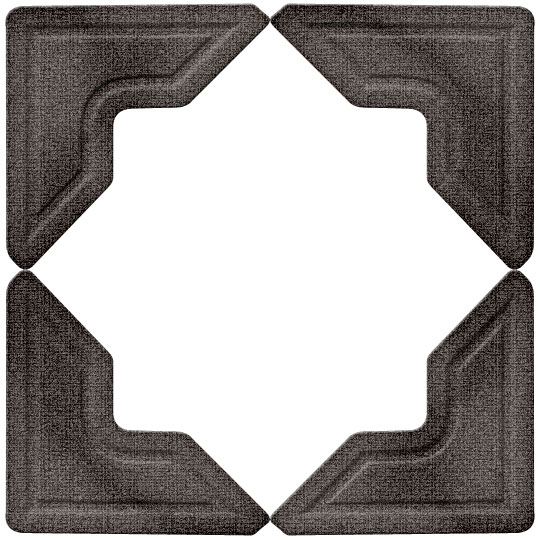
At this point we’re pretty much done creating the photo corner. I’ll want to merge the two layers that make up the corner, but not before creating my other 3 corners. The reason for this is that if we merge the layers first and then duplicate and rotate them, all the highlights and shadows will be rotated as well and the realistic effect will be blown. So first I’m going to select both layers and press Command-G (PC: Ctrl-G) to group the layers together into a folder which I’ll then name Bottom Right.
Then it’s a simple matter of duplicating that group and rotating it to create the other corners. (I’ll include all 4 corner groups in the lesson download at the end of the tutorial). Notice in my example below how the highlights and shadows are all consistent.
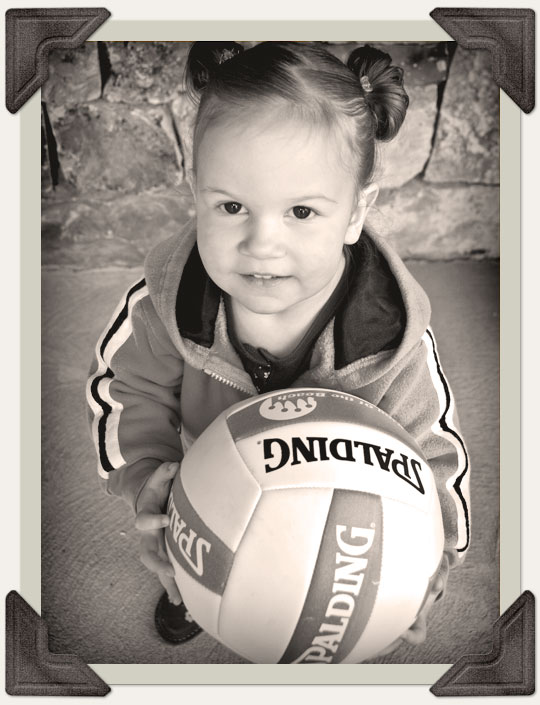
Step 17
At this point I’m ready to flatten each group and resize my corners to fit my photograph. Once I’ve merged the corners and resized them I’ll add the appropriate drop shadow to match the size and SHAZAM! We have a completed project.
Lesson Files + Additional Resources
Download the free .PSD file and other lesson files Right Here.
Tell Your Friends
More in Graphic Design


20 Responses to Vintage Photo Corners
Paulo Sales
May 21st, 2008 at 4:14 pm
one word..style!
Missy
May 23rd, 2008 at 4:03 pm
What a little babe! She looks just like her mama! Nice work.
Eric Martin
August 4th, 2008 at 11:16 am
I’ve been looking all over for something like this…thanks!
Guntas
August 14th, 2008 at 10:15 am
Amazing work, as always!! Thanks!
ali
September 2nd, 2008 at 4:03 am
thanxx man good job
u r a real herooooooo
ali, Egypt
Nicole Tow
September 12th, 2008 at 8:53 pm
Thank you!!! This was super easy to follow!
DreamersWings42
September 21st, 2008 at 9:57 am
Thank you so much for this! I’ve wanted to know how to do this for so long! This was really easy to follow, you did a great job and i much appreciate it!
Dreamer
Annette
December 8th, 2008 at 10:07 pm
Thank you so much for your help with this.
I was going nuts trying to figure it out myself.
Much appreciated!
misterbremer
December 12th, 2008 at 1:09 pm
This is nice… I googled “photoshop photograph corner tutorial” looking for exactly this. I’m using it for a custom christmas card.
Rob
February 18th, 2009 at 2:37 pm
Hey Hero, Awesome tutorial; thanks for sharing with us! It’s so ironic; I’m building a family heritage website and decided along the way how cool it would look if I could style the images with these fillets.
I’m not sure what you call them. I used to work in an art shop and they had fillets that customers could place as an inside border. It resembles the look of these corners.
Thanks again! P.S. Do you really love us? LOL! just kidding!
Shannon Hickcox
June 4th, 2009 at 5:00 pm
Thanks so much for this! I’m so excited :)
Hannah
February 1st, 2010 at 3:32 pm
These are exactly what I was looking for, any chance you could tell me how to get the same effects using Illustrator? Thanks!
Sarah
June 25th, 2010 at 11:20 am
Thank you so much for this! It was perfect! You are brilliant at explaning things step by step and pointing out “why” along the way :) Thank you!
Terry
July 8th, 2010 at 8:58 pm
Great tutorial and you explain everything so well! It was easy to follow and I am very happy with the results!
Thank you!
Alison
August 11th, 2010 at 1:52 am
Thanks! Very clear, very helpful, just what I needed.
SAMIA
August 26th, 2010 at 3:17 pm
Thank you.
Gooooooooooooooood !!!!
AlGeRia
Jodi
September 29th, 2010 at 3:37 pm
Thank you!! Awesome!
teevee_etc
November 17th, 2010 at 3:30 pm
Thank you for another great tutorial! And I concur with previous comments: simple, yet so much style.
Madie
January 20th, 2011 at 1:08 pm
Thanks so much, this is a great tutorial! Will look great in my design!
emily
February 25th, 2011 at 10:03 am
thanks hero, I struggled somewhat with the contour-customizing.But I got it right finally. A very useful tutorial…