

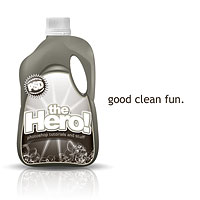
Creating A Customized Product And Label
I recently finished a brochure for a client where I had to take a vector piece of stock art and customize the look and feel to match that of the company identity as well as the brochure's monochromatic style. This tutorial is based on the process used to achieve the final result.Introduction
It should be noted that this is an advanced tutorial and I’ll be writing to that level. If you’re still getting your feet wet in Photoshop, you may just want to sit back, kick your feet up and watch the progression of the project because this lesson will move rather quickly and won’t have as much detailed instruction as you’re used to.
Step 1
For the purpose of this tutorial I’ll be working with a document that’s 540px wide at 72ppi. Obviously if you were working toward a print quality file, you’d want to be 150-300ppi depending on your printer’s desired file size.
I’m going to start by placing a vector file I found at iStockPhoto onto the stage and sizing it accordingly. Although I could have created the container from scratch, the small cost of a stock piece like this far outweighs the time it would have taken to create by hand. I’ve rasterized the vector because it’s a Rights Managed file and I can’t go giving it away. If you want to pick this one up at iStock it’s file ID is #5343602. In this case I was only worried about getting a container that would suit my style and labeling purposes and not so much about color.
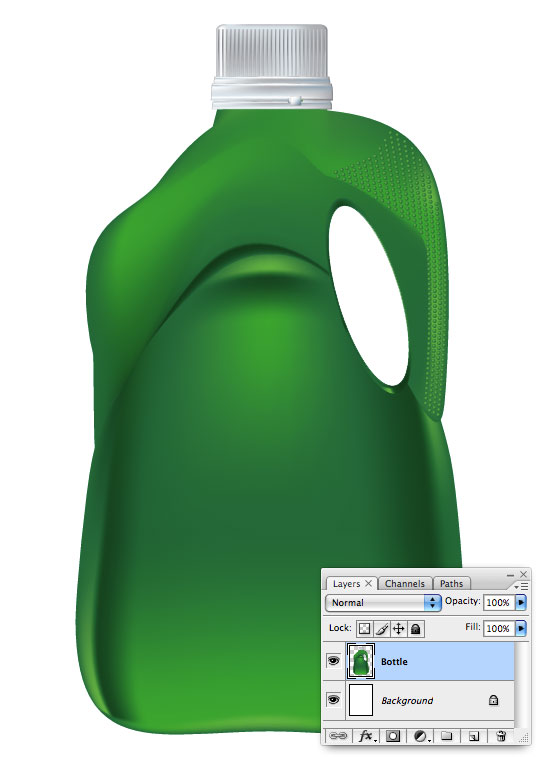
Step 2
The bottom of this container was a bit bright for my tastes, so I solved the problem on a new layer with a Black to Transparent Linear Gradient from the bottom of the container upward about 1/3 of the way. I then created a Clipping Mask between the Bottom Gradient and Bottle layers. I also changed the Bottom Gradient layer’s Blend Mode to Luminosity and lowered it’s Fill to around 75%.
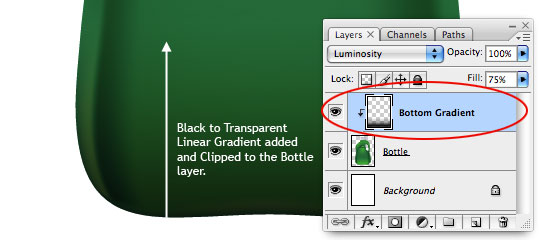
Step 3
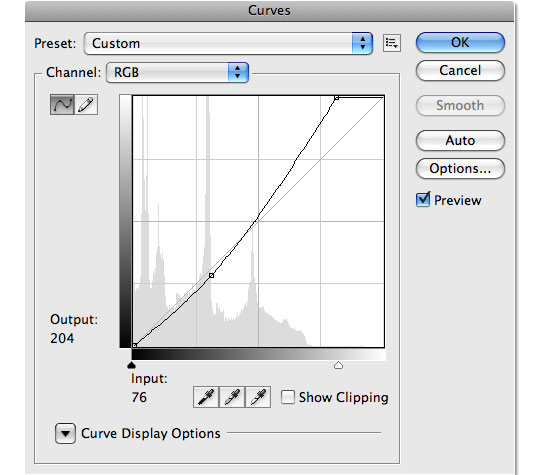
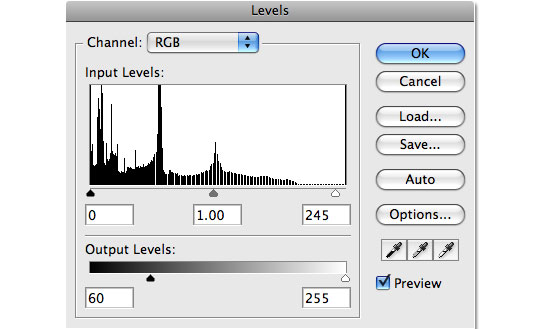
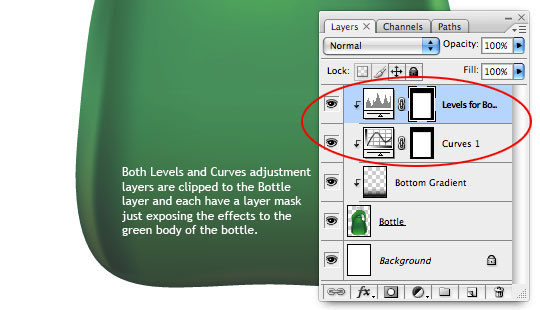
We’ll now add a few Adjustment Layers, one for Curves and one for Levels, above the Bottom Gradient layer also clipped to the Bottle layer as shown below. I want to deal with the cap separately, so I’m also going to add Layer Masks to these two adjustment layers so that they’re only visible over the body of the bottle.
(*note: Once you’ve created the Layer Mask on one of the Adjustment Layers, you can easily copy it to the other Adjustment Layer by holding down the Option (PC: Alt) key and dragging the mask from one layer to the other.)
Step 4
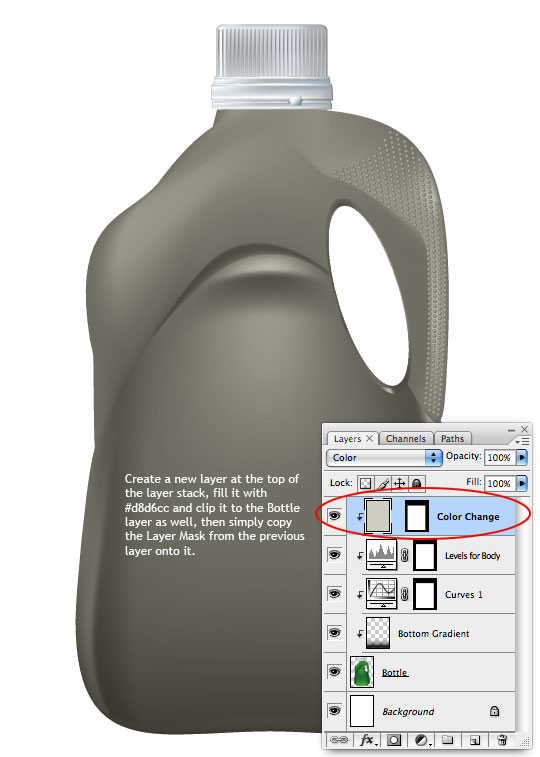
The last thing to do on the body of the bottle is to shift it’s color. To do this, create a new layer above the last Adjustment Layer called Color Change and fill the entire layer with a new color. I took a color from the design of the brochure #d8d6cc. Clip this layer to the others, add the same Layer Mask as the Adjustment Layers have (ie. just the body of the bottle) and change it’s Blend Mode to Color.
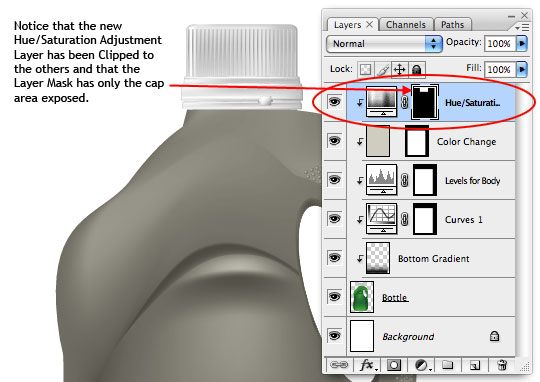
Step 5
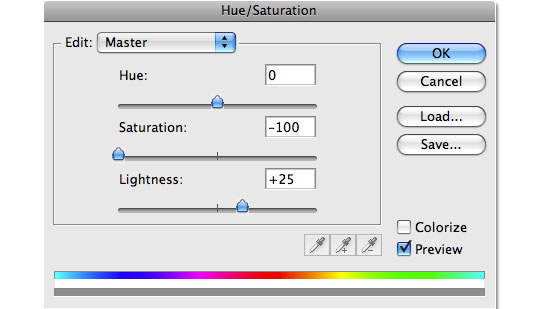
Now all we need to do is get the cap to look like it belongs. To do this I’m going to add a new Hue/Saturation adjustment layer at the top of the stack and simply drag the Saturation slider all the way to the left. I’ll also clip this layer to the others and I’ll black out everything except the cap in the Layer Mask.
Step 6
To keep our file clean and easy to manage, lets select the Bottle layer along with all the layers that area clipped to it and press Command-G (PC: Ctrl-G) to Group the layers. I’ll rename the group Bottle Group.
(*note: If you’re using and older version of Photoshop, this option may not be available to you. Perhaps it’s time to upgrade!)

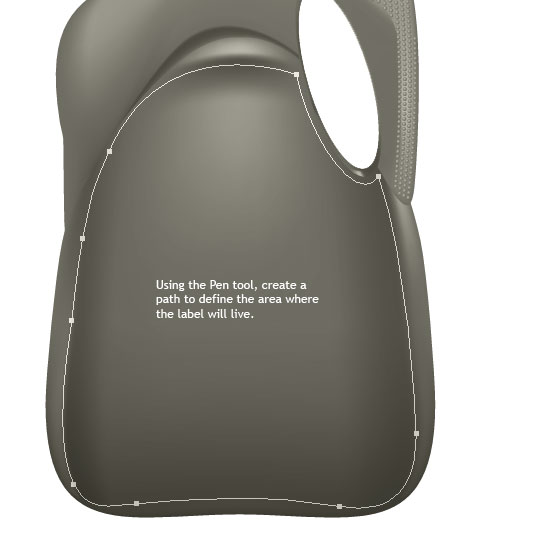
Step 7
Now lets grab the Pen tool by pressing the P key and create a Path to define where the label will live on our bottle. I tried to use the natural curves along the edges and bottom to help give my label a shape that would feel right.
(*note: As a reminder on good Photoshop habits, don’t forget to switch over to the Paths palette and rename your path so it’ll be saved incase you need it later!)
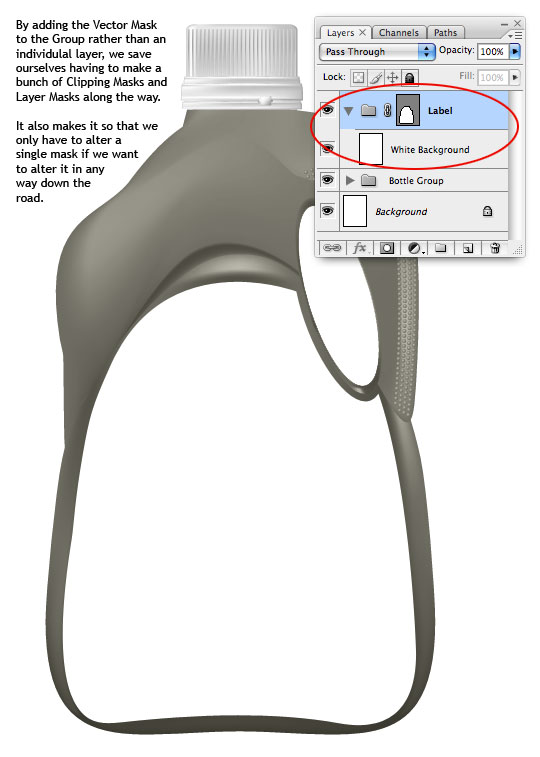
Step 8
Instead of using this new path as a mask for a single layer, we’re going to use it as a mask for an entire group… but since you can’t have a group without a starting layer, lets create a new layer called White Background and fill the layer with white, then with the new layer selected press Command-G (PC: Ctrl-G) to put it into it’s own group. Rename the group Label, select it and then with the Pen tool still active, Control-Click (PC: Right-Click) on the path and select Convert to Vector Mask. No anything we put inside this Group will use the same mask and we won’t have to mess with a bunch of Clipping Masks and Layer Masks as we work on the label elements. We’ll need plenty of those to achieve other effects anyway, so it’s one less thing to have to worry about.
(*note: If you’d prefer not to have the path lines visible, simply Option-Click (PC: Alt-Click) on the Vector Mask thumbnail next to the Group thumbnail.)
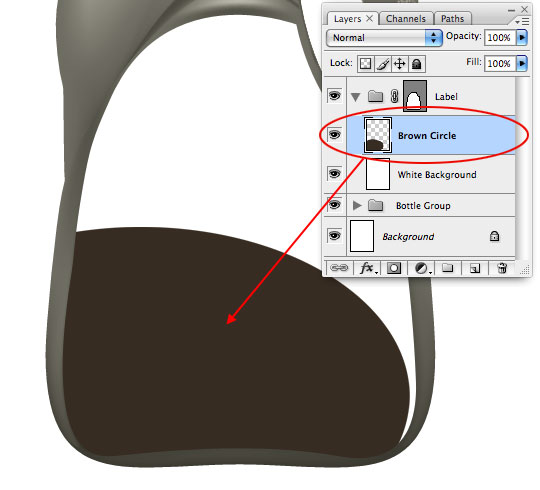
Step 9
The first thing I’m going to do is create a dark space at the bottom of my label. Most of this will be covered up as we continue to add layers and elements, so think of it as the first layer of paint on a canvas. It doesn’t have to be exact, and it may change later, but it’s our starting point. I used the Elliptical Marquee tool to create a large oval which I filled with a dark brown #493a2f and placed in the lower left side of the label.
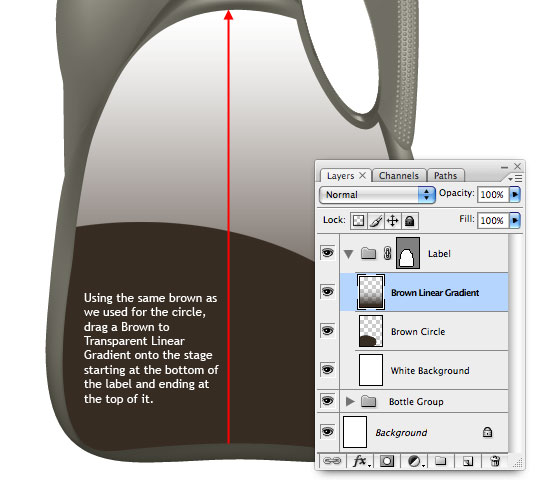
Step 10
Next, a Foreground to Transparent Linear Gradient from the bottom to the top of the label… on it’s own layer of course.
Step 11
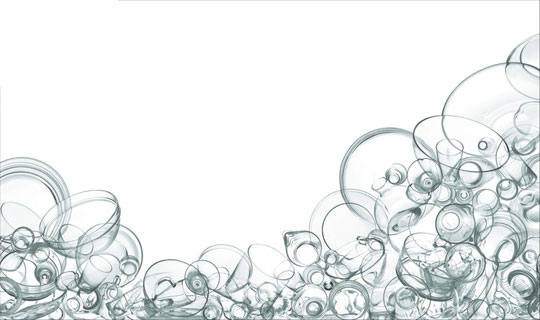
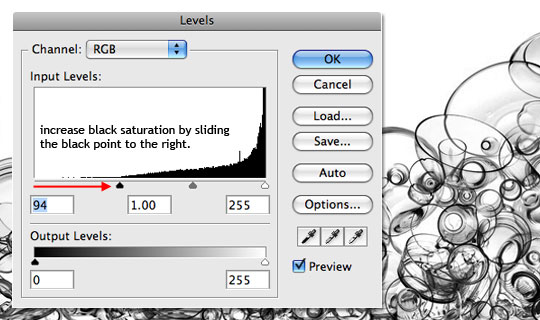
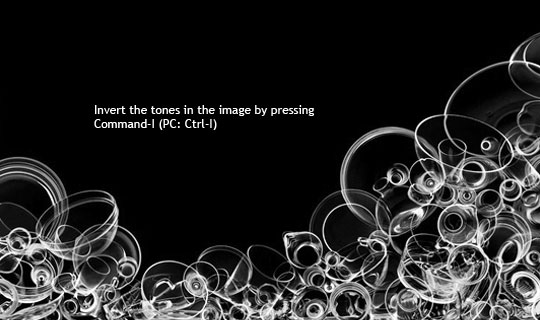
I wanted some bubbles for the bottom of the bottle, so I did a Google Images search for the term Bubbles and came up with this one from a foreign cleaning ad. I first desaturated the image by pressing Command-Shift-U (PC: Ctrl-Shift-U) used levels to increase the contrast of the blacks and then inverted the image by pressing Command-I (PC: Ctrl-I).
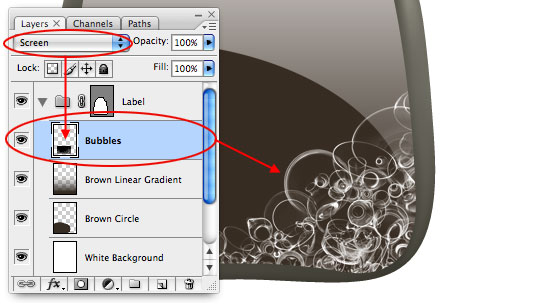
Step 12
Once the bubbles had been prepared and inverted I drug them into my file above the Brown Linear Gradient layer and named the layer that was created Bubbles. Then all I had to do was change the layer blend mode to Screen and Shazam!
Step 13
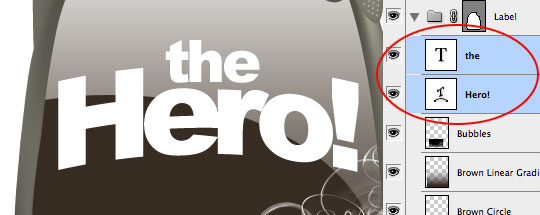
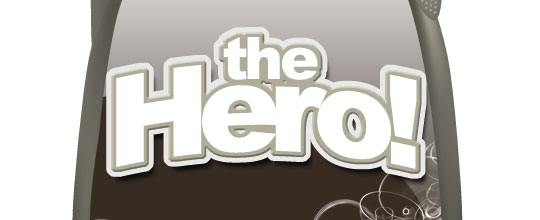
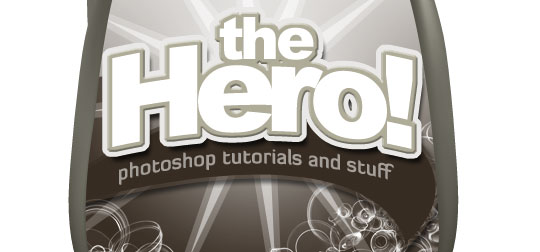
Now lets add the main text to the bottle. Since folks seem to think it’s ok to steal my tutorials, I like to include my name in the projects when possible… I’m sure you hadn’t noticed. I used the Arch Warped Text feature in the Character Options bar to add a little character to the word Hero and the word "the" is on it’s own layer so I could keep that text straight.
Step 14
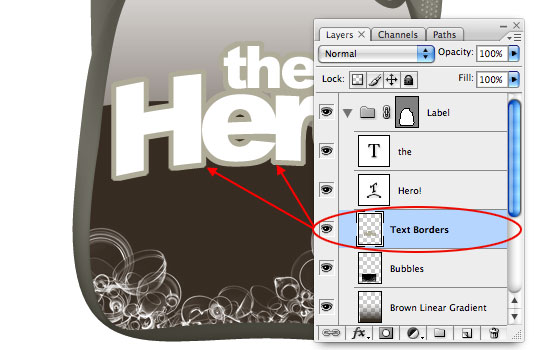
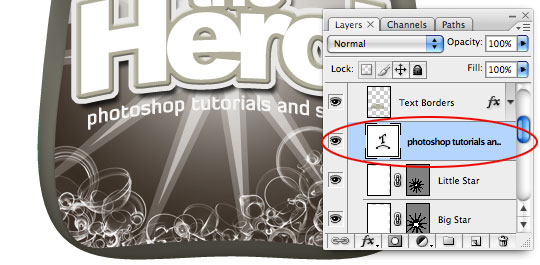
Now lets add a double border to the text. Create a new layer below the text layers called Text Borders and make both layers of text into a selection by holding down the Command and Shift keys while clicking on both the text layer’s thumbnails. Expand the selection by choosing Select>Modify>Expand from the main menu and setting the Expand amount to 5px. Using the color picker, find a nice tan color like #bebaaa and fill the selection with color.
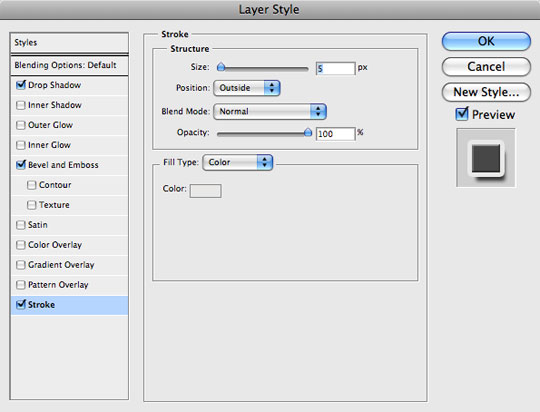
Step 15
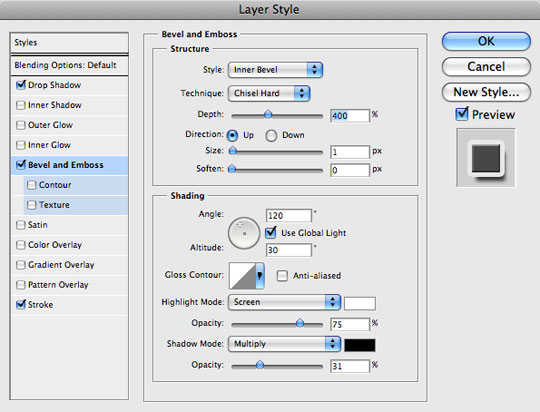
Now lets add a few Layer Styles to the Text Borders layer. A 5px stroke will add the second dimension to our border, the little bevel will make the first border stand out a little and a drop shadow will polish off the effect.

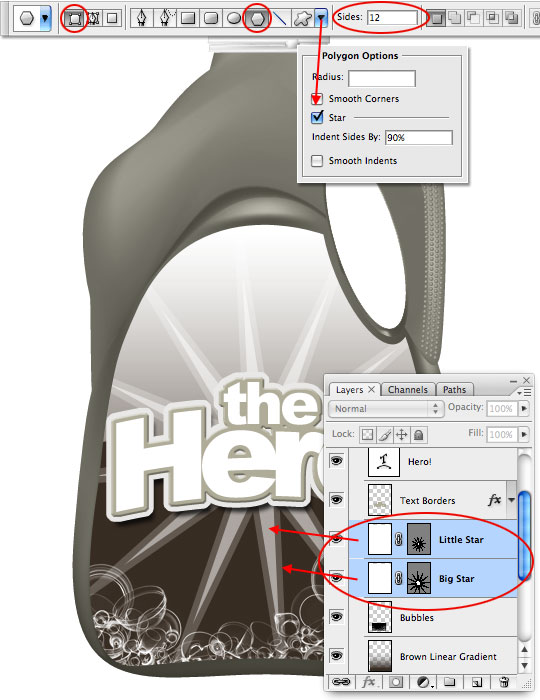
Step 16
Behind the Text Borders layer we’ll now add a couple of 12 point stars, one larger than the other by using the Custom Shape tool set to Shape Layer, Polygonal, and then using the Polygon Options fly out menu to set a deep indent to the sides and specifying that we want it to be a star. After creating the first star Shape Layer, I duplicated it and used Free Transform on the path to make the second one smaller.
I gave the Little Star layer an Opacity of 50% and the Big Star layer an Opacity of 25%.
(*note: Holding down the Option and Shift keys while transforming will constrain the proportions and transform from the center of the object.)
Step 17
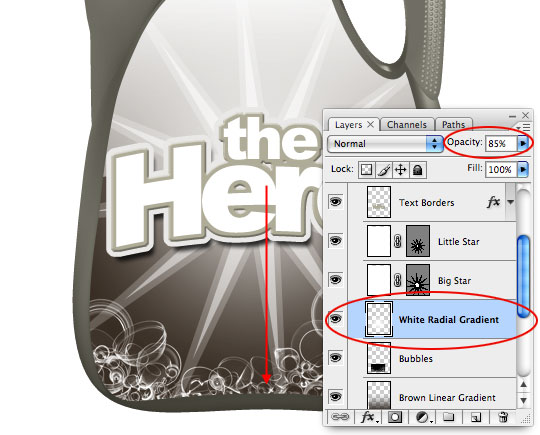
To add a little more brightness and glow behind the text, lets add one more layer, this time below the Star layers called White Radial Gradient. Press the G key to switch to the Gradient tool, make sure your foreground color is set to white and that the tool is set to Foreground to Transparent and Radial then drag a radial gradient from the middle of your text outward to the edge of the label. I also dropped the opacity of this new layer to 85% to tone down the effect a touch.
Step 18
Every good cleaning product needs a tagline of some sort, so lets add the text for that now. Again I’ll use the Arch style to make the tagline flow with the text above it. I placed this text layer just above my Star layers.
Step 19
It’s obvious we’ll need some sort of dark shape behind the taglilne if we want it to stand out, so lets create a new layer behind the tagline and using the Pen tool lets draw a nice little swoosh type shape. Convert the path to a Vector Mask as we did earlier and fill the layer with the original dark brown color used for the circle in Step 9 (#493a2f). I’ll name this layer Swoosh.
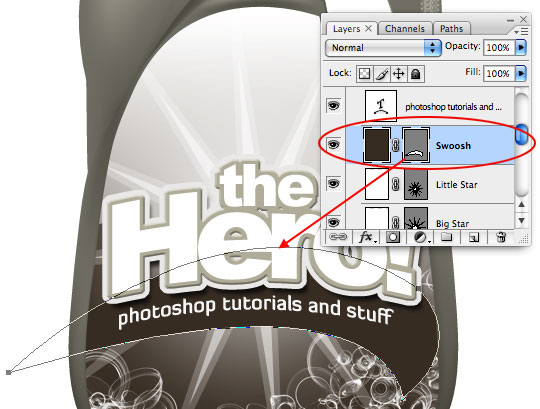
Step 20
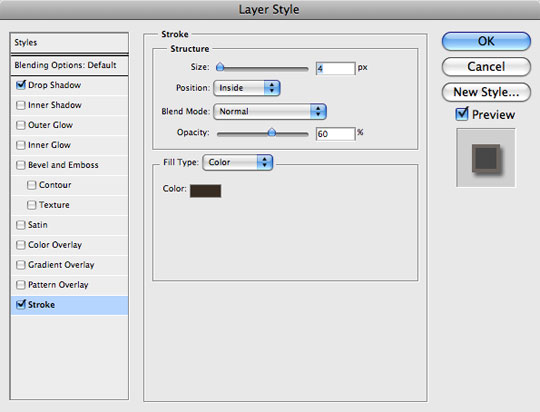
Lets add a few Layer Styles to the Swoosh layer as well. I’ll use a small Stroke with a low opacity to create a neat edge effect, and a Drop Shadow for depth.
The tagline looks a little too stark against the dark background so lets drop it’s Fill to around 65% as well.

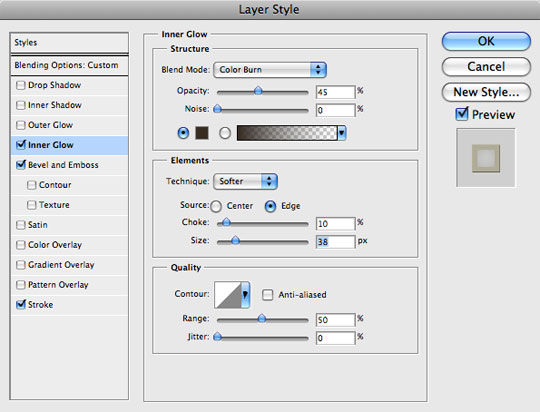
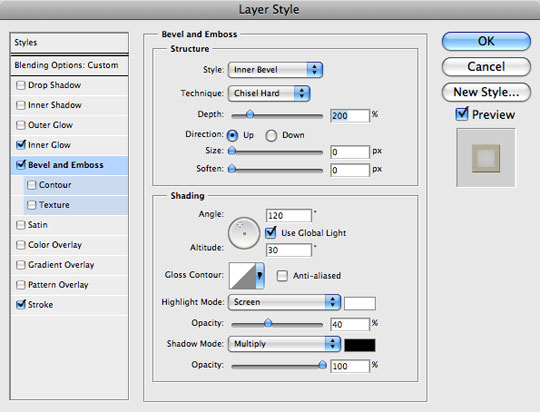
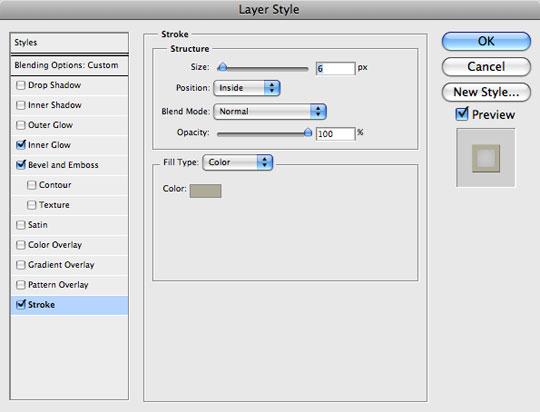
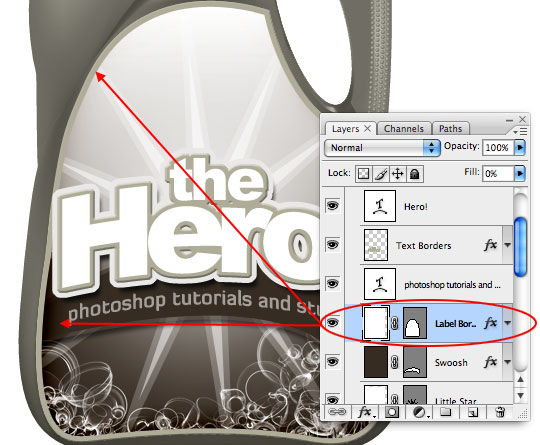
Step 21
Lets add one more thing before we move on. I really think a border around the whole label might set it apart from the body of the bottle better. I want the main lettering to appear on top of the border though, so lets add a new layer above the Swoosh layer called Label Border and for the moment lets fill it with white.
Drop the new layer’s Fill opacity down to 0% (which will momentarily make it invisible) and lets use the Vector Mask from this Group on the layer as well. Hold down the Option (PC: Alt) key and click and drag the Vector Mask from the Label Group onto the new Label Border layer. Once the mask is in place, add the following layer styles.
A few things to pay attention to here:
The Bevel and Emboss size is set to 0px, but when you combine that with the Chisel Hard setting you actually get what looks like a 1px hard bevel which is perfect for the edge of a piece of paper (or a label). And second, notice that the Stroke location is set to Inside. The color for the Inner Glow is #493a2f and for the Stroke is #beb9aa.
Step 22
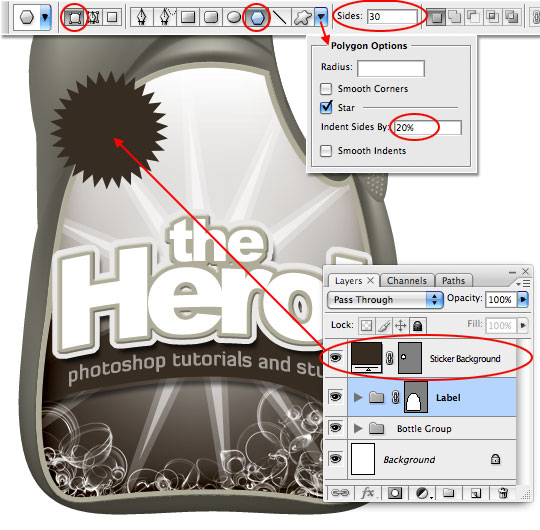
We’re now done with the label, but I think the bottle needs something more, perhaps in the upper left corner of the label. How bout one of those stickers they’re always putting on stuff… yeah, that’s it!
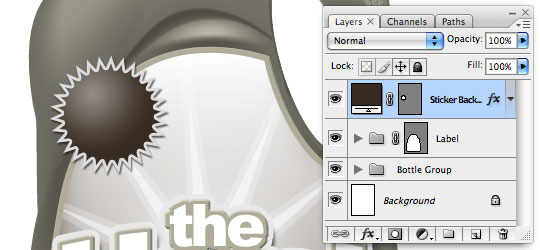
Create a new layer above the Label group called Sticker Background, change your foreground color to that nice dark brown #493a2f and grab the Custom Shape tool again. Making sure that Shape Layer and Polygon Tool are set correctly, change the number of sides to 30 and the options to Star with a 20% indent and click and drag your sticker shape onto the stage (don’t forget to hold down the Shift key to constrain it).
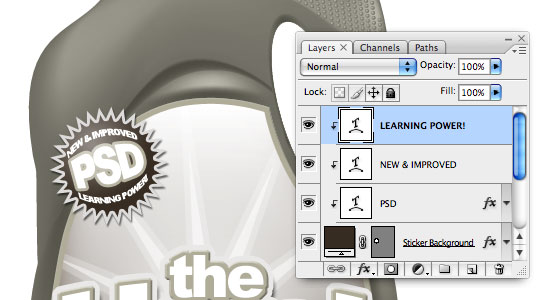
Step 23
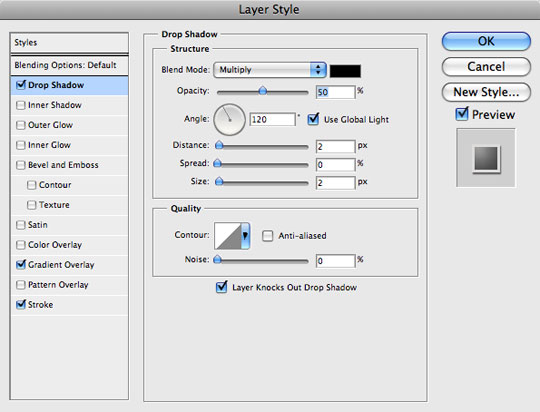
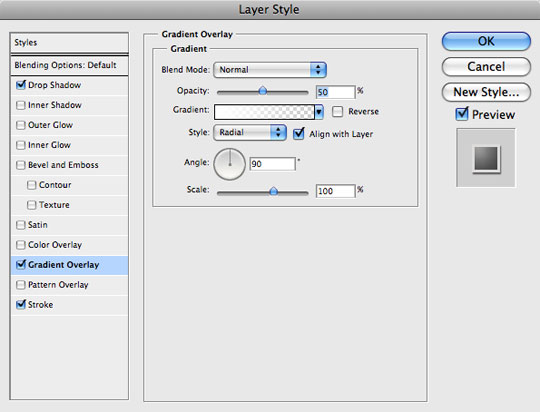
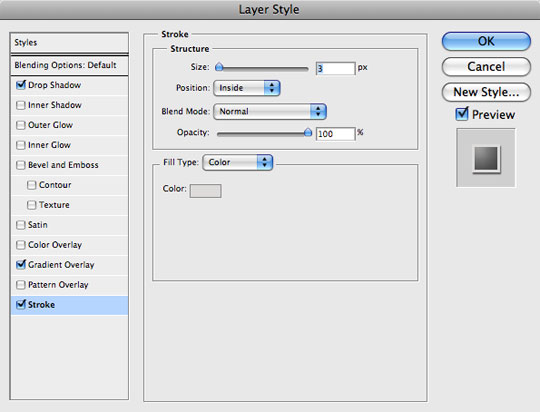
Now lets add a few layer styles to spice up the sticker. A Stroke (set to Inside) with a color of #e4e2e1, a Gradient Overlay set to White to Transparent and Radial and a little Drop Shadow for good measure.
Step 24
Add a little text to the sticker with maybe an outline like we used in the Hero text…
Step 25
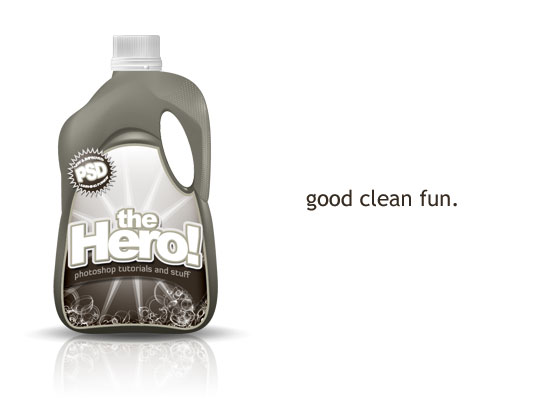
Maybe add a shadow, reflection and some witty text. And that’s it folks! I hope you learned something useful, or at least were mildly entertained.
Lesson Files + Additional Resources
Download the free .PSD file and other lesson files Right Here.
Tell Your Friends
More in Graphic Design


34 Responses to Creating A Customized Product And Label
Crazyhunk
January 20th, 2009 at 10:26 am
the end product is awesome….
thanx alot… :_
topherbailey
January 20th, 2009 at 6:59 pm
all hail hero
SBL Background removal
January 20th, 2009 at 10:05 pm
Excellent tutorial. Final result is good.
keep coming these kind tutorials. Thanks.
Ps User
January 20th, 2009 at 11:00 pm
Hey great job Hero!! keep it up. The interface of your site is so much better than any other site. Very easy to use. I have one suggestion can you make a tutorial on making caution tape that looks real. That would be awesome. Thanks HERO!!
andy
January 20th, 2009 at 11:16 pm
love this one! thanks.
Nikola
January 21st, 2009 at 12:27 am
it beautiful Hero! thank You!
Eva
January 21st, 2009 at 8:28 am
Sheer brilliance!
Russ
January 21st, 2009 at 3:22 pm
Wow! I didn’t realize so much went into this. I’d say it looks great, but you already know how I feel about it. :) Thanks for the tutorial.
darkcast
January 22nd, 2009 at 3:31 am
dude mega hot great tut
moih60
January 22nd, 2009 at 6:25 am
amazing commercial tut ..l ilike it THANX
julius
January 22nd, 2009 at 9:29 pm
Nice tutorial, thanks.
Frankus
January 30th, 2009 at 7:29 am
Excellent tutorial. Final result is good. WOW.
Thanks.
Jehu
January 30th, 2009 at 9:11 am
Encouraging to know that PSHERO uses the same housekeeping tricks I use. I thought I was weird for having a gazillion groups in my .psd files!
Thanks for sharing so much about the custom shape tool. don’t think i’ve ever really used it before. could come very in handy.
mauve
January 31st, 2009 at 12:00 am
Great tutorial man. May I ask what font you used for the tag line? Much love
Colorios
January 31st, 2009 at 7:58 pm
nice work
HERO
February 1st, 2009 at 10:18 am
MAUVE, The tag line font is called Diavlo and can be downloaded HERE.
ain
February 23rd, 2009 at 2:12 am
excellent job!! i like it..
ensurnepoks
March 1st, 2009 at 11:47 pm
Thank you!
Mardian A>T>Y
April 15th, 2009 at 12:54 am
very nice post.. amazing, high skilled photoshop user. glad i found this site
Nicky Tillyer (@artrox)
May 3rd, 2009 at 6:02 am
Such a wonderful tutorial explaining the capabilities of PS yet I still can’t find it in my skill base to replicate it or find the love for it…practice practice practice i guess…I’ve just got so used to AI I find it hard to beat.
But wonderful helpful sharing people make it easier for us newbies to at least see what we’re missing!
wei
May 3rd, 2009 at 4:19 pm
You are true hero indeed. Thanks for sharing and making such great tutorial site!!!
Rob Stathem
May 9th, 2009 at 2:55 pm
These are excellent tutorials–some of the very best if you ask me! There are so MANY poor tutorials out there, that when you find yours, folks are in for a treat!
Thanks Hero!
=) Rob
Scott
June 4th, 2009 at 3:41 am
nice tutorial, you didn’t happen to work on something for Tide by any chance?
JUANMENDEZ
June 27th, 2009 at 6:13 pm
WOw… very nice tutorial, its great , easy to follow. Thanks
Jen_D
July 21st, 2009 at 6:08 pm
LOL Awesome style and I love your sense of humor! Thanks!
Luke Sheppard
August 6th, 2009 at 8:45 am
Quite simply, brilliant! Thank you very very much.
steev
August 28th, 2009 at 11:42 am
how did you remove the black from behind the bubbles
HERO
August 31st, 2009 at 1:13 pm
STEEV, Changing the Blend Mode to Screen automatically removes the black because the Screen blend mode only deals with highlights.
Engagement Photographer Denver
September 10th, 2009 at 11:26 am
The bubbles turned out great all by themselves. I love those in black and white!
Lady Ambreen
February 13th, 2010 at 6:24 pm
COOLLL….!!!! :D
emlak ilan
March 6th, 2010 at 4:13 am
Nice tutorial, thanks.
Steven
December 3rd, 2010 at 8:41 am
Very ccol tutorial, easy to follow, very well documented. enjoyed it a lot, thanks for sharing ;-)
Julie Ryan
August 16th, 2011 at 11:47 am
you’re a rockstar. seriously, incredible work.
HERO
August 17th, 2011 at 1:14 pm
Well thank you JULIE!