


Water Drops
In this tutorial I will show you how to make basic water drops in three dimensional space using the elliptical marquee tool, free transform, duplicate layer and a few simple layer effects.Introduction
The idea was used on CynaraSource.com and I thought it’d make a nice tutorial… don’t even ask why I was visiting a site dedicated to artichokes
Step 1
Begin by opening a new document, mine is 540×300 at 72ppi as usual.
In the Tools bar set your foreground and background colors to #67774b and #303824 respectively then choose the Rectangular Marquee tool my pressing the M key. Drag a selection around the top 2/3 of the document as shown below.

Step 2
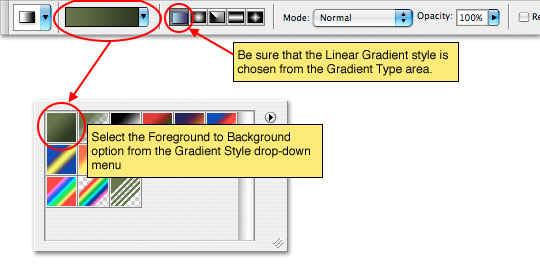
With the selection made, switch to the Gradient tool and make sure that the Foreground to Background setting is selected from the top-bar and that Linear Gradient is also selected.
Step 3
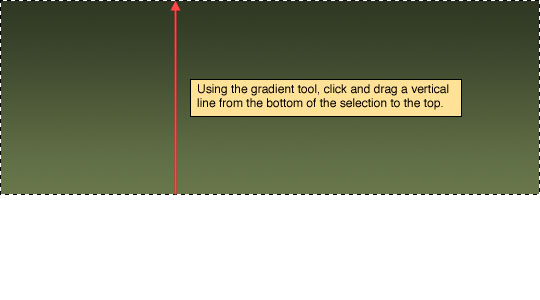
Click and drag from the bottom of your selection to the top to lay down a Linear Gradient.
Step 4
Invert the selection now by choosing Select>Inverse from the main menu or simply press Command-I (PC: Ctrl-I) to invert the selection using your keyboard. Once the selection is reversed and with the Gradient tool still selected, drag a line from the top of this selection to the bottom like the example below.

Step 5
Deselect by pressing Command-D (PC: Ctrl-D).
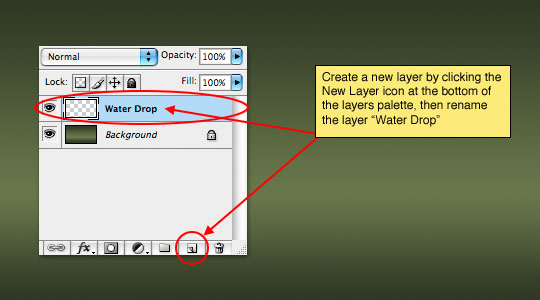
Create a new layer by clicking the new layer icon at the bottom of the Layers palette or by choosing Layer>New>Layer… from the main menu. Double click on the layers name in the Layers palette and call this layer "Water Drop".
Step 6
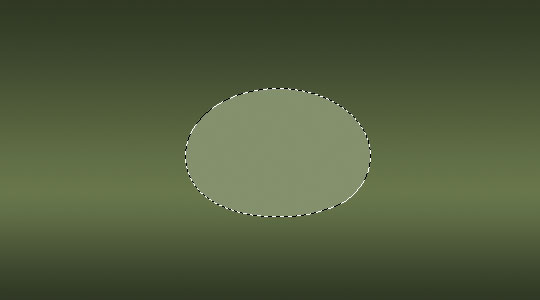
In the Tools bar change the foreground color to a green which is lighter than the lightest green we used for the gradient, I used #7f8a69.
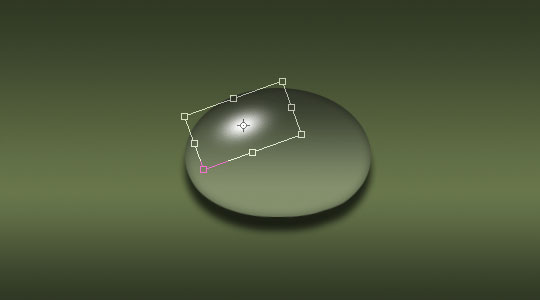
Switch to the Elliptical Marquee tool (which can be found in the fly out menu activated by clicking and holding your mouse on the Rectangular Marquee tool in the top left corner of the Tools palette), then drag out a nice drop-shaped oval on the stage like the one below. We are going to build the drop rather large, then scale it down to get the desired effect later.
With your selection made, press Option-Delete (PC: Alt-Backspace) to fill the new selection with the light foreground green we just selected then deselect by pressing Command-D (PC: Ctrl-D).
Step 7
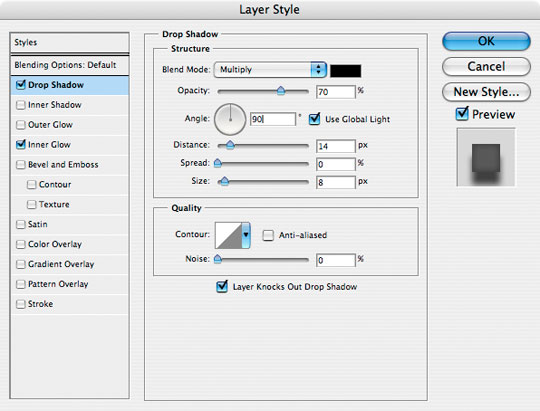
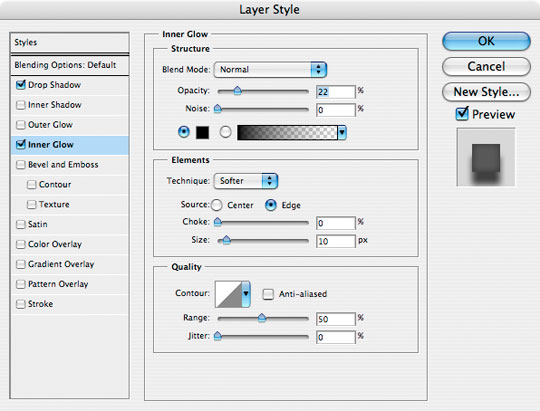
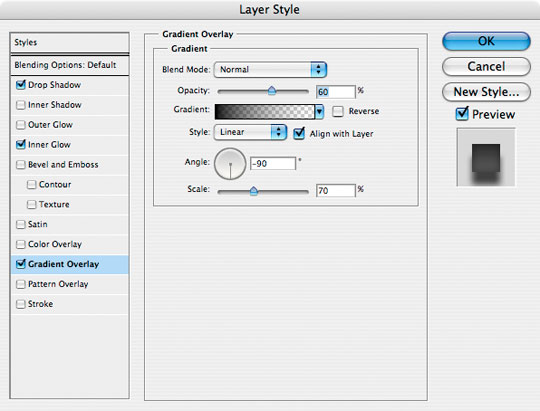
Bring up the Layer Styles dialog box by double clicking on the layer thumbnail in the Layers palette and apply the following 3styles then click OK.
Step 8
Your drop should look like this.

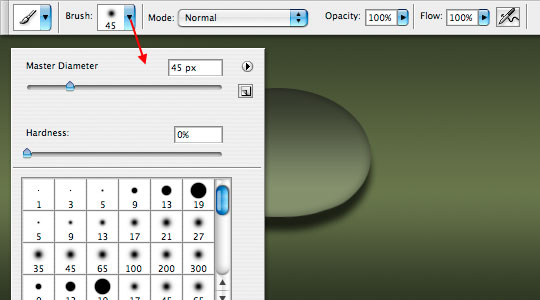
Step 9
Create a new layer just like you did in step 5 and name it Drop Highlight. Switch to the Brush tool by pressing the B key and choose a round brush with soft edges about 45 pixels in diameter with a hardness of 0%.
Step 10
Press the D key to reset the foreground colors to Black and White, then press the X key to switch the foreground and background colors, thus making the foreground color white.
Place the brush where the highlight for the droplet should go and click once.

Step 11
Now lets transform the highlight to ovalize and tilt it for a little more realism. Press Command-T (PC: Ctrl-T) to activate the Free Transform tool and using the anchor points stretch and rotate the highlight until it looks satisfactory. Press Return (PC: Enter) to commit the transformation.
Step 12
Follow the next few steps very carefully:
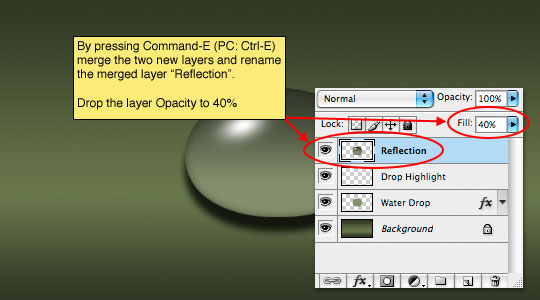
1) With the "Drop Highlight" layer still selected in the Layers palette, hold down the Shift key and click on the Water Drop layer (this will make it so both layers are selected at the same time).
2) Ctrl-Click (PC: Right-Click) on either layer and choose Duplicate Layers. A box will come up asking you to name the layers, just click ok. This will create two identical layers above the two layers we just had selected and the two new layers will now be highlighted.
3) Press Command-E (PC: Ctrl-E) to merge the two selected layers together then rename the layer "Reflection" and lower it’s Fill opacity to 40%.
Step 13
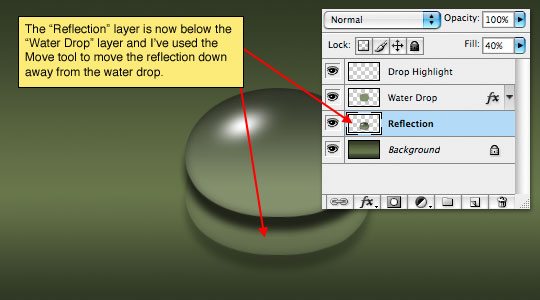
Now lets move the "Reflection" layer below our other two layers by pressing Command-[ (PC: Ctrl-[) or by simply grabbing the layer and dragging it below the other two layers.
Switch to the Move tool by pressing the V key and click and drag the reflection down until it looks like the one below.
Step 14
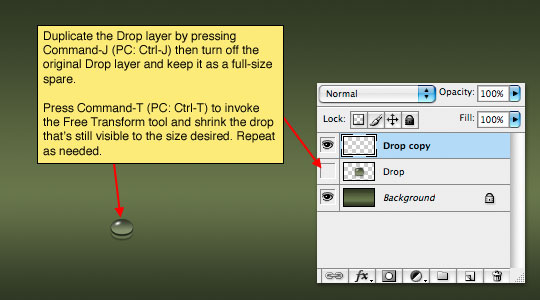
At this point our drop and reflection are complete and ready for sizing and placement. With the "Reflection" layer selected, hold down the Shift key and click on the "Drop Highlight" layer to select all three layers the comprise our droplet then press Command-E (PC: Ctrl-E) to merge the three layers together. You may want to rename the merged layer Drop or something so you know what’s on it.
Press Command-J (PC: Ctrl-J) to Duplicate the layer, then turn off the first copy and keep it hidden as your full-size drop. This will be useful if you want to duplicate and transform more drops so that you’re not loosing information during transformation each time.
With the new layer selected press Command-T (PC: Ctrl-T) to invoke the Free Transform tool just like we did before, now just drag the corners until the drop is a sufficient size. (*note: holding the Shift key will constrain the transformation) – Repeat this duplication and transformation process as desired.
Step 15
In my final example I thought I’d add the iPod Shuffle we created in an earlier lesson in a red color with it’s own reflection to add a little more depth to the project.

Lesson Files + Additional Resources
Download the free .PSD file and other lesson files Right Here.
Tell Your Friends
More in Graphic Design


47 Responses to Water Drops
Chad
December 26th, 2007 at 9:21 am
Cool Tutorial! I’ve always used a ton of layers for all the effects but using layer styles is so much better! I’ll be using this method from now on.
Ricardo
April 2nd, 2008 at 7:17 am
Very nice tutorial.
Pathard
June 4th, 2008 at 7:52 pm
Wow, very nice tutorial. Nice and simple way to make some nice waterdrops! Thanks!
Priyanka
June 10th, 2008 at 11:56 pm
This is nice & easy
derry
July 23rd, 2008 at 5:39 am
nice n’ easy tuts here, nice method and i’ll be using this method from now on.. thanks for sharing all of this
Nabil
July 27th, 2008 at 9:51 pm
Nice tuts I love them, I went from N00B to better in 2 days!
THANK U SO MUCH!!
Jose Luis
July 30th, 2008 at 9:44 pm
Buen tutorial, gracias
febriano
September 5th, 2008 at 7:41 am
wow.. i never tought of that..
thanks man..
azam
September 25th, 2008 at 11:06 pm
I a great tutorial explain many new shortcut key. Great work…………
dipesh
September 29th, 2008 at 3:50 pm
Great its really a nice tutorials i really enjoy it …thanks buddy
Ravi kanth
October 1st, 2008 at 12:19 am
Very nice tutorial
Thanks
vasundhara
October 23rd, 2008 at 1:47 am
hi,
this is one of the best tutorials i have seen,and im really impressed, thank you very much, keep it up.
nkl
November 15th, 2008 at 2:29 pm
Nice work man.You mentioned quit useful shortcuts. Anyways this tutorial is very good. Going to check your iPod Shuffle!!!
vivizhyy
November 15th, 2008 at 7:57 pm
Thanks a lot! It usefull!
Maxwell Ayeh
December 7th, 2008 at 1:02 am
I realy like this, you know I have been looking for this for a very long time. But now I have it from you thanks a log,and keep up the good job.
DudeMan
December 8th, 2008 at 6:56 am
Awesome tutorial dude thanks a lot !
ilike2photoshop
December 21st, 2008 at 3:45 pm
Great effect, thanks.
Andrew
January 18th, 2009 at 10:22 am
I love this one thanks.
Andrew
January 18th, 2009 at 10:28 am
this will be really useful…. some great stuff here.
Uday Vithal Jadhav
February 2nd, 2009 at 10:00 pm
hi,
this is very nice one of the best tutorials i have seen,and i am really impressed, thank you very much, keep it up.
Lemar
February 16th, 2009 at 3:59 am
nice man very nice
JuanPablo
March 11th, 2009 at 4:18 pm
Cool!!!! thank`s!
Dee
April 1st, 2009 at 4:09 am
Photoshop newbie here.. just wanted to say, an amazing site, well done and this particular tutorial blew me away. In fact, i’m even using the wee water drops on me blog header at present ;)
photo and photoshop
April 6th, 2009 at 2:06 am
WOW i like this tutorial very much
awesome and very easy to follow! Good job
pragati
June 4th, 2009 at 9:30 am
thanks for the tutorial, really it is very nice.
swarna
June 16th, 2009 at 8:27 am
I think it is best tutorial. It is great.
Andrew
June 26th, 2009 at 3:45 am
Luv it, gr8 job
chonghwi
July 7th, 2009 at 5:12 am
Wow.. i like your tutorial!!! is really good :D
keep it up
Irfan
July 30th, 2009 at 1:19 pm
Great tutorial, thanks. It’s really useful.
Cheers!
Vilas D
October 14th, 2009 at 4:47 am
Awesome! Thanks for tutorial. very easy to follow steps.
evilkitty75
November 22nd, 2009 at 6:16 am
lovely look so so real >.<
garvamatic
December 11th, 2009 at 10:36 am
BEST tutorial for a newb (me) so far!!!
more please
Racheal Mack
December 20th, 2009 at 11:34 pm
Great Stuff!
daniyal
December 31st, 2009 at 5:32 pm
Thanks for sharing with us this cool tutorial
registry winner review
January 12th, 2010 at 6:01 am
Cool… thanks for your course.
Ambreen
January 25th, 2010 at 10:00 pm
so beautiful, i love u HERO !! :D
HERO
February 2nd, 2010 at 6:41 pm
Thank you AMBREEN, I love you too.
Mike
March 2nd, 2010 at 1:49 am
i came across the artichoke website looking through the portfolio on rareview.com. you too?
anyway, awesome tutorial!
ericlee
April 10th, 2010 at 10:36 pm
absolutely great!!!thank you for your sharing!!!
shutter
May 15th, 2010 at 5:38 am
It is very good,I like it very much.
Amy
June 12th, 2010 at 7:50 am
Looks like something new to learn and fun to play with in PhotoShop! Thanks :)
Marco
June 21st, 2010 at 7:41 am
Fantastic job. I really like these water drops. Thanks for a great tutorial!
Amy Th
June 23rd, 2010 at 5:05 pm
Thank you for the tutorial, I will practice until I learn the steps. :)
Dirk
November 19th, 2010 at 3:18 pm
One of the best effects I’ve found recently on the web. Thank you for the very good instructions.
Paul Gilbery
December 12th, 2010 at 3:46 pm
Just used the tute for a HTC Desire Z advertisement poster. Really easy and simple to follow. Props…
Will
January 1st, 2011 at 6:12 am
Wow! What I love about your tutorials is that you can make a task which could be considered difficult, simple; all at the same time you go into every small detail as if the student was a complete newbie (from these details I have learn’t so much!). You do a much better job than any of my teachers and they teach at a highly regarded collage.
Thank you!
System Mechanic
June 7th, 2011 at 3:42 am
Thank you for this nice tutorial, It helped me . Thanks.