


US Postage Stamp
In this tutorial we will be creating a US postage stamp using the marquee tool, a clipping mask and an image of your choosing.Step 1
Open a new document and fill the background with a color other than white. Mine is 540×300 with a background color of #f6f3e3.

Step 2
Create a new layer by selecting the new layer icon from the bottom of the layers palette. If the layer’s palette isn’t showing select Window>Layers to bring it up. The new layer icon is just to the left of the trash can icon and looks like a piece of paper with a corner folded back. Rename the layer Stamp Background by double clicking on it’s name in the layers palette.
Click on the new layer to select it then draw a nice stamp-shaped rectangle in the center with the Rectangular Marquee tool from the Tools Bar (*note: the keyboard shortcut for the Marquee tool is M), then fill your rectangle with white.
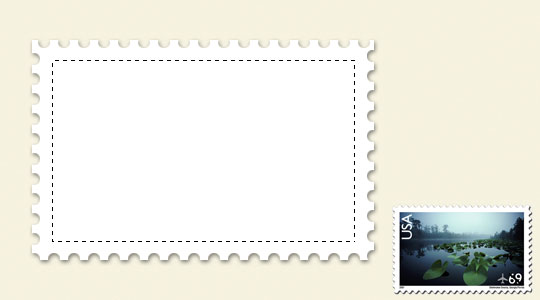
Anytime I’m trying to create an effect that actually exists, I like to find a piece of reference material. In this case I logged onto the USPS.com website and found a stamp with the horizontal aspect I was looking for. I’ve place the stamp in a layer below my working layer so I can reference it throughout the process. The aspect for this stamp is 14×9, so I selected the Rectangular Marquee tool and then in the style option at the top of photoshop I selected Fixed Aspect Ratio and entered a width of 14 and a height of 9 so that when I drag out my selection it’s a perfect replication of the original aspect ratio. Not a neccessary step, but one worth noting all the same. My rectangle is 342×220 pixels.
Step 3
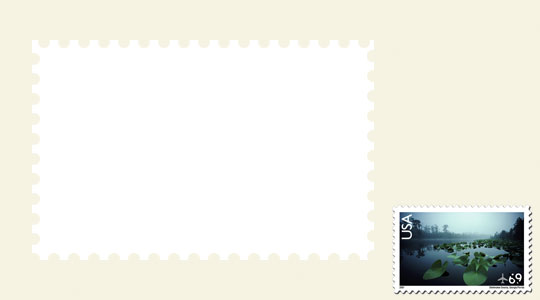
Our next step is to create the edge cutouts. There are a few ways to go about this, but since this is a beginner tutorial I’m going to opt for the straight forward easy approach.
In the Tools bar (*note: If your Tools bar isn’t open select Window>Tools from the main menu) we will select the Marquee tool from the top left corner of the palette, but we want an Elliptical Marquee not a square, so click and hold on the Rectanglar Marquee tool to activate the flyout menu and select the Elliptical Marquee tool from the list. The keyboard shortcut for toggeling between the Rectangular and Elliptical Marquee tool is holding the shift key and pressing the letter M.
From the menu at the top of the page select Fixed Size from the style dropdown and then type 12px in the Wide field and 12px in the Height field. This will make our selection exactly 12×12 pixels, which for this example works out very well.
Zoom in on your stamp by holding the Command (CTRL on PC) while pressing the + key. (*note: using the Command (CTRL on PC) and + or – keys is the easiest way to zoom in and out of your document). Holding down the space bar will allow you to click and drag the document around in your zoomed window. Drag the document around until you can see the upper left hand side of the stamp clearly, release the spacebar and click along the top line to create a 12×12 selection with the Marquee tool. Using your arrow keys you can move the selection around until you get it right where you want it, place it close to the left edge, but just a few pixels away like below and hit the Delete key to remove the spot from the stamp.
Step 4
Now we’re going to use a great little trick for moving objects around the stage. By holding down the Shift key while we hit the arrow keys we can move our selection 10 pixels at a time. So hold down the Shift key and hit the Right Arrow key twice, this will put you a nice distance from the first hole. Hit Delete again and repeat for the length of the stamp, then continue down the side, bottom and other side until your entire stamp has the same edge detail.
Step 5
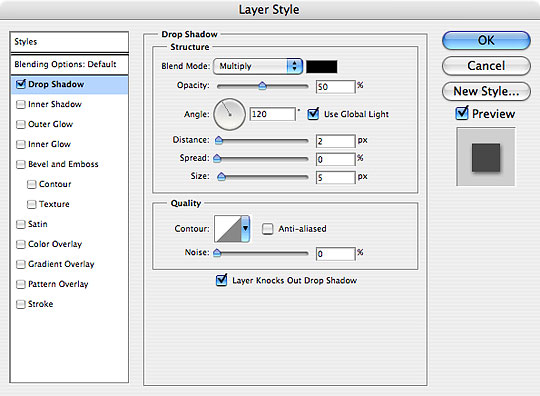
Lets add a drop shadow to this layer that will set it apart from the background. Right click on the Stamp Background layer in the layers palette and select Blending Options. When the options box comes up, click on Drop Shadow to show the options for the drop shadow and set the properties to the ones below.
Step 6
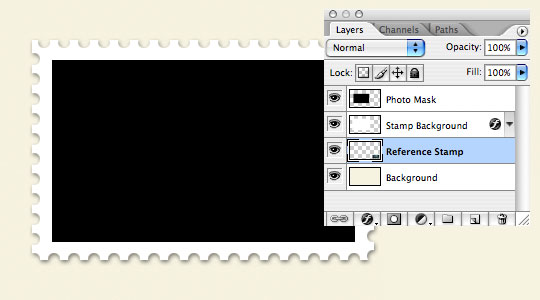
With the Stamp Background layer selected create a new layer above it by clicking the New Layer icon at the bottom of the palette (again, next to the garbage can). Name this layer Photo Mask by double clicking on the layer name.
Now we will drag out a selection where the stamp’s photo will live. You should still have the Marquee tool selected, but we need the Rectangular Marquee again, so either click and hold on the tool for it’s flyout menu or hold down shift and hit the M key to switch back. In the options at the top of the page switch the Style back to Normal and drag out a selection like the one below. If you skrew up your selection simply Command+D (CTRL+D on PC) to deselect and try again. Remember, once you’ve made your selection you can use the arrow keys to move it to exactly the right spot.
Step 7
With your selection made, press the D key to reset the foreground color to black, then press Command+Delete (CTRL+Delete on PC) to fill the selection with black. Command+D (CTRL+D on PC) will deselect the area. Your stamp should now look like the one below. I’ve included a view of my layers palette as well.
Step 8
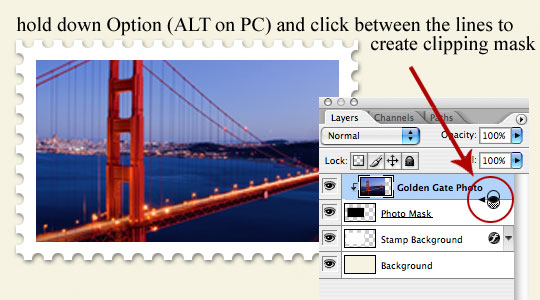
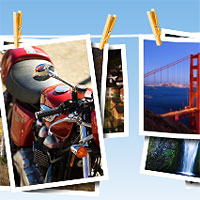
With the area for the image defined by our black Photo Mask layer, it’s time to choose an image or photograph for our stamp. Open the image that’s larger than the stamp we are creating and by using the move tool (press the V key to switch tools) click and drag your open photo into your stamp file. (*note: holding down the Shift key while you drag will center the photo in the window you drag it to.) You can then close the image or photo that you just opened.
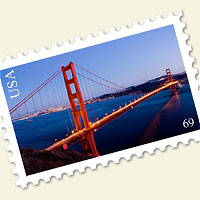
I used this beautiful photo of the Golden Gate Bridge that I shot in San Francisco last year… It’s pretty sweet. I know.
It’s likely that the image you brought over is completely the wrong size, so we’ll have to re-size it, but first of all we need to create a Clipping Mask between this new layer which should apper above the Photo Mask layer and the Photo Mask layer. To do this, right click on the new layer that holds your image or photo and select Create Clipping Mask or hold down the Option (Alt on PC) key and click on the line that appears between the two layers (you’ll notice that your pointer changes to the Clipping Mask symbol when you’re exactly on the line between the layers. A clipping mask uses the lower layer as a mask for the layer it’s linked to. Clipping masks are extremely useful in a variety of situations.
Step 9
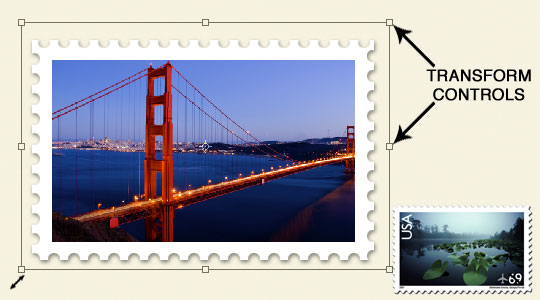
Ok, now that we’ve masked the photo it’s time to re-size it. Press Command+T (CTRL+T on PC) to activate the Free Transform tool. (*note: you can also access the Free Transform tool in the main menu at Edit>Free Transform).
If you can’t see the edges of your imported file, try pressing Command+0 (CTRL+0 on PC) (*note: that’s a zero). When in the Free Transform mode this function will resize the window and stage to a size that allows you to see all the edges of your transform box.
By dragging the corners of the transform box inward while holding down the Shift key to constrain the proportions of your image, size the image as needed for the stamp. Remember you can use the arrow keys to nudge the image as needed or you can drag it with your pointer. Once you’re happy with the resize and position simply press Return (Enter) to commit the transformation.
Step 10
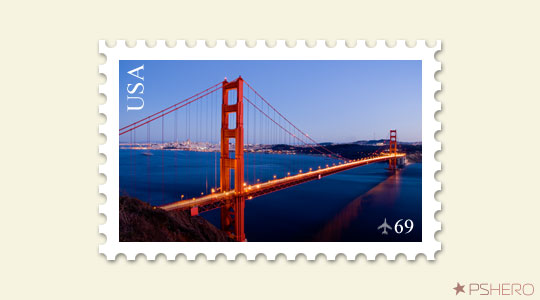
Now that we’ve gotten our basic stamp laid out, we need to place some text over the top of the image. The stamp I’m using as reference has USA and is a 69 cent stamp, so lets grab the text tool by pressing the T key and go to work.
Make sure your Character palette is open (Window>Character) and that you’ve chosen a nice font and the color white (unless the spot you plan on putting the lettering is white, then choose some other nice color). Place the text tool approxamately where you’d like your text to go, click and type and press Enter (not Return) when you’re done. (*note: clicking any other tool in the Tools bar will also commit your text). The font Times New Roman is installed on most computers and is a nice one to use. Play around with the font size until you find what looks right to you.
Remember, you can always bump your text around once you’re done with the arrow keys or by pressing V to get the move tool back.
If you’d like to make your text vertical, you can just use Command+T (CTRL+T) to Transform your text, or use Edit>Transform>Rotate 90° to get your desired result.
Step 11
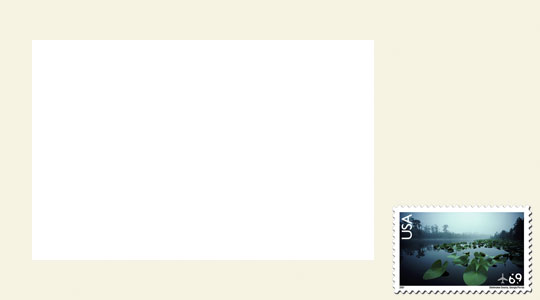
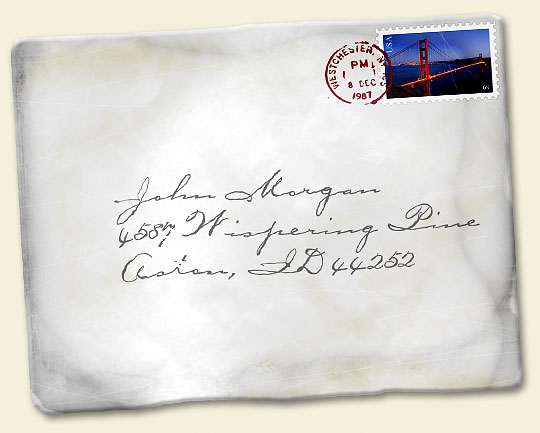
The only thing left to do is put it on an envelope! I also took the liberty of stamping it with an old US Postal Service stamp thanks to a brush set by kiya71677 at Deviant Art which I’m including in the tutorial download at the bottom of the page.
Lesson Files + Additional Resources
Download the free .PSD file and other lesson files Right Here.
Tell Your Friends
More in Graphic Design


20 Responses to US Postage Stamp
Abhisek
May 6th, 2008 at 5:30 am
thanks. Nice tutorial. I liked the way you paid attention to every detail. It’s great for a newbie like me! :)
daflai
May 27th, 2008 at 11:50 am
great tutorial
?ß‚Äò?æzone
July 25th, 2008 at 10:39 pm
clearly steps ,I like it very much. really nice.
Mark Abucayon
September 23rd, 2008 at 4:39 am
Great final result of this one.
Subash Aryal
December 19th, 2008 at 4:31 am
Thank u very much :-) I got an idea to use for me… gt8 tut…
lilly
February 21st, 2009 at 9:40 pm
how am i suppose to make the background the color u said.. other than white
the first step
helppppp
HERO
February 24th, 2009 at 12:00 pm
LILLY, Click on the Foreground swatch at the bottom of the Tools palette, pick a new color and click OK, then simply press Option-Delete (PC: Alt-Backspace) to fill the layer with that color.
shadolen White
April 15th, 2009 at 8:37 pm
thank you.
I going to use this for a class assignment,=.
We had to make postcards that would come annually with the same theme. What better way than to make a stamp look like a postcard. Stamps are always changing.
Djaloe
May 9th, 2009 at 11:42 am
Thanks a lot pal
elzarie
August 18th, 2009 at 2:34 pm
Thanks for this nice tutorial .
Marcus Andersson
December 28th, 2009 at 10:57 am
Thank you for the tutorial! It was – to say the least – great.
I’ve checked out some other tutorials on the topic of creating stamps in Photoshop, but this one was the best.
steven faucette
February 20th, 2010 at 2:59 pm
Thanks man!
I’ll be sure to use this in creating some new post card designs!
Francisco Costa
April 13th, 2010 at 2:17 pm
Congratulations and Thanks a lot! I was looked for it…
Deexit
April 15th, 2010 at 2:37 am
Superbe c’est le meilleur celui-là !
Merci encore pour ce tuto
fred
April 30th, 2010 at 5:15 pm
you are amazing. i like how you made this easy for beginners. a lot of tutorials assume people have experience w/PS. i really like how you didn’t alienate people new to this software. great job.
Khaleelur Rahman
August 2nd, 2010 at 11:49 am
Thanks a lot dear! Very nice tutorial!
Kimberly Roberts
September 6th, 2010 at 2:18 pm
SO Helpful! Thank You! :)
Kirk Thompson
November 29th, 2010 at 9:02 am
This tutorial is AWESOME!! The absolutely KEY piece is…. the snapshot of your layers. I tried this about 7 times, then realized I had incorrect fills only after looking at the graphic. Keep it up!!
GOLD STAR SITE!!
Masla
December 3rd, 2010 at 2:05 am
Great lesson, ..thanks for share
barisi
May 22nd, 2011 at 9:29 am
thankssssss…xery useful tutorial, esp. 4 me