


Sticker Edge Peel
In this tutorial I will show you how to lift the edge of a virtual sticker using the warp transform and a few neat little layer style tricks.Step 1
First let me say this is not a sticker making tutorial so you’ll need to have your own sticker prepared or download the source files at the end of the lesson where I’ve added a second file with a pre-made sticker for you. How nice am I!
Ok, so I’m starting with a new document 540x300pixels at 72ppi, then filling the background color with a light gray so we can see the difference between the stage and the edge of our white sticker. Click on the foreground swatch in the Tools palette and enter the color code #e4e4e4 in the field at the bottom then click OK to set this as your new foreground color.
Press Command-Delete (PC: Ctrl-Backspace) to fill the Background layer with the foreground color then open your sticker file and drag your sticker onto the new documents stage. (Go on and download the source files at the bottom of the lesson so you’ve got my sticker.pdf file with these steps already done for you if you want.)

Step 2
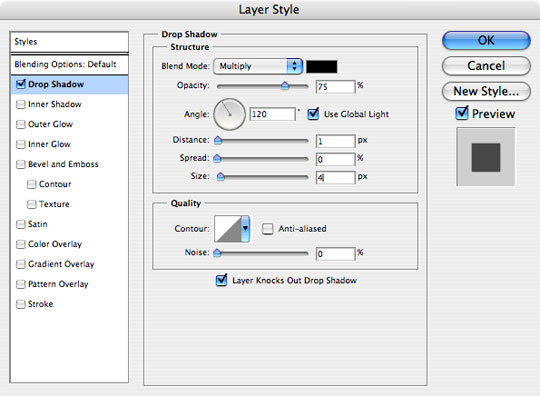
Add a drop shadow to the Sticker layer by double clicking to the right of the layer’s name in the layers palette to bring up the Layer Styles dialog box. From the default Drop Shadow settings just change the Distance to 1 and the Size to 4 and click OK. This gives us just a slight drop shadow but because the Distance is less than the size we get a slight outer shadow around the whole sticker.
Step 3
So with your drop shadow set, we’re going to do something really kind of cool… we’re going to separate the drop shadow from the layer and put it on it’s own layer below the Sticker layer.
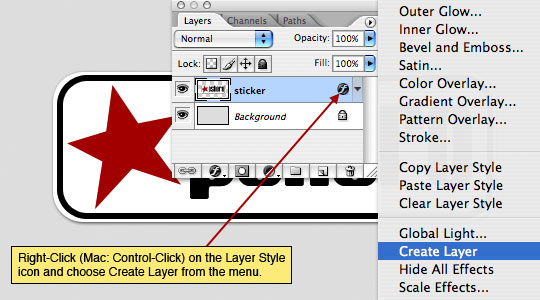
Right Click (Mac: Control-Click) on the layer style icon now sitting on the right hand side of the Sticker layer in the layers palette and way down at the bottom choose Create Layer. A little warning will pop up letting you know that not all layer styles can be created as layers… but this one can, so click OK.
Step 4
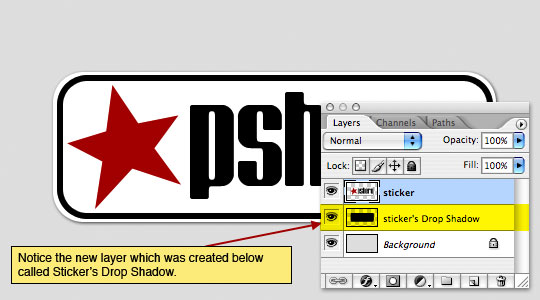
In the layers palette you’ll now notice a new layer beneath the Sticker layer called Stickers Drop Shadow.
Step 5
With the Sticker layer selected it’s time to go ahead and pull the edge of the sticker right off the background.
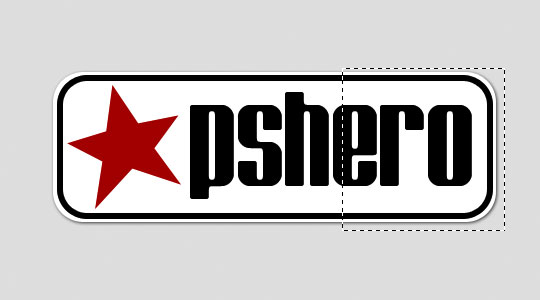
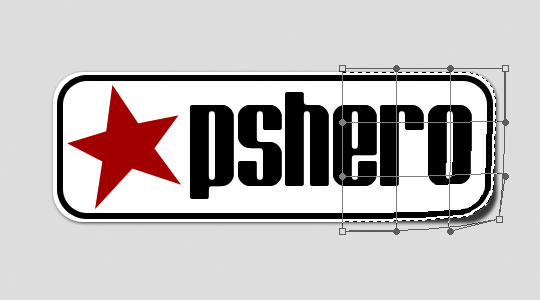
With the Rectangular Marquee tool selected from the Tools bar by pressing the M key, I’m going to make a square selection on the right hand side of the sticker. I’m doing this because if I bend the corner with the entire sticker selected I’ll get more peel than I want. (*note: Keep the selection fairly close to the sticker edges to make transforming a touch easier.)
Step 6
With the selection made select Edit>Transform>Warp from the main menu. The Warp tool gives you warping capabilities in a freeform mode. Push, pull, shove, drag with the tool to warp specific areas of an image. Feel free to play around, if you skrew it up, just press the ESC key to exit the tool without committing the transformation. (*note: If you’ve only made one change to the transformation that you don’t like, simply press Command-Z (PC: Ctrl-Z) to undo your most recent action.)
What we’re going to do here is grab the lower right hand corner handle and drag it up and left until the corner looks bent enough.
Step 7
When you are happy with your result press Return (PC: Enter) to commit the transformation and Command-D (PC: Ctrl-D) to deselect.

Step 8
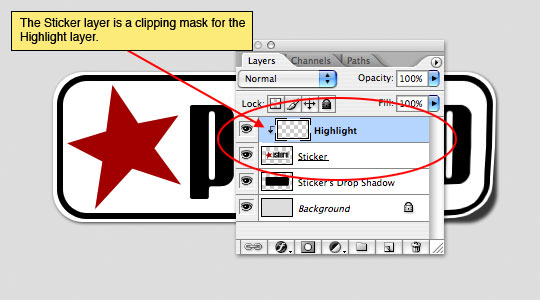
Add a new layer above the Sticker layer by clicking the New Layer icon at the bottom of the layers palette, double click on the layer’s name and rename it Highlight. Because this layer will contain the highlight which we want applied only to the Sticker layer, lets create a clipping mask right-clicking (Mac: Control-Click) on the Highlight layer and selecting Create Clipping Mask. You will know the Highlight layer is clipped to the Sticker layer because it will be indented and have a small arrow to the right pointing down.
Step 9
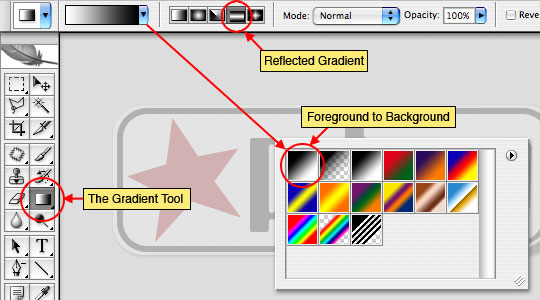
Now lets add the highlight by choosing the Gradient tool from the Tools bar by pressing G. Reset your foreground/background colors by pressing the D key and then reverse them by pressing X (keyboard shortcuts are cool!) … now white should be the foreground and black the background in swatches at the bottom of the Tools bar.
With the foreground and background colors set, choose the Foreground to Background option from the Gradient menu across the top of your screen, this should be the first option in the flyout menu (see the graphic below). Then set the gradient style to Reflected Gradient (again, see the graphic below).
Step 10
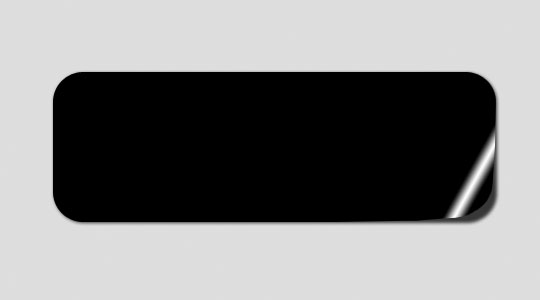
The Reflected Gradient works from a center point outward, so click approximately where the gradient should live and drag a short angled line up and to the left. You should be left with something like the graphic below. If you need to try again simply press Command-Z (PC: Ctrl-Z) to undo.
Step 11
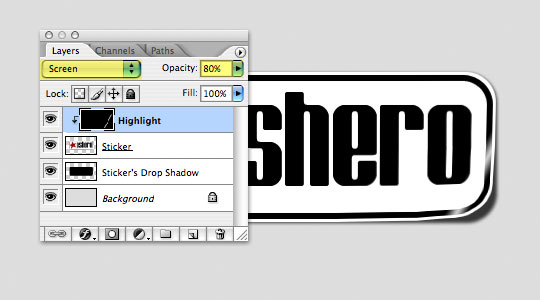
Change the blend mode of the layer to Screen at the top of the layers palette and lower the Opacity to around 80%.
(*note: The Screen blend mode is used for highlighting. It lightens all colors on the top layer by decreasing its opacity. The dark colors are not lightened as dramatically as the light colors are.)
Step 12
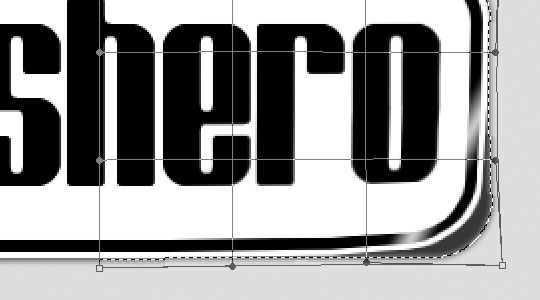
The sticker looks pretty good, but lets click down to the Sticker’s Drop Shadow layer and use the warp tool to pull the corner shadow down and out just a touch. Just like back in step 5 choose the Rectangular Marquee tool from the Tools bar by pressing the M key, make a square selection on the right hand side of the drop shadow, Choose Edit>Transform>Warp from the main menu again and grab that lower corner dragging out and down until a realistic shadow is made. Play with the corner’s side handles to arch the sides of the transform a bit for more realism.
Step 13
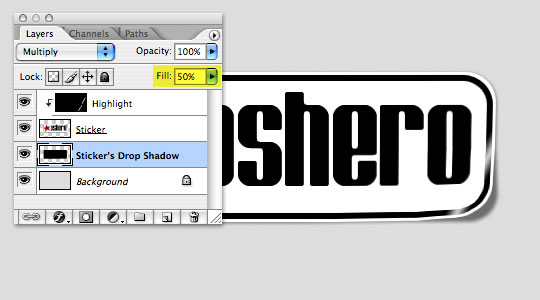
When you’ve got the Drop Shadow transform the way you like it, press Return (PC: Enter) to commit the transformation and Command-D (PC: Ctrl-D) to deselect. The layer’s Fill opacity should be set at 75% because that’s what we had the Drop Shadow opacity set to when we originally created it. Lower the Fill opacity to 50%.
Step 14
I added a little web 2.0 style gradient for the final effect… because I have OCD and just can’t leave a good thing well enough alone.
This technique works great for slightly lifting the edges of paper, sticky notes, photographs… you name it.

Lesson Files + Additional Resources
Download the free .PSD file and other lesson files Right Here.
Tell Your Friends
More in Graphic Design


22 Responses to Sticker Edge Peel
James McCryndle
August 8th, 2008 at 8:34 am
thanks great tutorial. I may use this for my new homepage!
Will Knot B Revealed
September 8th, 2008 at 1:53 pm
Excellent, many thnanks. I’m learning a lot here.
Samuel
October 20th, 2008 at 7:27 am
Finally a good tutorial about stickers!.
I like it!.
hd
November 18th, 2008 at 9:42 pm
Nice work.
I like it.
Julia
January 14th, 2009 at 1:13 pm
great!
wondering how to make the peeling sticker appear clear (?)– any thoughts?
HERO
January 14th, 2009 at 1:49 pm
JULIA, this would just be a matter of adjusting your layer opacity on each of the sticker layers until you get the desired level of transparency.
Sonica
January 26th, 2009 at 4:19 am
Thank you so much for posting this tutorial!
I’m just wondering, is it possible to do this sticker peel effect in PS7? Since PS7 doesn’t have the ‘warp’ tool..
HERO
January 26th, 2009 at 4:23 pm
SONICA, the warp tool was introduced with Photoshop CS2, so you’re right technically getting this effect is less possible in PS7. You might try creating the sticker using paths rather than just a rounded rectangular pixel shape, then you can move and bend the segments of the path to mimic the shape of the warped sticker. As long as you keep your sticker graphics away from the edge, you should be able to get the same effect using highlights and shadows as shown here.
Amir
March 3rd, 2009 at 6:22 am
Great tutorial! I was impressed! I’ll use this method for some graphics on my website.
genial
March 30th, 2009 at 2:54 pm
i use all the tricks from you master.. :)
thnx for all :)
giZZy
June 18th, 2009 at 5:58 am
This was a great tutorial. I never thought it would be so simple. Thanks.
Gerry
July 1st, 2009 at 7:56 am
Lately I was thinking of creating a sticker effects but I end up with a torn paper edge, now I know how I will do it properly next time.
Thanks for this tutorial… Long live Hero
yuli
July 3rd, 2009 at 12:22 am
Brilliant! Photoshop never been this easy. Thank you Hero!
Denisha
July 20th, 2009 at 7:10 pm
Hey thanks heaps for the tutorial! this effect makes a great logo
evilkitty75
November 20th, 2009 at 9:46 pm
lol real cool will come in handy for my numerous stickers lol
Allen
February 9th, 2010 at 7:46 pm
this is great! thank you!
Jessica
March 10th, 2010 at 7:35 pm
Man, if I had only looked a page or two over! You do the most fantastic work! Mrs. Hero is one lucky lady to have such a talented guy! You have helped kick up my designing ability 1000 percent! Why buy the book when we have you here! Great work!
Paolo
May 2nd, 2010 at 2:57 am
Hi,i’m new to photoshop,i’m looking some stuff for start with it and i find your site!Thank you for everything it helps a lot!I will show you my progress!^__^Thanks again
Torben Selch
July 8th, 2010 at 9:00 am
Thank you… i knew there was some brilliant way to do this… your way .. :))
Thanks for sharing
Rolfe Kolbe
November 15th, 2010 at 4:27 am
I loved the simplicity and effectiveness of this tutorial. Thanks, I am happy with my results and I have grown in knowledge!! Thanks heaps, Rolfe
Prabhu Chandian
February 9th, 2011 at 10:35 pm
This is really very nice. Thanks you.
Joanne
October 8th, 2011 at 10:04 am
Wow, you make it all so logical without dumbing down. Thanks a lot.