


Realistic Film
In this tutorial we will create a strip of 35mm film using the Rectangular Marquee tool, Rounded Rectangle custom shape tool and the Polygonal Lasso tool.Step 1
Traditionally when creating an effect that is meant to imitate a real-life object I round up a piece of reference and then try to replicate the object as closely as possible. Because of the nature of the 35mm negative however, it becomes necessary to deviate from reality to create an effect that is both pleasing to the eye and graphically convincing. This technique is commonly used to showcase images, but inverting the colors and tones to create a true negative would kill the appeal (unless of course you wanted the images to be nearly abstract). So technically speaking this tutorial would be replicating a strip of 35mm slide film which has been processed but not yet mounted.
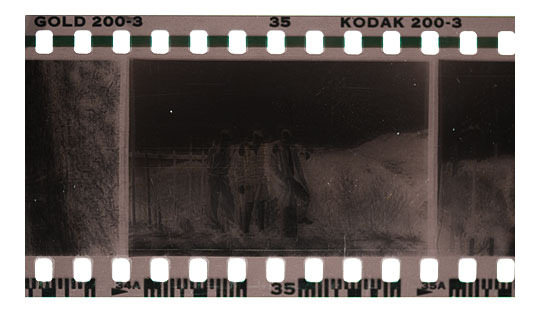
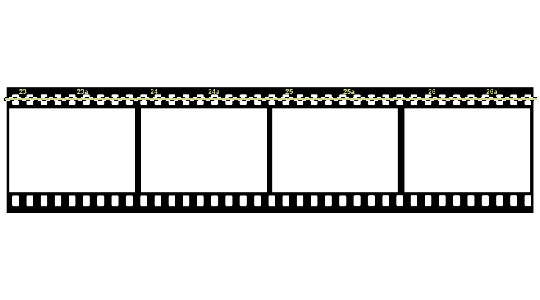
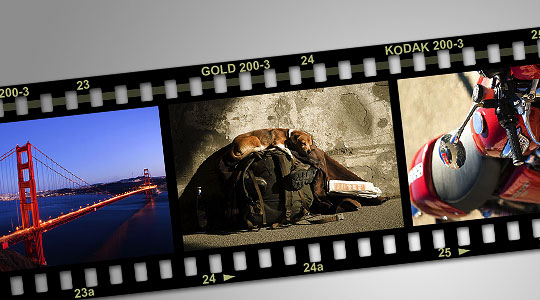
It is useful to examine reality in order to mimic it, so I took the liberty of photographing the old strip of film below. Notice the numbering and bar coding.
Step 2
Lets get started by creating the base for our film, the black edges and camera feed holes. This can be accomplished one of two ways, either by following a series of steps in Photoshop or by creating the filmstrip in a vector program like Illustrator or Flash and then importing that file, sizing it appropriately and then working from there. I will illustrate the all Photoshop method here.
Open a new document with a white background. Mine is 1620×900 at 300ppi because I want to have plenty of room to work and the text will be more manageable at this size. Remember, it is always better to size down that to size up!
Create a new layer by clicking the New Layer icon at the bottom of the layers palette. (*note: if your layers palette isn’t visible, access it by choosing Window>Layers from the main menu). Double click on the name of the layer in the layers palette to rename it "Film".
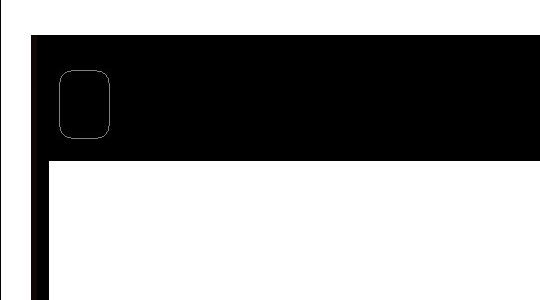
From the Tools palette choose the Rectangular Marquee tool by simply pressing the M key on your keyboard, then on the main stage drag out a nice long rectangle like the one below. Press the D key to reset the foreground and background colors to black and white, then press Option-Delete (PC: Alt-Backspace) to fill the selection with black. Press Command-D (PC: Ctrl-D) to deselect the area.

Step 3
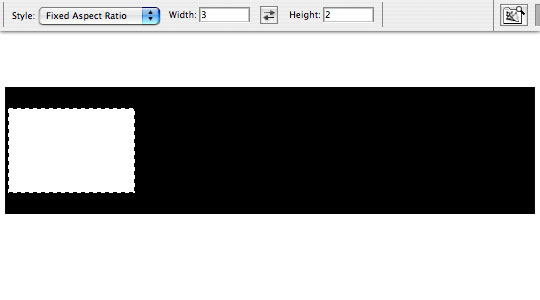
Next we need to delete the area where the photos will be placed. Standard frame format for a 35mm camera is a 2×3 aspect. We can set the Rectangular Marquee tool (which we currently have selected) to constrain itself by choosing Fixed Aspect Ratio from the Style drop down and then by setting the ratio to 3 Wide and 2 High. With the tool set, go ahead and drag out the first opening as shown below and press the Delete (PC: Backspace) key to remove the selection.
(*note: I’ve inset the options bar at the top for reference)
Step 4
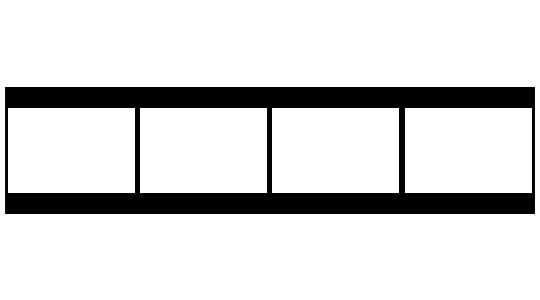
With the selection still active, move the rectangle to the right and remove the remaining frames. Holding down the Shift key while dragging the selection will keep it aligned horizontally or you can move the selection using the arrow keys on your keyboard. (*note: holding the Shift key while using the arrow keys will move the selection 10 pixels at a time.)
When all the sections have been removed press Command-D (PC: Ctrl-D) to deselect.
Step 5
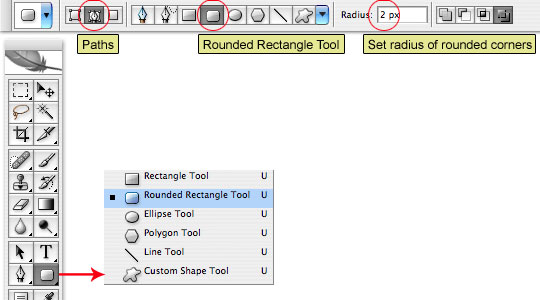
From the Tools bar select the Rounded Rectangle tool from the fly-out-menu by clicking and holding on the Rectangle tool icon in the Tools bar, set the mode to Paths and the corner radius to an appropriate size (for my example a corner radius of 6 pixels is perfect, but if you are building a larger file you may have to experiment a little to find the right size. Leave a little more room at the edge of the film than between the hole and the photo area so you will have room to add numbers in the outer margin later.
Step 6
Zoom in on the top left corner of your film by pressing Command-+ (PC: Ctrl-+). If the corner isn’t centered when you zoom, hold the space bar (which will change the cursor to a hand) and click and drag until you can see the corner.
(*note: holding the Space bar with any tool selected will bring up the Hand Tool and will allow you to move the stage around with any other tool selected.)
With the corner enlarged, use the Rounded Rectangle tool which you should still have selected to draw out a path for the first feed hole at the edge of the film. Notice that because we selected Paths from the Rounded Rectangle tool menu, the tool creates a path for our selection rather than a filled pixel shape. This will be important in the next step.
Step 7
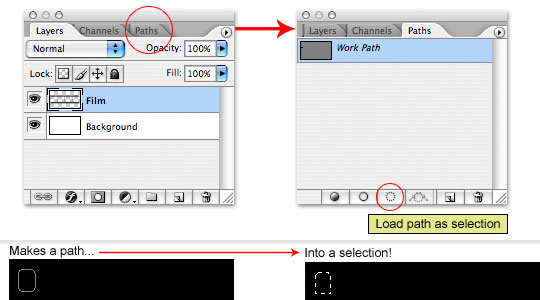
Now that we’ve created a rounded rectangle path, we need to convert the path to a selection so we can delete it from the film. To do this, click on the Paths tab in the layers palette and click the Convert Path to Selection icon at the bottom of the palette then click back to the Layers tab.
Step 8
With the path converted to a selection press Delete (PC: Backspace) to delete the area, then use the arrow keys like we did earlier to move the selection to the right (*note: count your keystrokes with the arrow keys to make sure that every hole is an equal distance from the others). When you finish the top of the film, repeat at the bottom.

Step 9
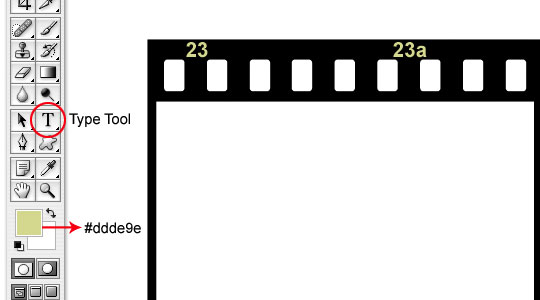
Grab the text tool from the Tools bar or by pressing the T key, set the foreground color to #ddde9e by clicking on the foreground swatch at the bottom of the Tools palette and type in numbering along the top of the film. Each picture should have it’s own number, and often times there exists a middle number followed by a lowercase "a" incase the film was loaded or wound incorrectly as an alternate identifier. (*note: number spacing isn’t always consistent with the hole pattern, so add a little variety for realism)
When you’re finished, double click on the layer name in the layers palette and call this layer Top Numbers.
Step 10
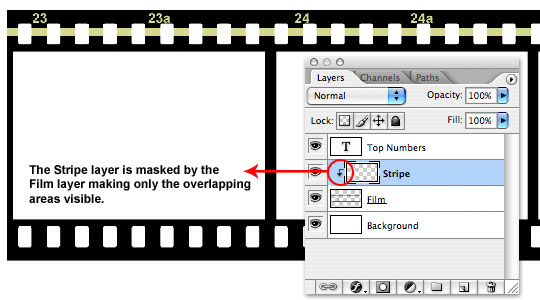
Add a new layer below the Top Numbers layer by holding down the Command key (PC: Ctrl) while clicking on the new layer icon at the bottom of the layers palette and name the layer Stripe.
Switch to the Rectangular Marquee tool by pressing the M key and change the Style back to Normal in the menu at the top. Drag a long rectangle across the holes at the top of the film to create the stripe we saw on the reference image in Step 1 and fill the rectangle with the foreground color we just set by pressing Command-Delete (PC: Ctrl-Backspace).
Step 11
Deselect by pressing Command-D (PC: Ctrl-D), right click on the layer in the layers palette and choose Create Clipping Mask from the menu OR hold down the Option (PC: Alt) key and place your mouse pointer on the line between this new layer and the Film layer until you see the cursor change to two overlapping circles then click to create the clipping mask. See inset below.
(*note: A clipping mask is used to mask one layer to the layer below, essentially hiding all the areas that don’t overlap. Clipping masks can be added on top of each other to mask multiple layers to a single layer.)
Step 12
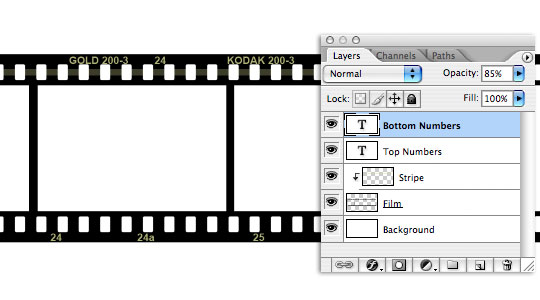
Change the opacity of the Stripe layer to 35% and click back to the Top Numbers layer.
Duplicate the Top Numbers layer by pressing Command-J (PC: Ctrl-J) name the new layer Bottom Numbers.
Switch to the Move tool by pressing the V key, then by clicking and dragging OR by using the arrow keys, move the numbers to the bottom of the film. I think I like the look of the the number and alternates better on the bottom, but I’d still like to use the top numbers (more like the reference in Step 1) so I’m going to double click on the layer icon for the Top Numbers layer (which will be a big T because the layer is text), this will highlight the text on the stage and I can go ahead and make my adjustments. Lets also drop the opacity of both text layers to 85% to make the lettering seem a touch transparent.
Step 13
I’m not a big fan of the barcode look at the bottom of the example film, but I have noticed that some film companies put little arrows in the margin, so I’m going to ad a few of those to the bottom row randomly between the numbers. I created a new layer called Arrows and with the Polygonal Lasso tool (which can be found under the Lasso tool in the Tools bar) I drew small arrow shapes and filled them with the foreground color.
(*note: an easy way to do this is to draw and fill one arrow then duplicate the layer by pressing Command-J (PC: Ctrl-J) and moving the new arrow on it’s own layer over with the arrow keys. You can then select all those layers by clicking on the top one, holding the Shift key and clicking on the bottom one and by pressing Command-E (PC: Ctrl-E) merge all those selected layers into one layer.)

Step 14
Click back to the Background layer (because now we are ready to insert our photos and we need them to be imported beneath the Film layer).
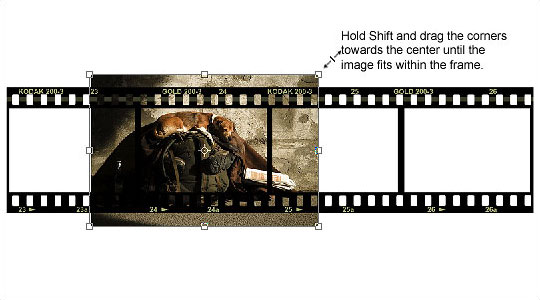
Open a photo that you would like to put inside one of the photo areas and with the Move tool selected by pressing V, click and drag the image into your Film file. This will create a new layer called Layer 1 directly above the Background layer.
It’s likely that your photo will be too large initially to fit inside the little box, so press Command-T (PC: Ctrl-T) to invoke the Free Transform tool OR click Edit>Free Transform from the main menu. While holding Shift to constrain the proportions, click and drag the corners of the transform box in until the photo fits within the space correctly. Because we constrained our photo areas to a 2×3 aspect ratio, most photos will fit in the window perfectly. You may want to leave the photo just a touch larger than the hole just to allow a little wiggle room. When it’s sized and positioned correctly press Return (PC: Enter) to commit the transform.
Step 15
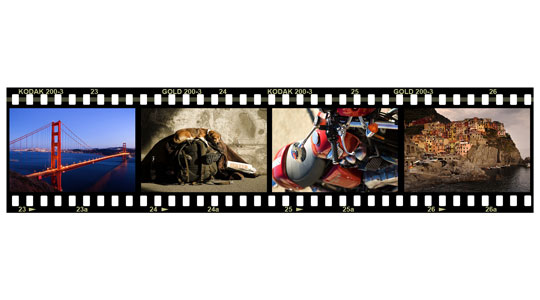
Add more photos as desired exactly the same way.
UPDATE: I didn’t get into photography until digital came along so I didn’t know about this, but it’s been brought to my attention that Kodak Gold 200 film is a negative film and thus would not be displaying positive images. To be product correct you may want to use text such as Kodak Ektachrome or Kodachrome on your film, both are slide films that produce a positive on the film rather than a negative. Thanks to papagmp for pointing that out!
Step 16
Style as needed! Nice work.
Lesson Files + Additional Resources
Download the free .PSD file and other lesson files Right Here.
Tell Your Friends
More in Graphic Design


27 Responses to Realistic Film
Chad
November 12th, 2007 at 9:38 pm
very good tutorial. thank you.
Bill Goodman
March 16th, 2008 at 10:11 am
This is a cool site you have and the tutorials you have are awesome! This one with the film is one of my favorites. It gave me inspiration for a little project. The family are taking a trip to Wisconsin Dells and this would make for a great picture. I’ll post the results in a few weeks after the trip and everything is completed.
Ghost Boots
March 21st, 2008 at 3:34 pm
Hero,
Great tutorial!
I always wanted to create a realistic film and I never got it right until now. You explain it so well that I keep saying to myself “why I didn’t think of that before” hehehe
Thanks!
PS. Thanks for your note (email).
Jessica
May 6th, 2008 at 4:39 pm
I love your tutorials! You are super talented and I wish there were more people like you out there! I could kiss you!
I am assuming it’s okay to use your effects, tips, tricks, etc. in our own work?
Thanks!
Jessica
HERO
May 6th, 2008 at 5:31 pm
I could kiss you too Jessica!
Thanks for the compliments. I’m glad your enjoying the site! And OF COURSE everything you learn here can (and should) be used in your own work. I’m givin’ it all for free baby!
ADAM
May 20th, 2008 at 10:50 am
Thanks for all your tutorials!!
My art project looks so much better now!
PapaGMP
June 6th, 2008 at 2:22 am
Love the tutorial! One minor thing – Kodak gold 200 is a negative film – and you’re showing a positive image in it.
Why not put the text for a positive film (slide film) such as Kodak Ektachrome or Kodachrome (both slide films) instead of the Gold?
Nice job – saved me a ton of time – but I’m changing the text layers ;-)
HERO
June 6th, 2008 at 9:52 am
PAPAGMP,
You’ll have to forgive my naivet?ɬ®, I didn’t get into photography until digital and have absolutely no experience with film. I’m sure your comment will be a great help to others so I’m going to add a little extra text to the tutorial as well.
martin
June 18th, 2008 at 9:49 am
very helpfull. thx a lot! the other tuts are also quite cool. last few days i learned a lot pshopping…
David
October 8th, 2008 at 11:24 am
Great job. The tutorial is well laid out and has great screenshots. The only thing I might change would be to give a fixed rectangle size to start with(I had trouble getting an exact number of film ‘windows’, I always had too little space left for it.). Other than that though it was great.
Bruno B?ɬ?hm
November 17th, 2008 at 10:16 pm
excelente tutorial, muy bien explicado.
saludos desde colombia…
alla
January 5th, 2009 at 7:56 pm
very good tutorial. thank you.
saskgirl
January 6th, 2009 at 1:48 pm
This is a great tutorial!! Thank you so much!! I am new to photoshopping and am actually using PE6, but I was able to follow your tutorial and make a great product!! I really appreciate you putting in the keyboard shortcuts and the detailed explanations.
Thanks!
phillip noury
January 8th, 2009 at 9:30 pm
great stuff!!!
my thought…step 8 would be faster if,after completing the top row, copy & paste> transform> rotate vertical and move into place…
Im glad I found this site, again great stuff!
-p
Tish Fearless
February 5th, 2009 at 8:06 am
Love this tutorial…was easy to follow…learned some new things and plan on using this on my portfolio website! Respect Hero!
Kalynn
February 21st, 2009 at 12:12 am
Finally took the time to go through this tutorial. The results were amazing, and I am totally pleased with this. I’ve been trying to make a decent realistic looking film strip for ages, and finally remembered this. Thanks for taking the time to figure it out and share the results with everyone!
javier
November 10th, 2009 at 4:29 pm
Congratulations!!!!
You are very good as a teacher. This tutorial is very wsy to understand without knowing a lot of photoshop.
Thank you very much
healer
January 26th, 2010 at 2:23 pm
Hi. How did you create the shadows beneath the filmstrip? I know how to do that with a box-shaped picture, but not if it’s an item like this with holes and stuff. Please tell?
Thanks
HERO
February 2nd, 2010 at 6:39 pm
HEALER, That’d be a simple drop-shadow layer style.
Dave
February 2nd, 2010 at 9:04 pm
This is extremely well done!!! Thank you very much for this awesome tut….I have been looking for this one for years…!!! And on top of all that you have been so kind as to include the .psd file – wow !
gigi
March 21st, 2010 at 12:51 am
Wow, this is amazing.. thanks ;-)
Fred
April 5th, 2010 at 9:52 am
For maximum realism if you go for Kodachrome – use the BIONDI font – that’s what Kodak use for that film.
PAUL
May 24th, 2010 at 7:02 am
I looked at many different CS tutorials which produces a “strip of 35mm film”.
This one is far, far the VERY BEST. EXCELLENT. BRAVO!!!
Thank you very much for the psd file!!!
As I am looking for a perfect match of the original film material I have a minor comment or question.
When producing the small transportation wholes (rounded rectangle path),
it might be an idea to follow your original with 8 wholes per foto?
Bluejayphoto
December 1st, 2010 at 4:33 pm
Thanks for the post, I just tried this and i’m going to print the result i’m so happy with how much it looks like real film. Thanks again
nathalie
December 14th, 2010 at 9:45 pm
amazing! more creative ideas please for my wedding invitation… thanks a lot! hug and kisses…
Kris
February 23rd, 2011 at 2:48 pm
it should be pointed out that if you are producing a contact print of any negative film, it would indeed appear as a positive
VG
June 14th, 2011 at 12:25 pm
You sure are a HERO! Thanks for sharing all your b-u-t-ful knowledge!